> For the complete documentation index, see [llms.txt](https://docs.pockethrms.com/llms.txt). Markdown versions of documentation pages are available by appending `.md` to page URLs; this page is available as [Markdown](https://docs.pockethrms.com/hr-and-admin-portal/cloud-configuration/recruitment-hire-v2-setup/onboarding-templates.md).
# Onboarding Templates
### **Onboarding Templates**
**Path:** Cloud > Settings > Recruitment V2 > Onboarding Templates.
**Onboarding Templates** allow HR administrators to create and manage structured onboarding workflows for candidates. Each template consists of milestones — either email tasks or checklist tasks — that are triggered based on the candidate's date of joining. Templates can be assigned to candidates to ensure a consistent and organised onboarding experience.
**Important Note:** You can edit or delete a template only if it is not linked to any candidate. Do not delete a template if an employee is mapped to it.
### **Manage Existing Templates**
**Step 1:** Log in to the **Cloud portal**, Go to **Settings**, Select **Recruitment V2.**
**Step 2:** Go to **Onboarding Templates**. Use the **search bar** to look up specific workflows and see how many active tasks are included in each template.
**Step 3:** Use the icons on the template card to:
1. **copy** an existing layout
2. **delete** a workflow that is not linked to an employee.
**Template Configuration**
Click on the **template card** you want to edit , the **Template Name**, and **Description fields** are prefilled
**Onboarding Milestones**
The **Onboarding Milestones** section displays all milestones added to the template, along with a count badge showing the total number of milestones. Each milestone is numbered and can be either an Email Milestone or a Checklist Milestone.
**To add an Email Milestone**
1. Click **+ Add Email Milestone** to add a new email milestone row
2. then enter the **Milestone Title**
3. select the **Owner** from the dropdown **(Candidate or Internal)**
4. enter a **Description**
5. and set the **number of Days before Date of Joining**.
**Step 2:** Optionally, click the **email icon** on the milestone to configure the email notification associated with that milestone.
1. Enter the **Milestone Name**.
2. Enter the **Email Subject**.
3. Compose or edit the **Email Body** content.
4. Use **Placeholders** to insert dynamic fields for Candidate, Job, or Special values.
5. Review the **Preview Email** field to check the template output.
6. Click **Preview** to see a full preview of the email.
7. Click **Save** to save the email template.
**To add a Checklist Milestone:**
**Step 1:**
1. Click **+ Add Checklist Milestone** to add a new checklist milestone row
2. then enter the **Milestone Title**
3. select the **Owner** from the dropdown
4. enter a **Description**
5. and set the **number of Days before Date of Joining.**
**Step 2:** Optionally, click the **email icon** on the milestone to configure the email notification associated with that milestone.
1. Enter the **Milestone Name**.
2. Enter the **Email Subject**.
3. Compose or edit the **Email Body** content.
4. Use **Placeholders** to insert dynamic fields for Candidate, Job, or Special values.
5. Review the **Preview Email** field to check the template output.
6. Click **Preview** to see a full preview of the email.
7. Click **Save** to save the email template.
**Step 3:** In the **Departmental Checklist** Options section below the milestone
1. select the **Department** from the dropdown

1. select the **employee to Assign** To.
**Step 4:** Click the Select **checklist items** dropdown and select the checklist items to be completed for this milestone.
**Step 5:** Check the **Prevent onboarding unless checklist is complete** checkbox if you want to block the onboarding process until this checklist is fully completed.
**Step 6:** Click **+ Add** New to add another **department checklist** row to the same milestone, if required.
**Step 7:** Click the **Delete icon** on the top right of the milestone card to remove it.
**Step 8:** Once all changes are made, click **Save** to apply the changes, or close the screen to exit without saving.
{% embed url="" %}
### **Create a New Template**
**Step 1:** Log in to the **Cloud porta**l, Go to **Settings**, Select **Recruitment V2.**
**Step 2:** Go to **Onboarding Template**and Click on the **+ New** button in the top right corner to open the builder view.
**Step 3:** Enter a **template name**, add a **description**.
**Onboarding Milestones**
The **Onboarding Milestones** section displays all milestones added to the template, along with a count badge showing the total number of milestones. Each milestone is numbered and can be either an Email Milestone or a Checklist Milestone.
**To add an Email Milestone**
**Step 1:** In the email milestones page:
1. Click **+ Add Email Milestone** to add a new email milestone row
2. then enter the **Milestone Title**
3. select the **Owner** from the dropdown **(Candidate or Internal)**
4. enter a **Description**
5. and set the **number of Days before Date of Joining**.
**Step 2:** Optionally, click the **email icon** on the milestone to configure the email notification associated with that milestone.
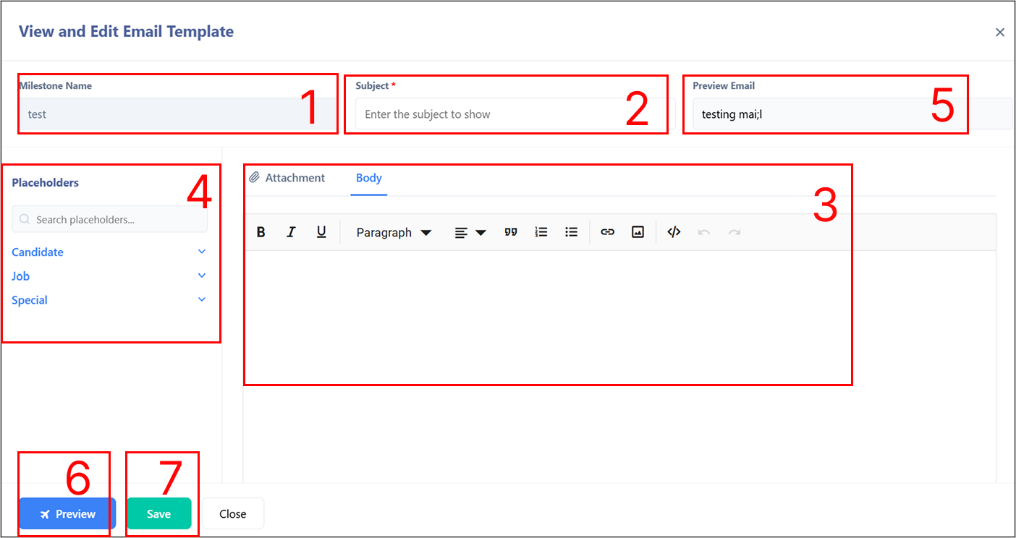
1. Enter the **Milestone Name**.
2. Enter the **Email Subject**.
3. Compose or edit the **Email Body** content.
4. Use **Placeholders** to insert dynamic fields for Candidate, Job, or Special values.
5. Review the **Preview Email** field to check the template output.
6. Click **Preview** to see a full preview of the email.
7. Click **Save** to save the email template.
**To add a Checklist Milestone:**
**Step 1:** In the checklist milestone page:
1. Click **+ Add Checklist Milestone** to add a new checklist milestone row
2. then enter the **Milestone Title**
3. select the **Owner** from the dropdown
4. enter a **Description**
5. and set the **number of Days before Date of Joining.**
**Step 2:** Optionally, click the **email icon** on the milestone to configure the email notification associated with that milestone.

1. Enter the **Milestone Name**.
2. Enter the **Email Subject**.
3. Compose or edit the **Email Body** content.
4. Use **Placeholders** to insert dynamic fields for Candidate, Job, or Special values.
5. Review the **Preview Email** field to check the template output.
6. Click **Preview** to see a full preview of the email.
7. Click **Save** to save the email template.
**Step 3:** In the **Departmental Checklist** Options section below the milestone
1. select the **Department** from the dropdown
2. select the **employee to Assign** To.
**Step 3:** Click the Select **checklist items** dropdown and select the checklist items to be completed for this milestone.
**Step 5:** Check the **Prevent onboarding unless checklist is complete** checkbox if you want to block the onboarding process until this checklist is fully completed.
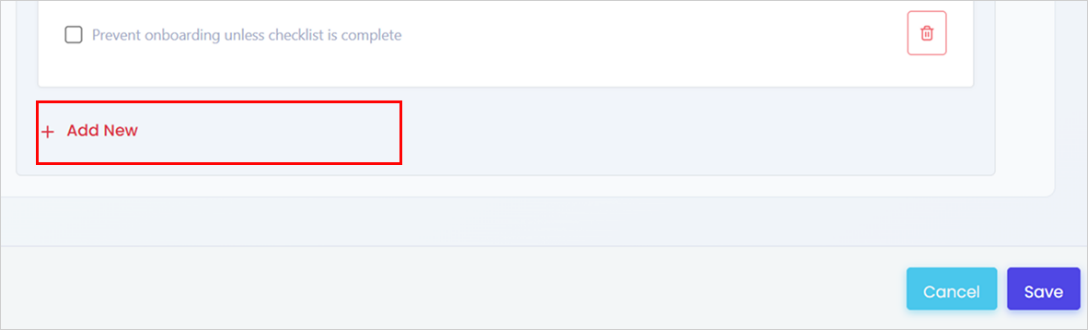
**Step 6:** Click **+ Add** New to add another **department checklist** row to the same milestone, if required.
**Step 7:** Click the **Delete icon** on the top right of the milestone card to remove it.
**Step 8:** Once all the details are filled, click **create template** to save the template.

{% embed url="" %}
**Path Link:** [**https://cloud.pockethrms.com/Recruitment/RecruitmentV2/Index?module=RecruitmentV2\&submodule=Onboarding%20Templates**](https://cloud.pockethrms.com/Recruitment/RecruitmentV2/Index?module=RecruitmentV2\&submodule=Onboarding%20Templates)
**For any queries, contact** [**support@pockethrms.com**](mailto:support@pockethrms.com)


