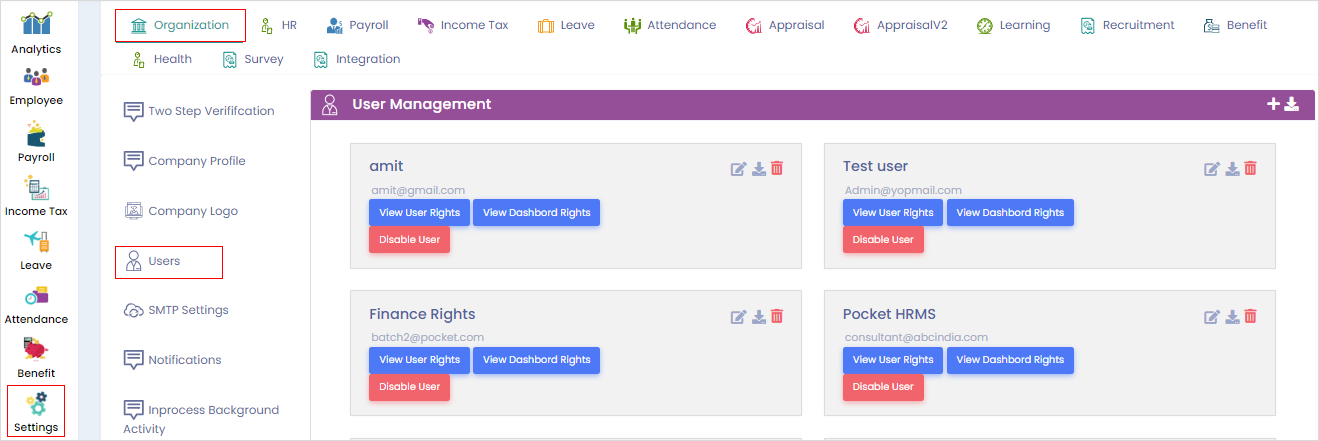
# Getting Started

**Pocket HRMS** is a new-age solution with ease of access and extensive features. Its intuitive features give you the advantage of simplifying your daily HR activities while keeping the fun alive. &#x20;

<figure><img src="https://4282324958-files.gitbook.io/~/files/v0/b/gitbook-x-prod.appspot.com/o/spaces%2F-MXep_PEmh8mDPVWj49x%2Fuploads%2FdaHT31vH2JLNz6sgYde7%2FHRMS-Software-banner.jpg?alt=media&amp;token=56355375-a4ed-4d02-a99c-ab4e884be39c" alt=""><figcaption></figcaption></figure>

Pocket HRMS is a fully scalable HR software, which aims to bring about a change in the working dynamics of the HR department. Our HRMS Solution takes HR steps ahead by introducing revolutionary features like automated [ChatBot](https://www.pockethrms.com/hr-chatbot/), interactive dashboards, mobility, customizable modules, etc.&#x20;

Real-time updates and automated report generation are a few things that HR experts crave. These features help them make better decisions and curb errors.&#x20;

Cloud-supportive Pocket HRMS is the perfect pick-me-up [HRMS software ](https://www.pockethrms.com/hrms-software/)of all sizes and verticals.


# ESS: Beginner's Guides

This page provides navigation to ESS beginner's guides


# ESS Portal: Employee's Guide

Pocket HRMS Employee Self-service Portal allows employees to take care of their day-to-day tasks such as applying for a leave, downloading salary slips and submitting with ease. Employees seamlessly enter and edit their personal details according to the rights provided by the Administrator.

This guide will walk you through the steps you need to follow for various tasks.

&#x20;

### How to log in to the ESS portal?

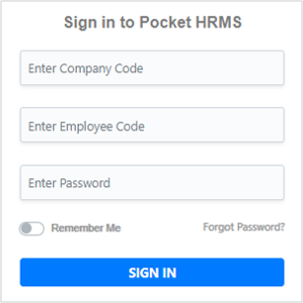
Go to [ess.pockethrms.com](https://ess.pockethrms.com/) and enter the ‘Company Code’, ‘Employee Code’ and ‘Password’ that you received from you via email.

Once you click on the ‘Sign In’ button, it will take you to the ESS dashboard Screen. You should start by creating a new password.

<figure><img src="https://4282324958-files.gitbook.io/~/files/v0/b/gitbook-x-prod.appspot.com/o/spaces%2F-MXep_PEmh8mDPVWj49x%2Fuploads%2FCh1Tj8gg9z3zoXMuhC6P%2F1.png?alt=media&amp;token=880d2ad4-0c75-4f14-9aa3-d7450df33023" alt=""><figcaption></figcaption></figure>

### &#x20;How to Reset Password?

&#x20;Go to the upper right-hand corner of the screen and click on the ‘Profile Icon’ as shown below.

<figure><img src="https://4282324958-files.gitbook.io/~/files/v0/b/gitbook-x-prod.appspot.com/o/spaces%2F-MXep_PEmh8mDPVWj49x%2Fuploads%2Fd57L5wESkiSvKw8StSQf%2F2.png?alt=media&amp;token=047abceb-dcee-4f4e-8f8a-aeeeda9f3e91" alt=""><figcaption></figcaption></figure>

Here you need to click on the change password menu.

<figure><img src="https://4282324958-files.gitbook.io/~/files/v0/b/gitbook-x-prod.appspot.com/o/spaces%2F-MXep_PEmh8mDPVWj49x%2Fuploads%2FelVPicbcZXugfDy0eGvF%2FFrame%201%20(33).png?alt=media&amp;token=48354c48-158e-4ba8-beaa-e3ad8d016db3" alt=""><figcaption></figcaption></figure>

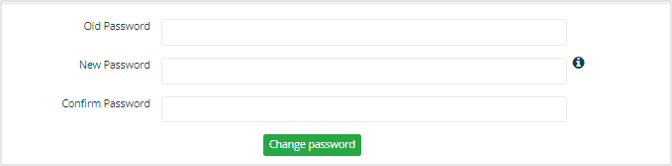
That will take you to the password reset screen. Enter ‘Old Password’ and ‘New Password’ in the respective fields. Ensure that the password you enter in the ‘New Password’ and ‘Confirm Password’ fields are the same. Click on the ‘Change Password’ button to set the new password.

<figure><img src="https://4282324958-files.gitbook.io/~/files/v0/b/gitbook-x-prod.appspot.com/o/spaces%2F-MXep_PEmh8mDPVWj49x%2Fuploads%2FFFb82ZwkEZ6L9KKr1XMX%2F4.png?alt=media&amp;token=341013ba-5168-45ae-bc6f-cd457e86072e" alt=""><figcaption></figcaption></figure>

### How to use ESS Dashboard?

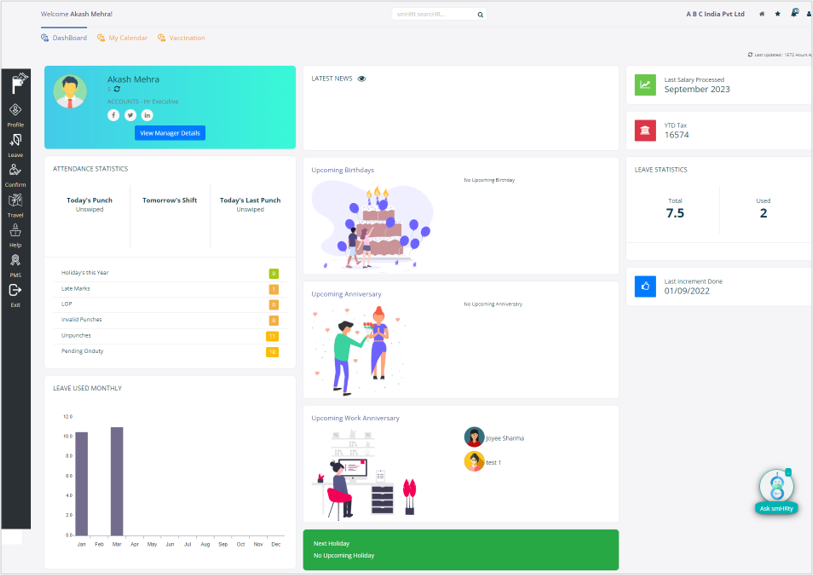
Once you login to the ESS portal it will take you to the ‘Dashboard’. The intuitive Dashboard is designed to provide employees with quick access to essential information. This single screen allows you to perform multiple activities through this easy-to-understand single screen. &#x20;

<figure><img src="https://4282324958-files.gitbook.io/~/files/v0/b/gitbook-x-prod.appspot.com/o/spaces%2F-MXep_PEmh8mDPVWj49x%2Fuploads%2FvJwXlvimqtmjyRSsi6sa%2F5.png?alt=media&amp;token=811bde32-645a-48b6-804a-9a2ba1d6f7f8" alt=""><figcaption></figcaption></figure>

The evident card at the top of the screen will show you your name. Employee code as well as designation you are working at.

<figure><img src="https://4282324958-files.gitbook.io/~/files/v0/b/gitbook-x-prod.appspot.com/o/spaces%2F-MXep_PEmh8mDPVWj49x%2Fuploads%2FzDq7wRy8A2jdhWMdwxAr%2F6.png?alt=media&amp;token=8afbfb4a-352e-4892-b4cd-dc90d022c4ab" alt=""><figcaption></figcaption></figure>

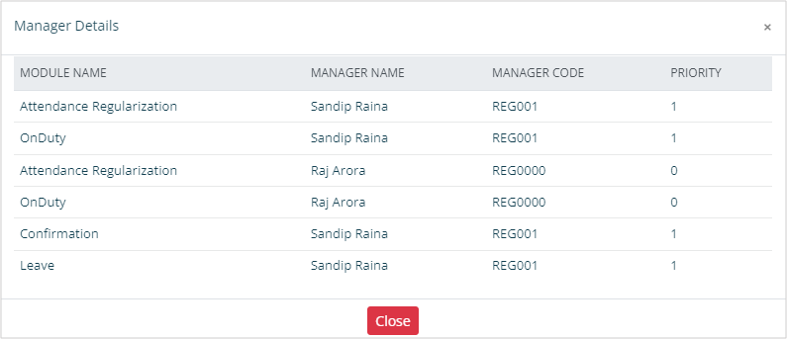
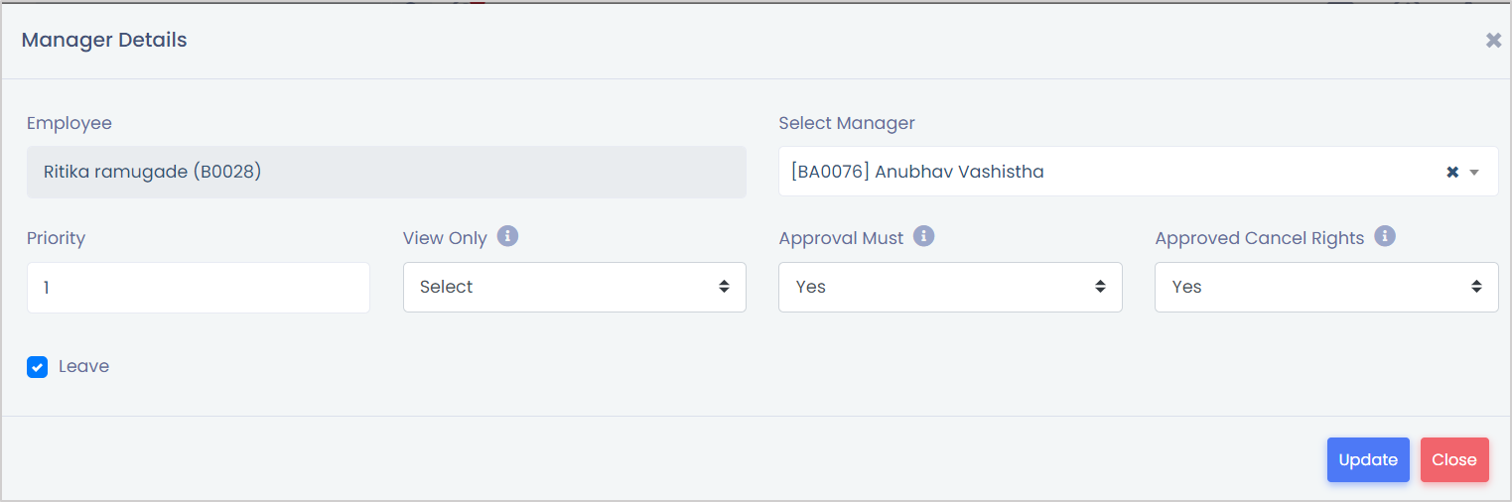
Click on the ‘View Manager Details’ buttons to view your approval manager’s name for respective processes such as ‘Leave’ or ‘Expense’.

<figure><img src="https://4282324958-files.gitbook.io/~/files/v0/b/gitbook-x-prod.appspot.com/o/spaces%2F-MXep_PEmh8mDPVWj49x%2Fuploads%2FD03CKHmMpkYtEsAzaQR1%2F7.png?alt=media&amp;token=4ab6ddb3-ad95-444a-bc9c-42de3e2225ab" alt=""><figcaption></figcaption></figure>

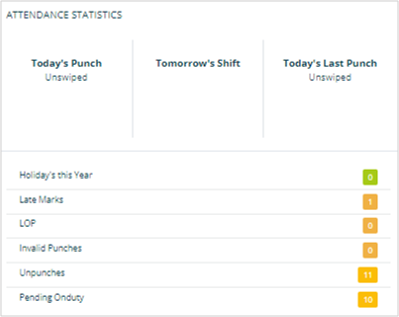
&#x20;In the ‘Attendance Statistics’ section, you will get easy-to-grasp data about your attendance.

&#x20;Starting with your Punch entries for the present day the top section also shows the shift schedule for the next day that way you get timely reminders and plan accordingly.

<figure><img src="https://4282324958-files.gitbook.io/~/files/v0/b/gitbook-x-prod.appspot.com/o/spaces%2F-MXep_PEmh8mDPVWj49x%2Fuploads%2FeQvgGszXsquDpJCgQmqp%2F8.png?alt=media&amp;token=a82a4e49-720b-453d-a766-8b6abef28006" alt=""><figcaption></figcaption></figure>

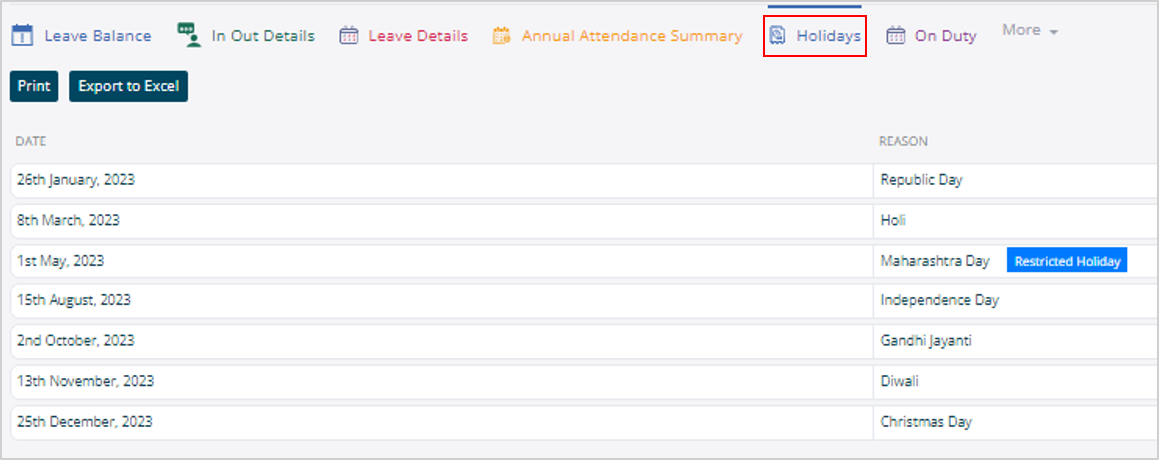
You can click on the ‘Holiday this Year’ to view details about the same.

<figure><img src="https://4282324958-files.gitbook.io/~/files/v0/b/gitbook-x-prod.appspot.com/o/spaces%2F-MXep_PEmh8mDPVWj49x%2Fuploads%2FBgogb7TuTq5V5xTjxyMk%2F9.png?alt=media&amp;token=2202b0e2-0ae8-4af4-863b-c607993348c4" alt=""><figcaption></figcaption></figure>

Similarly, you can view respective details when you click on the other tabs in the section such as late marks and unpunches.

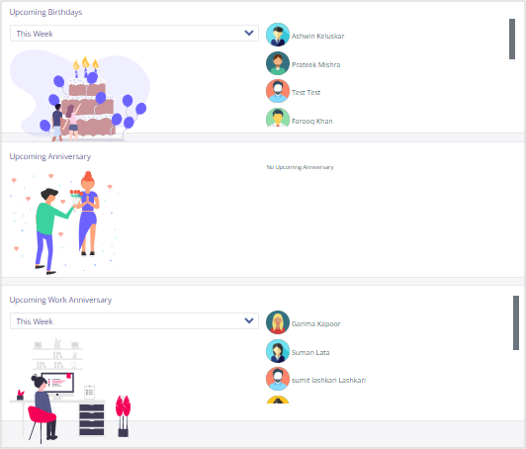
We also have dedicated sections for news as well as upcoming birthdays and anniversaries in the company so you can stay informed.

<figure><img src="https://4282324958-files.gitbook.io/~/files/v0/b/gitbook-x-prod.appspot.com/o/spaces%2F-MXep_PEmh8mDPVWj49x%2Fuploads%2FrpOCmnW3Fj7KbxzkgRM7%2F10.png?alt=media&amp;token=e1a11570-1d36-43af-8b00-a49188025303" alt=""><figcaption></figcaption></figure>

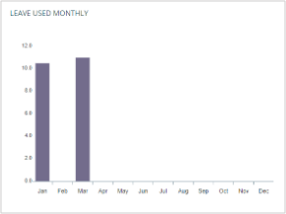
The graphical representation of the leaves you utilize helps you to easily grasp the information.

<figure><img src="https://4282324958-files.gitbook.io/~/files/v0/b/gitbook-x-prod.appspot.com/o/spaces%2F-MXep_PEmh8mDPVWj49x%2Fuploads%2FXNxm3bJ5eTJb5j4R5beb%2F11.png?alt=media&amp;token=fafcb2a2-bcad-49e6-884c-b57c656b8a84" alt=""><figcaption></figcaption></figure>

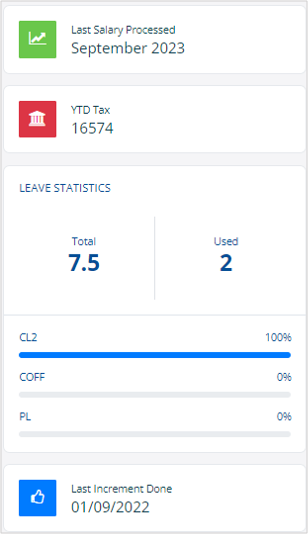
You can click on the ‘Last Salary Processed’ to download your pay slip. Similarly, the section gives you tac details, the last increment date as well as used leaves and leave balance.

<figure><img src="https://4282324958-files.gitbook.io/~/files/v0/b/gitbook-x-prod.appspot.com/o/spaces%2F-MXep_PEmh8mDPVWj49x%2Fuploads%2FCbT1tsWllQYz5MW94Qol%2F12.png?alt=media&amp;token=447976aa-2571-4fad-86cc-472fe7ec6941" alt=""><figcaption></figcaption></figure>

### How to view employment details? <a href="#id-4xtv78n3tj3b" id="id-4xtv78n3tj3b"></a>

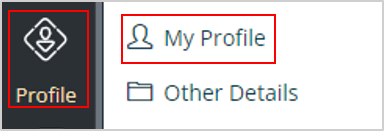
Go to the ‘Profile’ menu and select ‘My Profile’.

<figure><img src="https://4282324958-files.gitbook.io/~/files/v0/b/gitbook-x-prod.appspot.com/o/spaces%2F-MXep_PEmh8mDPVWj49x%2Fuploads%2F7W3auwiX74KZPxEK8dTv%2FHow%20to%20view%20employment%20details1.png?alt=media&amp;token=3743bc77-8fc2-46ac-b71f-354a76defb53" alt="" width="192"><figcaption></figcaption></figure>

Go to the ‘Employee Details’ tab to view your profile, where you can view your personal information such as name, date of birth, date of joining, PF account number and more. You can also access the ‘Personal Details’ and ‘Additional Details’ tab.

<figure><img src="https://4282324958-files.gitbook.io/~/files/v0/b/gitbook-x-prod.appspot.com/o/spaces%2F-MXep_PEmh8mDPVWj49x%2Fuploads%2FUDuQkZdjgY5rkTfuXUQc%2FHow%20to%20view%20employment%20details%202.png?alt=media&amp;token=9e8cd054-6e31-4439-83b0-8b116b665c25" alt=""><figcaption></figcaption></figure>

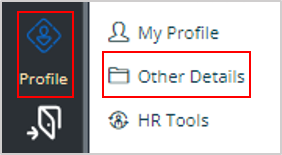
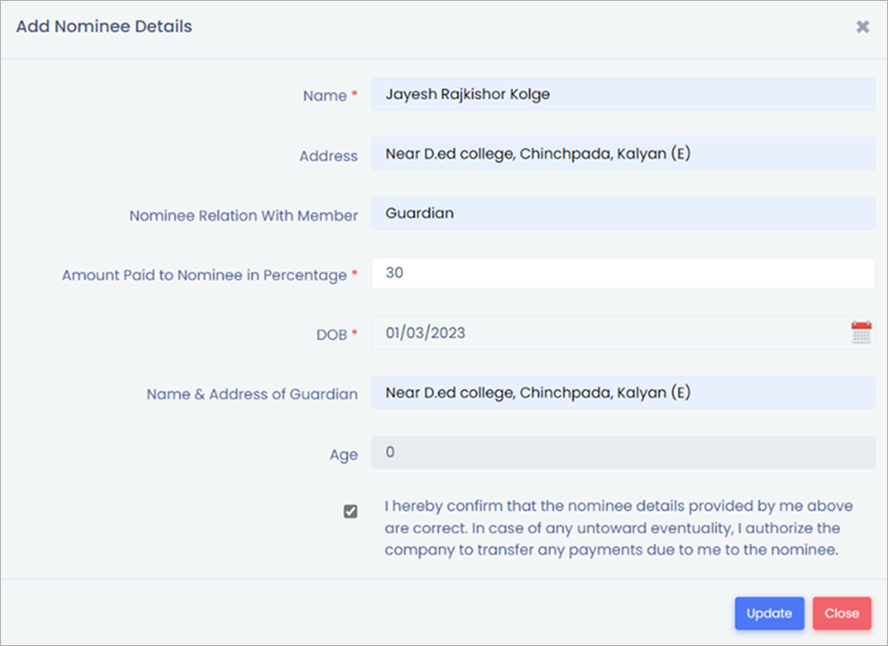
Under the ‘Other Details’ you can able to update or view Family, Academic, joining documents, nominee details, employee history, Language details and Training details based on the rights given to you.

<figure><img src="https://4282324958-files.gitbook.io/~/files/v0/b/gitbook-x-prod.appspot.com/o/spaces%2F-MXep_PEmh8mDPVWj49x%2Fuploads%2FAzowksNXbI5DJ0oTCS6a%2FHow%20to%20view%20employment%20details%203.png?alt=media&amp;token=175458de-1146-43e5-8168-6412c7bd3a7b" alt="" width="141"><figcaption></figcaption></figure>

<figure><img src="https://4282324958-files.gitbook.io/~/files/v0/b/gitbook-x-prod.appspot.com/o/spaces%2F-MXep_PEmh8mDPVWj49x%2Fuploads%2F7Akrl3Mej5OomZKxQgOZ%2F15.png?alt=media&amp;token=5f6d2f62-3562-4827-9476-2a64f8a53e63" alt=""><figcaption></figcaption></figure>

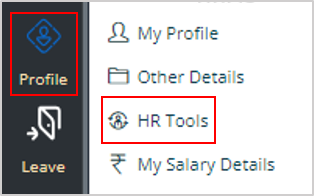
To access HR-related information, go to the ‘HR Tools’ submenu under the ‘Profile’ menu.

<figure><img src="https://4282324958-files.gitbook.io/~/files/v0/b/gitbook-x-prod.appspot.com/o/spaces%2F-MXep_PEmh8mDPVWj49x%2Fuploads%2F2YPcx5n88FdEvvjvHLp7%2F16.1.png?alt=media&amp;token=8606bd4d-0842-4ca8-8c4a-0fa1249f2a4e" alt="" width="157"><figcaption></figcaption></figure>

<figure><img src="https://4282324958-files.gitbook.io/~/files/v0/b/gitbook-x-prod.appspot.com/o/spaces%2F-MXep_PEmh8mDPVWj49x%2Fuploads%2FgbPj8Uea4pc8HtBS6xdU%2F16.png?alt=media&amp;token=bdfccde1-3632-49a7-af3c-6c1a46004bf5" alt=""><figcaption></figcaption></figure>

* Contact Info: Contact information of the HR and administrator can be seen here
* Policies: Company policies which are shared by the HR team can be downloaded from this option
* General Info: General Information about the company can be downloaded through this option

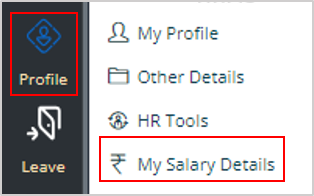
&#x20;To access details related to their salary go to the ‘My Salary Details’ submenu.

<figure><img src="https://4282324958-files.gitbook.io/~/files/v0/b/gitbook-x-prod.appspot.com/o/spaces%2F-MXep_PEmh8mDPVWj49x%2Fuploads%2FwG68w7ECwcFHvingSvbE%2F17.1.png?alt=media&amp;token=b2201fb8-3f64-430b-8a44-fba7a8f5ffae" alt="" width="157"><figcaption></figcaption></figure>

<figure><img src="https://4282324958-files.gitbook.io/~/files/v0/b/gitbook-x-prod.appspot.com/o/spaces%2F-MXep_PEmh8mDPVWj49x%2Fuploads%2FVG4UCWaEFZCyCJgpS78z%2F17.png?alt=media&amp;token=eacb0112-a9f0-412e-951c-5487cbafeece" alt="" width="381"><figcaption></figcaption></figure>

* My Pay slip: You may download your Pay slip from this option
* My Provident Fund Details:  You may check your PF details from this option

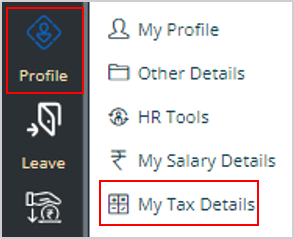
You can access your tax-related details by going to the ‘My Tax Details’ submenu.&#x20;

<figure><img src="https://4282324958-files.gitbook.io/~/files/v0/b/gitbook-x-prod.appspot.com/o/spaces%2F-MXep_PEmh8mDPVWj49x%2Fuploads%2FJgqYZW82Ne6oGxGXVJMW%2F18.1.png?alt=media&amp;token=c5692d74-8434-4f12-a027-4a3953f5f7f8" alt="" width="147"><figcaption></figcaption></figure>

<figure><img src="https://4282324958-files.gitbook.io/~/files/v0/b/gitbook-x-prod.appspot.com/o/spaces%2F-MXep_PEmh8mDPVWj49x%2Fuploads%2FAGu517SOQ2lC9dneiymS%2F18.png?alt=media&amp;token=81eab8fc-9bdf-4632-b099-f847cc5c41dc" alt=""><figcaption></figcaption></figure>

* Work Sheet – TDS: You may download your Income Tax worksheet through this option
* TDS Declaration Entry: You may enter your TDS declaration entries through this option
* &#x20;TDS – Proof Entry: You may enter your TDS declaration entries through this option
* Tax Calculation: You can able to calculate your annual tax using this option
* Form 16: You can able to download your form 16 using this option

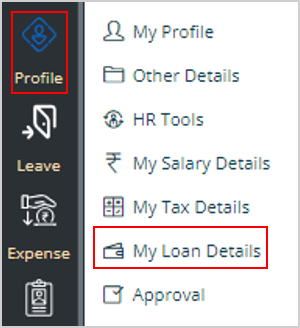
You also get easy access to your loan information under ‘My Loan Details’ submenu.

<figure><img src="https://4282324958-files.gitbook.io/~/files/v0/b/gitbook-x-prod.appspot.com/o/spaces%2F-MXep_PEmh8mDPVWj49x%2Fuploads%2FbrCvNFBEutJXJduVpTUr%2F19.1.png?alt=media&amp;token=e4d6c3e7-f6c2-4a11-8313-afa6beb27ce1" alt="" width="150"><figcaption></figcaption></figure>

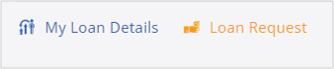
* My Loan Details: You can able to see your loan details using this option
* Loan Request: You can make a loan request using this option if applicable

<figure><img src="https://4282324958-files.gitbook.io/~/files/v0/b/gitbook-x-prod.appspot.com/o/spaces%2F-MXep_PEmh8mDPVWj49x%2Fuploads%2F9CS336BgLD7KKwEwMkoM%2F19.png?alt=media&amp;token=d82d7cad-7c76-4186-aa1b-d9ebdb26b845" alt=""><figcaption></figcaption></figure>

### &#x20;How to apply for leave?

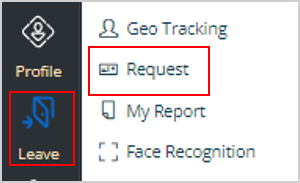
From the left-hand side menu bar click on the ‘Leave’ menu followed by the ‘Request’ submenu.

<img src="https://4282324958-files.gitbook.io/~/files/v0/b/gitbook-x-prod.appspot.com/o/spaces%2F-MXep_PEmh8mDPVWj49x%2Fuploads%2FJp1MR2ksZDclfPC7Q0G3%2F0.png?alt=media" alt="" width="225">

Click on the ‘Leave’ tab and,

![](https://4282324958-files.gitbook.io/~/files/v0/b/gitbook-x-prod.appspot.com/o/spaces%2F-MXep_PEmh8mDPVWj49x%2Fuploads%2FJnFch6fOUYS7MdYTTqD1%2F1.png?alt=media)

select ‘Type of Leave’ from the drop-down.

![](https://4282324958-files.gitbook.io/~/files/v0/b/gitbook-x-prod.appspot.com/o/spaces%2F-MXep_PEmh8mDPVWj49x%2Fuploads%2FGgtrbqpz0P4zad6WQiBT%2F2.png?alt=media)

Once you select the ‘Type of Leave’ the respective leave balance will be displayed in red colour.

![](https://4282324958-files.gitbook.io/~/files/v0/b/gitbook-x-prod.appspot.com/o/spaces%2F-MXep_PEmh8mDPVWj49x%2Fuploads%2F2NX5Td6QCaXH4fjig6Dn%2F3.png?alt=media)

Select ‘Reliever - Employee Name’ who is going to take care of your work responsibilities while you are on leave.

![](https://4282324958-files.gitbook.io/~/files/v0/b/gitbook-x-prod.appspot.com/o/spaces%2F-MXep_PEmh8mDPVWj49x%2Fuploads%2FS0czIpPGARoBhIx8wpAt%2F4.png?alt=media)

Select the duration of your leave. Choose whether it is a full day or half day from the drop-down options for both ‘From Date’ and ‘To Date’.

![](https://4282324958-files.gitbook.io/~/files/v0/b/gitbook-x-prod.appspot.com/o/spaces%2F-MXep_PEmh8mDPVWj49x%2Fuploads%2FEhffejhY4eGavjIuhoaQ%2F5.png?alt=media)

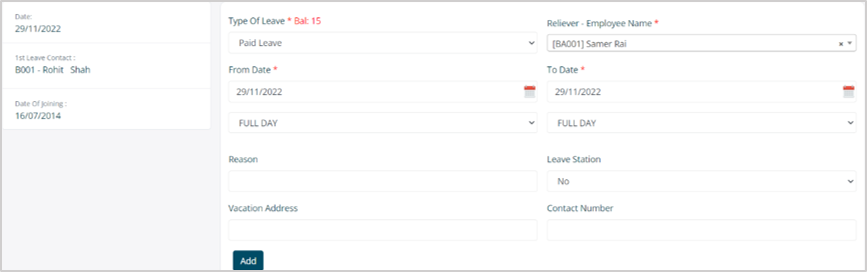
Fill in the other essential information such as ‘Reason’ for the leave, whether you are going to ‘Leave Station’, as well as ‘Vacation Address’ and ‘Contact Number’ in the respective fields.

![](https://4282324958-files.gitbook.io/~/files/v0/b/gitbook-x-prod.appspot.com/o/spaces%2F-MXep_PEmh8mDPVWj49x%2Fuploads%2F9QilBwDlRQX3ENIzTmOJ%2F6.png?alt=media)

Once you click on the ‘Add’ button you will see the summary for your leave request.

You can click on the ‘Delete’ icon if there are any mistakes and you want to create a new request. Click on the ‘Confirm Leave’ button to submit the leave request.

![](https://4282324958-files.gitbook.io/~/files/v0/b/gitbook-x-prod.appspot.com/o/spaces%2F-MXep_PEmh8mDPVWj49x%2Fuploads%2FerA5kGPB5yhe7cICuf0A%2F7.png?alt=media)

You can see your leave request under the ‘Previous Leaves’ section along with the ‘Status’.

You can also delete your leave application by clicking on the ‘Cancel’ button.

![](https://4282324958-files.gitbook.io/~/files/v0/b/gitbook-x-prod.appspot.com/o/spaces%2F-MXep_PEmh8mDPVWj49x%2Fuploads%2FOXFC7VuWEIVH4Zrazyjo%2F8.png?alt=media)

Once the manager approves your leave you will be notified about the same by an email as well as mobile notification for Pocket HRMS app.

### How to RequestOn-duty or Work from Home? <a href="#hlk160441358" id="hlk160441358"></a>

Click on the ‘Leave’ menu from the sidebar followed by ‘Request’ sub-menu.

![](https://4282324958-files.gitbook.io/~/files/v0/b/gitbook-x-prod.appspot.com/o/spaces%2F-MXep_PEmh8mDPVWj49x%2Fuploads%2F0uLRzH9MPM4mq8paPmKm%2F9.png?alt=media)

Click on the ‘On-duty or Work from Home’ tab and select the ‘Start Date’ & ‘End Date’ in the respective fields.

![](https://4282324958-files.gitbook.io/~/files/v0/b/gitbook-x-prod.appspot.com/o/spaces%2F-MXep_PEmh8mDPVWj49x%2Fuploads%2Fn0WLNC7rmIsZGWHLxOct%2F10.png?alt=media)

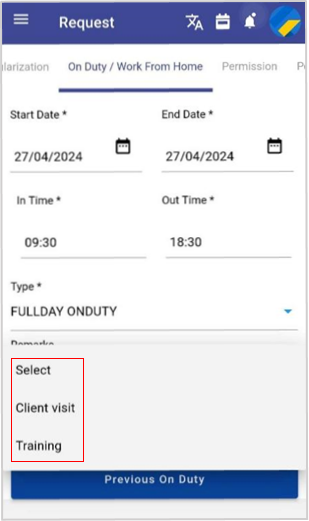
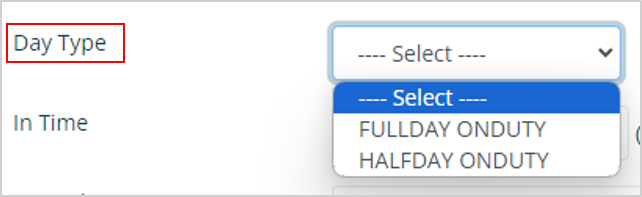
Select the ‘Day Type’ from the drop-down.
<img src="https://4282324958-files.gitbook.io/~/files/v0/b/gitbook-x-prod.appspot.com/o/spaces%2F-MXep_PEmh8mDPVWj49x%2Fuploads%2FLB4lgn8mmdXUvf7ODzZF%2F11.png?alt=media" alt="" width="321">

Enter ‘In Time’ and ‘Out Time’ according to 24-hour format.

![](https://4282324958-files.gitbook.io/~/files/v0/b/gitbook-x-prod.appspot.com/o/spaces%2F-MXep_PEmh8mDPVWj49x%2Fuploads%2Fx2JRm43oz1wt7TSwJzuC%2F12.png?alt=media)

Choose your ‘Remark’ and click on the ‘Save’ button to submit your request.

![](https://4282324958-files.gitbook.io/~/files/v0/b/gitbook-x-prod.appspot.com/o/spaces%2F-MXep_PEmh8mDPVWj49x%2Fuploads%2FRLaVOJ5GOYK3NzsLj3yz%2F13.png?alt=media)

The request will go to your Manager for approval. The respective and you will get an email and app notification after the approval.

### How to regularize your attendance? <a href="#hlk160459094" id="hlk160459094"></a>

Select ‘Leave’ from the left-hand sidebar followed by the ‘Request’.

![](https://4282324958-files.gitbook.io/~/files/v0/b/gitbook-x-prod.appspot.com/o/spaces%2F-MXep_PEmh8mDPVWj49x%2Fuploads%2FzRFMdEaaNbHh3Xzycybh%2F0.png?alt=media)

Go to ‘Attendance Regularization’ tab. Select the ‘From Date’, ‘To Date’ and click on the ‘Search’ button.
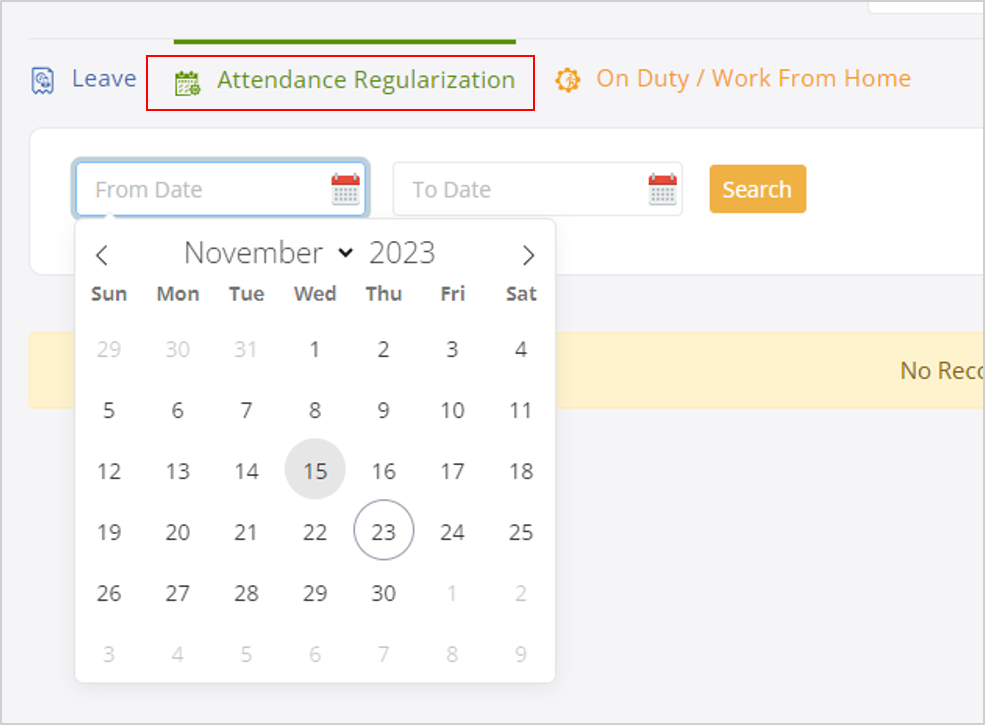
<img src="https://4282324958-files.gitbook.io/~/files/v0/b/gitbook-x-prod.appspot.com/o/spaces%2F-MXep_PEmh8mDPVWj49x%2Fuploads%2F0TlSOuXUnfKD3Y9GQQUO%2F1.png?alt=media" alt="" width="375">

In the search results, you will be able to see your in and out items along with status and remarks for your previous attendance regularization request. You can also choose to ‘Re-Updte’ your request.

![](https://4282324958-files.gitbook.io/~/files/v0/b/gitbook-x-prod.appspot.com/o/spaces%2F-MXep_PEmh8mDPVWj49x%2Fuploads%2Fz7pxdiRkgNNugnIq9k33%2F2.png?alt=media)

Click on the ‘Update’ button for the entry you want to regularize.

![](https://4282324958-files.gitbook.io/~/files/v0/b/gitbook-x-prod.appspot.com/o/spaces%2F-MXep_PEmh8mDPVWj49x%2Fuploads%2Fra7FQrLDtGUkcaQ1L24l%2F3.png?alt=media)

Modify the ‘In Time’ or ‘Out Time’, add ‘Remark’ and click on the ‘Save’ button to submit your attendance regularization request.
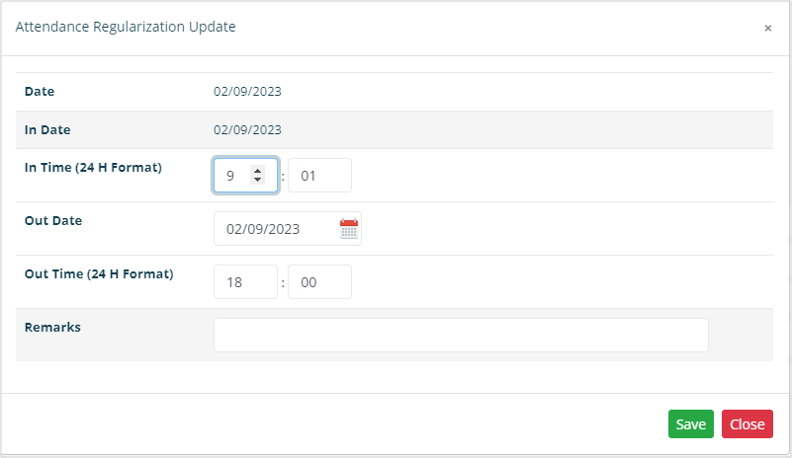
<img src="https://4282324958-files.gitbook.io/~/files/v0/b/gitbook-x-prod.appspot.com/o/spaces%2F-MXep_PEmh8mDPVWj49x%2Fuploads%2FyfKs1dM8PZfoJ5CZaIqO%2F4.png?alt=media" alt="" width="375">

Once the manager approves your request you will be notified about the same by email as well as mobile notification for Pocket HRMS app.

### How to upload pictures for face recognition?

Select ‘Leave’ from the left-hand sidebar followed by the ‘Face Recognition’.
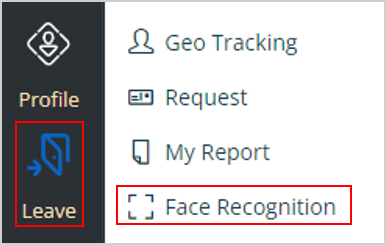
<img src="https://4282324958-files.gitbook.io/~/files/v0/b/gitbook-x-prod.appspot.com/o/spaces%2F-MXep_PEmh8mDPVWj49x%2Fuploads%2FXuAKY9npR80Y6z99Zqih%2F5.png?alt=media" alt="" width="193">

Go to the ‘Face Recognition’ tab. Click on the 3 boxes individually one-by-one to upload your high-resolution pictures with clear background and click on the ‘Save’ button.
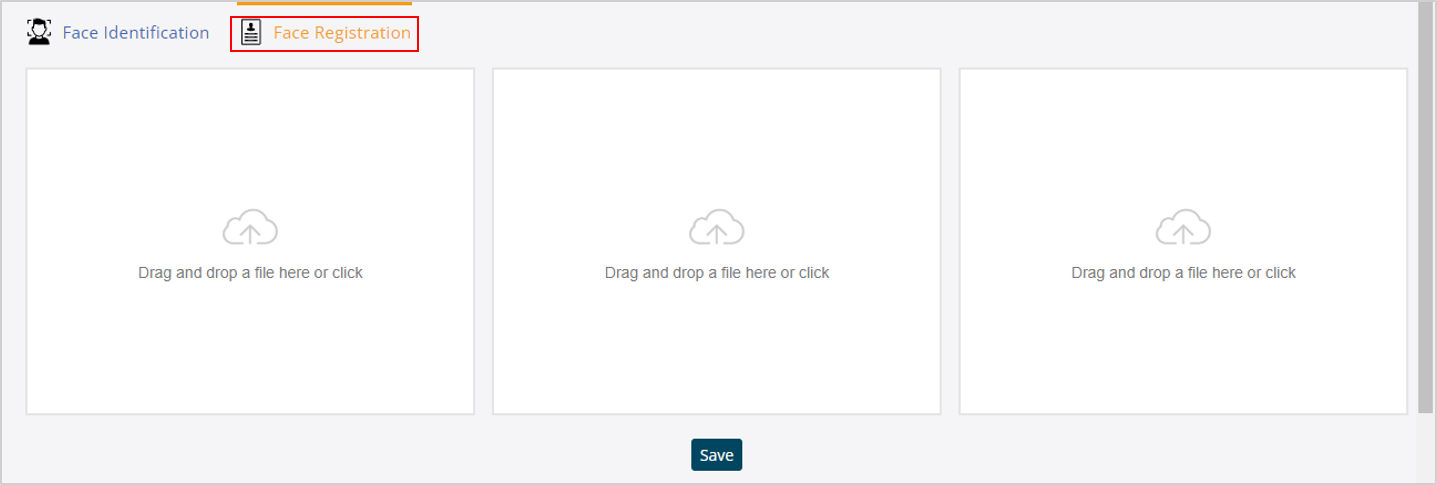
<img src="https://4282324958-files.gitbook.io/~/files/v0/b/gitbook-x-prod.appspot.com/o/spaces%2F-MXep_PEmh8mDPVWj49x%2Fuploads%2Fc58OS9YSzf4CYJIfKODE%2F6.png?alt=media" alt="" width="375">

After you click on the ‘Save’ button your pictures will be sent to HR for approval and the ‘Face Recognition’ feature will be activated for attendance once HR approves your pictures.

For any queries, contact <support@pockethrms.com>

# ESS Portal: Manager's Guide

### ESS Guide for Managers

Through approval matrix Admin can configure different managers for various modules such as leave, regularization, expense and more.

Whenever an employee submits any request the respective manger (The manager who has approval rights configured by the admin) will be notified about the same on an email as well as on their ESS. The manager can act (Approve/Reject) on these requests through

* ESS portal
* Email

According to the Pocket HRMS configuration the respective manager need to approve / reject the entries so the details will be updated in the system against the employee.

### Notification for Approval Requests

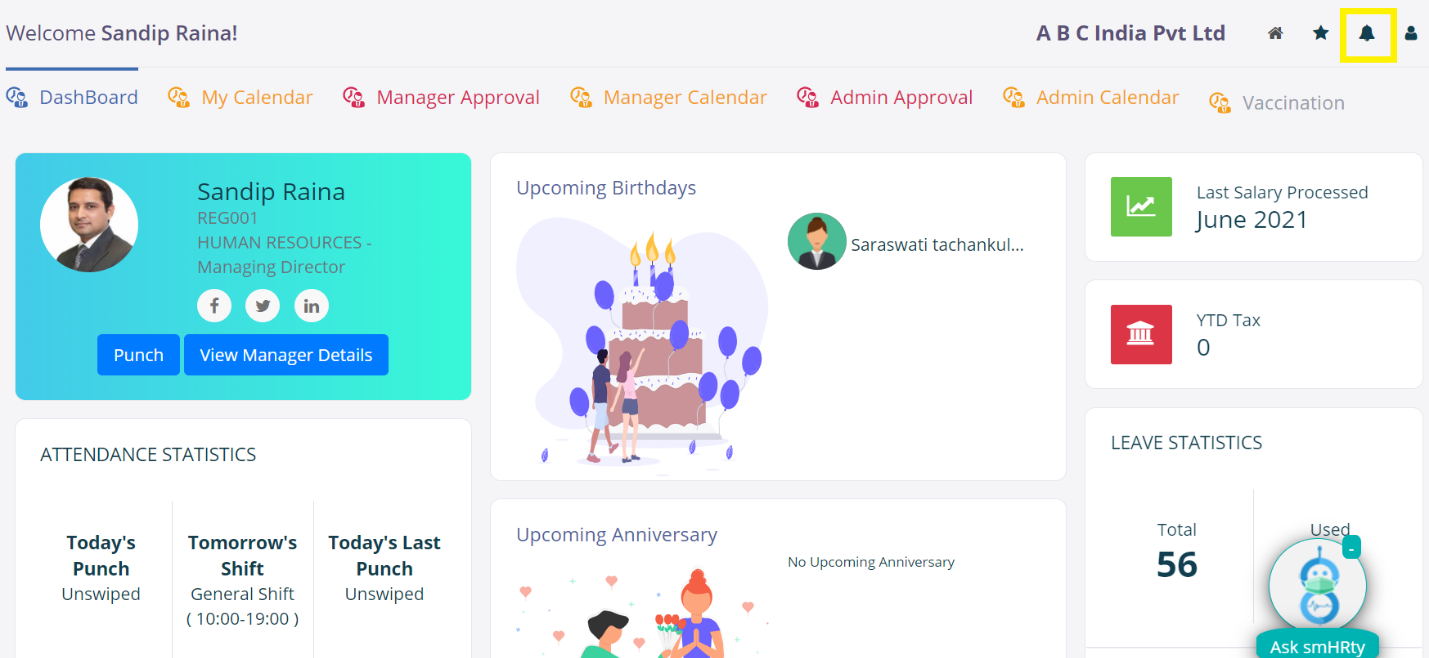
Once an employee submits any request their respective manager will receive notification about it in their ESS portal.<br>

<figure><img src="https://4282324958-files.gitbook.io/~/files/v0/b/gitbook-x-prod.appspot.com/o/spaces%2F-MXep_PEmh8mDPVWj49x%2Fuploads%2Fi2zH5cg7EYFmUPYch5kq%2F0.png?alt=media" alt=""><figcaption></figcaption></figure>

You can view these notifications once you click on the ‘Bell’ icon at right-hand corner of the screen. Click on the notification to reach the respective approval page.

Checking for Pending Approvals

To approve a request, you need to follow the path for particular module for example,

* On duty

Leave > Approval > Approval > On Duty

* Attendance Regularization

Leave > Approval > Attendance Regularization

You can check on the ‘Details’ button

![](https://4282324958-files.gitbook.io/~/files/v0/b/gitbook-x-prod.appspot.com/o/spaces%2F-MXep_PEmh8mDPVWj49x%2Fuploads%2F4yuE27MrewKsLhzJVHVz%2F1.png?alt=media)

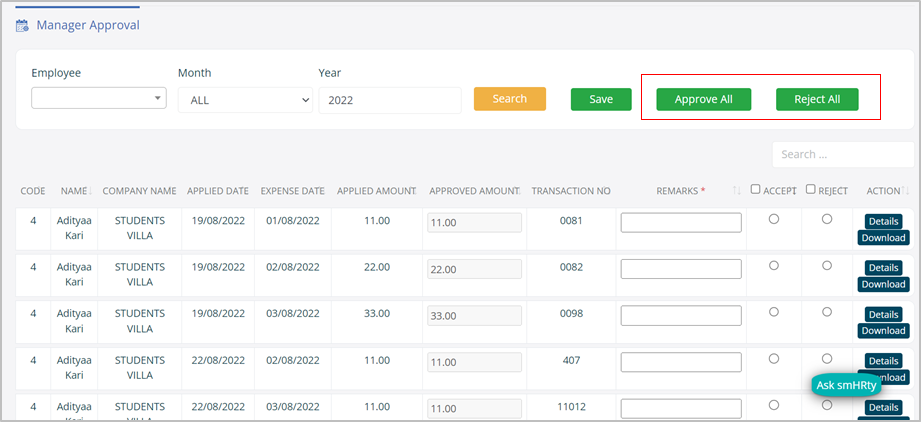
The manager may approve / reject multiple entries at a single go also.

### Email for Approval Request

Apart from the notification in the ESS, the manager will also receive an email notification for employee’s request. So, as a manager you can approve or reject reject requests from email itself.

![](https://4282324958-files.gitbook.io/~/files/v0/b/gitbook-x-prod.appspot.com/o/spaces%2F-MXep_PEmh8mDPVWj49x%2Fuploads%2F7SHzrmjQ9psErSiwc3yW%2F2.png?alt=media)

On the successful approval or rejection of the request the respective employee will be notified about the same on their ESS as well as via email.

**Note**:

In the multi-level approval, the request will go to Manger 1 and only after approval it goes to Manager 2 and so on according your configurations made by the Admin.

**Checking Team’s Attendance**\
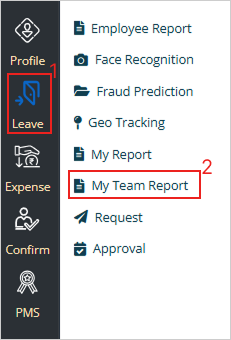
As a manager you may check the attendance details of you team through the below path:

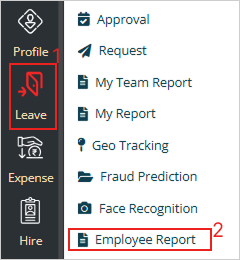
1. Leave > My Team Report > Punch In Out Report
2. Leave > My Team Report > In Out Details *(Note , here the attendance data will be updated after processing of attendance)*
3. Leave > My Team Report > Monthly Attendance Summary


# Product Updates

On this page you will find navigation to monthly updates

Pocket HRMS is committed to providing the best tools and features to our customers for effective employee management. We understand the dynamic nature and growing needs of the HR industry. That inspires us to continuously improve our product for a better user experience.&#x20;

Pocket HRMS software is designed to empower the human resource department for better productivity. We believe HR is crucial for the growth of any organization and should spend their time in strategic planning. So, we constantly work towards streamlining administration and automating processes.

Every month we incorporate several exciting features to provide you with a better user experience. With every software update, you will get a more intuitive and user-friendly interface, making navigation and task execution smoother than ever. Stay tuned to know how can our product updates benefit you.

* [April 2025](/product-updates/updates-2025/april-2025)
* [March 2025](/product-updates/updates-2025/march-2025)
* [February 2025](/product-updates/updates-2025/february-2025)
* [January 2025](/product-updates/updates-2025/january-2025)
* [2024 Major Highlights](/product-updates/updates-2024/2024-major-highlights)


# Updates 2022

On this page you will find navigation to monthly updates for year 2022

* [December 2022](/product-updates/updates-2022/december-2022)
* [November 2022](/product-updates/updates-2022/november-2022)
* [October 2022](/product-updates/updates-2022/october-2022)
* [September 2022](/product-updates/updates-2022/september-2022)
* [August 2022](/product-updates/updates-2022/august-2022)
* [July 2022](/product-updates/updates-2022/july-2022)
* [June 2022 ](/product-updates/updates-2022/june-2022)
* [April-May 2022](/product-updates/updates-2022/april-may-2022)
* [Jan, Feb & March 2022](/product-updates/updates-2022/jan-feb-and-mar-2022)


# December 2022

We are excited to announce the deployment of the ‘smHRt Payroll’ Process with the December 2022 update, which is one-of-a-kind feature wherein we have provided additional checks to ensure your payroll runs smoothly. It even uses machine learning to understand your company and suggest modifications and remove outliers from the data.

With the latest update, the HR and Administrator will also be able to identify modified attendance entries. Additionally, they can create custom ESS roles and enable email notifications to the managers and other stakeholders if the HR edits the ‘last working day’ of an employee. We have also added the option to create dynamic email tags for emails. Another major update is the integration of WhatsApp, using which you can send pay slips directly to the employees.

### smHRt Payroll

The smHRt Payroll Process ensures that the HR or Administrator can process payroll with pre-process checks that helps them identify errors in the configuration and formulae and avoid any outliers in the data. It also assures the users that all pre-requisites for processing the payroll are completed, by giving an overview, which includes the total gross salary processed, income tax processed, payroll count vs employee count, and more.

<div align="left"><figure><img src="https://4282324958-files.gitbook.io/~/files/v0/b/gitbook-x-prod.appspot.com/o/spaces%2F-MXep_PEmh8mDPVWj49x%2Fuploads%2F0UwYlVwNEn1XUD9BjSUm%2FPayroll-Process-1536x828.png?alt=media&amp;token=0a30d2d6-bd69-4daa-82c5-a249e3db4c92" alt=""><figcaption></figcaption></figure></div>

### Identify Modified Attendance Entries

The HR and Administrator can identify the ‘In’ and ‘Out’ entries modified by the employee or another HR or Admin as it get flagged after being modified. This functionality gives you transparency and mitigates fraud as flagging modified entries makes it easier to identify any unauthorized entry.

<div align="left"><figure><img src="https://4282324958-files.gitbook.io/~/files/v0/b/gitbook-x-prod.appspot.com/o/spaces%2F-MXep_PEmh8mDPVWj49x%2Fuploads%2FUbGPoURYlFbnWtBPYV6G%2FIn-Out-Core-Details.png?alt=media&amp;token=fc8a7f30-0685-4343-a47e-b9c234f96fa1" alt=""><figcaption></figcaption></figure></div>

### Seamless Designation Creation

The HR or Administrator can create multiple custom ESS roles which can be used for different designations of users. This feature allows HR administrators to define specific access and permissions for different employee groups. This flexibility allows a more organized approach to access to information and leads to a productive work environment.

<div align="left"><figure><img src="https://4282324958-files.gitbook.io/~/files/v0/b/gitbook-x-prod.appspot.com/o/spaces%2F-MXep_PEmh8mDPVWj49x%2Fuploads%2FrI7kyvBu1pBk5xJDHXQP%2FSelf-Service-Roles.png?alt=media&amp;token=288a23be-d929-4891-a53d-3b1ebea70afc" alt=""><figcaption></figcaption></figure></div>

### Notification for ‘Last Working Date’ Edits

The software now enables you to send email notifications for edits in the last working date provided. The notifications can be sent to HR, managers, the resigning employee, and external email IDs. This ensures seamless communication, enhancing transparency and accountability within the organization. It aids in keeping all relevant stakeholders informed about employee departures, facilitating smooth transitions and maintaining professional relationships.&#x20;

<div align="left"><figure><img src="https://4282324958-files.gitbook.io/~/files/v0/b/gitbook-x-prod.appspot.com/o/spaces%2F-MXep_PEmh8mDPVWj49x%2Fuploads%2FKqnU7yMrC9azo52g842M%2FReminder.png?alt=media&amp;token=c116f0ee-502c-4dee-ad48-6729375aa3db" alt=""><figcaption></figcaption></figure></div>

### Dynamic Email Fields

With our latest update HRs can create dynamic email template fields which can be used while sending offer letters to candidates.

For example, an HR can create a dynamic tag as ‘Address’ and the same will be used in the offer letter email template. While sending the offer letter, the ‘Address’ field will be replaced with the mapped dynamic tag.

<div align="left"><figure><img src="https://4282324958-files.gitbook.io/~/files/v0/b/gitbook-x-prod.appspot.com/o/spaces%2F-MXep_PEmh8mDPVWj49x%2Fuploads%2FE3QK4E7WSK8PZ9AnmRfO%2FEmail-Template.png?alt=media&amp;token=d468c127-29bd-4d9f-bd8d-0c0e5ee429b5" alt=""><figcaption></figcaption></figure></div>

<div align="left"><figure><img src="https://4282324958-files.gitbook.io/~/files/v0/b/gitbook-x-prod.appspot.com/o/spaces%2F-MXep_PEmh8mDPVWj49x%2Fuploads%2FL0wOy0RlnNmKoT7Vgk7m%2FEmail-Tags.png?alt=media&amp;token=2cc031c4-a882-4607-b0be-338a42752404" alt=""><figcaption></figcaption></figure></div>

### WhatsApp Integration

The HR or Administrator can enable WhatsApp integration to directly send pay slips on the employee’s WhatsApp mobile number. This direct and instant delivery enhances efficiency, ensuring timely access to crucial information. By leveraging this functionality, businesses can enhance their employee experience, fostering trust and transparency within the organization. It not only saves time and effort for both HR professionals and employees but also demonstrates the company's commitment to embracing modern, convenient communication channels.

<div align="left"><figure><img src="https://4282324958-files.gitbook.io/~/files/v0/b/gitbook-x-prod.appspot.com/o/spaces%2F-MXep_PEmh8mDPVWj49x%2Fuploads%2FYbcvVWUmlhWWPlgftcA6%2FPay-Slip.png?alt=media&amp;token=392b3e2f-95d5-4c70-9cac-e7683790bb1f" alt=""><figcaption></figcaption></figure></div>


# November 2022

With this update, we have introduced the option to attach documents with leave requests and restrict employees from making leave requests beyond a certain date. We have also added the option to allocate the duties of the leave day with a colleague while applying for leave. We have also enabled the option to view previous appraisals of employees for both the manager and employees as well as the option to download detailed performance review reports or a summarized version.

### Mandatory Supporting Leave Document

The HR or Administrator can enable the option to make it mandatory to attach documents with leave requests. By making it obligatory for employees to attach relevant documents such as medical certificates or official approvals, the company can validate the authenticity of leave requests. This feature streamlines the approval process, reducing the likelihood of false claims and ensuring compliance with company policies.

<div align="left"><figure><img src="https://4282324958-files.gitbook.io/~/files/v0/b/gitbook-x-prod.appspot.com/o/spaces%2F-MXep_PEmh8mDPVWj49x%2Fuploads%2FI0TckH1tAFzrbIuN3zJe%2FMandatory%20Supporting%20Leave%20Document.png?alt=media&amp;token=ad62c02b-0035-4f3d-8a01-c969aa6bb05f" alt=""><figcaption></figcaption></figure></div>

<div align="left"><figure><img src="https://4282324958-files.gitbook.io/~/files/v0/b/gitbook-x-prod.appspot.com/o/spaces%2F-MXep_PEmh8mDPVWj49x%2Fuploads%2FwCuFJTzHo1tsTEhUqmb9%2FMandatory%20Supporting%20Leave%20Document%201.png?alt=media&amp;token=a1d3a3b3-8432-418d-8f5d-0aa8bc7e1393" alt=""><figcaption></figcaption></figure></div>

### Limiting Retroactive Leave Requests

We are implementing a leave restriction feature, where you can limit employees from applying for leave for past dates based on the number of days specified in the leave configuration. It facilitates fair leave management, prevents misuse, and encourages employees to adhere to leave policies, thereby promoting a cohesive and efficient workplace.

<div align="left"><figure><img src="https://4282324958-files.gitbook.io/~/files/v0/b/gitbook-x-prod.appspot.com/o/spaces%2F-MXep_PEmh8mDPVWj49x%2Fuploads%2FtsNkksql7wZDOERkrxTe%2FLimiting%20Retroactive%20Leave%20Requests.png?alt=media&amp;token=d4fb5aeb-ae74-4574-8086-c92f672dac7b" alt=""><figcaption></figcaption></figure></div>

### Consistency with Leave Task Delegation

Pocket HRMS now enables employees to allocate their tasks to colleagues while applying for leave. This feature helps to foster seamless workflow continuity and ensure that the company functions efficiently even when team members are on leave. That leads to operational effectiveness enabling you to manage fluctuations in staffing without compromising productivity or project timelines.

<div align="left"><figure><img src="https://4282324958-files.gitbook.io/~/files/v0/b/gitbook-x-prod.appspot.com/o/spaces%2F-MXep_PEmh8mDPVWj49x%2Fuploads%2FlhKmIWRC8NdDftn9jpYB%2FConsistency%20with%20Leave%20Task%20Delegation.png?alt=media&amp;token=d15f81bf-4632-4238-b101-2bf030c12eed" alt=""><figcaption></figcaption></figure></div>

<div align="left"><figure><img src="https://4282324958-files.gitbook.io/~/files/v0/b/gitbook-x-prod.appspot.com/o/spaces%2F-MXep_PEmh8mDPVWj49x%2Fuploads%2FbRrOR1TTc8J3zxvaAvmC%2FConsistency%20with%20Leave%20Task%20Delegation1.png?alt=media&amp;token=c6c033f7-d67e-4eaf-8527-5466f4ae33ff" alt=""><figcaption></figcaption></figure></div>

### Holistic Performance Insight

Our software now offers the ability for employees and managers to access past performance reviews and feedback enabling employees to track their progress and understand expectations. When manager transitions occur, the new manager's access to prior ratings and feedback ensures a seamless transition, continuity in performance assessment, and a holistic understanding of the employee's journey.&#x20;

<div align="left"><figure><img src="https://4282324958-files.gitbook.io/~/files/v0/b/gitbook-x-prod.appspot.com/o/spaces%2F-MXep_PEmh8mDPVWj49x%2Fuploads%2FPvhTLnY8FYjJbAFD4K0e%2FHolistic%20Performance%20Insight.png?alt=media&amp;token=4cba6e12-47df-47fe-9d56-c20b9852fdcb" alt=""><figcaption></figcaption></figure></div>

<div align="left"><figure><img src="https://4282324958-files.gitbook.io/~/files/v0/b/gitbook-x-prod.appspot.com/o/spaces%2F-MXep_PEmh8mDPVWj49x%2Fuploads%2FzCxJrAqIzPhWKVHm0Pqb%2FHolistic%20Performance%20Insight1.png?alt=media&amp;token=ca9706f7-13f7-440d-a67b-0197e2f059e0" alt=""><figcaption></figcaption></figure></div>

### Convenient Performance Review Downloads

The employees can download their performance review reports either as a summary or in a detailed report format. That will make it easy to understand the performance highlights, key feedback, and achievements in a concise summary. Understand your strengths and areas for improvement at a glance. Employees can also dive deep with detailed feedback to understand the context behind evaluations.

<div align="left"><figure><img src="https://4282324958-files.gitbook.io/~/files/v0/b/gitbook-x-prod.appspot.com/o/spaces%2F-MXep_PEmh8mDPVWj49x%2Fuploads%2Fll16E4SL2R5UctygeO1a%2FConvenient%20Performance%20Review%20Downloads.png?alt=media&amp;token=dba96113-97c1-4561-9722-8a7b4808fb9c" alt=""><figcaption></figcaption></figure></div>


# October 2022

In our pursuit to improve the end-user experience, we have made further enhancements to your beloved HRMS software.

In this update, we have introduced the option to assign training to employees in bulk. We have also developed the option to save ratings for employees and save it as a draft instead of submitting it. As for the recruiters, there is a new option to whitelist domains before posting jobs online. Finally, we have introduced a robust employee filter to manage their roster effectively.

### Seamless Bulk Training Assignments

Our latest feature ‘Bulk Training Assignment’, allows HR professionals and administrators to effortlessly assign training to all employees in one go. This streamlined process eliminates the tedious task of manual allocation, saving valuable time and effort.

By simplifying the training assignment for multiple employees simultaneously, our software ensures efficient workforce development, allowing businesses to focus on strategic goals while ensuring every team member receives the necessary training. Boost productivity, enhance employee skills, and streamline your HR tasks.

<div align="left"><figure><img src="https://4282324958-files.gitbook.io/~/files/v0/b/gitbook-x-prod.appspot.com/o/spaces%2F-MXep_PEmh8mDPVWj49x%2Fuploads%2FbZXgDLDl2e9PDvbeVeTR%2FSeamless%20Bulk%20Training%20Assignments.png?alt=media&amp;token=e108e168-7d5a-44c6-862e-f524589d17bb" alt=""><figcaption></figcaption></figure></div>

### &#x20;Convenient Performance Reviews

We empower users to effortlessly ‘Save as Draft’ their performance reviews or ratings at any moment, regardless of whether all parameters are completed. This unique feature grants employees the flexibility to work on their performance reports at their own pace and convenience. By eliminating the pressure of completing all fields in one go, we enhance efficiency and reduce stress.

Employees can now focus on their tasks without worrying about stringent deadlines, ensuring a more relaxed and productive work environment. Experience the freedom to manage your performance evaluations seamlessly, promoting a healthier work-life balance and fostering enhanced employee well-being.

<div align="left"><figure><img src="https://4282324958-files.gitbook.io/~/files/v0/b/gitbook-x-prod.appspot.com/o/spaces%2F-MXep_PEmh8mDPVWj49x%2Fuploads%2FRMljqeDfgQF6dliQtP41%2FConvenient%20Performance%20Reviews.png?alt=media&amp;token=a2357b23-33db-419b-a60b-8ac866455bd4" alt=""><figcaption></figcaption></figure></div>

### Boost Recruitment Reach by Domain Whitelisting

Introducing domain whitelisting feature that provides recruiters the ability to whitelist their company's website or any preferred domain before posting jobs. This streamlined process guarantees that job listings are seamlessly published on the whitelisted domains, ensuring maximum visibility and outreach.

This simplifies the posting procedure and enhances control, recruiters can save valuable time and find the perfect candidates swiftly and effortlessly.

<div align="left"><figure><img src="https://4282324958-files.gitbook.io/~/files/v0/b/gitbook-x-prod.appspot.com/o/spaces%2F-MXep_PEmh8mDPVWj49x%2Fuploads%2FE7Azp8KxbSKPhxnpXoxJ%2FWhitelist%20Domains%20for%20Job%20Posting.png?alt=media&amp;token=16687fb3-88e4-40d2-b0fc-485164d42077" alt=""><figcaption></figcaption></figure></div>

### Streamline Roster Management with Filter

With our latest update, you will get an Employee Filter on our Roster Management page in the cloud and the Employee Self-Service (ESS) portal. Now HR/Administrators and managers can effortlessly streamline their workforce management.

<div align="left"><figure><img src="https://4282324958-files.gitbook.io/~/files/v0/b/gitbook-x-prod.appspot.com/o/spaces%2F-MXep_PEmh8mDPVWj49x%2Fuploads%2Fx1AlYDs0VEBpd26nYThQ%2FStreamline%20Roster%20Management%20with%20Filter.png?alt=media&amp;token=fe18e210-0544-4a49-9b77-b94468ec50b4" alt=""><figcaption></figcaption></figure></div>

<div align="left"><figure><img src="https://4282324958-files.gitbook.io/~/files/v0/b/gitbook-x-prod.appspot.com/o/spaces%2F-MXep_PEmh8mDPVWj49x%2Fuploads%2FgVaZM2eISMizbkxjrIRY%2FEmployee%20Filter%20in%20Roster%20Management1.png?alt=media&amp;token=680ad943-aa9c-416b-9da2-9a84d600214c" alt=""><figcaption></figcaption></figure></div>

&#x20;For any queries, contact <support@pockethrms.com>


# September 2022

Pocket HRMS continuously strives to improve the end-user experience, and in this pursuit, we have made further enhancements to your beloved HRMS software.

In this update, we present the brand-new training dashboard, which will provide an overview of employee training. We have also optimized the roster management system for a smoother roster setup. Finally, our users can enjoy the added usability of Single Sign On (SSO), which helps improve the login experience.

### All-Inclusive Training Dashboard

Introducing our groundbreaking feature, the 'Training Dashboard' in our HRMS software! Now, employees can effortlessly access a comprehensive overview of their training activities in one streamlined interface. It consists of vital information such as:

* Assigned training sessions
* Training Schedule
* Completion status
* Certifications Achieved
* Monthly Training Report and more.

This dashboard helps in boosting productivity and empowering employees. It ensures seamless training management, enhancing both individual and organizational growth.

<div align="left"><figure><img src="https://4282324958-files.gitbook.io/~/files/v0/b/gitbook-x-prod.appspot.com/o/spaces%2F-MXep_PEmh8mDPVWj49x%2Fuploads%2FfpxHX3R7m9FBHkbxwVOT%2FAll-Inclusive%20Training%20Dashboard.png?alt=media&amp;token=14639a0f-cfbc-43b8-8ffb-b1eac6d6b524" alt=""><figcaption></figcaption></figure></div>

<div align="left"><figure><img src="https://4282324958-files.gitbook.io/~/files/v0/b/gitbook-x-prod.appspot.com/o/spaces%2F-MXep_PEmh8mDPVWj49x%2Fuploads%2FoBCecmJYWXhl6UkRLabu%2FAll-Inclusive%20Training%20Dashboard1.png?alt=media&amp;token=6ddcf7b9-d467-4015-946b-d94d44dfc157" alt=""><figcaption></figcaption></figure></div>

### Revolutionize Work Schedules Instantly

Now you will get an advanced Roster Management System with this cutting-edge feature, managers can effortlessly apply complete rosters for their teams, streamlining the scheduling process. Meanwhile, our Admin/HR users gain the power to apply new rosters for all employees, accommodating various shifts and even managing week offs seamlessly.

This functionality ensures optimal workforce organization, reducing managerial workload and enhancing overall productivity. Experience hassle-free scheduling and empower your team with our HRMS software.

<div align="left"><figure><img src="https://4282324958-files.gitbook.io/~/files/v0/b/gitbook-x-prod.appspot.com/o/spaces%2F-MXep_PEmh8mDPVWj49x%2Fuploads%2FHQv7ycvW2owm7RP8aiik%2FRevolutionize%20Work%20Schedules%20Instantly.png?alt=media&amp;token=8abafbf7-4c5e-4535-a736-c8d87565e191" alt=""><figcaption></figcaption></figure></div>

<div align="left"><figure><img src="https://4282324958-files.gitbook.io/~/files/v0/b/gitbook-x-prod.appspot.com/o/spaces%2F-MXep_PEmh8mDPVWj49x%2Fuploads%2FqU1fbNkPOaAiUC8YqTws%2FRevolutionize%20Work%20Schedules%20Instantly1.png?alt=media&amp;token=d2d9d0d9-dbcd-4615-b15c-dc9b53dfa929" alt=""><figcaption></figcaption></figure></div>

### Simple Access with Enhanced Security

With this update, we are introducing our seamless Single Sign-On (SSO) feature powered by Microsoft Account integration. With just one click, employees can enjoy password-less sign-ins, streamlining their access to our HRMS platform effortlessly.

By granting initial access to their Microsoft Account, employees ensure a hassle-free login experience every time. This not only enhances security but also boosts productivity, eliminating the need to remember complex passwords.

<div align="left"><figure><img src="https://4282324958-files.gitbook.io/~/files/v0/b/gitbook-x-prod.appspot.com/o/spaces%2F-MXep_PEmh8mDPVWj49x%2Fuploads%2Ff2aocwTVDZPXPgEOYPcK%2FSimple%20Access%20with%20Enhanced%20Security.png?alt=media&amp;token=96c6cabe-9b1a-44c4-b2ec-6f229ae0e502" alt=""><figcaption></figcaption></figure></div>

<div align="left"><figure><img src="https://4282324958-files.gitbook.io/~/files/v0/b/gitbook-x-prod.appspot.com/o/spaces%2F-MXep_PEmh8mDPVWj49x%2Fuploads%2F3WcJJRXtdocA1KTUHaaV%2FSimple%20Access%20with%20Enhanced%20Security1.jpg?alt=media&amp;token=be01d07d-b2b1-4970-88a5-b6b6ca450d7e" alt=""><figcaption></figcaption></figure></div>

&#x20;For any queries, contact <support@pockethrms.com>


# August 2022

## August 2022

The Pocket HRMS team is always passionate about upgrading the user experience and providing more significant help for our clients. In our pursuit of excellence, we are introducing a few enhancements.

Here is an overview of all the major and minor enhancements made in August 2022

### Custom Display of Appraisal Total Ratings&#x20;

With our new update Admins and HR professionals can now effortlessly enable ratings to be displayed on both employees' and managers' screens. This innovation promotes transparency and empowers employees by allowing them to view the ratings of their appraisals firsthand.

&#x20;It fosters open communication and clarity, ensuring a transparent and accountable work environment for everyone involved.

<div align="left"><figure><img src="https://4282324958-files.gitbook.io/~/files/v0/b/gitbook-x-prod.appspot.com/o/spaces%2F-MXep_PEmh8mDPVWj49x%2Fuploads%2FKKr9psIPbwHXPtcbTXpV%2FCustom%20Display%20of%20Appraisal%20Total%20Ratings.png?alt=media&amp;token=34b2a416-f919-432b-b570-693c2c308f8d" alt=""><figcaption></figcaption></figure></div>

<div align="left"><figure><img src="https://4282324958-files.gitbook.io/~/files/v0/b/gitbook-x-prod.appspot.com/o/spaces%2F-MXep_PEmh8mDPVWj49x%2Fuploads%2F3lGmwhKd1J0WjCgsA19d%2FCustom%20Display%20of%20Appraisal%20Total%20Ratings%201.png?alt=media&amp;token=4f1c10cc-3ecd-4bad-8202-ca3f9bfe8a10" alt=""><figcaption></figcaption></figure></div>

### Download Employee Appraisals Effortlessly

Empower your managers with the seamless downloading of appraisal reports in Excel sheets and PDF format. This functionality streamlines the evaluation process, offering managers detailed insights into employee performance, including their remarks, Custom KPI Fields, and Parameters. By providing comprehensive data in accessible formats, managers can make informed decisions swiftly.

<div align="left"><figure><img src="https://4282324958-files.gitbook.io/~/files/v0/b/gitbook-x-prod.appspot.com/o/spaces%2F-MXep_PEmh8mDPVWj49x%2Fuploads%2FJCY2SI7DUCSQct1WTJ6b%2FDownload%20Employee%20Appraisals%20Effortlessly.png?alt=media&amp;token=1c37b505-7711-4304-aa04-75050b3afd77" alt=""><figcaption></figcaption></figure></div>

<div align="left"><figure><img src="https://4282324958-files.gitbook.io/~/files/v0/b/gitbook-x-prod.appspot.com/o/spaces%2F-MXep_PEmh8mDPVWj49x%2Fuploads%2F4EFPLFc3oQ2fMy18Fxgp%2FDownload%20Employee%20Appraisals%20Effortlessly1.png?alt=media&amp;token=f036b24b-62f1-4f01-87c3-d565dcf212e2" alt=""><figcaption></figcaption></figure></div>

### &#x20;Configurable Pay Scales for Efficient Payroll

Pocket HRMS now offer slab-wise Pay Scales Configuration. With this, Admin and HR teams have seamless control over employee salaries. Define and adjust pay scales effortlessly, ensuring fair compensation across the board. Instantly update salaries based on predefined increments and PayScale structures. Plus, set effective dates for changes, ensuring accuracy and transparency. This feature streamlines payroll processes making your HR tasks smoother and more efficient.

<div align="left"><figure><img src="https://4282324958-files.gitbook.io/~/files/v0/b/gitbook-x-prod.appspot.com/o/spaces%2F-MXep_PEmh8mDPVWj49x%2Fuploads%2F5jsvpwuhfK759lVcjYBS%2FConfigurable%20Pay%20Scales%20for%20Efficient%20Payroll.png?alt=media&amp;token=64fbdce8-e4a7-4eb6-a27d-2702ebaae048" alt=""><figcaption></figcaption></figure></div>

### Team’s TDS Simple View for Managers

Experience seamless document management with our cutting-edge software. Now, employees, HR professionals, admins, and managers can effortlessly view uploaded files and documents directly on the TDS proof entry page within the Employee Self-Service (ESS) Portal.

This streamlined feature ensures quick access to essential information, enabling efficient tax compliance and payroll processing while saving valuable time.

&#x20;

<div align="left"><figure><img src="https://4282324958-files.gitbook.io/~/files/v0/b/gitbook-x-prod.appspot.com/o/spaces%2F-MXep_PEmh8mDPVWj49x%2Fuploads%2FMHU7D3EA0rV3Qrk0jqEI%2FSimple%20Team%E2%80%99s%20TDS%20View%20for%20Managers.png?alt=media&amp;token=4359ded2-2552-4cdb-a876-53c8bb9498cf" alt=""><figcaption></figcaption></figure></div>

&#x20;For any queries, contact <support@pockethrms.com>


# July 2022

Embrace effortless HR management with our latest enhancements to the HRMS software. From a comprehensive Employee Timeline to an intuitive Experience Field and Manager Overtime Updates, these features redefine efficiency. Dive into a world of streamlined processes, ensuring precise tracking, informed decisions, and enhanced collaboration for your team. For the month of July, we have the following enhancements:

### Career Milestone Overview

Our latest update brings you the Employee Timeline feature, providing Administrators and HR professionals with a comprehensive view of an employee's journey. From the date of joining and confirmation to increments, designation updates, and department changes, this feature offers a holistic understanding of an employee's career progression. It enables better decision-making by offering insights into the historical context of an employee's role within the organization.

<div align="left"><figure><img src="https://4282324958-files.gitbook.io/~/files/v0/b/gitbook-x-prod.appspot.com/o/spaces%2F-MXep_PEmh8mDPVWj49x%2Fuploads%2FMoMBgPVPMGlVBWuBZbxP%2FCareer%20Milestone%20Overview.png?alt=media&amp;token=869b8db2-70e0-4b9e-b098-666d1717ed54" alt=""><figcaption></figcaption></figure></div>

### Employee Expertise Peek

Incorporating user feedback, we’ve enhanced the Experience Field on the employee card. Now, by hovering over the information icon 'i' next to the 'Total Experience' field, users can instantly access a pop-up displaying the employee's previous work experience. Understanding backgrounds helps in the delegation of tasks for the managers.

<div align="left"><figure><img src="https://4282324958-files.gitbook.io/~/files/v0/b/gitbook-x-prod.appspot.com/o/spaces%2F-MXep_PEmh8mDPVWj49x%2Fuploads%2F33JFRHUmD5KIXLvcvQKj%2FEmployee%20Expertise%20Peek.png?alt=media&amp;token=0478dd94-b67e-4f5d-8858-73ebbb909f20" alt=""><figcaption></figcaption></figure></div>

### Effortless Overtime Adjustments

We understand the need for flexibility in managing work hours. With our latest update, managers can now manually update employee overtime hours. This feature allows managers to tailor overtime records to reflect the actual work done, ensuring accurate compensation and work-hour tracking. It’s designed to simplify HR processes, providing managers with the tools they need to efficiently oversee their team's workload.

<div align="left"><figure><img src="https://4282324958-files.gitbook.io/~/files/v0/b/gitbook-x-prod.appspot.com/o/spaces%2F-MXep_PEmh8mDPVWj49x%2Fuploads%2FSjm9qNNqsEdeeENh03ix%2FEffortless%20Overtime%20Adjustments.png?alt=media&amp;token=34184715-940d-4197-b3d6-ceffcca3f2d7" alt=""><figcaption></figcaption></figure></div>

<div align="left"><figure><img src="https://4282324958-files.gitbook.io/~/files/v0/b/gitbook-x-prod.appspot.com/o/spaces%2F-MXep_PEmh8mDPVWj49x%2Fuploads%2FSkKbn7KQFmazqLrZFpUv%2FEffortless%20Overtime%20Adjustments%201.png?alt=media&amp;token=9c03bd78-a4ea-4d04-bc3f-b9d253b2be2a" alt=""><figcaption></figcaption></figure></div>

### Focused Appraisal Access

Ensuring data confidentiality, we’ve introduced the 'View Only' access rights for specific managers regarding employee appraisals. This feature maintains data integrity while allowing managers to assess their team's performance comprehensively. It’s a natural progression toward more streamlined appraisal processes, promoting a collaborative work environment.

<div align="left"><figure><img src="https://4282324958-files.gitbook.io/~/files/v0/b/gitbook-x-prod.appspot.com/o/spaces%2F-MXep_PEmh8mDPVWj49x%2Fuploads%2FpylQaunjsZ9dbaiV8Z9S%2FFocused%20Appraisal%20Access.png?alt=media&amp;token=e6ea991c-5cae-4e62-82f4-4dc47ecf2481" alt=""><figcaption></figcaption></figure></div>

<div align="left"><figure><img src="https://4282324958-files.gitbook.io/~/files/v0/b/gitbook-x-prod.appspot.com/o/spaces%2F-MXep_PEmh8mDPVWj49x%2Fuploads%2F4q7GzG66EUTSi8WjBwhv%2FFocused%20Appraisal%20Access%201.png?alt=media&amp;token=3008b38a-3aca-4a6b-9807-b8d6cbb54d0f" alt=""><figcaption></figcaption></figure></div>

For any queries, contact <support@pockethrms.com>

&#x20;


# June 2022

At Pocket HRMS, our commitment to providing an unparalleled user experience drives us to continually enhance our technology. We are thrilled to introduce our latest updates, such as detailed split shift attendance reports, simplified account management, streamlined project approvals, and swift compensation processing, designed to empower both employees and HR teams with increased efficiency and performance. For the month of June, we have the following enhancements.

### Enhanced Attendance Insights for Split Shift

We understand the importance of detailed insights, which is why our new split shift attendance report format offers a comprehensive view. Now, you can download reports configured to display information such as Casual Leave (CL) in the first half and Presence (P) in the second half, providing a clear overview of your employees' attendance patterns for managers. It also makes it easier for employees to understand their attendance details.

<div align="left"><figure><img src="https://4282324958-files.gitbook.io/~/files/v0/b/gitbook-x-prod.appspot.com/o/spaces%2F-MXep_PEmh8mDPVWj49x%2Fuploads%2FKPAMeKVxKbRxTOQ5POXa%2FSplit%20Shift%20Attendance%20Report.png?alt=media&amp;token=3e4c4f68-56b8-428e-a254-2470ad27897f" alt=""><figcaption></figcaption></figure></div>

<div align="left"><figure><img src="https://4282324958-files.gitbook.io/~/files/v0/b/gitbook-x-prod.appspot.com/o/spaces%2F-MXep_PEmh8mDPVWj49x%2Fuploads%2FbtCZf6ISWVDlBXoIDRyO%2FSwift%20Compensation%20and%20Overtime%20Approvals%201.png?alt=media&amp;token=6f5cdc03-f240-4def-b8ac-fd932c361e1c" alt=""><figcaption></figcaption></figure></div>

### Merging ESS Accounts with Ease

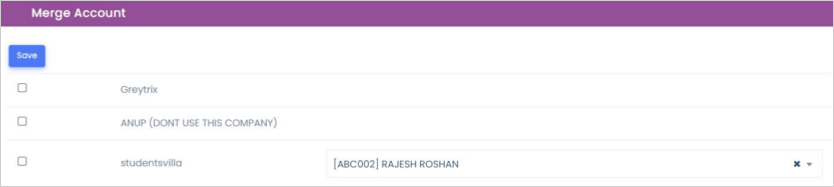
Managing multiple accounts within sub-companies just became seamless. HR/Admin can now merge accounts, ensuring a consolidated view. Employees gain easy access to merged accounts directly from the ESS homepage, simplifying their experience.

<div align="left"><figure><img src="https://4282324958-files.gitbook.io/~/files/v0/b/gitbook-x-prod.appspot.com/o/spaces%2F-MXep_PEmh8mDPVWj49x%2Fuploads%2FClTXi9n8CuVYkj3lyvbs%2FMerging%20ESS%20Accounts%20with%20Ease.png?alt=media&amp;token=bc6aa65c-ca1c-44d4-9382-48f1711b5b05" alt=""><figcaption></figcaption></figure></div>

<div align="left"><figure><img src="https://4282324958-files.gitbook.io/~/files/v0/b/gitbook-x-prod.appspot.com/o/spaces%2F-MXep_PEmh8mDPVWj49x%2Fuploads%2FdEVuPkkBHIADxie6qgfM%2FMerging%20ESS%20Accounts%20with%20Ease1.png?alt=media&amp;token=8b5a8b9c-edb0-4f1d-95be-e712f976d5db" alt=""><figcaption></figcaption></figure></div>

### Timesheet Approval Made Simple

Efficiency is key, especially when it comes to project management. With our latest update, employees' timesheet submissions for specific projects are streamlined. These submissions now directly route for approval to the designated project manager, enhancing the approval process and ensuring swift project progression.

<div align="left"><figure><img src="https://4282324958-files.gitbook.io/~/files/v0/b/gitbook-x-prod.appspot.com/o/spaces%2F-MXep_PEmh8mDPVWj49x%2Fuploads%2FbOOclpJWibFsEpzArGjM%2FTimesheet%20Approval%20Made%20Simple.png?alt=media&amp;token=b0983a59-7f98-4235-a123-7fb2bda04a3f" alt=""><figcaption></figcaption></figure></div>

### Swift Compensation and Overtime Approvals

Timely approvals for compensation pay and overtime hours are essential. Managers can now effortlessly update and approve overtime hours and compensatory pay for week-offs and holidays directly from the ESS Portal. This streamlined process ensures that your team's efforts are recognized and rewarded promptly.

<div align="left"><figure><img src="https://4282324958-files.gitbook.io/~/files/v0/b/gitbook-x-prod.appspot.com/o/spaces%2F-MXep_PEmh8mDPVWj49x%2Fuploads%2FqIRWDxB5bJUjA4gOZsuD%2FSwift%20Compensation%20and%20Overtime%20Approvals.png?alt=media&amp;token=d3a203b1-267d-4c4c-a2c5-9d8863691380" alt=""><figcaption></figcaption></figure></div>

<div align="left"><figure><img src="https://4282324958-files.gitbook.io/~/files/v0/b/gitbook-x-prod.appspot.com/o/spaces%2F-MXep_PEmh8mDPVWj49x%2Fuploads%2FGq4ZRQ2q1I6oUOkzwBTn%2FSwift%20Compensation%20and%20Overtime%20Approvals%201.png?alt=media&amp;token=c3890247-41a1-46cd-af92-2e98ee2d8a7d" alt=""><figcaption></figcaption></figure></div>

For any queries, contact <support@pockethrms.com>

&#x20;

&#x20;


# April-May 2022

At Pocket HRMS, our dedication to enhancing user experiences remains unwavering. In our continuous pursuit of excellence, we are thrilled to announce a series of exciting enhancements. Our latest upgrades redefine HR management. The upgrades are intended to personalize and simplify use experience. For the months of April & May, we have the following enhancements:

### Personalized Log in Screens

Personalization meets professionalism with our latest feature. Admins can now add up to four images and a group company logo to the ESS Portal Login screen, creating a tailored and branded experience for every user.

<div align="left"><figure><img src="https://4282324958-files.gitbook.io/~/files/v0/b/gitbook-x-prod.appspot.com/o/spaces%2F-MXep_PEmh8mDPVWj49x%2Fuploads%2F1R7RaqoZKag7idOgchJd%2FPersonalized%20Login%20Screens.png?alt=media&amp;token=81993dc3-ffda-4f32-a1fc-ae266786be74" alt=""><figcaption></figcaption></figure></div>

<div align="left"><figure><img src="https://4282324958-files.gitbook.io/~/files/v0/b/gitbook-x-prod.appspot.com/o/spaces%2F-MXep_PEmh8mDPVWj49x%2Fuploads%2FWKQ5QjKg8TrinU0m7san%2Fpersonalized%20Login%20screens1.png?alt=media&amp;token=5d235c4d-7daf-474f-b98e-2085e9d3c71e" alt=""><figcaption></figcaption></figure></div>

### Unified Approval System

Managing approvals across multiple companies has never been simpler. Admins can configure approval matrices for employees based on cross-company criteria. For example, suppose, Sam is an employee and Rakesh is a manager in XYZ Company. There is another employee Rajesh who is a manager at ABC Company. With Pocket HRMS, Sam’s approval matrix can be set as Approver 1 (Rakesh) and Approver 2 (Rajesh).

<div align="left"><figure><img src="https://4282324958-files.gitbook.io/~/files/v0/b/gitbook-x-prod.appspot.com/o/spaces%2F-MXep_PEmh8mDPVWj49x%2Fuploads%2FnTyI5iq8GKH8CBB6nabC%2FCross%20Company%20wise%20Manager%20Setting.png?alt=media&amp;token=ff7fd109-83f4-4586-87c5-e8cb4289f99f" alt=""><figcaption></figcaption></figure></div>

### Understanding Monthly Variance&#x20;

Understanding your data is key to informed decision-making. Now, admins can effortlessly download variance reports for consecutive months using Pocket HRMS, enabling in-depth analysis and strategic planning.

<div align="left"><figure><img src="https://4282324958-files.gitbook.io/~/files/v0/b/gitbook-x-prod.appspot.com/o/spaces%2F-MXep_PEmh8mDPVWj49x%2Fuploads%2FygTSHINJPPvMZ5CS68ew%2FUnderstanding%20Monthly%20Variance.png?alt=media&amp;token=d62dc5fc-be94-464e-9f0b-cc43400d35b6" alt=""><figcaption></figcaption></figure></div>

### Streamlined Appraisals: Deleting Hassle-Free

Our appraisal module has been enhanced for comprehensive performance evaluation. Admins can now delete various types of appraisals, including those with KPIs and stage-wise appraisals. Additionally, the introduction of Appraisal Peer Ratings allows for a nuanced evaluation process.

&#x20;

<div align="left"><figure><img src="https://4282324958-files.gitbook.io/~/files/v0/b/gitbook-x-prod.appspot.com/o/spaces%2F-MXep_PEmh8mDPVWj49x%2Fuploads%2FKWV5vNGWHdXNHR27eLSn%2FStreamlined%20Appraisals-Deleting%20Hassle-Free.png?alt=media&amp;token=e1560037-94e0-4ea1-9f3c-8898e6720b9e" alt=""><figcaption></figcaption></figure></div>

### &#x20;Peer Contributions for Appraisals

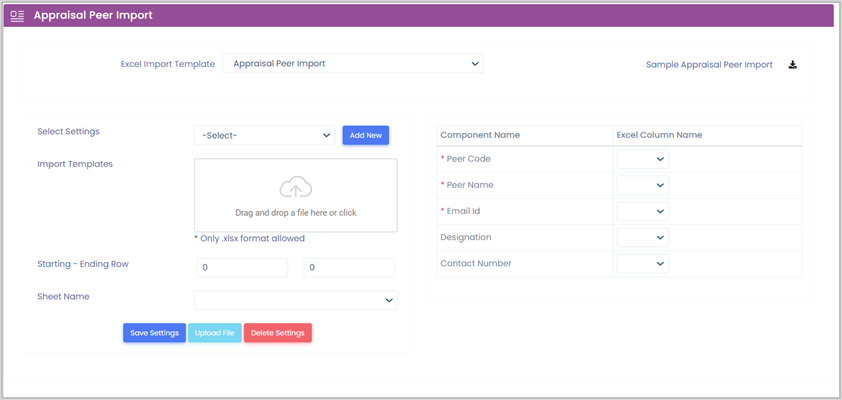
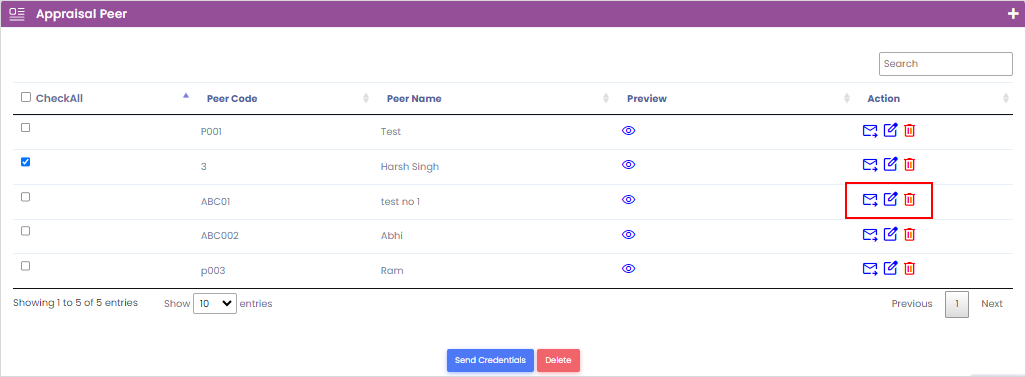
The admin can create new users for the sole purpose of Appraisal Peer ratings for the employees. The new user will only have access to the appraisal module. The admin can define various parameters, questions and assign managers as well for the appraisal.

<div align="left"><figure><img src="https://4282324958-files.gitbook.io/~/files/v0/b/gitbook-x-prod.appspot.com/o/spaces%2F-MXep_PEmh8mDPVWj49x%2Fuploads%2FEgrdk4LM6TIWu1pktVGm%2FPeer%20Contributions%20for%20Appraisals.png?alt=media&amp;token=2b38952d-58de-4326-b32f-354c8f33c631" alt=""><figcaption></figcaption></figure></div>

&#x20;

### Quantifiable Objectives: KPIs as Integers

Precision is paramount. Users can define KPI fields with numerical values, ensuring accurate assessment based on predefined KRA marks in the Appraisal Parameters. This feature maintains clarity and consistency in performance evaluations.

<div align="left"><figure><img src="https://4282324958-files.gitbook.io/~/files/v0/b/gitbook-x-prod.appspot.com/o/spaces%2F-MXep_PEmh8mDPVWj49x%2Fuploads%2FbD5ztxvxk9uDuMlqAiSh%2FQuantifiable%20Objectives-KPIs%20as%20Integers.png?alt=media&amp;token=ed8fab0f-391f-4917-a472-2a551ebfdcca" alt=""><figcaption></figcaption></figure></div>

<div align="left"><figure><img src="https://4282324958-files.gitbook.io/~/files/v0/b/gitbook-x-prod.appspot.com/o/spaces%2F-MXep_PEmh8mDPVWj49x%2Fuploads%2FYJXaXYDEY6RjMl84gl5I%2FQuantifiable%20Objectives-KPIs%20as%20Integers1.png?alt=media&amp;token=e5d7f2b6-001f-4d8e-ae0e-7e9f46278ce4" alt=""><figcaption></figcaption></figure></div>

### Flexible Managers' Attendance Control

Flexibility for managers and admins is at the heart of our updates. Managers can manually mark attendance and update overtime hours for their teams, streamlining the process for present and backdated dates. Admins, too, can efficiently manage attendance records with this functionality.

<div align="left"><figure><img src="https://4282324958-files.gitbook.io/~/files/v0/b/gitbook-x-prod.appspot.com/o/spaces%2F-MXep_PEmh8mDPVWj49x%2Fuploads%2F9CTPDYvW67BEDwUXi259%2FFlexible%20Managers'%20Attendance%20Control.png?alt=media&amp;token=16b1524c-ec49-4a5b-94ce-da67b3f853ac" alt=""><figcaption></figcaption></figure></div>

### &#x20;Transparent Claim Approval

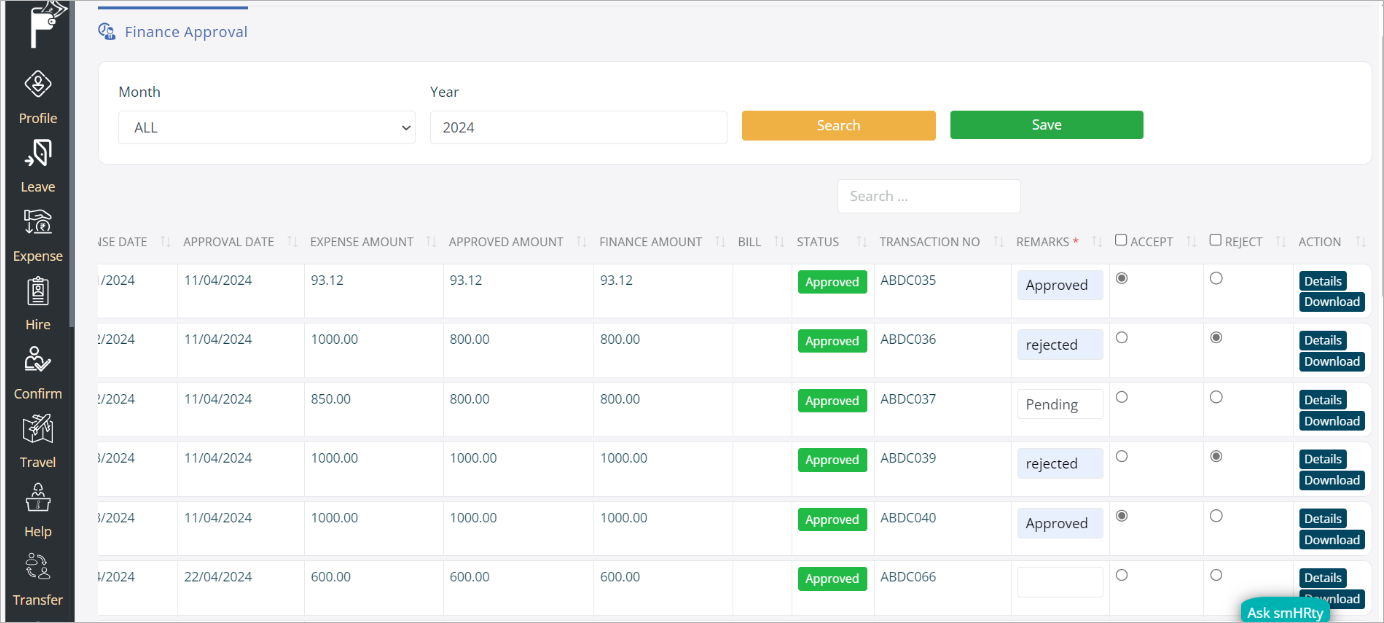
Financial transactions are made effortless. Finance approvers can now enter the final claim amount to be disbursed to employees, accompanied by remarks. This transparent process ensures clarity for employees initiating requests, fostering trust and efficiency.

<div align="left"><figure><img src="https://4282324958-files.gitbook.io/~/files/v0/b/gitbook-x-prod.appspot.com/o/spaces%2F-MXep_PEmh8mDPVWj49x%2Fuploads%2FuWy01NMEjPcnCzpeaX5K%2FTransparent%20Claim%20Approval.png?alt=media&amp;token=d2ae3c51-34c9-419c-be0f-b3b2e0102540" alt=""><figcaption></figcaption></figure></div>

<div align="left"><figure><img src="https://4282324958-files.gitbook.io/~/files/v0/b/gitbook-x-prod.appspot.com/o/spaces%2F-MXep_PEmh8mDPVWj49x%2Fuploads%2Fkw3yjyXAO3gBLo2RUS1I%2FTransparent%20Claim%20Approval1.png?alt=media&amp;token=b28f9435-3b90-432b-bd24-3bb1118338be" alt=""><figcaption></figcaption></figure></div>

&#x20;

For any queries, contact <support@pockethrms.com>


# Jan, Feb & Mar 2022

Guided by invaluable feedback from our esteemed clientele, we've focused on refining user interfaces and design elements, embodying our steadfast commitment to a 'user-first' approach. These developments showcase our dedication to enhancing every user's experience. For the month of March, we have the following enhancements.

### Revolutionary Interface for Recruitment Management

Our recruitment module has undergone a transformation, empowering users to take swift actions without navigating away from candidate profiles:

#### Candidate List

* Candidate List: Easily manage and view all candidates in one place.
* Schedule Interviews: Efficiently plan interviews, saving time for both recruiters and candidates and ensuring a smooth and timely hiring process.
* Add Candidate Feedback: Enabling better decision-making and ensuring alignment among team members regarding potential hires.
* Assign Interviewers: Seamlessly delegate interview responsibilities, distributing the workload among team members, and facilitating diverse perspectives in the evaluation process.

<div align="left"><figure><img src="https://4282324958-files.gitbook.io/~/files/v0/b/gitbook-x-prod.appspot.com/o/spaces%2F-MXep_PEmh8mDPVWj49x%2Fuploads%2FFlLacWLS1IorMMQLTwFR%2Fcandidate%20List.png?alt=media&amp;token=51da4db8-ab5f-497c-8ecf-fd8e0812e891" alt=""><figcaption></figcaption></figure></div>

#### Job Stage Visibility

We now have enhanced Job Stage Visibility with a New Colour Palette. Visual cues through colour-coded job stages simplify tracking, allowing for efficient candidate management.

<div align="left"><figure><img src="https://4282324958-files.gitbook.io/~/files/v0/b/gitbook-x-prod.appspot.com/o/spaces%2F-MXep_PEmh8mDPVWj49x%2Fuploads%2FHA5wQC0PCLqvW6nUvFPq%2FJob%20Stage%20Visibility.png?alt=media&amp;token=34872c80-3d64-47b7-813f-bf61c0c4b28b" alt=""><figcaption></figcaption></figure></div>

#### Job List

* View Number of Vacancies: Instantly assess hiring needs, ensuring timely recruitment to fill crucial positions.
* Assigned Recruiters: Clearly assigned responsibilities streamline communication, avoiding confusion and enhancing efficiency in the hiring process.
* Interview Panel Details: Transparency in panel composition ensures effective collaboration, leading to more informed hiring decisions.
* Set Job Closure Date: Clear deadlines promote prompt decision-making, ensuring timely closure of job postings and efficient use of resources.

<div align="left"><figure><img src="https://4282324958-files.gitbook.io/~/files/v0/b/gitbook-x-prod.appspot.com/o/spaces%2F-MXep_PEmh8mDPVWj49x%2Fuploads%2Ftiz5GVsSWaaigSE6nVIC%2FJob%20List.png?alt=media&amp;token=4735ea26-5a71-4504-8f54-a227aae3f882" alt=""><figcaption></figcaption></figure></div>

### Personalize News Section

The Latest News section now supports Rich Text Formats (RTF). You can add text with the following parameters:

·         Colours

·         Fonts

·         Hyperlinks

·         Alignment

·         Timestamp

&#x20;& other features supported by RTF enhance your news viewing experience by creating visually engaging. This enhances user experience, making news more interactive and appealing for your team.

<div align="left"><figure><img src="https://4282324958-files.gitbook.io/~/files/v0/b/gitbook-x-prod.appspot.com/o/spaces%2F-MXep_PEmh8mDPVWj49x%2Fuploads%2FQTwJgymhVF1hryRpjUwF%2FPersonalize%20News%20Section.png?alt=media&amp;token=96ea573e-40bc-487f-83b6-7b6f6122e0ff" alt=""><figcaption></figcaption></figure></div>

### Attendance Snapshot: Data at a Glance

Experience enhanced visibility in the Attendance Dashboard with precise data on present and absent counts presented both numerically and as percentages. Gives you valuable insights at a glance enabling quick decisions with simpler representation of information.

<div align="left"><figure><img src="https://4282324958-files.gitbook.io/~/files/v0/b/gitbook-x-prod.appspot.com/o/spaces%2F-MXep_PEmh8mDPVWj49x%2Fuploads%2FeSR0rNyiNMuTSdYD4Uja%2FAttendance%20Snapshot-Data%20at%20a%20Glance.png?alt=media&amp;token=c712b205-33f4-4741-ade2-bceb01415b48" alt=""><figcaption></figcaption></figure></div>

### Dynamic CTC Calculator

In our recruitment module, configure formulas for job profiles and create diverse templates. Upon entering the CTC amount, the system provides a detailed breakdown of the employee’s salary, which can be conveniently shared with candidates via email.

Our recruitment module streamlines the hiring process by allowing you to create tailored job profiles and templates. It simplifies salary negotiations by instantly generating detailed salary breakdowns based on the entered CTC amount, making communication with candidates clear and efficient.

<div align="left"><figure><img src="https://4282324958-files.gitbook.io/~/files/v0/b/gitbook-x-prod.appspot.com/o/spaces%2F-MXep_PEmh8mDPVWj49x%2Fuploads%2F1AZwQDAg7r8I7DcKCZMp%2FDynamic%20CTC%20Calculator.png?alt=media&amp;token=03b1e889-51f1-4ec5-888f-a33b2e8f77d5" alt=""><figcaption></figcaption></figure></div>

### Fostering Transparency with Employee Remarks

Encourage open communication by enabling employee remarks after the final Manager rating in the appraisal process. These comments foster transparency and understanding, visible to both Managers and Admins.

This feature promotes openness in appraisals by allowing employees to share feedback after their manager's assessment. It enhances transparency and understanding among employees, managers, and admins, fostering a collaborative work environment.

<div align="left"><figure><img src="https://4282324958-files.gitbook.io/~/files/v0/b/gitbook-x-prod.appspot.com/o/spaces%2F-MXep_PEmh8mDPVWj49x%2Fuploads%2F64K5l38dKqA7GtiDvCgr%2FFostering%20Transparency%20with%20Employee%20Remarks.png?alt=media&amp;token=007ecae2-2c4d-4d36-b233-d7ffd43526bf" alt=""><figcaption></figcaption></figure></div>

<div align="left"><figure><img src="https://4282324958-files.gitbook.io/~/files/v0/b/gitbook-x-prod.appspot.com/o/spaces%2F-MXep_PEmh8mDPVWj49x%2Fuploads%2FddehQiqJ3A3v6h8vF3n7%2FFostering%20Transparency%20with%20Employee%20Remarks1.png?alt=media&amp;token=ce03bbbd-b5ee-4f75-bb10-3b08128a4c91" alt=""><figcaption></figcaption></figure></div>

### Efficient Payslip Management with Emails

Now experience enhanced ease using the Payslip Email Log feature. Understand the status of sent payslips and seamlessly resend them in case of email failure with the 'Retry' button. Additionally, download logs for in-depth analysis using the 'Download' option.

<div align="left"><figure><img src="https://4282324958-files.gitbook.io/~/files/v0/b/gitbook-x-prod.appspot.com/o/spaces%2F-MXep_PEmh8mDPVWj49x%2Fuploads%2Fgi8ZFs5TT90ZGI7x4Bqv%2FEfficient%20Payslip%20Management%20with%20Emails.png?alt=media&amp;token=9dafa443-28f2-4929-8261-d49e60744001" alt=""><figcaption></figcaption></figure></div>

For any queries, contact <support@pockethrms.com>


# Updates 2023

On this page you will find navigation to monthly updates for year 2023

* [December 2023](/product-updates/updates-2023/december-2023)
* [November 2023](/product-updates/updates-2023/november-2023)
* [September 2023](/product-updates/updates-2023/september-2023)
* [August 2023](/product-updates/updates-2023/august-2023)
* [July](/product-updates/updates-2023/july-2023)[ 2023](/product-updates/updates-2023/july-2023)
* [June](https://app.gitbook.com/o/G3LCBkrp2yl1NkDoBuDg/s/-MXep_PEmh8mDPVWj49x/~/changes/316/product-updates/june-2023)[ 2023](/product-updates/updates-2023/may-june-2023)
* [April 2023](/product-updates/updates-2023/april-2023)
* [March 2023](/product-updates/updates-2023/march-2023)
* [February 2023](/product-updates/updates-2023/february-2023)
* [January 2023](/product-updates/updates-2023/january-2023)


# December 2023

We are thrilled to present our Monthly Update, with enhanced user-friendly tools to elevate your HR experience. Our commitment to innovation and efficiency drives us to bring you seamless updates that transform your HR processes. For the month of November, we have the following enhancements:

### Approval-based Configuration for Job Modifications

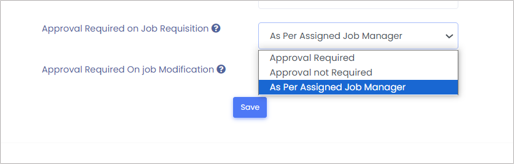
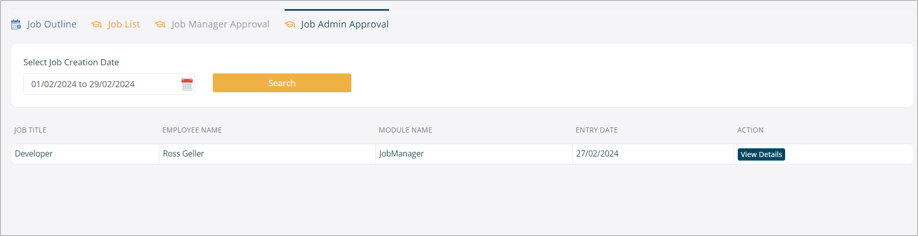
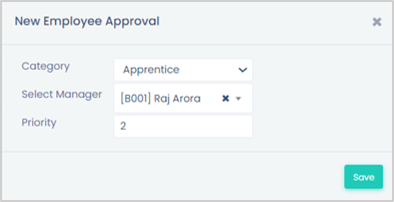
The latest update in your HRMS software empowers HR/Admin to control job modifications, allowing them to decide whether changes require approval. This ensures a streamlined process, preventing unauthorized modifications as well as secure and organize job updates. It enhances your ability to enforce approval protocols, ensuring the accuracy and reliability of job-related information within the system.

<div align="left"><figure><img src="https://4282324958-files.gitbook.io/~/files/v0/b/gitbook-x-prod.appspot.com/o/spaces%2F-MXep_PEmh8mDPVWj49x%2Fuploads%2F4VEVGkb5vl9VOvei2B17%2FEnhanced%20Accuracy%20and%20Security%20in%20Job%20Changes.png?alt=media&amp;token=bdb750b4-a648-48aa-9290-f580481a990e" alt=""><figcaption></figcaption></figure></div>

### Job Timeline

Now, you can easily track a job's history with the new 'Job Timeline' button on the Job Profile page. Admins, HR, or Recruiters can view all job-related activities from creation to approval/rejection, publication, modification, and more.

It provides a comprehensive overview of a job's entire journey. It enhances efficiency, enabling quick access to crucial information, making job management smoother.

<div align="left"><figure><img src="https://4282324958-files.gitbook.io/~/files/v0/b/gitbook-x-prod.appspot.com/o/spaces%2F-MXep_PEmh8mDPVWj49x%2Fuploads%2F0NTmLXhElU8YsXrS50eg%2FMaster%20Job%20History%20with%20Job%20Timeline%201.png?alt=media&amp;token=9567b44d-e449-4e8a-b329-2c39564bf319" alt=""><figcaption></figcaption></figure></div>

<div align="left"><figure><img src="https://4282324958-files.gitbook.io/~/files/v0/b/gitbook-x-prod.appspot.com/o/spaces%2F-MXep_PEmh8mDPVWj49x%2Fuploads%2FLgn8rID6vSfAeKxrxKwj%2FMaster%20Job%20History%20with%20Job%20Timeline%202.png?alt=media&amp;token=7f23097b-d32b-4fba-9119-422367680e32" alt=""><figcaption></figcaption></figure></div>

### ‘Custom Field’ Transfer from Candidate to Employee

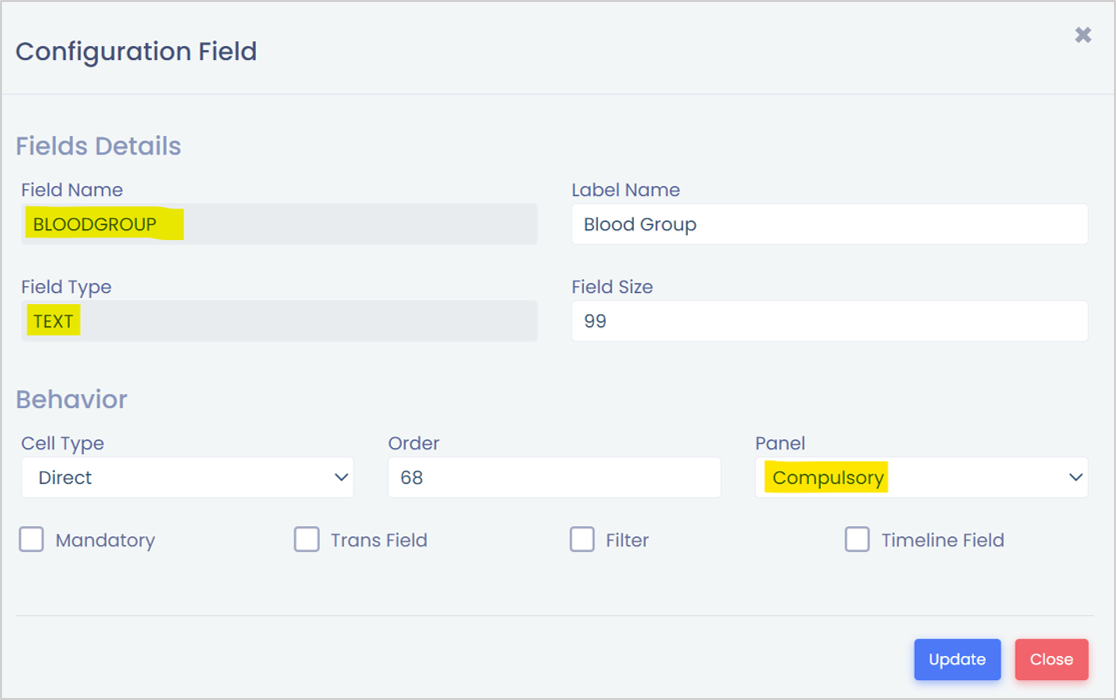
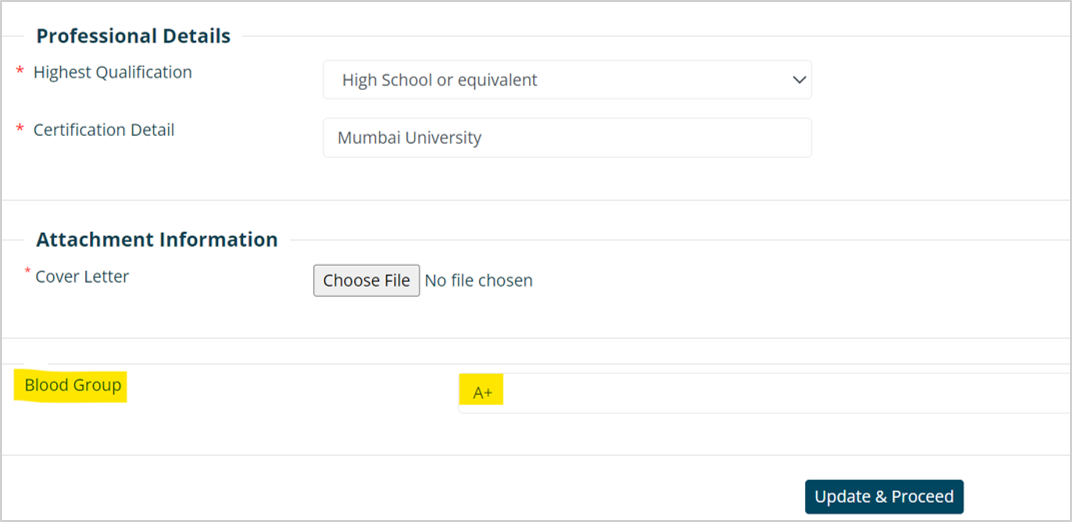
Automate data transfer from Custom Fields in Candidate Profile to Employee Profile by ensuring matching 'Field Name' and 'Field Type'. Set 'Compulsory' in Configuration field creation for seamless migration, simplifying the process and enhancing data consistency.

<div align="left"><figure><img src="https://4282324958-files.gitbook.io/~/files/v0/b/gitbook-x-prod.appspot.com/o/spaces%2F-MXep_PEmh8mDPVWj49x%2Fuploads%2FuMLOKnnnZyeuMjzxcRKE%2FBoost%20Accuracy%20by%20Field%20Matching%201.png?alt=media&amp;token=c6d7f28d-97bf-4031-8e70-75dd54008d85" alt=""><figcaption></figcaption></figure></div>

<div align="left"><figure><img src="https://4282324958-files.gitbook.io/~/files/v0/b/gitbook-x-prod.appspot.com/o/spaces%2F-MXep_PEmh8mDPVWj49x%2Fuploads%2FgSVjIkidBRRKm4uYKTmn%2FBoost%20Accuracy%20by%20Field%20Matching%202.png?alt=media&amp;token=e9d467c7-1a89-4791-88c1-302405397230" alt=""><figcaption></figcaption></figure></div>

<div align="left"><figure><img src="https://4282324958-files.gitbook.io/~/files/v0/b/gitbook-x-prod.appspot.com/o/spaces%2F-MXep_PEmh8mDPVWj49x%2Fuploads%2FGdy23enor5GI2vNzW8jw%2FBoost%20Accuracy%20by%20Field%20Matching%203.png?alt=media&amp;token=2af96db0-dcac-4f52-9945-86cf32eb5aa1" alt=""><figcaption></figcaption></figure></div>

<div align="left"><figure><img src="https://4282324958-files.gitbook.io/~/files/v0/b/gitbook-x-prod.appspot.com/o/spaces%2F-MXep_PEmh8mDPVWj49x%2Fuploads%2Fnzhn2l4H3FrmRr8Bmbd8%2FBoost%20Accuracy%20by%20Field%20Matching%204.png?alt=media&amp;token=e3a25f5d-6597-4fbc-b9b1-bf24c3fe6dae" alt=""><figcaption></figcaption></figure></div>

<div align="left"><figure><img src="https://4282324958-files.gitbook.io/~/files/v0/b/gitbook-x-prod.appspot.com/o/spaces%2F-MXep_PEmh8mDPVWj49x%2Fuploads%2FeiLstOn5ODIm8ir6cyet%2FBoost%20Accuracy%20by%20Field%20Matching%205.png?alt=media&amp;token=880e1a5c-470b-47e4-a512-4ebf973f810c" alt=""><figcaption></figcaption></figure></div>

### &#x20;Auto-Migration of Candidate Info Upon Onboarding

Upon onboarding the education and work details saved in the candidate profile can be automatically migrated to the Employment History tab in the Employee Profile. It streamlines onboarding for Admins, HR, and Recruiters, eliminates manual data entry, saves time and ensures accuracy.&#x20;

<div align="left"><figure><img src="https://4282324958-files.gitbook.io/~/files/v0/b/gitbook-x-prod.appspot.com/o/spaces%2F-MXep_PEmh8mDPVWj49x%2Fuploads%2F1cBsi03vPAwmYuhHNE3w%2FBoost%20Accuracy%20by%20Field%20Matching%201.png?alt=media&amp;token=30f64c4e-8159-4da0-9db4-5d8df016ddac" alt=""><figcaption></figcaption></figure></div>

<div align="left"><figure><img src="https://4282324958-files.gitbook.io/~/files/v0/b/gitbook-x-prod.appspot.com/o/spaces%2F-MXep_PEmh8mDPVWj49x%2Fuploads%2FrCRZx5GgujI0b4oWbRop%2FBoost%20Accuracy%20by%20Field%20Matching%202.png?alt=media&amp;token=b59c388e-5890-446f-9cb7-93ae5247997c" alt=""><figcaption></figcaption></figure></div>

### Automated Logo Generation for Offer Letters

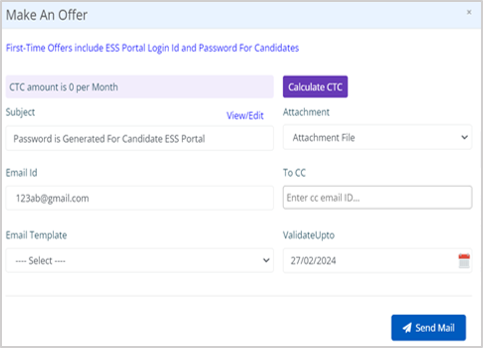
When moving a candidate to the 'Offer' stage and you use the CTC Calculator to make an offer, the system now automatically includes the Company Name and Logo in the CTC template sent to the candidate. That provides a professional touch to your communication and ensures a polished and branded presentation.

<div align="left"><figure><img src="https://4282324958-files.gitbook.io/~/files/v0/b/gitbook-x-prod.appspot.com/o/spaces%2F-MXep_PEmh8mDPVWj49x%2Fuploads%2FxzHsV1CFDz2h33Ksk4JV%2FProvide%20Brand%20Identity%20to%20Offer%20Letters%201.png?alt=media&amp;token=ba552b49-766d-41d0-84d7-4174a911398f" alt=""><figcaption></figcaption></figure></div>

<div align="left"><figure><img src="https://4282324958-files.gitbook.io/~/files/v0/b/gitbook-x-prod.appspot.com/o/spaces%2F-MXep_PEmh8mDPVWj49x%2Fuploads%2Fpp6LfBVuBwfWWUtzXz9l%2FProvide%20Brand%20Identity%20to%20Offer%20Letters%202.png?alt=media&amp;token=91f8716b-4715-410d-a7ef-c7a6ebaf8435" alt=""><figcaption></figcaption></figure></div>

<div align="left"><figure><img src="https://4282324958-files.gitbook.io/~/files/v0/b/gitbook-x-prod.appspot.com/o/spaces%2F-MXep_PEmh8mDPVWj49x%2Fuploads%2F1k7L8yXp0hXmAPGXG7Hx%2FProvide%20Brand%20Identity%20to%20Offer%20Letters%203.png?alt=media&amp;token=ac46f38e-c116-4408-8911-cff06689f15c" alt=""><figcaption></figcaption></figure></div>

### &#x20;Multiple Filters for Flexible Reporting

Use the reporting system's filter to precisely customize reports and find exactly what you need. That makes them more user-friendly and provides targeted insights. This aids in tracking changes and extracting precise data to enhance decision-making. You will get these filters for various reports such as gratuity, report wizard and compliance.

&#x20;

<div align="left"><figure><img src="https://4282324958-files.gitbook.io/~/files/v0/b/gitbook-x-prod.appspot.com/o/spaces%2F-MXep_PEmh8mDPVWj49x%2Fuploads%2F0zE0WGvNYWxbJwjm3LL5%2FFlexible%20Reports%20to%20Focus%20on%20What%20Matters%20Most%20-Filters.png?alt=media&amp;token=829b5b56-cecf-4d9d-91b4-57776ec0a12d" alt=""><figcaption></figcaption></figure></div>

&#x20;

For any queries, contact <support@pockethrms.com>


# November 2023

We are thrilled to present our Monthly Update, with enhanced user-friendly tools to elevate your HR experience. Our commitment to innovation and efficiency drives us to bring you seamless updates that transform your HR processes. For the month of November, we have the following enhancements:

### Streamlined Certificate Management in Employee Profiles

This enhancement lets an employee upload certificates in the Training section of his profile. This section is where you find info about the education and training of employees. Now, it's all in one place, making it simpler for an employee to upload, download and delete all the important training and education details.

<div align="left"><figure><img src="https://4282324958-files.gitbook.io/~/files/v0/b/gitbook-x-prod.appspot.com/o/spaces%2F-MXep_PEmh8mDPVWj49x%2Fuploads%2F4o9rfsWCz3VSePYLzZV4%2F1%20Certificate%20Upload%20Option%20in%20Training%20Details.png?alt=media&amp;token=ebf28dfd-cf9a-473f-b6c1-570d89a5de95" alt=""><figcaption></figcaption></figure></div>

### &#x20;Shift-Centric Leave Deductions

The system now allows for setting up attendance and leave deductions based on different shifts. This means you can customize how leave is deducted for employees depending on the specific shift they are working.

This feature provides flexibility in managing attendance and leave policies, allowing you to tailor deduction rules according to the varied schedules and working hours of different shifts. It simplifies the process of handling leaves by aligning deduction practices with the unique characteristics of each work shift.

<div align="left"><figure><img src="https://4282324958-files.gitbook.io/~/files/v0/b/gitbook-x-prod.appspot.com/o/spaces%2F-MXep_PEmh8mDPVWj49x%2Fuploads%2FvN5JtZMIsdAsWBXfvegs%2F2Working%20Hours%20Setting%20Shift%20Wise1.png?alt=media&amp;token=bee3ce41-ea84-4245-8167-9d461ccf8363" alt=""><figcaption></figcaption></figure></div>

<div align="left"><figure><img src="https://4282324958-files.gitbook.io/~/files/v0/b/gitbook-x-prod.appspot.com/o/spaces%2F-MXep_PEmh8mDPVWj49x%2Fuploads%2FiYVDDHGpbIaUDM09PzYi%2F2Working%20Hours%20Setting%20Shift%20Wise2.png?alt=media&amp;token=40a2988c-f88f-4e39-83c5-0f70708241df" alt=""><figcaption></figcaption></figure></div>

### Flexible Week-Off Overtime Settings

The updated HRMS software now lets you set specific rules to easily manage overtime for employees during their week off. In addition to the minimum and maximum working hour eligibility for overtime, the system also allows you to specify the start time after which overtime work hours will be counted.

For example, if you set,  &#x20;

* Overtime on week off will start at 15 hours (according to the 24-hour Clock)
* Minimum time to be considered as 1 minute &
* Maximum working hours as 6    &#x20;

If an employee works past 3 pm (15 hrs) on a weekend, even just for one minute, it's considered overtime (OT). However, only up to 6 hours of overtime is allowed. So, if an employee works 6 hours and 30 minutes on the weekend, only 6 hours will be counted as overtime.

### Customize Deletion Access for Joining Documents

The new feature in the software allows you to control the deletion of employees' joining documents. In simpler terms, you can now choose whether or not to show the delete button to employees for Joining Documents. You can opt to hide the delete button adding an extra layer of control and preventing accidental or unauthorized removal of crucial joining documents.

<div align="left"><figure><img src="https://4282324958-files.gitbook.io/~/files/v0/b/gitbook-x-prod.appspot.com/o/spaces%2F-MXep_PEmh8mDPVWj49x%2Fuploads%2F5r3WJAJmy1JnQFXLpmSA%2F4Delete%20Option%20Hide%20for%20Joining%20Document1.png?alt=media&amp;token=ba2d56ed-7181-4810-96e7-44244755f1c0" alt=""><figcaption></figcaption></figure></div>

<div align="left"><figure><img src="https://4282324958-files.gitbook.io/~/files/v0/b/gitbook-x-prod.appspot.com/o/spaces%2F-MXep_PEmh8mDPVWj49x%2Fuploads%2Fx5TIyIGt3UXZjYh1mhY5%2F4Delete%20Option%20Hide%20for%20Joining%20Document2.png?alt=media&amp;token=11555ed3-c58d-4e5d-a9fa-42d02a126a4b" alt=""><figcaption></figcaption></figure></div>

### &#x20;Payroll Dashboard with Versatile Component Selection

Now, when you're setting up your payroll dashboard, you have a broader selection of earning and deduction components at your disposal. This enhancement provides a comprehensive list that makes the dashboard creation process more flexible and reflects the organization's payroll data.

So, you can more accurately represent different aspects of compensation and deductions in your payroll dashboards. This simplifies and enhances your ability to manage and analyze payroll information effectively.

<div align="left"><figure><img src="https://4282324958-files.gitbook.io/~/files/v0/b/gitbook-x-prod.appspot.com/o/spaces%2F-MXep_PEmh8mDPVWj49x%2Fuploads%2F3DdWck68PzSiRdcjon1w%2F5Payroll%20Components%20Updated%20in%20Dashboard.png?alt=media&amp;token=cf5e0606-1464-421f-8a1f-2b8482f5d26f" alt=""><figcaption></figcaption></figure></div>

### Appraisal – Bell Curve

#### Bell Curve – Normal Distribution

The Bell Curve Screen displays employee performance. It's a visual tool that displays their performance and potential ratings in a standard and default non-editable format. It helps illustrate how ratings are distributed in a workforce. In a typical bell curve shape most employees are in the average range, with fewer at the high and low extremes of performance and/or potential.

<div align="left"><figure><img src="https://4282324958-files.gitbook.io/~/files/v0/b/gitbook-x-prod.appspot.com/o/spaces%2F-MXep_PEmh8mDPVWj49x%2Fuploads%2FDOGNirDhYUeDNtSqhRKz%2FBell%20Curve%20%E2%80%93%20Normal%20Distribution.png?alt=media&amp;token=a0b6a028-4d1d-49d1-8b26-5e37cbaa5c54" alt=""><figcaption></figcaption></figure></div>

#### Rating Normalization

In simpler terms, the Rating Normalization feature allows you to adjust final ratings based on different filters like job categories, departments, locations, and grade percentages This customization ensures a more accurate representation of performance distribution within specific segments of your workforce.

The calibrated curve is visible only when predefined conditions are met which are essential to form a meaningful visual representation of how well employees are performing within selected segments. This feature enables you to make more informed decisions about talent management, promotions, and training.

#### Graph Representation

Our HRMS software now provides three helpful views allowing HR professionals to easily visualize and compare employee performance.

* &#x20;The Expected Bell Curve View helps you see how performance is ideally distributed across your workforce.
* The Actual Graph View provides a real-time display of current performance levels.
* The Calibrated Curve View enables you to fine-tune and adjust performance expectations.

These views empower you to make informed decisions, identify areas for improvement, and recognize top performers. By having a clear visual representation of your workforce's performance, you can enhance talent management strategies, address skill gaps, and ensure a fair and calibrated evaluation process.&#x20;

<div align="left"><figure><img src="https://4282324958-files.gitbook.io/~/files/v0/b/gitbook-x-prod.appspot.com/o/spaces%2F-MXep_PEmh8mDPVWj49x%2Fuploads%2FWewvrTjJzBWud9wqOE4I%2FGraph%20Representation1.png?alt=media&amp;token=32e74b56-af4f-402a-84e0-00e01cce9c4c" alt=""><figcaption></figcaption></figure></div>

<div align="left"><figure><img src="https://4282324958-files.gitbook.io/~/files/v0/b/gitbook-x-prod.appspot.com/o/spaces%2F-MXep_PEmh8mDPVWj49x%2Fuploads%2FLRlFGawjIK5PHhHV7Hh0%2FGraph%20Representation2.png?alt=media&amp;token=9ac8ef34-bf7a-48ac-8175-b1f5ea979105" alt=""><figcaption></figcaption></figure></div>

For any queries, contact <support@pockethrms.com>


# September  2023

We are thrilled to present our Monthly Update, with enhanced user-friendly tools to elevate your HR experience. Our commitment to innovation and efficiency drives us to bring you seamless updates that transform your HR processes. For the month of September, we have the following enhancements:

### Cross Company Manager in Travel

The travel request approval process has been expanded to involve managers from other companies within the same corporate group or umbrella organization.

It allows for centralized control and monitoring of travel requests across multiple companies. This is especially useful for organizations with diverse business units or subsidiaries, ensuring uniformity and adherence to policies.

Cross-company approval streamlines the workflow by eliminating the need for separate approval processes for each company. It saves time and reduces administrative overhead by providing a standardized system for travel approval.

Same Company Manager: Dipti Thakkar (B003)\
Cross Company Manager: Sandip Raina (REG001)

<div align="left"><figure><img src="https://4282324958-files.gitbook.io/~/files/v0/b/gitbook-x-prod.appspot.com/o/spaces%2F-MXep_PEmh8mDPVWj49x%2Fuploads%2FpGL7nRQk4jK5u4asjPCH%2FCross%20Company%20Manager%20in%20Travel.png?alt=media&amp;token=94437870-9292-4dc8-aa94-5deafb606f5a" alt=""><figcaption></figcaption></figure></div>

#### Cross Company Manager in Confirmation

The dual-layered approval process helps guarantee that the employee's confirmation is well-informed and considers broader organizational needs and specific job requirements.

It enhances the transparency and fairness of the confirmation process, ultimately contributing to better decisions regarding permanent employment for the individual in question.

Same Company Manager: Dipti Thakkar (B003)\
Cross Company Manager: Sandip Raina (REG001)

<div align="left"><figure><img src="https://4282324958-files.gitbook.io/~/files/v0/b/gitbook-x-prod.appspot.com/o/spaces%2F-MXep_PEmh8mDPVWj49x%2Fuploads%2FZlljfp6sRz46LzguqmAr%2FCross%20Company%20Manager%20in%20Confirmation.png?alt=media&amp;token=6a7aeba6-320c-4265-a070-518ab64839ec" alt=""><figcaption></figcaption></figure></div>

### Seamless Signature Addition

With our updated signature option, employees can now draw and type their signatures effortlessly, offering simplicity and flexibility. This user-friendly feature empowers employees to modify their signatures anytime, ensuring accuracy and personalization.

The seamless integration of this feature into the HR approval workflow ensures that every time you update your signature, it automatically goes through the approval process based on the configurations set by HR. As a result, your changes are swiftly reviewed and confirmed, keeping your records up-to-date.

<div align="left"><figure><img src="https://4282324958-files.gitbook.io/~/files/v0/b/gitbook-x-prod.appspot.com/o/spaces%2F-MXep_PEmh8mDPVWj49x%2Fuploads%2FWQF30Cj92sVzz0BdXGQi%2FSeamless%20Signature%20Addition.png?alt=media&amp;token=464c6352-8286-4bdf-aa76-7915eec48884" alt=""><figcaption></figcaption></figure></div>

<div align="left"><figure><img src="https://4282324958-files.gitbook.io/~/files/v0/b/gitbook-x-prod.appspot.com/o/spaces%2F-MXep_PEmh8mDPVWj49x%2Fuploads%2FTFPa0KjagemOs76JDDjs%2FSeamless%20Signature%20Addition3.png?alt=media&amp;token=146813dd-bfa4-4c05-952d-3f88b6001af3" alt=""><figcaption></figcaption></figure></div>

### Expense Cycles

With this enhancement, administrators can effortlessly establish specific expense date ranges, which can be paired with corresponding due dates for reimbursement claims. This ensures clarity and precision in your expense cycle, ensuring smooth operations for your entire team.

It allows employees to request claims only within the predefined date ranges. This smart system not only saves time but also ensures that all claims are processed promptly, without any delays or confusion.

This update also offers the ability to set exclusive expenses. This means you can specify certain types of expenses that employees can claim. Once a user claims a specific expense type, the system will not allow any blocked expenses to be requested on the same day. This control is fully customizable through the ‘restrictions’ page in the cloud portal.

<div align="left"><figure><img src="https://4282324958-files.gitbook.io/~/files/v0/b/gitbook-x-prod.appspot.com/o/spaces%2F-MXep_PEmh8mDPVWj49x%2Fuploads%2FyIgrAq2thBcr88iF2StJ%2FExpense%20Cycles.png?alt=media&amp;token=867d1400-57a2-43cc-9d07-3ff773e194d8" alt=""><figcaption></figcaption></figure></div>

### Probation Extension Letter Download

This feature allows employees to download their probation letter in scenarios where their probation is extended, such as:

·   when the manager decided to extend the probation and the employee agreed to it.

·   when the employee disagrees with the probation extension and approaches their HR, who then extends the probation period.

It enhances efficiency by streamlining the probation extension process, ensuring transparency and trust among employees.

<div align="left"><figure><img src="https://4282324958-files.gitbook.io/~/files/v0/b/gitbook-x-prod.appspot.com/o/spaces%2F-MXep_PEmh8mDPVWj49x%2Fuploads%2F4nFE8qG4HhktSfhVoQPk%2FProbation%20Extension%20Letter%20Download.png?alt=media&amp;token=6462c5b8-ebe2-4112-885b-9a71ffe661d9" alt=""><figcaption></figcaption></figure></div>

<div align="left"><figure><img src="https://4282324958-files.gitbook.io/~/files/v0/b/gitbook-x-prod.appspot.com/o/spaces%2F-MXep_PEmh8mDPVWj49x%2Fuploads%2F1p2V6XYPKdp9XNdKjgux%2FProbation%20Extension%20Letter%20Download1.png?alt=media&amp;token=f0b585a5-363c-4496-9074-16e1eb05d238" alt=""><figcaption></figcaption></figure></div>

### Predefined Validity for Job Approval

This enhancement enables a date range feature on the Job Manager approval page. This new functionality allows for specifying a period during which a specific job approval is valid.

When accessing the approval page, managers can now set a start and end date, effectively establishing a window of time during which the job approval is valid.

<div align="left"><figure><img src="https://4282324958-files.gitbook.io/~/files/v0/b/gitbook-x-prod.appspot.com/o/spaces%2F-MXep_PEmh8mDPVWj49x%2Fuploads%2FgvJLWP8q4Nx8dNA3hWu0%2FPredefined%20Validity%20for%20Job%20Approval.png?alt=media&amp;token=6b16f40b-8fc3-46a8-a216-76f68612174a" alt=""><figcaption></figcaption></figure></div>

### Smart AI-Powered Recruitment

With Smart AI-powered recruitment, you can utilize smHRt AI tool to level up the entire recruitment process.

#### Job Description

HRs can quickly generate job descriptions based on the job title by clicking on the ‘Smart AI’ button.

<div align="left"><figure><img src="https://4282324958-files.gitbook.io/~/files/v0/b/gitbook-x-prod.appspot.com/o/spaces%2F-MXep_PEmh8mDPVWj49x%2Fuploads%2F5aINPEQFkUmA792N7lZ8%2FJob%20Description.png?alt=media&amp;token=c8e9928e-9178-4682-90a4-8ed4d9c22654" alt=""><figcaption></figcaption></figure></div>

#### Interview Questions

The HR can also enhance the interview experience with accurate professional and behavioural questions based on the position being offered and the candidate’s profile.

#### &#x20;Resume Summary

You can summarize candidate profiles with a single click to highlight the relevant details in the ESS portal. Such summaries empower recruiters to swiftly extract vital details from resumes, which accelerates candidate screening, ensures timely responses, and enhances the overall application experience.

By focusing on skills and qualifications, these summaries enable objective evaluations, reduce biases and optimize the shortlisting process.

<div align="left"><figure><img src="https://4282324958-files.gitbook.io/~/files/v0/b/gitbook-x-prod.appspot.com/o/spaces%2F-MXep_PEmh8mDPVWj49x%2Fuploads%2FEB2oV9opCD7X2fS60IIY%2FResume%20Summary.png?alt=media&amp;token=3a66f403-af99-42f5-a0d2-b79125859c07" alt=""><figcaption></figcaption></figure></div>

#### Resume Parsing by Smart AI

Resume parsing extracts and organizes essential candidate information from multiple resumes, which can be selected by the user. This functionality significantly reduces manual effort, enabling recruiters to swiftly review and compare numerous applications. Parsing systems categorize details like skills, experience, and education, creating a structured database.

This structured data allows recruiters to quickly find suitable candidates. Additionally, it ensures consistency in candidate evaluation and helps in identifying top talents effectively.

<div align="left"><figure><img src="https://4282324958-files.gitbook.io/~/files/v0/b/gitbook-x-prod.appspot.com/o/spaces%2F-MXep_PEmh8mDPVWj49x%2Fuploads%2F3xHgl1HSq7Hexb7gZTsc%2FResume%20Parsing%20by%20Smart%20AI.png?alt=media&amp;token=fa3fb805-be80-4d59-be58-29fc5e6f0c77" alt=""><figcaption></figcaption></figure></div>

#### Smart AI in HR Letters

Smart AI HR letters allow you to instantly generate various templates such as Transfer Letters, Warning Letters, Welcome Letters, and more. It also allows you to generate customized letters according to your needs, saving you time and effort.

<div align="left"><figure><img src="https://4282324958-files.gitbook.io/~/files/v0/b/gitbook-x-prod.appspot.com/o/spaces%2F-MXep_PEmh8mDPVWj49x%2Fuploads%2FGGbhQ0U5fUCUEVbAHzRw%2FSmart%20AI%20in%20HR%20Letters.png?alt=media&amp;token=49cb4fe5-534a-4ec0-977f-e394908f3285" alt=""><figcaption></figcaption></figure></div>

### Set Validity for Offer Letters

With this new feature, when a recruiter sends an offer letter to a candidate, they can set a deadline for the candidate to accept the job. For example, the deadline might be stated as "Offer Letter Acceptance Deadline will be \[date]."

This feature helps companies create a sense of urgency by ensuring a clear and well-defined timeframe for candidates to respond. It streamlines the hiring process, making it more organized and efficient.&#x20;

<div align="left"><figure><img src="https://4282324958-files.gitbook.io/~/files/v0/b/gitbook-x-prod.appspot.com/o/spaces%2F-MXep_PEmh8mDPVWj49x%2Fuploads%2FCh3HJNqmg8TDq30fDN7a%2FSet%20Validity%20for%20Offer%20Letters.png?alt=media&amp;token=59706509-43cc-4c51-b2ad-a24ce7bd041e" alt=""><figcaption></figcaption></figure></div>

<div align="left"><figure><img src="https://4282324958-files.gitbook.io/~/files/v0/b/gitbook-x-prod.appspot.com/o/spaces%2F-MXep_PEmh8mDPVWj49x%2Fuploads%2FfZG5dHKCuUxwmkOUsq75%2FSet%20Validity%20for%20Offer%20Letters2.png?alt=media&amp;token=c780c63f-b8ce-4e2a-9bd8-04694853ae6a" alt=""><figcaption></figcaption></figure></div>

<div align="left"><figure><img src="https://4282324958-files.gitbook.io/~/files/v0/b/gitbook-x-prod.appspot.com/o/spaces%2F-MXep_PEmh8mDPVWj49x%2Fuploads%2FDD1lKqq4cyeLfZpU1UMP%2FSet%20Validity%20for%20Offer%20Letters3.png?alt=media&amp;token=fc1240a4-1bb4-44f8-9627-eaf73922c66e" alt=""><figcaption></figcaption></figure></div>

### Multiple Managers in Appraisal Questions & Manager Data

The appraisal report has been improved to display data for all managers. The candidates will be able to see responses and ratings by all the managers providing them a comprehensive view for their appraisal.

<div align="left"><figure><img src="https://4282324958-files.gitbook.io/~/files/v0/b/gitbook-x-prod.appspot.com/o/spaces%2F-MXep_PEmh8mDPVWj49x%2Fuploads%2FXrplrBM9q33ZGyCzyIgj%2FMultiple%20Managers%20in%20Appraisal%20Questions%20%26%20Manager%20Data.png?alt=media&amp;token=d9f76b6c-1b0b-4a5a-aba7-d37fff522aee" alt=""><figcaption></figcaption></figure></div>

<div align="left"><figure><img src="https://4282324958-files.gitbook.io/~/files/v0/b/gitbook-x-prod.appspot.com/o/spaces%2F-MXep_PEmh8mDPVWj49x%2Fuploads%2FM8aI76yd8jLnd41qzQJ2%2FMultiple%20Managers%20in%20Appraisal%20Questions%20%26%20Manager%20Data2.png?alt=media&amp;token=db1591a5-8a20-446b-bd40-43b463cd8ca9" alt=""><figcaption></figcaption></figure></div>

### Map Column in Punch In-Out Report

We have also introduced a map icon to our punch-in and punch-out reports. Now, users can easily click on the map icon in the report to view their specific punch location on the map. It enables users to visualize employees’ locations directly on the map.

It simplifies tracking employee movements, making it easier to monitor work patterns and ensure everyone is where they are required to be. Understanding the geographical distribution of their workforce helps businesses allocate resources accordingly.<br>

<div align="left"><figure><img src="https://4282324958-files.gitbook.io/~/files/v0/b/gitbook-x-prod.appspot.com/o/spaces%2F-MXep_PEmh8mDPVWj49x%2Fuploads%2FtcupxjF0so6aHQa68Qgj%2FMap%20Column%20in%20Punch%20In-Out%20Report.png?alt=media&amp;token=cc0b6701-b9ed-476e-95fa-599d2c7adc62" alt=""><figcaption></figcaption></figure></div>

<div align="left"><figure><img src="https://4282324958-files.gitbook.io/~/files/v0/b/gitbook-x-prod.appspot.com/o/spaces%2F-MXep_PEmh8mDPVWj49x%2Fuploads%2FuvJyhnwoxaSBu3LO9oAx%2FMap%20Column%20in%20Punch%20In-Out%20Report2.png?alt=media&amp;token=b72cd6e6-2baa-4868-bf89-88ab9a7c8217" alt=""><figcaption></figcaption></figure></div>

For any queries, contact <support@pockethrms.com>


# August 2023

We’re excited to introduce a powerful new update to Pocket HRMS that will greatly benefit our users. The introduction of these updates showcases our commitment to continually improving and refining Pocket HRMS for better user experience and productivity.

### &#x20;Enhancing Privacy and Transparency through CC and BCC Fields

Now you can use CC (Carbon Copy) and BCC (Blind Carbon Copy) fields in HR letters. These fields allow additional recipients in an email improving communication by ensuring that the right people stay informed. It also increases efficiency allowing you to send a single email to multiple recipients saving time and effort.

\
CC helps to keep everyone in the loop, sharing information widely, or documenting who has been informed about a specific matter. It is a great tool to build accountability for being informed.

\
BCC offers an extra layer of privacy keeping recipients' email addresses and identities hidden from the other recipients. This is valuable when sending sensitive or confidential information. Recipients in the BCC field won’t receive replies from other recipients, reducing email clutter of unnecessary responses.

<div align="left"><figure><img src="https://4282324958-files.gitbook.io/~/files/v0/b/gitbook-x-prod.appspot.com/o/spaces%2F-MXep_PEmh8mDPVWj49x%2Fuploads%2FXMej8P1XLotwZxNeA1HN%2FAug1.png?alt=media&amp;token=887693fc-b718-4915-94b5-95590e3e2663" alt=""><figcaption></figcaption></figure></div>

### Simplified Break Shift Report

The reports enable you to download the details for multiple IN-OUT punches. To maintain accuracy and consistency in tracking attendance, the Total Punch Count should be even. The system intelligently assigns the first punch as IN, the second punch as OUT, and so on, making it easy to interpret attendance records.

\
That increases comprehensiveness as it includes fields such as productive hours, permitted hours, additional hours and short hours. That results in simplified monitoring working hours. The report becomes especially important for companies where we break working shifts into small bunches of working hours such as in the hospitality industry.

\
**1. Productive Hours**

The column makes it seamless to track and calculate the total working hours of each employee, providing a number for total working hours through various shifts.

\
**2. Permitted Hours**

The value indicates the ideal working hours for the employees. That makes it easier to understand if employees are adhering to the assigned shift hours.

#### **3. Additional Hours**

This field helps show value for extra hours the employee worked, making it easier for you to identify and compensate for their effort.

#### 4. Short Hours

Detect differences between the permitted hours and actual productive hours. This can be crucial for addressing attendance issues and improving scheduling accuracy.

<div align="left"><figure><img src="https://4282324958-files.gitbook.io/~/files/v0/b/gitbook-x-prod.appspot.com/o/spaces%2F-MXep_PEmh8mDPVWj49x%2Fuploads%2FPVrraDdU1bBCtNWmV0Ha%2FAug2.png?alt=media&amp;token=07712643-1529-4033-be59-1fec2a1a527e" alt=""><figcaption></figcaption></figure></div>

<div align="left"><figure><img src="https://4282324958-files.gitbook.io/~/files/v0/b/gitbook-x-prod.appspot.com/o/spaces%2F-MXep_PEmh8mDPVWj49x%2Fuploads%2FTEAOBw5y2qtH6iQ0md4Z%2FAug3.png?alt=media&amp;token=0eee4715-d68c-44b1-bfe4-439781ae7632" alt=""><figcaption></figcaption></figure></div>

### Flexibility in Leave Remark

In the leave configuration page, you make it mandatory or keep it optional for employees to mention ‘Leave Remarks’ to submit a leave request providing you better flexibility over the leave request process.

* Mandatory Leave Remark

It promotes transparency in the leave request process and helps in making informed decisions regarding approval. It improves communication as managers can discuss any potential issues or concerns related to the leave request.

* Optional Leave Remark

This simplifies the leave request process and makes it more user-friendly and less cumbersome for both employees and HR personnel. It also shows respect for employee privacy which can lead to a more positive work culture and higher job satisfaction.

<div align="left"><figure><img src="https://4282324958-files.gitbook.io/~/files/v0/b/gitbook-x-prod.appspot.com/o/spaces%2F-MXep_PEmh8mDPVWj49x%2Fuploads%2FrqPuHGgc0hoyWJ5LTOIe%2FAug4.png?alt=media&amp;token=7a6950a2-cfaf-4974-9d55-3c58fe51b699" alt=""><figcaption></figcaption></figure></div>

### Insightful IN and OUT Reports

Now you can look into the IN and OUT details of employees with the Detailed Report and Status Report. The four new columns In Location, Out Location, Attendance, and Status enhance understanding and the status report makes it easier to take a glance.

The Detailed Report provides more comprehensive insights into attendance as it shows you data for columns In Location, and Out Location making it easier to monitor if the employee were at the location that they were expected to be.

#### Status Report

<div align="left"><figure><img src="https://4282324958-files.gitbook.io/~/files/v0/b/gitbook-x-prod.appspot.com/o/spaces%2F-MXep_PEmh8mDPVWj49x%2Fuploads%2FQiB6YAENHr23teQyRxXu%2FAug5.png?alt=media&amp;token=750a6b3e-8f73-4d51-9128-5e782c44f13a" alt=""><figcaption></figcaption></figure></div>

#### Detailed Report

<div align="left"><figure><img src="https://4282324958-files.gitbook.io/~/files/v0/b/gitbook-x-prod.appspot.com/o/spaces%2F-MXep_PEmh8mDPVWj49x%2Fuploads%2FbQQU3AC9KiJ0qHA6vkty%2FAug6.png?alt=media&amp;token=ddcc6fa7-fe38-4b68-a14f-1e0302a5fd5c" alt=""><figcaption></figcaption></figure></div>

#### Detailed Report

<div align="left"><figure><img src="https://4282324958-files.gitbook.io/~/files/v0/b/gitbook-x-prod.appspot.com/o/spaces%2F-MXep_PEmh8mDPVWj49x%2Fuploads%2FF0qr1XzmpTCilOZKN48k%2FAug7.png?alt=media&amp;token=ee4ce69b-abea-4212-a043-a358ac9cef8f" alt=""><figcaption></figcaption></figure></div>

<div align="left"><figure><img src="https://4282324958-files.gitbook.io/~/files/v0/b/gitbook-x-prod.appspot.com/o/spaces%2F-MXep_PEmh8mDPVWj49x%2Fuploads%2Fj3XrbHMMWBehUpqk1kIh%2FAug8.png?alt=media&amp;token=be36a752-703d-45ba-afdf-bc3c9d31b796" alt=""><figcaption></figcaption></figure></div>

### Detailed Attendance Report

Pocket HRMS upgraded all types of reports within the attendance report wizard with new insightful columns such as working hours, attendance and status.

#### 1. Working Hours

This column shows the cumulative duration of hours worked for each recorded attendance entry. The working hour column allows HR and management to track employee attendance more closely.

This can help identify trends such as late arrivals, early departures, or excessive absences, enabling proactive management interventions. It also makes it easy to identify overtime done by the employee.

#### 2. Status

The “Status” column shows the attendance status marked as ‘Present’, ’Absent’ or the other relevant status accordingly. The “Status” column allows you to track employee attendance by quickly glancing at this column.

#### 3. Attendance

The “Attendance” column showcases the attendance status in short abbreviations for each individual entry, for example; FH/Leave Type/Shift Name – FH/CL/GS. This gives you details on the shift they are working in or additional information such as if the employee is working outside the office.

Similarly, the attendance column also shows the type of leave the employee is taking with abbreviation which can help in workforce adjustment immediately.

<div align="left"><figure><img src="https://4282324958-files.gitbook.io/~/files/v0/b/gitbook-x-prod.appspot.com/o/spaces%2F-MXep_PEmh8mDPVWj49x%2Fuploads%2FdgTW4oHbt7JHeriCdlhI%2FAug9.png?alt=media&amp;token=2e2b9a1a-a7b7-459b-842b-f05133b76f61" alt=""><figcaption></figcaption></figure></div>

<div align="left"><figure><img src="https://4282324958-files.gitbook.io/~/files/v0/b/gitbook-x-prod.appspot.com/o/spaces%2F-MXep_PEmh8mDPVWj49x%2Fuploads%2F6eHFw8JzCJZtme3Mhs68%2FAug10.png?alt=media&amp;token=a31969aa-2365-4bc6-8c3a-177e692100ef" alt=""><figcaption></figcaption></figure></div>

### Over Time can be Claimed as Comp Off

Now you can allow your employees to accumulate their overtime working hours on weekends to be claimed as compensatory time off or comp off. That way employees can get a comp off when they complete a set number of overtime hours.

<div align="left"><figure><img src="https://4282324958-files.gitbook.io/~/files/v0/b/gitbook-x-prod.appspot.com/o/spaces%2F-MXep_PEmh8mDPVWj49x%2Fuploads%2FOkf1OhujCYRngy7XrmQ9%2FAug11.png?alt=media&amp;token=f1fd96c2-6ceb-4ff1-8ae5-5fe28f3c44e5" alt=""><figcaption></figcaption></figure></div>

<div align="left"><figure><img src="https://4282324958-files.gitbook.io/~/files/v0/b/gitbook-x-prod.appspot.com/o/spaces%2F-MXep_PEmh8mDPVWj49x%2Fuploads%2FLSuUSewpTuXzAq60vuHs%2FAug12.png?alt=media&amp;token=c71cc545-b8f2-4ed6-9ee4-9ca86d25c533" alt=""><figcaption></figcaption></figure></div>

<div align="left"><figure><img src="https://4282324958-files.gitbook.io/~/files/v0/b/gitbook-x-prod.appspot.com/o/spaces%2F-MXep_PEmh8mDPVWj49x%2Fuploads%2F7C0Wit6ygViH2AyD1tt2%2FAug13.png?alt=media&amp;token=e3aa5207-1bc8-4a83-92ce-7264589eb3db" alt=""><figcaption></figcaption></figure></div>

<div align="left"><figure><img src="https://4282324958-files.gitbook.io/~/files/v0/b/gitbook-x-prod.appspot.com/o/spaces%2F-MXep_PEmh8mDPVWj49x%2Fuploads%2FlySAuHieOVJ7GcQmrILo%2FAug14.png?alt=media&amp;token=5e1c4e8f-8f6b-4501-8167-2a1bd407ad31" alt=""><figcaption></figcaption></figure></div>

### Enhanced Control Over Leave Request

The Leave Lock Feature is a valuable addition to our leave management system that empowers administrators to enhance control over employee leave requests.

When the “Leave Lock” checkbox is enabled in the leave configuration settings, it introduces a set of restrictions and options that govern how employees can apply for leave within the defined leave cycle. This feature provides flexibility while ensuring compliance with organizational leave policies.<br>

<div align="left"><figure><img src="https://4282324958-files.gitbook.io/~/files/v0/b/gitbook-x-prod.appspot.com/o/spaces%2F-MXep_PEmh8mDPVWj49x%2Fuploads%2FsENvGPwlr7pSWX8Isa8l%2FAug15.png?alt=media&amp;token=7dbffe72-15c0-4881-a375-270e6be10d6b" alt=""><figcaption></figcaption></figure></div>

<div align="left"><figure><img src="https://4282324958-files.gitbook.io/~/files/v0/b/gitbook-x-prod.appspot.com/o/spaces%2F-MXep_PEmh8mDPVWj49x%2Fuploads%2FEn0SycDffR5LtN0xTS7N%2FAug16.png?alt=media&amp;token=72d16d21-0b9a-4b21-80e1-7d1180220187" alt=""><figcaption></figcaption></figure></div>

For any queries, contact <support@pockethrms.com>


# July 2023

To deliver the best user experience you need to constantly ensure that your software offers the best. That means continuously improving the features and enabling higher convenience and speed. Here is an overview of our July enhancement in Pocket HMRS endeavour to excellence.

### Seamless Auto-Log in Across Companies

Managers can now auto-login to view the candidate shared with them without going in and out of multiple accounts they hold. You can use the ‘Merge Account’ feature to allow manager auto login for multiple companies.

For Example:

Consider, that a manager is logged into the ‘Company A’ account and someone has shared a candidate with him in the ‘Company B’ account. Managers will get Auto Login into the ‘Company B’ account once they click on the shared link.

That eliminates the entire manual process of logging out of ‘Company A’ followed by logging in ‘Company B’ to view the shared candidate information.

<div align="left"><figure><img src="https://4282324958-files.gitbook.io/~/files/v0/b/gitbook-x-prod.appspot.com/o/spaces%2F-MXep_PEmh8mDPVWj49x%2Fuploads%2FWiQ7oaIKrEe8v5qm1tZT%2FJuly1.png?alt=media&amp;token=15d14957-0cc7-4866-b7a9-60bdb9b0b057" alt=""><figcaption></figcaption></figure></div>

### Effective Recruiter Allocation by Manager

The final level manager or the last level manager can assign a Recruiter and the new recruiter gets a notification for the same. That ensures that the right recruiters with appropriate skills and expertise are handling specific recruitment tasks.

The prompt notification of the newly assigned responsibility allows them to act quickly. It also creates accountability and transparency as everyone involved knows who is responsible for each task.

<div align="left"><figure><img src="https://4282324958-files.gitbook.io/~/files/v0/b/gitbook-x-prod.appspot.com/o/spaces%2F-MXep_PEmh8mDPVWj49x%2Fuploads%2FCzzj3qwgsfa5iHHvUOza%2FJuly2.png?alt=media&amp;token=f7ce43db-7c82-4057-9726-9f78fc65065b" alt=""><figcaption></figcaption></figure></div>

### Simplified ESS Update Approvals

If an employee has updated any information through the ESS portal that particular change will go for approval to HR. This will make update approvals clutter-free for HR as they will only see the fields where the employee has made some changes from the employee profile.

<div align="left"><figure><img src="https://4282324958-files.gitbook.io/~/files/v0/b/gitbook-x-prod.appspot.com/o/spaces%2F-MXep_PEmh8mDPVWj49x%2Fuploads%2FvzsYEXhg0DCVNYSWtvee%2FJuly3.png?alt=media&amp;token=f7568563-25b8-45c2-bf86-4559aa892373" alt=""><figcaption></figcaption></figure></div>

### End-to-End Candidate Overview

We have updated several tracker reports to give you more insights into the valuable information you seek.

#### ➔ Effective Referral Assessment

With this report, you can track the effectiveness of the company’s employees referral program. The report shows an overview of the candidates that were referred by employees, partners and other members of the company’s network. That makes it easier to assess the quality of candidates referred by internal or external sources.

<div align="left"><figure><img src="https://4282324958-files.gitbook.io/~/files/v0/b/gitbook-x-prod.appspot.com/o/spaces%2F-MXep_PEmh8mDPVWj49x%2Fuploads%2F1xDY5HszL157Z1aHAPpq%2FJuly4.png?alt=media&amp;token=b7bf8dfa-9d92-4b68-bd5a-2e8f70eb4c27" alt=""><figcaption></figcaption></figure></div>

#### ➔ Navigate Candidate Progress

The candidate tracker report provides detailed information on candidates that an organization is considering for various job roles. It helps you to track candidates’ progress through various stages in recruitment. It will help recruiters, managers and other stakeholders to make the hiring process more organized and make informed decisions.

<div align="left"><figure><img src="https://4282324958-files.gitbook.io/~/files/v0/b/gitbook-x-prod.appspot.com/o/spaces%2F-MXep_PEmh8mDPVWj49x%2Fuploads%2FL5gqHOI2bM2aAy7lcPZe%2FJuly5.png?alt=media&amp;token=74002b29-c4ad-4b74-95d8-7c4598b5cf8d" alt=""><figcaption></figcaption></figure></div>

#### ➔ Transparent Candidate Offers

This report provides an overview of job offers extended to the candidates during the recruitment process. This helps HR professionals, hiring managers, and other stakeholders involved in the recruitment process to track and manage candidate offers.

This way it becomes easier to maintain transparency and consistency in the job offers while maintaining compliance with relevant regulations as well as company policies.

<div align="left"><figure><img src="https://4282324958-files.gitbook.io/~/files/v0/b/gitbook-x-prod.appspot.com/o/spaces%2F-MXep_PEmh8mDPVWj49x%2Fuploads%2FJcwz2LjBKExkEbATv8SU%2FJuly6.png?alt=media&amp;token=356d96e8-5293-456d-9a8d-58146eb46e26" alt=""><figcaption></figcaption></figure></div>

### Deadline-Oriented Attendance Requests

You can now set a deadline for the number of days within which employees can request Regularization/On duty.

For example, if the limit is set at 5, then an employee can request regularization/on duty within 5 days only and won’t be able to apply for it after that.

<div align="left"><figure><img src="https://4282324958-files.gitbook.io/~/files/v0/b/gitbook-x-prod.appspot.com/o/spaces%2F-MXep_PEmh8mDPVWj49x%2Fuploads%2FueTf7zLDB3r2jUGGHj7V%2FJuly7.png?alt=media&amp;token=85b9dea5-582f-4ace-8601-cc22fbfa17f0" alt=""><figcaption></figcaption></figure></div>

### Improved Performance Analytics

Now you will get a better perspective with our updated appraisal reports as we made it more informative and comprehensive by adding more useful data.

#### ➔ Enhanced Performance Report

Now, you’ll find new columns like Parameter Marks, Marks, Calculated Weightage, and Final Rating (the final rating will appear according to the configuration). These changes are designed to make the appraisal reports much clearer and easier to understand.

<div align="left"><figure><img src="https://4282324958-files.gitbook.io/~/files/v0/b/gitbook-x-prod.appspot.com/o/spaces%2F-MXep_PEmh8mDPVWj49x%2Fuploads%2FUW8x47hFfF2VliZH4NKb%2FJuly8.png?alt=media&amp;token=c9e77c5c-50f6-4c90-9642-9e6637bb5e30" alt=""><figcaption></figcaption></figure></div>

#### ➔ In-Depth Performance Review

In the new detailed report – KPI/Questions, weightage, weighted score, Average Manager Rating, Final Rating, Employee Review, Manager Review, Manager Review 2. That gives you more information on the employee performance.

<div align="left"><figure><img src="https://4282324958-files.gitbook.io/~/files/v0/b/gitbook-x-prod.appspot.com/o/spaces%2F-MXep_PEmh8mDPVWj49x%2Fuploads%2FEkWXUdtCUD94FJzIh9bT%2FJuly9.png?alt=media&amp;token=c26bab4b-09af-4575-b10f-47c9535efc9a" alt=""><figcaption></figcaption></figure></div>

#### ➔ Complete Appraisal Summary

The ‘Overall Manager Rating’ column combines and condenses the individual ratings given by managers for different sections or parameters. This single rating provides a holistic overview of the employee’s performance or other evaluated criteria.

&#x20;

<div align="left"><figure><img src="https://4282324958-files.gitbook.io/~/files/v0/b/gitbook-x-prod.appspot.com/o/spaces%2F-MXep_PEmh8mDPVWj49x%2Fuploads%2FH9Lcs1rBT4qGTcAmYVYV%2FJuly10.png?alt=media&amp;token=77cab4dd-d4c3-4407-8c62-f73fa2237227" alt=""><figcaption></figcaption></figure></div>

### Efficient Overtime Control

The Admin/HR can configure overtime (OT) hours, in the setting for working hours you will see shift timings once you select the shift name. Employees will be eligible for OT once they complete default working hours for selected shifts.

You can set the maximum OT hours allowed in a day. Additionally, you will also get an option to allow a manager to update and approve OT.

<div align="left"><figure><img src="https://4282324958-files.gitbook.io/~/files/v0/b/gitbook-x-prod.appspot.com/o/spaces%2F-MXep_PEmh8mDPVWj49x%2Fuploads%2F8ZmLZO0vVqE0zpYpwUS1%2FJuly11.png?alt=media&amp;token=e2168b14-b12d-465f-af91-b3db0c6763da" alt=""><figcaption></figcaption></figure></div>

### Personalize Candidate Data

With our new enhancement HR/Admin now can create custom fields with the ‘Field Creation’ feature. These fields will be reflected in the candidate details page in the ESS once you configure it in the Master field screen.

&#x20;

<div align="left"><figure><img src="https://4282324958-files.gitbook.io/~/files/v0/b/gitbook-x-prod.appspot.com/o/spaces%2F-MXep_PEmh8mDPVWj49x%2Fuploads%2FePTqqAtdaMAkS6ydGI6k%2FJuly12.png?alt=media&amp;token=bda8d96f-9da1-4379-aca6-c5cbe59a71b4" alt=""><figcaption></figcaption></figure></div>

### Personalize Job Data

Thanks to this improvement, HR/Admin now has the ability to generate custom fields through the “Field Creation” feature. These custom fields will seamlessly appear on the Job Details page within the Employee Self-Service (ESS) portal once you configure it in the Master field screen.

This enhancement streamlines the process of adding more information to job-related details for a smoother experience.

<div align="left"><figure><img src="https://4282324958-files.gitbook.io/~/files/v0/b/gitbook-x-prod.appspot.com/o/spaces%2F-MXep_PEmh8mDPVWj49x%2Fuploads%2FCRdgHqe1mdmxIqui8fPF%2FJuly13.png?alt=media&amp;token=3b06edd5-f41a-4182-8505-665fbee76114" alt=""><figcaption></figcaption></figure></div>

### Flexi-configuration for Leave Credits

With this enhancement for advanced leave settings, you can set varying frequencies for different leave types. In addition to that you can also set leave credit with constant or varying count. As per the frequency selected the leave types will be created.

<div align="left"><figure><img src="https://4282324958-files.gitbook.io/~/files/v0/b/gitbook-x-prod.appspot.com/o/spaces%2F-MXep_PEmh8mDPVWj49x%2Fuploads%2F6OGmzqN8XRZzngF2Pot1%2FJuly14.png?alt=media&amp;token=79e63e75-6d4f-411b-ae18-3d7655bc0f5e" alt=""><figcaption></figcaption></figure></div>

For any queries, contact <support@pockethrms.com>


# May-June 2023

Pocket HRMS understands that technology is all about giving the best possible experience and productivity to users. That drives us to constantly improve our software, so you get enhanced quality of work and increased productivity.

We take this opportunity to present you our latest and most significant updates for the month of June so you can benefit from them.

### Simplifying Attendance Summary with Colours

With this update, you will get a custom monthly attendance summary report in a more engaging format. Our user-friendly interface allows you to configure colours for different shifts, transforming complex data into a visually appealing view. Allowing you to grasp attendance patterns swiftly, promoting instant understanding without diving into intricate details.&#x20;

<div align="left"><figure><img src="https://4282324958-files.gitbook.io/~/files/v0/b/gitbook-x-prod.appspot.com/o/spaces%2F-MXep_PEmh8mDPVWj49x%2Fuploads%2FHefCjYfSF6md1fn8sXwt%2F1.jpg?alt=media&amp;token=feee68a5-07d6-4c18-b164-3fa7e58c688e" alt=""><figcaption></figcaption></figure></div>

### Graphical Shift Attendance Insights

This feature provides a clear and visual representation of shift attendance. You can easily compare actual punch counts with expected employee numbers for each shift, all presented in a graphical format.&#x20;

This visual overview offers immediate insights into attendance patterns, enabling informed staffing decisions.&#x20;

<div align="left"><figure><img src="https://4282324958-files.gitbook.io/~/files/v0/b/gitbook-x-prod.appspot.com/o/spaces%2F-MXep_PEmh8mDPVWj49x%2Fuploads%2F7q8Y10eQt2JV50AKoE7M%2F2.png?alt=media&amp;token=5877c9f7-cdcd-4fc5-8291-8610ce26b6af" alt=""><figcaption></figcaption></figure></div>

### Seamless Image Uploads for Emails

You can upload photos, essential documents, and visual materials with just a few clicks, making communication more efficient. Along with ease of uploading this feature also makes HR communication more engaging. &#x20;

<div align="left"><figure><img src="https://4282324958-files.gitbook.io/~/files/v0/b/gitbook-x-prod.appspot.com/o/spaces%2F-MXep_PEmh8mDPVWj49x%2Fuploads%2FhyMC7wwtRh2ViBfMsoQw%2F3.jpg?alt=media&amp;token=0bff53dc-db1a-4952-a6cd-350aac6acdb0" alt=""><figcaption></figcaption></figure></div>

### Hassle-Free  Merged Entries for On-Duty and Half-day

With this enhancement, employees can now request an on-duty when they work half day. The system will be showing only a punch entry until acceptance of the request. Once the request is accepted, a single entry will be shown which is a merged punch entry and on-duty entry. It simplifies the process by showing all the information in one entry after approval.&#x20;

<div align="left"><figure><img src="https://4282324958-files.gitbook.io/~/files/v0/b/gitbook-x-prod.appspot.com/o/spaces%2F-MXep_PEmh8mDPVWj49x%2Fuploads%2FRWXKMIyheKo2WGxcedQC%2F4.png?alt=media&amp;token=7af06407-0c1b-42b5-8605-57d0bb927f4c" alt=""><figcaption></figcaption></figure></div>

### Smart Customization for Comp Off Credit Eligibility.

This enhancement allows you to set rules for comp off eligibility based on predefined working hours. This means employees will only earn comp off credits when they complete the specific working hours. That ensures transparency and simplifies the comp off management process making it a hassle-free and efficient experience.

<div align="left"><figure><img src="https://4282324958-files.gitbook.io/~/files/v0/b/gitbook-x-prod.appspot.com/o/spaces%2F-MXep_PEmh8mDPVWj49x%2Fuploads%2Fo9WZvdqyCOcdg2ORG5lY%2F5.png?alt=media&amp;token=bd0f5c88-2833-4b7b-b039-493a2fe03294" alt=""><figcaption></figcaption></figure></div>

### Optimized Leave Overview for Strategic Leave Planning

With our new tracker report you get a snapshot of crucial' leave data such as opening and closing leave balances along with numbers for leaves credited, used, and debited in a single report. This detailed tracker report helps you spot trends in leave utilization for smarter, more efficient workforce management.

<div align="left"><figure><img src="https://4282324958-files.gitbook.io/~/files/v0/b/gitbook-x-prod.appspot.com/o/spaces%2F-MXep_PEmh8mDPVWj49x%2Fuploads%2FvYWtV9PLcyWj33ru91Ar%2F6.png?alt=media&amp;token=d6711b4a-f921-4718-a298-c226403267d6" alt=""><figcaption></figcaption></figure></div>

### Fast-Track Stop Payment Entries&#x20;

The feature simplifies the process of adding stop payment entries in bulk. Instead of selecting employees one by one, you can now import these entries in bulk, saving a significant amount of time and energy. That helps you to reduce manual errors and also enhance data accuracy.&#x20;

<div align="left"><figure><img src="https://4282324958-files.gitbook.io/~/files/v0/b/gitbook-x-prod.appspot.com/o/spaces%2F-MXep_PEmh8mDPVWj49x%2Fuploads%2FE9TA5JTasaLCqpBZwkqy%2F7.png?alt=media&amp;token=43cae392-8c58-49b3-ac22-e924271bbc90" alt=""><figcaption></figcaption></figure></div>

### Empowering Managers with Project-wise Timesheet

Now managers can download detailed reports that show how much time employees spend on specific projects after approvals. This means managers can see exactly how many hours are dedicated to each project.

<div align="left"><figure><img src="https://4282324958-files.gitbook.io/~/files/v0/b/gitbook-x-prod.appspot.com/o/spaces%2F-MXep_PEmh8mDPVWj49x%2Fuploads%2FjEmO0J28ORFM9R47Bnx6%2F9.png?alt=media&amp;token=addf8540-14a3-4d9f-8c5c-d8bb59b37b2f" alt=""><figcaption></figcaption></figure></div>

### Crystal-Clear Attendance Details with Raw Punch Data

The feature allows managers to get detailed raw data for in-and-out punches by their team members. This functionality is accessible through My Team Reports and Employee Reports. Managers can use the detailed punch information to identify the pattern and optimize shift schedules.

<div align="left"><figure><img src="https://4282324958-files.gitbook.io/~/files/v0/b/gitbook-x-prod.appspot.com/o/spaces%2F-MXep_PEmh8mDPVWj49x%2Fuploads%2FQuw22FY34qfMrstLlOhW%2F10.png?alt=media&amp;token=5cc6e0a2-7bd3-4dea-89d3-bcc60b7f614d" alt=""><figcaption></figcaption></figure></div>

<div align="left"><figure><img src="https://4282324958-files.gitbook.io/~/files/v0/b/gitbook-x-prod.appspot.com/o/spaces%2F-MXep_PEmh8mDPVWj49x%2Fuploads%2FLILWkbWG8ehZCaL1GRJC%2F10.2.png?alt=media&amp;token=b8ad8c74-7d71-45f2-a1ec-fe82b0c3ca51" alt=""><figcaption></figcaption></figure></div>

For any queries, contact <support@pockethrms.com>


# April 2023

Pocket HRMS Product Update April 2023

Pocket HRMS has always been committed to consistent improvement. This April we present you our latest updates that will improve your user experience further.

### 1.      Employee Joining Insights

The month-wise joining chart in Pocket HRMS provides a visual representation of the number of new employees who joined the organization every month in graphical format.&#x20;

Makes it easier for HR to grasp information and asset trends quicker so they can take suitable action. For example, they might discover that certain months consistently have higher turnover rates, prompting a closer look at onboarding or retention strategies.

<div align="left"><figure><img src="https://4282324958-files.gitbook.io/~/files/v0/b/gitbook-x-prod.appspot.com/o/spaces%2F-MXep_PEmh8mDPVWj49x%2Fuploads%2FYF0jZX9QQVp6NTeCvOHf%2F1.png?alt=media&amp;token=68af61e0-60c0-4acd-a035-a86a7ec9c93b" alt=""><figcaption></figcaption></figure></div>

### 2.      Viewing Increment Records Easily

These new fields allow HR to easily view details related to the last incremented date, the month in which the last increment occurred, and the effective date of the increment. This improved visibility helps HR professionals stay up-to-date with critical employee compensation data.

The 'Increment Register' feature allows HR to download all incremented data in a structured format saving time and effort.&#x20;

<div align="left"><figure><img src="https://4282324958-files.gitbook.io/~/files/v0/b/gitbook-x-prod.appspot.com/o/spaces%2F-MXep_PEmh8mDPVWj49x%2Fuploads%2F5KRUCgmOzTcBUzU8xpWt%2F2.jpg?alt=media&amp;token=3448d99c-cc93-4917-9ba7-c56f1e9cc0cf" alt=""><figcaption></figcaption></figure></div>

### 3.      Personalise Ticket’s Priority and Status

When the ticket is created, the user is redirected to the ticket information page as shown below. On this page, the user can change the priority and status of the ticket according to their requirement. The user can see the agent assigned to the ticket. The user and agent can also communicate with each other regarding the issue.&#x20;

<div align="left"><figure><img src="https://4282324958-files.gitbook.io/~/files/v0/b/gitbook-x-prod.appspot.com/o/spaces%2F-MXep_PEmh8mDPVWj49x%2Fuploads%2F1TjJJaYGFtnkjHWP11JH%2F3.png?alt=media&amp;token=6d44326e-2718-47a3-be80-48fae80ceaeb" alt=""><figcaption></figcaption></figure></div>

* Coming back to the My Ticket List page, the open tab shows the list of all the tickets raised by the employee. The status will be shown as either open, in progress or reopen. Similarly, the closed tab shows the list of tickets having the status as resolved and closed.
* The user can also filter the tickets using the filter option and get the data according to their requirements such as Ticket ID, Title, Status, Priority, and Tag Name.

<div align="left" data-full-width="false"><figure><img src="https://4282324958-files.gitbook.io/~/files/v0/b/gitbook-x-prod.appspot.com/o/spaces%2F-MXep_PEmh8mDPVWj49x%2Fuploads%2FeDdBCx0xKjLaDj9kizbs%2F4.png?alt=media&amp;token=f1f17f78-e38f-471f-bed8-d4fb46012183" alt=""><figcaption></figcaption></figure></div>

### 4.      Convenient Bulk Asset Mapping

The bulk asset mapping feature in Pocket HRMS allows users to map multiple assets to multiple employees. This feature is designed to save time and effort by avoiding the need to map assets to each employee separately. It's a powerful tool for HR professionals, allowing them to efficiently manage assets and streamline their workflows.

Note: If it is available, it will fill all the fields automatically. If you have multiple devices in the same category you can select the asset name to write a note for it and click on the ‘Save’ button.

<div align="left"><figure><img src="https://4282324958-files.gitbook.io/~/files/v0/b/gitbook-x-prod.appspot.com/o/spaces%2F-MXep_PEmh8mDPVWj49x%2Fuploads%2FwgH7KSt7NN1AfOZtspHw%2F4.1.png?alt=media&amp;token=c690fff6-b1dd-44fe-8063-0c6005d56b5d" alt=""><figcaption></figcaption></figure></div>

### 5.      Enhanced Assets History

We added new functionality in the employee module in which users would see ‘Assets History’. HR will have better visibility into the history of assets assigned to employees. This enhanced tracking helps in preventing asset misplacement or loss.

<div align="left"><figure><img src="https://4282324958-files.gitbook.io/~/files/v0/b/gitbook-x-prod.appspot.com/o/spaces%2F-MXep_PEmh8mDPVWj49x%2Fuploads%2FLHbNnIkyhsrzANiCb3df%2F5.png?alt=media&amp;token=aa33eeab-09b8-46f7-a253-2f148f5b6b7d" alt=""><figcaption></figcaption></figure></div>

### 6.      Easy Asset Insights

In this enhancement, the user would be able to view the “Assets Report” in the ESS portal. They will be able to view the current assets and history of assets in the “My Assets” tab. The feature makes it convenient for them to access information reducing the need for employees to contact HR or other departments for asset-related inquiries.

### 7.      Simplified Filters

With the Generic Filter options, HR can easily narrow down the list of employees based on various criteria such as Employee Status, Department, Designation, and more. This simplifies the payroll posting process, making it quicker and more efficient. HR staff can easily select and process payroll for specific groups of employees, saving time in payroll preparation.

<div align="left"><figure><img src="https://4282324958-files.gitbook.io/~/files/v0/b/gitbook-x-prod.appspot.com/o/spaces%2F-MXep_PEmh8mDPVWj49x%2Fuploads%2F70dhWpHeF4UtchUa0BWb%2F6.png?alt=media&amp;token=8c0449f0-1352-4ed2-adbc-a8feb9a8f34b" alt=""><figcaption></figcaption></figure></div>

### 8.      Effortless Approval Management

As a view-only Manager in the appraisal, the user should be able to Review the Appraisal form and Approve/Reject it, so that the appraisal is finalised.&#x20;

* Review Appraisal Settings should be enabled for a review process.
* Approval/ Reject will not impact the current appraisal process as it is for review purposes only.
* Review Approve and reject can only be done after the appraisal process is completed or else the system will give validation.
* The status of the review whether Approve/Reject including remarks will be displayed in the Admin Detailed Report.
* The remark option is optional for both approval and rejection&#x20;

Appraisal Entries of the employees’ active stage will be displayed on the Employee Appraisal Page.

<div align="left"><figure><img src="https://4282324958-files.gitbook.io/~/files/v0/b/gitbook-x-prod.appspot.com/o/spaces%2F-MXep_PEmh8mDPVWj49x%2Fuploads%2FLAlwcFMRITbmQcW1oUr2%2F7.jpg?alt=media&amp;token=9fdd9812-0838-4d3c-a2f7-835c0e30f9d9" alt=""><figcaption></figcaption></figure></div>

### 9.      Travel Module in Mobile APP

The travel module in the mobile ESS app allows employees to create travel requests, get them approved, and track travel details like ‘Travel from’, ‘Travel to’, the Purpose of travel, Departure date, Arrival date, Accommodation expenses, Miscellaneous expenses, Other details and more.&#x20;

This streamlines the entire process and also removes manual paperwork ensuring data accuracy and reducing the risk of financial discrepancies. That results in quicker decision making keeping everyone informed and maintaining transparency.&#x20;

<div align="left"><figure><img src="https://4282324958-files.gitbook.io/~/files/v0/b/gitbook-x-prod.appspot.com/o/spaces%2F-MXep_PEmh8mDPVWj49x%2Fuploads%2FDkLXLQhRuqhDCZLasqD7%2F8.png?alt=media&amp;token=c54416b0-fb89-4b39-89cc-7afee25d6d8f" alt=""><figcaption></figcaption></figure></div>

### 10. Improved Ticket Management with Sorting

The group manager can download the reports of all the tickets received in the group and can also download the reports for all the unassigned tickets by going to the ‘Unassigned Ticket Report’ tab and then applying the required filters. This makes it easier for them to efficiently manage and track the progress of tickets related to their team or department.

<div align="left"><figure><img src="https://4282324958-files.gitbook.io/~/files/v0/b/gitbook-x-prod.appspot.com/o/spaces%2F-MXep_PEmh8mDPVWj49x%2Fuploads%2FoaOxcENoYiVcEaQMS0A0%2F9.png?alt=media&amp;token=d913d04f-228d-48d1-bed2-ff19b5498001" alt=""><figcaption></figcaption></figure></div>

<div align="left"><figure><img src="https://4282324958-files.gitbook.io/~/files/v0/b/gitbook-x-prod.appspot.com/o/spaces%2F-MXep_PEmh8mDPVWj49x%2Fuploads%2FJ6vX9iqJKP10dW5zHrlq%2F10.png?alt=media&amp;token=3db766e4-33e6-4b69-94da-3ef23984e82f" alt=""><figcaption></figcaption></figure></div>

### 11. Transparent Managerial Insights

With our new update in the Confirmation Module, when the 1st level manager confirms an employee, their review, recommendation, and date are visible to the 2nd level manager which streamlines the confirmation process.&#x20;

<div align="left"><figure><img src="https://4282324958-files.gitbook.io/~/files/v0/b/gitbook-x-prod.appspot.com/o/spaces%2F-MXep_PEmh8mDPVWj49x%2Fuploads%2F8uX8HWaHrlxXUQsCLdnO%2F11.jpg?alt=media&amp;token=a283a903-2ef0-4140-8855-376d3c61fd3f" alt=""><figcaption></figcaption></figure></div>

&#x20;

### 12. Simplified Talent Management

The skill repository serves as a centralized database for storing information about the skills of employees. This makes it easy for HR managers and other relevant stakeholders to access and update skill-related information in one place

In Pocket HRMS, the skill repository is likely to be a centralized database that stores information about the skills of employees for example HTML, and CSS. The repository may include details such as the employee’s skills. HR managers can use this information to create personalized development plans for each employee and identify skill gaps and areas for improvement.

There are multiple beneficial features as described below.

• Set skills in the job title.

• Name the Skill Set

<div align="left"><figure><img src="https://4282324958-files.gitbook.io/~/files/v0/b/gitbook-x-prod.appspot.com/o/spaces%2F-MXep_PEmh8mDPVWj49x%2Fuploads%2FuRV4qgFJROH9y0O3aFFO%2F12.jpg?alt=media&amp;token=6a369494-d7e0-4318-a7f6-2a6fc1be06bd" alt=""><figcaption></figcaption></figure></div>

• User will get to set skill for the job as shown below.

<div align="left"><figure><img src="https://4282324958-files.gitbook.io/~/files/v0/b/gitbook-x-prod.appspot.com/o/spaces%2F-MXep_PEmh8mDPVWj49x%2Fuploads%2FAWrqlfwZq6yrTDYebwD1%2F13.png?alt=media&amp;token=11d59fe9-d224-4ffe-996a-4f96907982df" alt=""><figcaption></figcaption></figure></div>

• User can find the details of the particular Skill Set by clicking the eye icon.

<div align="left"><figure><img src="https://4282324958-files.gitbook.io/~/files/v0/b/gitbook-x-prod.appspot.com/o/spaces%2F-MXep_PEmh8mDPVWj49x%2Fuploads%2FM8U84Ve2V5QEdrtzNKYE%2F14.png?alt=media&amp;token=07004ded-a26e-47e2-9f73-65ec276d36fc" alt=""><figcaption></figcaption></figure></div>

• Managers can approve data with the skill set

<div align="left"><figure><img src="https://4282324958-files.gitbook.io/~/files/v0/b/gitbook-x-prod.appspot.com/o/spaces%2F-MXep_PEmh8mDPVWj49x%2Fuploads%2F2qm8wD8gFbphQnoIUH5H%2F15.jpg?alt=media&amp;token=09643ab1-e0c5-4894-bea0-95f2e94f83aa" alt=""><figcaption></figcaption></figure></div>

· After creating a job, the user will also receive an e-mail

· After clicking on Rate, A skill option, the user can rate a candidate as shown screenshot below.

<div align="left"><figure><img src="https://4282324958-files.gitbook.io/~/files/v0/b/gitbook-x-prod.appspot.com/o/spaces%2F-MXep_PEmh8mDPVWj49x%2Fuploads%2FydAlQwOrr6LnTdG0U0ZM%2F16.png?alt=media&amp;token=632763aa-5d62-4d36-b9ce-2508ac3a4207" alt=""><figcaption></figcaption></figure></div>

· On the Career page, the user will get the all job details with the Skill Description.

<div align="left"><figure><img src="https://4282324958-files.gitbook.io/~/files/v0/b/gitbook-x-prod.appspot.com/o/spaces%2F-MXep_PEmh8mDPVWj49x%2Fuploads%2FDe32JrEQUcav6do1OUg4%2F17.png?alt=media&amp;token=0b3e2ee4-e350-4e6a-9784-28ab122168c8" alt=""><figcaption></figcaption></figure></div>

·  User can also track the activity record of the candidate in the candidate Timeline

<div align="left"><figure><img src="https://4282324958-files.gitbook.io/~/files/v0/b/gitbook-x-prod.appspot.com/o/spaces%2F-MXep_PEmh8mDPVWj49x%2Fuploads%2FPsPAZPUrJckXJmJOsHuv%2F18.png?alt=media&amp;token=40d3b1b7-eb4d-40a8-beb8-bfe212918984" alt=""><figcaption></figcaption></figure></div>

· The candidate’s skill details will reflect on a particular employee profile after onboarding.

<div align="left"><figure><img src="https://4282324958-files.gitbook.io/~/files/v0/b/gitbook-x-prod.appspot.com/o/spaces%2F-MXep_PEmh8mDPVWj49x%2Fuploads%2FSV6RXU2BcHJCm5GCtkmd%2F19.png?alt=media&amp;token=ddd30237-7e01-4997-a35d-6f4030c2d3ca" alt=""><figcaption></figcaption></figure></div>


# March 2023

Pocket HRMS has always been dedicated to providing our users with the best possible features and continuously improving the user experience. Aligning with our commitment to being the best in the company here we showcase some major and minor improvements in March 2023, to enhance the efficiency further.

Here is the key highlight of the features we are going to discuss in the blog,

### 1. Streamline Employee Confirmation

With our new update, remarks and recommendations of ‘Manager 1’ will be visible to ‘Manager2’ about confirming employees or extending their probation period. That keeps the transparency for the level 2 manager and helps them to make an informed decision. It contributes to effective probation management ensuring that the company has the right employees for efficiency

For example, if an employee's performance needs improvement, 'Manager 2' can

extend the probation period based on the feedback from 'Manager 1,' ensuring that the right decisions are made for the company's growth.

&#x20;

<div align="left"><figure><img src="https://4282324958-files.gitbook.io/~/files/v0/b/gitbook-x-prod.appspot.com/o/spaces%2F-MXep_PEmh8mDPVWj49x%2Fuploads%2F0vyznZHf2VU6T0L0MYT3%2F1.jpg?alt=media&amp;token=82cc1968-05e5-4201-b3ff-a0ca61dff859" alt="" width="375"><figcaption></figcaption></figure></div>

### &#x20;2. Half-Day Leave Tracker / Effortless Half-Day Tracking

This update makes tracking partial-day leaves and attendance much easier! If an employee takes half a day off, we display '0.5' in the leave column. Similarly, the 'Physical Present' column shows '0.5' when they are present for the other half of the day. This simple update ensures accurate leave records and attendance tracking, ensuring employees use their entitled leave days effectively.

<div align="left"><figure><img src="https://4282324958-files.gitbook.io/~/files/v0/b/gitbook-x-prod.appspot.com/o/spaces%2F-MXep_PEmh8mDPVWj49x%2Fuploads%2FKJ1Ks29clSezwnmiEW3D%2F2.1.png?alt=media&amp;token=ab5d8d9e-7848-4e98-b105-0ca99ddbfc77" alt=""><figcaption></figcaption></figure></div>

Muster’s report showcases a present-day 0.5 for his attendance.

<div align="left"><figure><img src="https://4282324958-files.gitbook.io/~/files/v0/b/gitbook-x-prod.appspot.com/o/spaces%2F-MXep_PEmh8mDPVWj49x%2Fuploads%2FbfNU4B9Uh4fLddJ5FG5M%2F2.2.png?alt=media&amp;token=7cd79e1f-75c5-46fb-91e8-79a33c18c295" alt=""><figcaption></figcaption></figure></div>

ESS employee portal showcases No. of days 0.5 for half-day leave.

### 3. Comprehensive Time Card Tracking <a href="#a3wu5gds28r2" id="a3wu5gds28r2"></a>

This feature helps you to easily download a detailed staff time card report. This report includes essential employee information like their Shift Time, Punch Time, Late By, and any additional Remarks about their shift including Absent and Present, making tracking and managing workforce attendance a breeze.

<div align="left"><figure><img src="https://4282324958-files.gitbook.io/~/files/v0/b/gitbook-x-prod.appspot.com/o/spaces%2F-MXep_PEmh8mDPVWj49x%2Fuploads%2Fafd2iPnkgA3CiapheVZ5%2F3.1.png?alt=media&amp;token=3e2e4340-eb2c-439c-8fcb-729acceb9bf7" alt=""><figcaption></figcaption></figure></div>

<div align="left"><figure><img src="https://4282324958-files.gitbook.io/~/files/v0/b/gitbook-x-prod.appspot.com/o/spaces%2F-MXep_PEmh8mDPVWj49x%2Fuploads%2FfWq7gXwvO23Sz0PaFGYc%2F3.2.png?alt=media&amp;token=a641748d-ba13-4196-9a1f-5bd6d16c7bf1" alt=""><figcaption></figcaption></figure></div>

### 4. Flexible Late Arrival Deductions

HR can set rules specific to the different time ranges in the late arrivals. This means there can be different rules for the deductions for corresponding time ranges.

For example, if an employee is late by 15 minutes, half an hour will be deducted. If an employee is late by 30 minutes, one hour will be deducted from the total working hours. These rules can be seamlessly applied to payroll calculations, ensuring accurate deductions.

HR professionals can use this feature to enforce fair and consistent late arrival deductions. Setting specific rules helps in ensuring a level playing field and maintaining discipline in the workplace. By automatically applying the defined rules to latecomers, payroll calculations become precise, saving time and resources for the business.

<div align="left"><figure><img src="https://4282324958-files.gitbook.io/~/files/v0/b/gitbook-x-prod.appspot.com/o/spaces%2F-MXep_PEmh8mDPVWj49x%2Fuploads%2F0Ah38OtfiBoO5pIDmNP0%2Fmarch4.1.png?alt=media&amp;token=38965105-7e4c-4aa9-8cf2-38555c9543f1" alt=""><figcaption></figcaption></figure></div>

<div align="left"><figure><img src="https://4282324958-files.gitbook.io/~/files/v0/b/gitbook-x-prod.appspot.com/o/spaces%2F-MXep_PEmh8mDPVWj49x%2Fuploads%2FIMPpuzW4pKrAZf6ESxvH%2F4.2.png?alt=media&amp;token=ceb2f7ec-7843-424b-b9c5-3e44123974a1" alt=""><figcaption></figcaption></figure></div>

### &#x20;5. Accessible Ratings and Feedback

Using the Employee Self-Service (ESS) portal, employees can view detailed reports on the ratings they receive and download them, providing transparency and feedback at their fingertips.

Making ratings transparent and accessible to employees, makes it easier for employees to understand their strengths and areas for improvement.&#x20;

<div align="left"><figure><img src="https://4282324958-files.gitbook.io/~/files/v0/b/gitbook-x-prod.appspot.com/o/spaces%2F-MXep_PEmh8mDPVWj49x%2Fuploads%2FAB2qCbpeLh5LjUWqJ2o0%2F5.1.png?alt=media&amp;token=5026f5d4-f0f6-4749-8d72-bac7e2057596" alt=""><figcaption></figcaption></figure></div>

<div align="left"><figure><img src="https://4282324958-files.gitbook.io/~/files/v0/b/gitbook-x-prod.appspot.com/o/spaces%2F-MXep_PEmh8mDPVWj49x%2Fuploads%2FqGLXLvLwhSdhAJzVkU83%2F5.2.png?alt=media&amp;token=ecccde65-525e-4379-bfd2-c5baef467b4b" alt=""><figcaption></figcaption></figure></div>

### 6. Easy to Access HR/Admin Ratings <a href="#hwd13lixlaja" id="hwd13lixlaja"></a>

Now Admin/HR can easily download and review employee ratings given by them to employees from the Cloud Portal. This feature simplifies performance evaluation, making it convenient to track and assess employee performance.

By analyzing ratings given to employees over time HR can conduct data-driven performance reviews, enabling them to make informed decisions about training, promotions, and recognition programs.&#x20;

<div align="left"><figure><img src="https://4282324958-files.gitbook.io/~/files/v0/b/gitbook-x-prod.appspot.com/o/spaces%2F-MXep_PEmh8mDPVWj49x%2Fuploads%2FPjHTESuLOdTymzCNyvTq%2F6.1.png?alt=media&amp;token=929d47ca-9d86-46da-923f-ccf2ea6055bc" alt=""><figcaption></figcaption></figure></div>

### 7. Simplified Filters for Attendance Export

Our new update allows HR/Admin to easily filter and generate monthly attendance reports. You can filter by various criteria like job title, department, location, bank name, and more. Once filtered, the reports can be exported effortlessly, simplifying attendance tracking for your team.

Filtered attendance data based on location or cost center, HR can identify areas with fluctuating attendance, enabling them to redistribute resources effectively. This ensures that all departments have adequate staffing levels, enhancing productivity and customer service.

<div align="left"><figure><img src="https://4282324958-files.gitbook.io/~/files/v0/b/gitbook-x-prod.appspot.com/o/spaces%2F-MXep_PEmh8mDPVWj49x%2Fuploads%2FAKnR3YWI11S0VR9Etg3z%2Fmarch7.jpg?alt=media&amp;token=f6ca3986-27c9-4c20-bd8c-d74a356e4e15" alt=""><figcaption></figcaption></figure></div>

### 8. Customizable Late Mark Indicator

Our latest update makes it easier to track late marks.  Late times are shown in black, but if someone exceeds allowed late marks (configurable based on company rules), it's displayed in red. This customizable feature helps maintain workplace punctuality standards and makes it easier to grasp the late marks information.

The red colour indicator highlights violations, allowing HR to address attendance issues promptly. This maintains a professional work environment, setting a standard for employees and fostering a culture of accountability.

<div align="left"><figure><img src="https://4282324958-files.gitbook.io/~/files/v0/b/gitbook-x-prod.appspot.com/o/spaces%2F-MXep_PEmh8mDPVWj49x%2Fuploads%2F2g8OtdfipBPKRxrQAOFS%2F8.1.jpg?alt=media&amp;token=96e74e1f-9ff6-42bc-a4af-314ea65d8b6d" alt=""><figcaption></figcaption></figure></div>

&#x20;


# February 2023

Introducing our latest enhancements designed to optimize your HR processes. HR professionals and Administrators can now effortlessly download candidate documents with a single click, streamlining the hiring process. Explore a range of job types, enhancing job role alignment with expertise and company needs.&#x20;

Additionally, simplify interview scheduling by sending invitations to multiple recipients at once, saving valuable time for both recruiters and applicants. For the month of February, we have the following Updates that promise to enhance operational efficiency and streamline your recruitment efforts.

### Automated Shift Assignments

Our latest update introduces the 'Auto Assign Shift Import Time' option, making shift management effortless for HR and Administrators. Now, you can easily set 'In' and 'Out' punch time ranges, automating the shift assignment process with just a few clicks.

Business owners can automate shift assignments, eliminating the need for manual adjustments. HR professionals can define precise shift timings, ensuring employees' schedules align seamlessly with business needs. This accuracy prevents scheduling conflicts and enhances overall workforce efficiency.

<div align="left"><figure><img src="https://4282324958-files.gitbook.io/~/files/v0/b/gitbook-x-prod.appspot.com/o/spaces%2F-MXep_PEmh8mDPVWj49x%2Fuploads%2FLizt7ZsLruu875IXqNM2%2F1.1.png?alt=media&amp;token=3cd6e5e2-595b-4af7-bd30-41d827d21410" alt=""><figcaption></figcaption></figure></div>

<div align="left"><figure><img src="https://4282324958-files.gitbook.io/~/files/v0/b/gitbook-x-prod.appspot.com/o/spaces%2F-MXep_PEmh8mDPVWj49x%2Fuploads%2Fm7Ta1VYjcaTQQ0bUXGxw%2F1.2.png?alt=media&amp;token=22be924a-5a57-4f0e-a447-6cc1e218e79c" alt=""><figcaption></figcaption></figure></div>

### Automated Shift Adjustments for Single Punch

With our intuitive Auto-Scheduler feature, Pocket HRMS simplifies shift management effortlessly. When an employee arrives within their designated shifts and makes a single punch, the system automatically synchronizes their time, reducing administrative workload.

For example, if an employee arrives somewhere in the middle of their assigned shift hours (for instance, 09 AM – 05:30 PM) and records a single IN/OUT punch, our system automatically updates the shift timing against the employee’s Time IN/OUT punch. This smart automation eliminates the need for manual adjustments, ensuring precise time tracking without the hassle.

<div align="center"><figure><img src="https://4282324958-files.gitbook.io/~/files/v0/b/gitbook-x-prod.appspot.com/o/spaces%2F-MXep_PEmh8mDPVWj49x%2Fuploads%2FI8cuyvmnSLSq7QY8LGF5%2F2.1.png?alt=media&amp;token=bf9205f5-5138-4db4-92a2-86fec47f41fe" alt=""><figcaption></figcaption></figure></div>

### Multi-Manager Approval System

The Auto-Scheduler feature simplifies leave approvals. Now, you can assign multiple managers at the same level, each with unique leave approval responsibilities. For instance, one manager can handle approvals, while others supervise the process, ensuring efficient leave management without complications.

This flexibility prevents bottlenecks and ensures that leave requests are processed promptly and employees experience faster responses to their requests.

<div align="left"><figure><img src="https://4282324958-files.gitbook.io/~/files/v0/b/gitbook-x-prod.appspot.com/o/spaces%2F-MXep_PEmh8mDPVWj49x%2Fuploads%2F6qgq1VVzVpRpke4CBwBR%2F3.1.png?alt=media&amp;token=81b470d4-574a-4a2a-9d2b-91aebe351882" alt=""><figcaption></figcaption></figure></div>

<div align="left"><figure><img src="https://4282324958-files.gitbook.io/~/files/v0/b/gitbook-x-prod.appspot.com/o/spaces%2F-MXep_PEmh8mDPVWj49x%2Fuploads%2FXfyO7xVLF8kRhmtjHKAE%2F3.2.png?alt=media&amp;token=83ae8d7c-0a8c-4d6f-a07d-a20d2fc59c69" alt=""><figcaption></figcaption></figure></div>

### Manager's Notes in Travel Requests

Now, managers can leave comments while sending travel requests to employees via email.

That helps to maintain clear communication as managers can provide specific instructions through comments, ensuring everyone is on the same page.

<div align="left"><figure><img src="https://4282324958-files.gitbook.io/~/files/v0/b/gitbook-x-prod.appspot.com/o/spaces%2F-MXep_PEmh8mDPVWj49x%2Fuploads%2FT2tLexouLzX8pahrDSMQ%2F4.1.png?alt=media&amp;token=55d31645-4d8f-453b-8f3e-70273ee32ac8" alt=""><figcaption></figcaption></figure></div>

### Quick Feedback Download from ESS

Now, employees can easily download ratings given by Admin/HR via the ESS Portal. This allows them to view their performance feedback conveniently.

<div align="left"><figure><img src="https://4282324958-files.gitbook.io/~/files/v0/b/gitbook-x-prod.appspot.com/o/spaces%2F-MXep_PEmh8mDPVWj49x%2Fuploads%2FxNmK5INsuT5kzCxSEHKZ%2F5.png?alt=media&amp;token=66e3ca6e-74c6-425f-ad38-378174dfb406" alt=""><figcaption></figcaption></figure></div>

### Streamlined Attendance Regularization Reports

&#x20;With our latest update, HR professionals and administrators can now easily download the Attendance Regularization Report making your HR tasks more efficient and hassle-free.

<div align="left"><figure><img src="https://4282324958-files.gitbook.io/~/files/v0/b/gitbook-x-prod.appspot.com/o/spaces%2F-MXep_PEmh8mDPVWj49x%2Fuploads%2FEwZ60rskIEovvxmwBl6K%2F6.png?alt=media&amp;token=8da6d3b3-4ab2-4428-9ed3-c1fdf8ac0586" alt=""><figcaption></figcaption></figure></div>

### State-wise Statutory Reports Made Simple

With our new update HR/Admins can access and manage report status on our Cloud Portal. The data is presented in a simple calendar format, making tracking important dates and updates effortlessly.

<div align="left"><figure><img src="https://4282324958-files.gitbook.io/~/files/v0/b/gitbook-x-prod.appspot.com/o/spaces%2F-MXep_PEmh8mDPVWj49x%2Fuploads%2FwffrRm4o8exFyc9rtK9t%2F7.1.png?alt=media&amp;token=85d2cf05-b89b-4ae9-b5f1-5515ea4ce9ff" alt=""><figcaption></figcaption></figure></div>

#### Compliance Tracker

Our new Compliance Dashboard simplifies reporting. Easily choose states and get a monthly summary of pending and submitted reports. Stay ahead with upcoming deadlines displayed prominently.

<div align="left"><figure><img src="https://4282324958-files.gitbook.io/~/files/v0/b/gitbook-x-prod.appspot.com/o/spaces%2F-MXep_PEmh8mDPVWj49x%2Fuploads%2FUfDuJCCE8htzfR6WfFtr%2F7.12.png?alt=media&amp;token=6007609f-08d4-4d29-bc2f-616c9480d615" alt=""><figcaption></figcaption></figure></div>

It will provide in-depth details such as applicable Form no, frequency, upcoming deadline, etc. It has multiple filters (Month/Year) on the basis of which we can download the report and check the last downloaded report history.&#x20;

<div align="left"><figure><img src="https://4282324958-files.gitbook.io/~/files/v0/b/gitbook-x-prod.appspot.com/o/spaces%2F-MXep_PEmh8mDPVWj49x%2Fuploads%2FoTAZ4Li7qSwARmFjrCpS%2F7.3.png?alt=media&amp;token=c7222d17-3103-4bb7-bc06-e69ef4dc92c8" alt=""><figcaption></figcaption></figure></div>

### Automated Escalation Solutions

The Administrator or HR can now define a reporting and escalation matrix without changing the reporting manager for an employee. The Reporting Matrix and Escalation Matrix has four options:

·         Employee Code

·         Reporting Manager

·         ESS Role

·         Department Head

&#x20;

The features of Escalation Matrix include:

#### Auto Approval Flow:

Easily set multiple-level approval mechanisms in your company. The requests would be automatically approved after a set number of days, ensuring requests are managed efficiently, saving time and reducing manual errors.

#### Approval with Escalation Workflow:

A powerful new feature that allows you to configure a detailed approval workflow with an escalation mechanism. Precise notifications ensure that no request is left unanswered to help improve employee engagement.

The system can automatically escalate pending approvals to higher authorities, guaranteeing timely responses. This not only improves efficiency but also enhances employee satisfaction by ensuring their requests are promptly addressed.

<div align="left"><figure><img src="https://4282324958-files.gitbook.io/~/files/v0/b/gitbook-x-prod.appspot.com/o/spaces%2F-MXep_PEmh8mDPVWj49x%2Fuploads%2FEzxkv8OYFgeBwJp3DtnF%2F8.1.png?alt=media&amp;token=ef2668bb-1ba8-4c02-b1a2-5167a9e2042e" alt=""><figcaption></figcaption></figure></div>

### Avoid Repeated Candidate Application <a href="#gkp3em9pyhpv" id="gkp3em9pyhpv"></a>

Since the PAN number is unique a candidate can not apply twice. When someone applies for a job, the system will validate their PAN number with pre-existing data and won’t allow repeated applications.

<div align="left"><figure><img src="https://4282324958-files.gitbook.io/~/files/v0/b/gitbook-x-prod.appspot.com/o/spaces%2F-MXep_PEmh8mDPVWj49x%2Fuploads%2FBBoVjeNMLPXd0xJhnr72%2F9.png?alt=media&amp;token=e658c831-4c77-4b52-ab0c-98107dc5b76a" alt=""><figcaption></figcaption></figure></div>

### Effortless Bulk Asset Management

Now, HR professionals effortlessly map assets in bulk in one go, ensuring accurate tracking and minimizing the chances of loss. This simplifies inventory management, saving time and resources.

During employee onboarding, HR can quickly assign necessary assets to new hires in bulk. This ensures that employees have the tools they need from day one, enhancing their productivity and satisfaction.

<div align="left"><figure><img src="https://4282324958-files.gitbook.io/~/files/v0/b/gitbook-x-prod.appspot.com/o/spaces%2F-MXep_PEmh8mDPVWj49x%2Fuploads%2FACpgg5QYj4Et2qJgD1xA%2F10.1.png?alt=media&amp;token=1648e387-ac8b-4d26-9c80-9bdaec79f14d" alt=""><figcaption></figcaption></figure></div>

### Instant Candidate Report Access

With our latest update, HR professionals and administrators can effortlessly download detailed candidate reports from Pocket HRMS. Access to detailed candidate data helps in evaluating qualifications, experience, and suitability for specific roles. This swift access to candidate reports streamlines the hiring process, allowing HR to acquire talent promptly and maintain a competitive edge in the market.

<div align="left"><figure><img src="https://4282324958-files.gitbook.io/~/files/v0/b/gitbook-x-prod.appspot.com/o/spaces%2F-MXep_PEmh8mDPVWj49x%2Fuploads%2FLZw6oCcmzWdE8Lf1NsGt%2F12.png?alt=media&amp;token=ef8bfa23-0d92-4266-b24b-ddd89523b0dd" alt=""><figcaption></figcaption></figure></div>

### Instant Candidate Document Retrieval

In our latest update, HR professionals and Administrators can now effortlessly download all candidate documents with just one click, streamlining your hiring process.

<div align="left"><figure><img src="https://4282324958-files.gitbook.io/~/files/v0/b/gitbook-x-prod.appspot.com/o/spaces%2F-MXep_PEmh8mDPVWj49x%2Fuploads%2F1ce45MDVAwX8pZELfk0M%2F13.png?alt=media&amp;token=1e928027-3ee5-4cb2-9036-64f745015284" alt=""><figcaption></figcaption></figure></div>

### Diverse Job Type Options

Now, HR and Administrators can easily choose from various job types as we added multiple Job Types to make the hiring process more effective. This customization ensures job role alignment with the expertise, and company requirements enhancing overall productivity and job satisfaction.

By easily selecting from multiple job types, HR professionals can efficiently plan their workforce. They can identify skill gaps and optimize staffing levels to meet business demands effectively, leading to improved operational efficiency and cost savings.

<div align="left"><figure><img src="https://4282324958-files.gitbook.io/~/files/v0/b/gitbook-x-prod.appspot.com/o/spaces%2F-MXep_PEmh8mDPVWj49x%2Fuploads%2FQRPb87S71LAue0Gyw2QB%2F14.png?alt=media&amp;token=313c3cb9-5166-489e-9c8f-0c309f836dce" alt=""><figcaption></figcaption></figure></div>

### Multi-Recipient Interview Invitation  &#x20;

With our latest update, recruiters can now effortlessly schedule interviews by sending emails to multiple recipients at once.

HR professionals can send interview invitations to multiple candidates, hiring managers, and team members simultaneously. This streamlines the scheduling process, saving valuable time for both recruiters and applicants and ensuring everyone is on the same page.

<div align="left"><figure><img src="https://4282324958-files.gitbook.io/~/files/v0/b/gitbook-x-prod.appspot.com/o/spaces%2F-MXep_PEmh8mDPVWj49x%2Fuploads%2FFtkqVv25rvdNnMBkJjJw%2F15.png?alt=media&amp;token=4a5f15ad-5570-44be-8218-b073d60711e7" alt=""><figcaption></figcaption></figure></div>

For any queries, contact <support@pockethrms.com>


# January 2023

Introducing our latest HRMS software upgrades tailored to enhance workplace efficiency. Experience seamless attendance tracking streamline hiring access real-time attendance tracking and regularization requests. Elevate support with the revamped 'Help Desk,' ensuring swift issue resolution and superior user satisfaction. For the month of January, we have the following enhancements.

### Single Punch Shift Attendance

The feature offers a flexible and efficient way for employees to record their attendance. The HRMS software allows the HR manager or administrator to enable the 'Single Punch' feature for multiple employees or specific categories of employees. Once enabled, employees can punch their attendance at any time between their designated 'in' and 'out' timings.

The system automatically assigns shifts to employees based on their recorded punch time. This ensures accurate tracking of working hours and adherence to the assigned schedules. That accommodates flexible work hours, remote work, or staggered shifts, catering to the modern workforce's needs and reducing administrative burden with automation.&#x20;

<div align="left"><figure><img src="https://4282324958-files.gitbook.io/~/files/v0/b/gitbook-x-prod.appspot.com/o/spaces%2F-MXep_PEmh8mDPVWj49x%2Fuploads%2FBnHUedb1Quz4LGyY6uyS%2FPicture1.png?alt=media&amp;token=721363aa-b2b3-4be7-8103-27ea4949f2c2" alt=""><figcaption></figcaption></figure></div>

### 2. Bulk Admin Ratings for Hassle-Free Stage Settings

Introducing our latest software update, designed to empower HR managers. With the new 'Bulk Admin Ratings' feature, you can now effortlessly upload large volumes of 'Admin Ratings' at once, simplifying the importing process stage-wise.

It saves valuable time and effort by uploading multiple Admin Ratings in one go, eliminating manual entry hassles. Minimize data entry errors, ensuring accurate and reliable stage-wise settings for a seamless workflow.

<div align="left"><figure><img src="https://4282324958-files.gitbook.io/~/files/v0/b/gitbook-x-prod.appspot.com/o/spaces%2F-MXep_PEmh8mDPVWj49x%2Fuploads%2FmXXPEKVPbDUCbhD0mLkE%2FPicture2.png?alt=media&amp;token=35bcd1c9-ac95-430e-bfdd-6ff49f039995" alt=""><figcaption></figcaption></figure></div>

### 3. Streamline Hiring with External Invites

Recruiters can now effortlessly invite external interviewers by simply entering their email IDs into the system. HR teams can extend invites to candidates without the hassle of juggling multiple platforms. That helps to simplify your recruitment process and elevate your HR capabilities.

<div align="left"><figure><img src="https://4282324958-files.gitbook.io/~/files/v0/b/gitbook-x-prod.appspot.com/o/spaces%2F-MXep_PEmh8mDPVWj49x%2Fuploads%2Fd4WMQPoVdOc8YUPo0gk2%2FPicture3.png?alt=media&amp;token=91c6863e-055c-472d-8e3d-02d4cbd3075d" alt=""><figcaption></figcaption></figure></div>

### 4. Effortless Time Tracking with Mobile App

The enhanced 'My Calendar' feature on the ESS mobile App. Now, employees can effortlessly track in and out timings, monitor completion of total work hours, and instantly identify invalid attendance punches—all in one place.&#x20;

The app also prompts employees to apply for regularization directly from 'My Calendar,' simplifying the entire process.

<div align="left"><figure><img src="https://4282324958-files.gitbook.io/~/files/v0/b/gitbook-x-prod.appspot.com/o/spaces%2F-MXep_PEmh8mDPVWj49x%2Fuploads%2Fi7EdJpVy1wZaYFaqqv9V%2FPicture4.png?alt=media&amp;token=479bdcbb-7333-470b-a3b5-3c06010af522" alt=""><figcaption></figcaption></figure></div>

### 5. Discover the Enhanced Help Desk Experience

We're thrilled to introduce the revamped 'Help Desk' features with sleek and modern UI tailored for an unmatched user experience. This means streamlined issue resolution, faster ticket handling, and an intuitive interface that enhances productivity.&#x20;

With our enhanced Help Desk, your team can provide swift, accurate assistance, ensuring employee satisfaction and smooth operations.&#x20;

**My Tickets:**

<div align="left"><figure><img src="https://4282324958-files.gitbook.io/~/files/v0/b/gitbook-x-prod.appspot.com/o/spaces%2F-MXep_PEmh8mDPVWj49x%2Fuploads%2F1tW0j1hZbHgo2cA4yzpc%2FPicture5.jpg?alt=media&amp;token=b2fd15b3-3c07-4818-9aad-f181037ac43b" alt=""><figcaption></figcaption></figure></div>

&#x20;

**My Reports:**

<div align="left"><figure><img src="https://4282324958-files.gitbook.io/~/files/v0/b/gitbook-x-prod.appspot.com/o/spaces%2F-MXep_PEmh8mDPVWj49x%2Fuploads%2FEpSFhjpmJOMsplI86yYS%2FPicture6.jpg?alt=media&amp;token=c026fc16-5325-4b3e-8b9d-a500b9550707" alt=""><figcaption></figcaption></figure></div>

&#x20;

**Agent Tickets:**

<div align="left"><figure><img src="https://4282324958-files.gitbook.io/~/files/v0/b/gitbook-x-prod.appspot.com/o/spaces%2F-MXep_PEmh8mDPVWj49x%2Fuploads%2FsE9s0VGeVfQ1dgYIqoDS%2FPicture7.jpg?alt=media&amp;token=716379b4-9cb6-46a0-a303-0654e04e501e" alt=""><figcaption></figcaption></figure></div>

&#x20;

**Agent Reports**

<div align="left"><figure><img src="https://4282324958-files.gitbook.io/~/files/v0/b/gitbook-x-prod.appspot.com/o/spaces%2F-MXep_PEmh8mDPVWj49x%2Fuploads%2FXJnl1e4P5qzraQi0HR66%2FPicture8.jpg?alt=media&amp;token=aa0b7c01-af5d-41e8-8b40-2aec401a6d80" alt=""><figcaption></figcaption></figure></div>

&#x20;For any queries, contact <support@pockethrms.com>


# Updates 2024


# 2024 Major Highlights

We are thrilled to present our most remarkable updates, with enhanced user-friendly tools to elevate your HR experience. Our commitment to innovation and efficiency drives us to bring you seamless updates that transform your HR processes. For the year 2024, here are some of the most remarkable enhancements.&#x20;

### Leave <a href="#lop-deduction-in-sandwich-rule" id="lop-deduction-in-sandwich-rule"></a>

### LOP Deduction in Sandwich Rule <a href="#lop-deduction-in-sandwich-rule" id="lop-deduction-in-sandwich-rule"></a>

The sandwich leave setting now includes LOP leave within the leave deduction options. You can select the LOP leaves with ease from the dropdown and improve leave management.

<figure><img src="https://docs.pockethrms.com/~gitbook/image?url=https%3A%2F%2F4282324958-files.gitbook.io%2F%7E%2Ffiles%2Fv0%2Fb%2Fgitbook-x-prod.appspot.com%2Fo%2Fspaces%252F-MXep_PEmh8mDPVWj49x%252Fuploads%252FkE6ClZo5pTLh0qsZEECq%252F10.png%3Falt%3Dmedia&#x26;width=768&#x26;dpr=4&#x26;quality=100&#x26;sign=e29b26fb&#x26;sv=2" alt=""><figcaption></figcaption></figure>

### Effortless Bulk LOP Credit Entry <a href="#effortless-bulk-lop-credit-entry" id="effortless-bulk-lop-credit-entry"></a>

Now you can do bulk LOP credit input, making it easier than ever to manage Loss of Pay. No more manual entry for each employee - simply enter credits in bulk for multiple employees at once. This saves time, improves efficiency, and enhances workflow management. As an HR professional or organization, you'll enjoy smoother processes and increased productivity.

<figure><img src="https://docs.pockethrms.com/~gitbook/image?url=https%3A%2F%2F4282324958-files.gitbook.io%2F%7E%2Ffiles%2Fv0%2Fb%2Fgitbook-x-prod.appspot.com%2Fo%2Fspaces%252F-MXep_PEmh8mDPVWj49x%252Fuploads%252FOpTivOf1M8dfZQaP7QBz%252F0.png%3Falt%3Dmedia&#x26;width=768&#x26;dpr=4&#x26;quality=100&#x26;sign=2df6b1f0&#x26;sv=2" alt=""><figcaption></figcaption></figure>

### Customize Week-Off Scheduling <a href="#customize-week-off-scheduling" id="customize-week-off-scheduling"></a>

The week-off setting is now more flexible than ever before. Now you have more control and select whether the 1st, 2nd, 3rd, 4th, or 5th occurrence of a day (like Sunday) should be your week-off for a certain date range.

Once you save the settings, your choices will be clearly shown on the screen for easy reference and full transparency.

<figure><img src="https://docs.pockethrms.com/~gitbook/image?url=https%3A%2F%2F4282324958-files.gitbook.io%2F%7E%2Ffiles%2Fv0%2Fb%2Fgitbook-x-prod.appspot.com%2Fo%2Fspaces%252F-MXep_PEmh8mDPVWj49x%252Fuploads%252FObdBVUvzuFVqTkkbsVlU%252F9.png%3Falt%3Dmedia&#x26;width=768&#x26;dpr=4&#x26;quality=100&#x26;sign=e09e0364&#x26;sv=2" alt=""><figcaption></figcaption></figure>

### Comp Off Leave, Now with a Deadline!

Admins can now restrict employees from applying for Comp Off leave after a specific timeframe from the Comp Off date. That ensures policy compliance and prevents misuse of leave.

**For example,** If the Comp Off date is 13th September and the limit is 30 days, leave can only be applied between 13th September and 12th October. Requests outside this range will be denied.

<figure><img src="https://docs.pockethrms.com/~gitbook/image?url=https%3A%2F%2F4282324958-files.gitbook.io%2F%7E%2Ffiles%2Fv0%2Fb%2Fgitbook-x-prod.appspot.com%2Fo%2Fspaces%252F-MXep_PEmh8mDPVWj49x%252Fuploads%252FYoeevjpquw73IBoxqMqx%252F0.png%3Falt%3Dmedia&#x26;width=768&#x26;dpr=4&#x26;quality=100&#x26;sign=f242cfa3&#x26;sv=2" alt=""><figcaption></figcaption></figure>

### Attendance <a href="#improved-monitoring-with-geolocation" id="improved-monitoring-with-geolocation"></a>

### Improved Monitoring with Geolocation <a href="#improved-monitoring-with-geolocation" id="improved-monitoring-with-geolocation"></a>

The ‘In Out Detail’ report now features two new columns, 'IN geolocation' and 'OUT geolocation,'. These columns show where employees enter and exit specified areas, aiding in tracking their movements. This enhancement offers a detailed overview of employee activities based on geolocation data, enhancing monitoring.

<figure><img src="https://docs.pockethrms.com/~gitbook/image?url=https%3A%2F%2F4282324958-files.gitbook.io%2F%7E%2Ffiles%2Fv0%2Fb%2Fgitbook-x-prod.appspot.com%2Fo%2Fspaces%252F-MXep_PEmh8mDPVWj49x%252Fuploads%252Fq6Zy4NlCY9lXV8rq7cOz%252F8.png%3Falt%3Dmedia&#x26;width=768&#x26;dpr=4&#x26;quality=100&#x26;sign=9255b146&#x26;sv=2" alt=""><figcaption></figcaption></figure>

### Late Mark Deductions with Customizable Settings <a href="#late-mark-deductions-with-customizable-settings" id="late-mark-deductions-with-customizable-settings"></a>

We've upgraded the late mark customization to now include deductions for late days, which are determined by shift settings and prioritize different types of leave. Admin/HR can now save specific settings for various shifts, enabling them to prioritize the deduction of certain types of leave before others.

<figure><img src="https://docs.pockethrms.com/~gitbook/image?url=https%3A%2F%2F4282324958-files.gitbook.io%2F%7E%2Ffiles%2Fv0%2Fb%2Fgitbook-x-prod.appspot.com%2Fo%2Fspaces%252F-MXep_PEmh8mDPVWj49x%252Fuploads%252FX8RG0tGw6ZnxJLhNdxjp%252F0.png%3Falt%3Dmedia&#x26;width=768&#x26;dpr=4&#x26;quality=100&#x26;sign=b29aa050&#x26;sv=2" alt=""><figcaption></figcaption></figure>

### Priority-Based Time Range Leave Deductions <a href="#priority-based-time-range-leave-deductions" id="priority-based-time-range-leave-deductions"></a>

Pocket HRMS offers flexible settings of leave deductions based on employees' attendance punch times. You can do the following customizations with ease.

* Define auto deduction criteria for individual shifts
* Set multiple time ranges of deductions for each shift
* Set priorities with multiple leave types for deductions for each time range
* Delete settings for individual time ranges without disturbing other settings
* Delete all the custom settings for the particular shift when you no longer need it

These settings provide better control and efficiency for attendance and leave management.

<figure><img src="https://docs.pockethrms.com/~gitbook/image?url=https%3A%2F%2F4282324958-files.gitbook.io%2F%7E%2Ffiles%2Fv0%2Fb%2Fgitbook-x-prod.appspot.com%2Fo%2Fspaces%252F-MXep_PEmh8mDPVWj49x%252Fuploads%252FTg2twgCOAORbMJnekdM9%252F0.png%3Falt%3Dmedia&#x26;width=768&#x26;dpr=4&#x26;quality=100&#x26;sign=d77e23ff&#x26;sv=2" alt=""><figcaption></figcaption></figure>

<figure><img src="https://4282324958-files.gitbook.io/~/files/v0/b/gitbook-x-prod.appspot.com/o/spaces%2F-MXep_PEmh8mDPVWj49x%2Fuploads%2FH6NsC9ZtlovGXC86VTO3%2Fimage.png?alt=media&amp;token=22311af0-b88d-4676-883a-1476dcdefdd2" alt=""><figcaption></figcaption></figure>

### Optimized Sandwich Leave Rule Based on Leave Taken

Sandwich Leave deductions now follow the order in which employees apply for them and not the predefined order. If an employee lacks the balance for a particular leave type, Loss of Pay (LOP) will be applied.

**Example**,

* Employee requests 'Paid Leave' for Friday and 'Sick Leave' for Monday.
* Resulting leave pattern: Paid Leave, Week off, Week off, Sick Leave.

**Scenarios**:

* **If the remaining Paid Leave balance is 2 or more** - Both week off are deducted as Paid Leave.
* **If the remaining Paid Leave balance is 1** -First week off as Paid Leave; the system checks Sick Leave for the second week off.
* **If there is no remaining Sick Leave balance** - The second week off will be considered LOP.

<figure><img src="https://docs.pockethrms.com/~gitbook/image?url=https%3A%2F%2F4282324958-files.gitbook.io%2F%7E%2Ffiles%2Fv0%2Fb%2Fgitbook-x-prod.appspot.com%2Fo%2Fspaces%252F-MXep_PEmh8mDPVWj49x%252Fuploads%252FYJKTrKLrDxr1Wp6AIjKk%252F3.png%3Falt%3Dmedia&#x26;width=768&#x26;dpr=4&#x26;quality=100&#x26;sign=12a668b9&#x26;sv=2" alt=""><figcaption></figcaption></figure>

## Employee

## Streamline Employee Access&#x20;

We have introduced a new module named Employee Access. Here, the managers have been given an option to raise requests on behalf of their subordinates to grant or revoke access on various events like New Joining, Promotion, Separation, etc. Access forms can be created in Form Master and the requests can be raised by Managers in ESS and approved by the IT Team.

<figure><img src="https://4282324958-files.gitbook.io/~/files/v0/b/gitbook-x-prod.appspot.com/o/spaces%2F-MXep_PEmh8mDPVWj49x%2Fuploads%2FRcRk96ha5yma9Gfgqx7F%2FFrame%2097.png?alt=media&amp;token=7616ad13-e800-47a5-857c-b7c8fac9aa48" alt=""><figcaption></figcaption></figure>

### PMS <a href="#integrated-training-period-with-confirmation-module" id="integrated-training-period-with-confirmation-module"></a>

### Bell Curve Flexibility: Tailor Your Appraisal Process

The Appraisal module has been enhanced to provide greater flexibility and configuration options for the Bell Curve functionality.

**Rating Type Configuration**

Users can select ‘Scale’ with a default range of 1-5 or ‘Weightage’ which displays the Grade % as the rating type for appraisals.

**Define Bell Curve Screen**

The graph dynamically updates based on the first three values entered. Users can display either Rating Scale or Grade % in the first column. Strict validation ensures the first three values are in ascending order, with the total Expected % equaling 100%.

**Rating Normalization Screen**

The Rating Normalization screen will now adapt its columns based on the selected rating type (Scale or Grade %). Normalization calculations align with the chosen configuration. An additional "Count to be Normalized" column provides further insights.

<figure><img src="https://docs.pockethrms.com/~gitbook/image?url=https%3A%2F%2F4282324958-files.gitbook.io%2F%7E%2Ffiles%2Fv0%2Fb%2Fgitbook-x-prod.appspot.com%2Fo%2Fspaces%252F-MXep_PEmh8mDPVWj49x%252Fuploads%252Fin6KgDeTsSzOjjbN4FEa%252F3.png%3Falt%3Dmedia&#x26;width=768&#x26;dpr=4&#x26;quality=100&#x26;sign=a4ac1b41&#x26;sv=2" alt=""><figcaption></figcaption></figure>

<figure><img src="https://docs.pockethrms.com/~gitbook/image?url=https%3A%2F%2F4282324958-files.gitbook.io%2F%7E%2Ffiles%2Fv0%2Fb%2Fgitbook-x-prod.appspot.com%2Fo%2Fspaces%252F-MXep_PEmh8mDPVWj49x%252Fuploads%252Fi1bR1lkBrgFNoEL6FDFV%252F4.png%3Falt%3Dmedia&#x26;width=768&#x26;dpr=4&#x26;quality=100&#x26;sign=6585e134&#x26;sv=2" alt=""><figcaption></figcaption></figure>

<figure><img src="https://docs.pockethrms.com/~gitbook/image?url=https%3A%2F%2F4282324958-files.gitbook.io%2F%7E%2Ffiles%2Fv0%2Fb%2Fgitbook-x-prod.appspot.com%2Fo%2Fspaces%252F-MXep_PEmh8mDPVWj49x%252Fuploads%252FR5QqnSuAMKJetd2lZPvY%252F5.png%3Falt%3Dmedia&#x26;width=768&#x26;dpr=4&#x26;quality=100&#x26;sign=54ef3dcc&#x26;sv=2" alt=""><figcaption></figcaption></figure>

### Confirmation <a href="#integrated-training-period-with-confirmation-module" id="integrated-training-period-with-confirmation-module"></a>

### Integrated Training Period with Confirmation Module <a href="#integrated-training-period-with-confirmation-module" id="integrated-training-period-with-confirmation-module"></a>

Our new training period configurations allow you flexibility to add training period before probation and ensures that employee receives adequate training with better user experience.

* To set a training period by defining the ‘End Date’ as the ‘Joining Date’ is considered as the start date.
* Probation begins right after the training period ends.
* Extend the training by adding more days.
* Both the employee and manager will be notified of the new end date.

<figure><img src="https://docs.pockethrms.com/~gitbook/image?url=https%3A%2F%2F4282324958-files.gitbook.io%2F%7E%2Ffiles%2Fv0%2Fb%2Fgitbook-x-prod.appspot.com%2Fo%2Fspaces%252F-MXep_PEmh8mDPVWj49x%252Fuploads%252FI4ZBG1ty0Oecu4Bpo1Pv%252F9.png%3Falt%3Dmedia&#x26;width=768&#x26;dpr=4&#x26;quality=100&#x26;sign=d1b8f1a4&#x26;sv=2" alt=""><figcaption></figcaption></figure>

### Exit

### Optimized Employee Separation <a href="#optimized-employee-separation" id="optimized-employee-separation"></a>

Pocket HRMS will block the separation if the employee has any pending requests for

Leaves, On-Duty, Regularizations, Expenses, Reimbursements, or Loans. The system will display the 10 most recent pending requests in each category and also provide you with an option to download an Excel report. That makes the process of reviewing pending requests and taking the necessary steps to proceed with the separation, quick and effortless.

<figure><img src="https://docs.pockethrms.com/~gitbook/image?url=https%3A%2F%2F4282324958-files.gitbook.io%2F%7E%2Ffiles%2Fv0%2Fb%2Fgitbook-x-prod.appspot.com%2Fo%2Fspaces%252F-MXep_PEmh8mDPVWj49x%252Fuploads%252FCA24qWdLl3M5XYa1fYDs%252F5.png%3Falt%3Dmedia&#x26;width=768&#x26;dpr=4&#x26;quality=100&#x26;sign=7fd13126&#x26;sv=2" alt=""><figcaption></figcaption></figure>

<figure><img src="https://docs.pockethrms.com/~gitbook/image?url=https%3A%2F%2F4282324958-files.gitbook.io%2F%7E%2Ffiles%2Fv0%2Fb%2Fgitbook-x-prod.appspot.com%2Fo%2Fspaces%252F-MXep_PEmh8mDPVWj49x%252Fuploads%252Fd0JMcRjGb4Ovqt6pjOHF%252F7.png%3Falt%3Dmedia&#x26;width=768&#x26;dpr=4&#x26;quality=100&#x26;sign=8eb533a2&#x26;sv=2" alt=""><figcaption></figcaption></figure>

### **Streamline Resignation Requests with Mobile App** <a href="#streamline-resignation-requests-with-mobile-app" id="streamline-resignation-requests-with-mobile-app"></a>

Experience the seamless exit process from the mobile app. Employees can now submit their resignation requests directly from their mobile apps. Managers and Department Heads can approve or reject these requests right from their phones as well. This feature is available on both Android and iOS, and it works just like it does on the web. Providing consistent & uniform experience.

![](https://docs.pockethrms.com/~gitbook/image?url=https%3A%2F%2F4282324958-files.gitbook.io%2F%7E%2Ffiles%2Fv0%2Fb%2Fgitbook-x-prod.appspot.com%2Fo%2Fspaces%252F-MXep_PEmh8mDPVWj49x%252Fuploads%252FaPY7G0bzgL4wlSQCnCZP%252F8.png%3Falt%3Dmedia\&width=768\&dpr=4\&quality=100\&sign=9423b24f\&sv=2)![](https://docs.pockethrms.com/~gitbook/image?url=https%3A%2F%2F4282324958-files.gitbook.io%2F%7E%2Ffiles%2Fv0%2Fb%2Fgitbook-x-prod.appspot.com%2Fo%2Fspaces%252F-MXep_PEmh8mDPVWj49x%252Fuploads%252FYKOTkmT0IsKy9afyMX8C%252F9.png%3Falt%3Dmedia\&width=768\&dpr=4\&quality=100\&sign=cefaa8a2\&sv=2)![](https://docs.pockethrms.com/~gitbook/image?url=https%3A%2F%2F4282324958-files.gitbook.io%2F%7E%2Ffiles%2Fv0%2Fb%2Fgitbook-x-prod.appspot.com%2Fo%2Fspaces%252F-MXep_PEmh8mDPVWj49x%252Fuploads%252FRnfIHKkjT3pQ6XZtVWbR%252F10.png%3Falt%3Dmedia\&width=768\&dpr=4\&quality=100\&sign=1dafcc7e\&sv=2)

### Recruitment <a href="#customizable-job-offer-approval-flow" id="customizable-job-offer-approval-flow"></a>

### Customizable Job Offer Approval Flow <a href="#customizable-job-offer-approval-flow" id="customizable-job-offer-approval-flow"></a>

We’ve created a flexible approval process for job offers. The system allows two options:

* Serial Approval: Both the Job Offer Approval Manager and Department Head approve the offer one after the other.
* Single Approval: Either the Job Offer Approval Manager or Department Head can approve the offer on their own.

With customizable approval settings, multiple managers or department heads can be included. Each approver can:

* Approve the offer as is.
* Reject the offer.
* Modify details like the offer letter, salary, or validity before approving.

The final approver can send the offer directly to the candidate, without needing further input from the recruiter.

<figure><img src="https://docs.pockethrms.com/~gitbook/image?url=https%3A%2F%2F4282324958-files.gitbook.io%2F%7E%2Ffiles%2Fv0%2Fb%2Fgitbook-x-prod.appspot.com%2Fo%2Fspaces%252F-MXep_PEmh8mDPVWj49x%252Fuploads%252FMqmSJm97MkhUbxHk4QLu%252F6.png%3Falt%3Dmedia&#x26;width=768&#x26;dpr=4&#x26;quality=100&#x26;sign=386ba5f0&#x26;sv=2" alt=""><figcaption></figcaption></figure>

<figure><img src="https://docs.pockethrms.com/~gitbook/image?url=https%3A%2F%2F4282324958-files.gitbook.io%2F%7E%2Ffiles%2Fv0%2Fb%2Fgitbook-x-prod.appspot.com%2Fo%2Fspaces%252F-MXep_PEmh8mDPVWj49x%252Fuploads%252FEjZo0Ik9LaQm7V5uJyY9%252F7.png%3Falt%3Dmedia&#x26;width=768&#x26;dpr=4&#x26;quality=100&#x26;sign=ab111ca2&#x26;sv=2" alt=""><figcaption></figcaption></figure>

<figure><img src="https://4282324958-files.gitbook.io/~/files/v0/b/gitbook-x-prod.appspot.com/o/spaces%2F-MXep_PEmh8mDPVWj49x%2Fuploads%2FWCfu7HJNNiuJOTTSq1yQ%2Fimage.png?alt=media&amp;token=0967c50a-fff8-4de2-8c32-d464375bfeae" alt=""><figcaption></figcaption></figure>

<figure><img src="https://docs.pockethrms.com/~gitbook/image?url=https%3A%2F%2F4282324958-files.gitbook.io%2F%7E%2Ffiles%2Fv0%2Fb%2Fgitbook-x-prod.appspot.com%2Fo%2Fspaces%252F-MXep_PEmh8mDPVWj49x%252Fuploads%252FVdw4c3cumXEqV7Kem0xO%252F9.png%3Falt%3Dmedia&#x26;width=768&#x26;dpr=4&#x26;quality=100&#x26;sign=58c6f8cb&#x26;sv=2" alt=""><figcaption></figcaption></figure>

### Flexible Header/Footer Options for Recruitment PDFs <a href="#flexible-header-footer-options-for-recruitment-pdfs" id="flexible-header-footer-options-for-recruitment-pdfs"></a>

We’ve introduced a new Header/Footer feature for Recruitment Email and CTC Templates, allowing users to choose how to display headers and footers in generated PDFs:

* **No Header/Footer**: PDFs will be created without any headers or footers.
* **System-Generated Header/Footer**: Automatically includes a header with the company logo and name, and a footer with the company name and address.
* **Custom Header/Footer**: Users can upload their own header and footer images to be included in the PDFs.

<figure><img src="https://docs.pockethrms.com/~gitbook/image?url=https%3A%2F%2F4282324958-files.gitbook.io%2F%7E%2Ffiles%2Fv0%2Fb%2Fgitbook-x-prod.appspot.com%2Fo%2Fspaces%252F-MXep_PEmh8mDPVWj49x%252Fuploads%252FvLq08KCySe8WYm0uqvTR%252F15.png%3Falt%3Dmedia&#x26;width=768&#x26;dpr=4&#x26;quality=100&#x26;sign=e6443e0&#x26;sv=2" alt=""><figcaption></figcaption></figure>

### e-Posh

### e-POSH: Empowering Action Against Harassment <a href="#e-posh-empowering-action-against-harassment" id="e-posh-empowering-action-against-harassment"></a>

The e-POSH (Prevention of Sexual Harassment) module is now available on web and mobile. It allows female employees to report sexual harassment incidents at the workplace, either for themselves or co-workers, with an option to keep their identity anonymous. A Complaint Committee can be set up, including a Committee Head and members, who can monitor and take necessary actions through the ESS portal.

<figure><img src="https://docs.pockethrms.com/~gitbook/image?url=https%3A%2F%2F4282324958-files.gitbook.io%2F%7E%2Ffiles%2Fv0%2Fb%2Fgitbook-x-prod.appspot.com%2Fo%2Fspaces%252F-MXep_PEmh8mDPVWj49x%252Fuploads%252FWKgWZwvYwLhW9XaRwNE2%252F7.png%3Falt%3Dmedia&#x26;width=768&#x26;dpr=4&#x26;quality=100&#x26;sign=cfb2b8b8&#x26;sv=2" alt=""><figcaption></figcaption></figure>

<figure><img src="https://docs.pockethrms.com/~gitbook/image?url=https%3A%2F%2F4282324958-files.gitbook.io%2F%7E%2Ffiles%2Fv0%2Fb%2Fgitbook-x-prod.appspot.com%2Fo%2Fspaces%252F-MXep_PEmh8mDPVWj49x%252Fuploads%252FXUwLvHi8nuA6ETCqMFlp%252F9.png%3Falt%3Dmedia&#x26;width=768&#x26;dpr=4&#x26;quality=100&#x26;sign=ad2eff73&#x26;sv=2" alt=""><figcaption></figcaption></figure>

<figure><img src="https://docs.pockethrms.com/~gitbook/image?url=https%3A%2F%2F4282324958-files.gitbook.io%2F%7E%2Ffiles%2Fv0%2Fb%2Fgitbook-x-prod.appspot.com%2Fo%2Fspaces%252F-MXep_PEmh8mDPVWj49x%252Fuploads%252FHvnmgDgnhz6B7szSp4TS%252F10.png%3Falt%3Dmedia&#x26;width=768&#x26;dpr=4&#x26;quality=100&#x26;sign=2e2b1ec1&#x26;sv=2" alt=""><figcaption></figcaption></figure>

### UI/UX Improvements

### All New Dashboard for Easy Access to Work Essentials <a href="#all-new-dashboard-for-easy-access-to-work-essentials" id="all-new-dashboard-for-easy-access-to-work-essentials"></a>

We’ve created a new, all-in-one employee dashboard that gives a clear view of everything important. Employees can easily check their profile details, shift schedules, upcoming events, leave history, monthly attendance, and company news. With a fresh, easy-to-use design, we’ve also made it simpler for employees to apply for leave, view salary details, and connect with their managers.

<figure><img src="https://docs.pockethrms.com/~gitbook/image?url=https%3A%2F%2F4282324958-files.gitbook.io%2F%7E%2Ffiles%2Fv0%2Fb%2Fgitbook-x-prod.appspot.com%2Fo%2Fspaces%252F-MXep_PEmh8mDPVWj49x%252Fuploads%252FPCzsYbpkWeJuchrb3hSo%252F11.png%3Falt%3Dmedia&#x26;width=768&#x26;dpr=4&#x26;quality=100&#x26;sign=eefa1b4&#x26;sv=2" alt=""><figcaption></figcaption></figure>

For any queries, contact <support@pockethrms.com>


# December 2024

We are thrilled to present our Monthly Update, with enhanced user-friendly tools to elevate your HR experience. Our commitment to innovation and efficiency drives us to bring you seamless updates that transform your HR processes. For the month of December, we have the following enhancements.

### **Flexibility in Payroll Posting: Calendar or Date Range**

Now you can process payroll postings with greater flexibility. The payroll posting can now be processed using specific date ranges. Based on your setup, you can choose to post payroll data either calendar-wise or by selecting date-wise option with ease.

![](https://4282324958-files.gitbook.io/~/files/v0/b/gitbook-x-prod.appspot.com/o/spaces%2F-MXep_PEmh8mDPVWj49x%2Fuploads%2FN1ucRhhTRJxh4y15YOtp%2F0.png?alt=media)

### Smart **Shift Management with Smooth New Year Transfer**

Assign shifts to multiple employees at once, and easily edit or delete assigned shifts. Now, the system will automatically transfer selected shifts to the next year based on your leave calendar. We have also added a filter to easily sort the data based on business unit, category, or shift name. Also, you can easily find employee using their name or employee. Making your shift management swift and well-organized.

![](https://4282324958-files.gitbook.io/~/files/v0/b/gitbook-x-prod.appspot.com/o/spaces%2F-MXep_PEmh8mDPVWj49x%2Fuploads%2FFwmoNDEHAqwY6jmhbP8k%2F1.png?alt=media)

![](https://4282324958-files.gitbook.io/~/files/v0/b/gitbook-x-prod.appspot.com/o/spaces%2F-MXep_PEmh8mDPVWj49x%2Fuploads%2FIv0KapjENxXY1fajFzyE%2F2.png?alt=media)

### **Advanced Filters in** Admin Approval

The Admin Approval screen now features a new Filter button. You can click on it to open a pop-up where you can set filter conditions using various Employee Master fields like Bank Name, Blood Group, Branch, Department, and more.

The system allows you to combine multiple conditions and add additional criteria by clicking the "Insert Row" button. Once your conditions are set, you can save them or close the popup without saving them. You also get the flexibility to remove individual filter rows. This enhancement streamlines data management and helps you find information quickly and efficiently.

![](https://4282324958-files.gitbook.io/~/files/v0/b/gitbook-x-prod.appspot.com/o/spaces%2F-MXep_PEmh8mDPVWj49x%2Fuploads%2FvFINyEeuuVrBLxqeI0sC%2F3.png?alt=media)

![](https://4282324958-files.gitbook.io/~/files/v0/b/gitbook-x-prod.appspot.com/o/spaces%2F-MXep_PEmh8mDPVWj49x%2Fuploads%2FMKZojJLGw3lbDkWzFvXK%2F4.png?alt=media)

### **Consistent Colour Coding Across Web and Excel Reports**

Now the exported Annual Summary, Monthly Summary, My Report, My Teams Report, and Employee Reports visually retain the same colour-coding as the web interface. This gives you better consistency and ease of understanding the information.

Each attendance status has a unique colour:

**Absent (A)**: Red

**Present (P)**: Green

**Holiday (H)**: Pink/Light Red

**Other statuses** (e.g., On Duty, Week Off, Invalid Punch) retain their specific colours.

![](https://4282324958-files.gitbook.io/~/files/v0/b/gitbook-x-prod.appspot.com/o/spaces%2F-MXep_PEmh8mDPVWj49x%2Fuploads%2FMBM8BG4VGSvAG3oC2Tna%2F5.png?alt=media)

![](https://4282324958-files.gitbook.io/~/files/v0/b/gitbook-x-prod.appspot.com/o/spaces%2F-MXep_PEmh8mDPVWj49x%2Fuploads%2FObVjckcSWztx8KmGWwFW%2F6.png?alt=media)

### **Flexibility to Mark Incomplete Punches as On-duty**

Our latest update lets you decide whether you want to allow employees to apply for "On Duty" even if their punch entries are incomplete or invalid. This makes it easier for employees to submit their on-duty requests if they work in multiple locations in the same day and enhances attendance management.

![](https://4282324958-files.gitbook.io/~/files/v0/b/gitbook-x-prod.appspot.com/o/spaces%2F-MXep_PEmh8mDPVWj49x%2Fuploads%2FBxtrQGhfeVHvb9RbrmQL%2F7.png?alt=media)

### **Enhanced Search Tools for Employee Data**

Now in the ‘Employee Eligibility’ screen, you get filter options to easily search and sort records using predefined fields. We also provide the option to multi-select dropdowns for fields with multiple values. Along with that, a search field helps you to find results based on keywords. These features will not only reduce the time & effort but also elevate your user experience.

<figure><img src="https://4282324958-files.gitbook.io/~/files/v0/b/gitbook-x-prod.appspot.com/o/spaces%2F-MXep_PEmh8mDPVWj49x%2Fuploads%2FGdRh7MnzDfxlxM2bWXSy%2F8.png?alt=media" alt=""><figcaption></figcaption></figure>

### **Focus on What Matters: Hide Empty Columns**

Now you can simply tick a checkbox to hide the empty columns. The columns with new values will be removed from the screen as well as from the Excel report. This makes it easier to read and focus on the relevant information.

![](https://4282324958-files.gitbook.io/~/files/v0/b/gitbook-x-prod.appspot.com/o/spaces%2F-MXep_PEmh8mDPVWj49x%2Fuploads%2F6poHoVlApEmvx6aaoqt6%2F9.png?alt=media)

### **Set Up Future Holidays Ahead of Time**

With our latest update you can set holiday dates for future calendar years, even if the leave calendar for those years is not active yet. These holidays for future years will stay inactive until the respective calendar year is activated. So, you can prepare in advance with ease without impacting the current year configurations.

![](https://4282324958-files.gitbook.io/~/files/v0/b/gitbook-x-prod.appspot.com/o/spaces%2F-MXep_PEmh8mDPVWj49x%2Fuploads%2Fbb3nsZEcd1wXGZKuMZZ7%2F10.png?alt=media)

### Automated Employee Code Generation Across Scenarios

Now, based on the selected business unit, the system will automatically generate employee code during importing multiple employees, adding new employees as well as during the candidate onboarding. This reduces the manual effort and adds convenience to employee management.

<figure><img src="https://4282324958-files.gitbook.io/~/files/v0/b/gitbook-x-prod.appspot.com/o/spaces%2F-MXep_PEmh8mDPVWj49x%2Fuploads%2FNocuwOGzljQAoL9OpUV4%2F11.png?alt=media" alt=""><figcaption></figcaption></figure>

![](https://4282324958-files.gitbook.io/~/files/v0/b/gitbook-x-prod.appspot.com/o/spaces%2F-MXep_PEmh8mDPVWj49x%2Fuploads%2Fmg12yY8mG5BFVgOMNNnr%2F12.png?alt=media)

![](https://4282324958-files.gitbook.io/~/files/v0/b/gitbook-x-prod.appspot.com/o/spaces%2F-MXep_PEmh8mDPVWj49x%2Fuploads%2F3mFOYmsr11Dny0SNDzyF%2F13.png?alt=media)

![](https://4282324958-files.gitbook.io/~/files/v0/b/gitbook-x-prod.appspot.com/o/spaces%2F-MXep_PEmh8mDPVWj49x%2Fuploads%2FmFgNnKzWAMQbYKvjIFki%2F14.png?alt=media)

![](https://4282324958-files.gitbook.io/~/files/v0/b/gitbook-x-prod.appspot.com/o/spaces%2F-MXep_PEmh8mDPVWj49x%2Fuploads%2FynLWLJ8TSQ3Ki8d1tsNY%2F15.png?alt=media)

![](https://4282324958-files.gitbook.io/~/files/v0/b/gitbook-x-prod.appspot.com/o/spaces%2F-MXep_PEmh8mDPVWj49x%2Fuploads%2FbjMxe9Btgnh3r9B0dk9o%2F16.png?alt=media)

### **Identify and Manage Duplicate Claims Instantly**

Now, the system will spot and flag duplicate expense entries based on the **expense type** and **expense amount**. System will notify employee about it and they can easily **edit** or **delete** duplicate entries directly from the pop-up notification. This improves efficiency in expense management and saves time.

![](https://4282324958-files.gitbook.io/~/files/v0/b/gitbook-x-prod.appspot.com/o/spaces%2F-MXep_PEmh8mDPVWj49x%2Fuploads%2F6UfkAHac7nmW9C3ZunP2%2F17.png?alt=media)

### **Quickly Choose HR Letter Templates with a Dropdown**

Now you can experience faster template creation by simply selecting the template tags from the dropdown. This reduces the effort to manually enter the template and improves efficiency by eliminating the possibility of error.

![](https://4282324958-files.gitbook.io/~/files/v0/b/gitbook-x-prod.appspot.com/o/spaces%2F-MXep_PEmh8mDPVWj49x%2Fuploads%2Fngm1Uo9yCgFKOtcIIYjX%2F18.png?alt=media)

### **Manage FnF Department Heads Faster with Import & Export**

No more tagging the department heads one by one. Simply import department heads details and priorities at once using the Excel sheet in the FnF Department Head Manager. You can also generate an Excel sheet with a list of all department heads saved so far, reducing time and effort as well as bringing precision to the process.&#x20;

<figure><img src="https://4282324958-files.gitbook.io/~/files/v0/b/gitbook-x-prod.appspot.com/o/spaces%2F-MXep_PEmh8mDPVWj49x%2Fuploads%2FBOnOlZc0L5MIanc9UfcG%2F19.png?alt=media" alt=""><figcaption></figcaption></figure>

### **Simplify Department Head Assignments** in FnF Department Head Manager

Now you get the flexibility to assign a single manager to all departments. This will save a lot of time during manual entry. You also get an option to replace the current manager with a new one, in the FnF Department Head Manager with a single click, making the process hustle free.

<figure><img src="https://4282324958-files.gitbook.io/~/files/v0/b/gitbook-x-prod.appspot.com/o/spaces%2F-MXep_PEmh8mDPVWj49x%2Fuploads%2FlxkN2auOje5vrW6NYzsL%2F20.png?alt=media" alt=""><figcaption></figcaption></figure>

### **Easily Notify Department Heads for Exit and FnF Events**

Admin/HR can now send email notifications to Department Heads for Exit and FnF-related events, such as when an employee submits their separation request or when FnF forms are activated. You can easily choose the type of event, either 'Exit' or 'FnF', to specify which department heads should receive the email notification.

<figure><img src="https://4282324958-files.gitbook.io/~/files/v0/b/gitbook-x-prod.appspot.com/o/spaces%2F-MXep_PEmh8mDPVWj49x%2Fuploads%2FoGog3xl8ObADoAHjeHv4%2F14.1.png?alt=media&amp;token=24b588ed-ec59-4495-8e2f-d8c54513cf21" alt=""><figcaption></figcaption></figure>

### **Custom Field Tracking Now Available in Recruitment Module**

The trackers in the Recruitment module now capture data from all custom fields for both Candidates and Jobs. Previously, only default fields were tracked. This improvement will provide more detailed data analysis by capturing all relevant information.

<figure><img src="https://4282324958-files.gitbook.io/~/files/v0/b/gitbook-x-prod.appspot.com/o/spaces%2F-MXep_PEmh8mDPVWj49x%2Fuploads%2Ft0QQVBFP9uVkymDRWaiY%2F15.1.png?alt=media&amp;token=e2f26a6d-35f0-4550-9a4f-94f9517ab079" alt=""><figcaption></figcaption></figure>

For any queries, contact <support@pockethrms.com>


# October & November 2024

We are thrilled to present our Monthly Update, with enhanced user-friendly tools to elevate your HR experience. Our commitment to innovation and efficiency drives us to bring you seamless updates that transform your HR processes. For the months of October & November, we have the following enhancements.

### Comp Off Leave, Now with a Deadline!

Admins can now restrict employees from applying for Comp Off leave after a specific timeframe from the Comp Off date. That ensures policy compliance and prevents misuse of leave.

**For example,** If the Comp Off date is 13th September and the limit is 30 days, leave can only be applied between 13th September and 12th October. Requests outside this range will be denied.

![](https://4282324958-files.gitbook.io/~/files/v0/b/gitbook-x-prod.appspot.com/o/spaces%2F-MXep_PEmh8mDPVWj49x%2Fuploads%2FYoeevjpquw73IBoxqMqx%2F0.png?alt=media)

### Turn OT Hours into Time Off Seamlessly

Introducing configurations to consider OT hours as Comp Off for week offs/holidays. Simply, define OT hour ranges and their corresponding Comp Off counts and system will automatically credit Comp off accordingly. There is no minimum hour limit giving you greater flexibility and saving a ton of time.

![](https://4282324958-files.gitbook.io/~/files/v0/b/gitbook-x-prod.appspot.com/o/spaces%2F-MXep_PEmh8mDPVWj49x%2Fuploads%2FHpkV5jx3sOAQ3NMgxJSS%2F1.png?alt=media)

### Revolutionizing Consecutive Leave Management

With this release, we introduce the following improvements to consecutive leave policies:

#### Consecutive Leaves Restricted

Employees cannot take consecutive leave days without a break. Promotes balanced leave utilization and appropriate rest periods.

#### Week offs and Holidays Excluded

Week offs and holidays are excluded from consecutive leave calculations. Providing flexibility by not penalizing leaves around company holidays or regular time off.

#### Same Leave Type Restriction

The system restricts consecutive usage of the same leave type. Encouraging varied leave usage and identifying potential attendance concerns. These enhancements allow transparent leave administration, supporting employee well-being and operational efficiency.

![](https://4282324958-files.gitbook.io/~/files/v0/b/gitbook-x-prod.appspot.com/o/spaces%2F-MXep_PEmh8mDPVWj49x%2Fuploads%2FN86xs1xswn2MhVA2TgaV%2F2.png?alt=media)

### Bell Curve Flexibility: Tailor Your Appraisal Process

The Appraisal module has been enhanced to provide greater flexibility and configuration options for the Bell Curve functionality.

#### Rating Type Configuration

Users can select ‘Scale’ with a default range of 1-5 or ‘Weightage’ which displays the Grade % as the rating type for appraisals.

#### Define Bell Curve Screen

The graph dynamically updates based on the first three values entered. Users can display either Rating Scale or Grade % in the first column. Strict validation ensures the first three values are in ascending order, with the total Expected % equaling 100%.

#### Rating Normalization Screen

The Rating Normalization screen will now adapt its columns based on the selected rating type (Scale or Grade %). Normalization calculations align with the chosen configuration. An additional "Count to be Normalized" column provides further insights.

![](https://4282324958-files.gitbook.io/~/files/v0/b/gitbook-x-prod.appspot.com/o/spaces%2F-MXep_PEmh8mDPVWj49x%2Fuploads%2Fin6KgDeTsSzOjjbN4FEa%2F3.png?alt=media)

![](https://4282324958-files.gitbook.io/~/files/v0/b/gitbook-x-prod.appspot.com/o/spaces%2F-MXep_PEmh8mDPVWj49x%2Fuploads%2Fi1bR1lkBrgFNoEL6FDFV%2F4.png?alt=media)

![](https://4282324958-files.gitbook.io/~/files/v0/b/gitbook-x-prod.appspot.com/o/spaces%2F-MXep_PEmh8mDPVWj49x%2Fuploads%2FR5QqnSuAMKJetd2lZPvY%2F5.png?alt=media)

### Real-time Daily Shift-wise Headcount

Now, you can get Department and shift-wise headcount reports with details such as the number of employees present on the current day based on the employee punches. You can also export a list of the present and absent employees by selecting a business unit.&#x20;

<figure><img src="https://4282324958-files.gitbook.io/~/files/v0/b/gitbook-x-prod.appspot.com/o/spaces%2F-MXep_PEmh8mDPVWj49x%2Fuploads%2FmTUXGa50QG3tuoDx8Msv%2F6.png?alt=media" alt=""><figcaption></figcaption></figure>

### Effortless Learning Certificate Customization

HR can now configure learning certificates more easily by selecting a learning template and mapping fields directly into the certificates. This ensures all key details about the learning program are included.\
**The Learning fields are as follows:**

Learning Code

* Learning Name
* Duration
* Start Date
* End Date
* Completion Date
* Learning Head

![](https://4282324958-files.gitbook.io/~/files/v0/b/gitbook-x-prod.appspot.com/o/spaces%2F-MXep_PEmh8mDPVWj49x%2Fuploads%2F6jbyodxD692La1hTkm5Q%2F7.png?alt=media)

### A Quick Toggle to Make Expense Modes Mandatory

HR can now make modes mandatory for specific expense types with a simple toggle key. Once activated, if the employee chooses no mode, the system will block expense submissions on the ESS portal. This will streamline the process and increase efficiency in expense management.

![](https://4282324958-files.gitbook.io/~/files/v0/b/gitbook-x-prod.appspot.com/o/spaces%2F-MXep_PEmh8mDPVWj49x%2Fuploads%2Fr3Iwch3w4iQnLHcKy6Xt%2F8.png?alt=media)

### More Flexibility in Managing Expense Entries

Our latest UX improvement allows managers to select or deselect individual expense entries as needed. They are no longer restricted to either approve or reject the entry. Now, managers can choose not to take action on specific entries allowing greater flexibility and control.

<figure><img src="https://4282324958-files.gitbook.io/~/files/v0/b/gitbook-x-prod.appspot.com/o/spaces%2F-MXep_PEmh8mDPVWj49x%2Fuploads%2FleP4MTZi6PD11dYAZTmD%2F9.png?alt=media" alt=""><figcaption></figcaption></figure>

### Travel Approval with Editable Amounts & disclaimer

The new travel enhancement lets you add finance approval to travel advance requests. When enabled, all requests need finance approval. The final amounts for travel advances and reimbursements can also edited during finance approval. Plus, an approval note or disclaimer can be added to the approval pages through the travel configuration settings.

![](https://4282324958-files.gitbook.io/~/files/v0/b/gitbook-x-prod.appspot.com/o/spaces%2F-MXep_PEmh8mDPVWj49x%2Fuploads%2FnwbMtCK17IWqoHRu00L0%2F10.png?alt=media)

![](https://4282324958-files.gitbook.io/~/files/v0/b/gitbook-x-prod.appspot.com/o/spaces%2F-MXep_PEmh8mDPVWj49x%2Fuploads%2FSAOPjOkpH2dRQ56QAnDh%2F11.png?alt=media)

![](https://4282324958-files.gitbook.io/~/files/v0/b/gitbook-x-prod.appspot.com/o/spaces%2F-MXep_PEmh8mDPVWj49x%2Fuploads%2Fr2B4P7BFgTfPVu5xAF4k%2F12.png?alt=media)

### Track Every Category Change with Ease

The category transfer feature is now improved further with visibility of the past transfers. Enabling to easily track all the previous changes.

<figure><img src="https://4282324958-files.gitbook.io/~/files/v0/b/gitbook-x-prod.appspot.com/o/spaces%2F-MXep_PEmh8mDPVWj49x%2Fuploads%2FugLTEX227mf8T0W1z2vS%2F0.png?alt=media" alt=""><figcaption></figcaption></figure>

### Simplified Sorting for HR Separation Data

A filter has been added to the HR Separation Approval page where the HR can filter out the entries based on the combination of the filters defined making it even easier to sort the data and take action on the same.

![](https://4282324958-files.gitbook.io/~/files/v0/b/gitbook-x-prod.appspot.com/o/spaces%2F-MXep_PEmh8mDPVWj49x%2Fuploads%2FsuADmusyaHHkDauI2toP%2F1.png?alt=media)

![](https://4282324958-files.gitbook.io/~/files/v0/b/gitbook-x-prod.appspot.com/o/spaces%2F-MXep_PEmh8mDPVWj49x%2Fuploads%2FvbOKtyZV1elw2X6Q5tQk%2F2.png?alt=media)

### Convenient filter in exit tracker report

A filter has been added to the Exit Tracker report where the HR can further filter out the entries based on the combination of the filters defined making it even easier to sort the data.

![](https://4282324958-files.gitbook.io/~/files/v0/b/gitbook-x-prod.appspot.com/o/spaces%2F-MXep_PEmh8mDPVWj49x%2Fuploads%2FhzPlzl2gl7GSR0eP8jAd%2F3.png?alt=media)

<figure><img src="https://4282324958-files.gitbook.io/~/files/v0/b/gitbook-x-prod.appspot.com/o/spaces%2F-MXep_PEmh8mDPVWj49x%2Fuploads%2FeEgqVuTvgkSx53RtNmIV%2Fb16.png?alt=media&amp;token=84b0667b-0f46-4b5e-bf80-cee0bfe720e1" alt=""><figcaption></figcaption></figure>

### Enhanced Layout for Exit Interviews

The Exit Interview Form has been improved with a panel-wise layout, making it easier for employees to fill out by organizing the questions in a clear, structured format.

![](https://4282324958-files.gitbook.io/~/files/v0/b/gitbook-x-prod.appspot.com/o/spaces%2F-MXep_PEmh8mDPVWj49x%2Fuploads%2Fk8vvq3ayqwbSDwbIWgfS%2F5.png?alt=media)

![](https://4282324958-files.gitbook.io/~/files/v0/b/gitbook-x-prod.appspot.com/o/spaces%2F-MXep_PEmh8mDPVWj49x%2Fuploads%2FhZtnKVxnb2EQ9yiJDYnl%2F6.png?alt=media)

### e-POSH: Empowering Action Against Harassment

The e-POSH (Prevention of Sexual Harassment) module is now available on web and mobile. It allows female employees to report sexual harassment incidents at the workplace, either for themselves or co-workers, with an option to keep their identity anonymous. A Complaint Committee can be set up, including a Committee Head and members, who can monitor and take necessary actions through the ESS portal.

![](https://4282324958-files.gitbook.io/~/files/v0/b/gitbook-x-prod.appspot.com/o/spaces%2F-MXep_PEmh8mDPVWj49x%2Fuploads%2FWKgWZwvYwLhW9XaRwNE2%2F7.png?alt=media)

![](https://4282324958-files.gitbook.io/~/files/v0/b/gitbook-x-prod.appspot.com/o/spaces%2F-MXep_PEmh8mDPVWj49x%2Fuploads%2F3hOh5aDhE3UPSlt6fj4U%2F8.png?alt=media)

![](https://4282324958-files.gitbook.io/~/files/v0/b/gitbook-x-prod.appspot.com/o/spaces%2F-MXep_PEmh8mDPVWj49x%2Fuploads%2FXUwLvHi8nuA6ETCqMFlp%2F9.png?alt=media)

!\[A screenshot of a computer

Description automatically generated]\(/files/R5RhuLc4yXaucCjpOLeI)

### Simplify FnF with Department Filters

A new filter is added to the FnF Department Head Manager page, allowing you to filter entries by department. This makes it easier to manage and view information by department. The department name is now also displayed in the entries.

![](https://4282324958-files.gitbook.io/~/files/v0/b/gitbook-x-prod.appspot.com/o/spaces%2F-MXep_PEmh8mDPVWj49x%2Fuploads%2FsGiTxCxoe79NBqxJOlJP%2F11.png?alt=media)

### Display Last Working Dates for HR Approvals

Now the Last Working Date is shown to the HR while approving the separation entries based on the notice period, the employee's request, and the manager's approval. This enables HR to take quick and informed decision.

![](https://4282324958-files.gitbook.io/~/files/v0/b/gitbook-x-prod.appspot.com/o/spaces%2F-MXep_PEmh8mDPVWj49x%2Fuploads%2FzRxbINj7EEXj6Php2bNL%2F12.png?alt=media)

## Streamline Employee Access&#x20;

We have introduced a new module named Employee Access. Here, the managers have been given an option to raise requests on behalf of their subordinates to grant or revoke access on various events like New Joining, Promotion, Separation, etc. Access forms can be created in Form Master and the requests can be raised by Managers in ESS and approved by the IT Team.

<figure><img src="https://4282324958-files.gitbook.io/~/files/v0/b/gitbook-x-prod.appspot.com/o/spaces%2F-MXep_PEmh8mDPVWj49x%2Fuploads%2FRcRk96ha5yma9Gfgqx7F%2FFrame%2097.png?alt=media&amp;token=7616ad13-e800-47a5-857c-b7c8fac9aa48" alt=""><figcaption></figcaption></figure>

### Key Insights in the Helpdesk Employee Report

The employee report in helpdesk has been enhanced by adding columns like:

* **Response Received**: Shows when the first response was received after the ticket was created.
* **Last Updated by (Code and Name)**: Displays who last updated the ticket.
* **Last Updated Date and Time**: Shows when the ticket was last updated.

Providing comprehensive overview

![](https://4282324958-files.gitbook.io/~/files/v0/b/gitbook-x-prod.appspot.com/o/spaces%2F-MXep_PEmh8mDPVWj49x%2Fuploads%2F49MZKAySWtKAEFZ4nKWx%2F13.png?alt=media)

### Easily Copy Forms Across Companies

Admins and HRs can now copy form templates from one company to another within the same login. Multiple forms from a single module can be copied to several companies at once. For Exit Management and AccessForm modules, if the target company already has a form, the system will notify the user. This update significantly reduces manual effort in creating the same forms for different companies.

![](https://4282324958-files.gitbook.io/~/files/v0/b/gitbook-x-prod.appspot.com/o/spaces%2F-MXep_PEmh8mDPVWj49x%2Fuploads%2FAvIJu0467McjpasEcuD0%2F14.png?alt=media)

### Simplify CTC Creation with smHRt AI

Admins/HR can now use smHRt AI to easily generate the CTC Template and Annexure Table, or just the Annexure Table. The generated template can be edited, allowing changes to properties like font style, size, and headings.<br>

![](https://4282324958-files.gitbook.io/~/files/v0/b/gitbook-x-prod.appspot.com/o/spaces%2F-MXep_PEmh8mDPVWj49x%2Fuploads%2FO6noIhM7BBx8ciGYIoLw%2F15.png?alt=media)

### Know Your Last Working Day at a Glance

Now the employees who are on their notice period will be able to see their Last Working Date on their ESS and Mobile Dashboard.

![](https://4282324958-files.gitbook.io/~/files/v0/b/gitbook-x-prod.appspot.com/o/spaces%2F-MXep_PEmh8mDPVWj49x%2Fuploads%2FH1QKIpPezuJUVjqeHgHd%2F16.png?alt=media)

![](https://4282324958-files.gitbook.io/~/files/v0/b/gitbook-x-prod.appspot.com/o/spaces%2F-MXep_PEmh8mDPVWj49x%2Fuploads%2FSLKuUmEePoCkSjviQl7l%2F17.png?alt=media)

For any queries, contact <support@pockethrms.com>


# September 2024

We are thrilled to present our Monthly Update, with enhanced user-friendly tools to elevate your HR experience. Our commitment to innovation and efficiency drives us to bring you seamless updates that transform your HR processes. For the month of July, we have the following enhancements.

### Track Actual vs. Regularized Times with Ease

The Attendance Regularization Report now shows both the actual IN/OUT times and the regularized IN/OUT times. This gives you a complete view of attendance records. The enhancement is reflected in My Report, Team Report, as well as Employee Report.

![My Report:](https://4282324958-files.gitbook.io/~/files/v0/b/gitbook-x-prod.appspot.com/o/spaces%2F-MXep_PEmh8mDPVWj49x%2Fuploads%2Fiixeix2e7lofFA5S729g%2F0.png?alt=media)

!\[A screenshot of a computer

My Team Report/Employee Report]\(/files/3uTBsTXEmYzFjkZreAlT)

Remark Configuration for Regularization and On Duty

!\[A screenshot of a computer

Description automatically generated]\(/files/QP8WToh7e8FXojC2ZxO6)

### Flexible Remarks in Regularization and On Duty

Now, HR can choose whether to make it mandatory for employees to provide remarks while submitting the regularization & on duty requests or not. If you make remarks mandatory, employees will have to provide them. If it is kept optional, employees can choose to submit their requests with or without remarks.

!\[A screenshot of a computer

Description automatically generated]\(/files/g6MpOruSlnly3AJnqZUS)

### On-Duty Type Option for Greater Clarity

With our new enhancement along with the On-duty Remarks you can also configure the dropdown values for the ‘On-Duty Type’ field. The configured values will be visible to employee in dropdown options for easy selection. Providing greater ease, segregation and keep comprehensive information.

Some Examples for reference,

**On Duty Type:** Work from Home, Field Work, Client Meetings, External Training Sessions, Site Visits, etc.

**On Duty Remarks:** Equipment Maintenance, Client Follow-up, Project Coordination, Research and Development, etc.

!\[A screenshot of a computer

Description automatically generated]\(/files/FnSJUK93o6sieFqphBTq)

### Complete Comp Off Reports at Your Fingertips

Pocket HRMS allows you to download a detailed Comp Off Elapse Report. The report includes dates when comp offs were credited, how many have been used, the remaining balance, manager approvals, and details about expired comp offs.

To get this report, make sure the Elapse Feature is set up in the Leave Configuration screen.

!\[A screenshot of a computer

Description automatically generated]\(/files/7K5sbo9Yoq4NwrmwQEyU)

!\[A screenshot of a computer

Description automatically generated]\(/files/NMGJ8DC99tiu2lgAom69)

!\[A screenshot of a computer

Description automatically generated]\(/files/5ItPtu5FihgIzskfi4yn)

!\[A screenshot of a computer

Description automatically generated]\(/files/SqzL2ZAd5jvWgnV2Rt9K)

### Customize Week-Off Scheduling

The week-off setting is now more flexible than ever before. Now you have more control and select whether the 1st, 2nd, 3rd, 4th, or 5th occurrence of a day (like Sunday) should be your week-off for a certain date range.

Once you save the settings, your choices will be clearly shown on the screen for easy reference and full transparency.

!\[A screenshot of a computer

Description automatically generated]\(/files/LlIDWMcZj63e68AALf3y)

### Automatic Alerts for Incomplete Shift Hours

Employees who haven't finished their scheduled shift hours will now automatically receive an email notification. The email will include details like how many hours are missing, the actual shift hours, and other important information.

!\[A screenshot of a computer

Description automatically generated]\(/files/q984ZjQbmkF3Uazfx4mx)

### All New Dashboard for Easy Access to Work Essentials

We’ve created a new, all-in-one employee dashboard that gives a clear view of everything important. Employees can easily check their profile details, shift schedules, upcoming events, leave history, monthly attendance, and company news. With a fresh, easy-to-use design, we’ve also made it simpler for employees to apply for leave, view salary details, and connect with their managers.

![](https://4282324958-files.gitbook.io/~/files/v0/b/gitbook-x-prod.appspot.com/o/spaces%2F-MXep_PEmh8mDPVWj49x%2Fuploads%2FPCzsYbpkWeJuchrb3hSo%2F11.png?alt=media)

### Faster Company Selection in a Single Click

We’ve made it easier to select and switch between companies. Now, when you click on the company field, start typing the company name, and it will instantly appear, allowing you to switch companies with just one click. This update makes navigation faster and reduces the number of steps needed.

![](https://4282324958-files.gitbook.io/~/files/v0/b/gitbook-x-prod.appspot.com/o/spaces%2F-MXep_PEmh8mDPVWj49x%2Fuploads%2FB7qmmhwVKy1gfkFz67cs%2F12.png?alt=media)

### Upload Multiple Expense Files with Ease

You can now upload multiple files at once when submitting expenses. Now, you can add several files, and they will be downloaded together in a ZIP folder. The system has a size limit—each file can be up to 5MB, and for multiple files, the total size can be up to 20MB. This new feature is available on both the web and mobile apps, saving a lot of time and effort.

<figure><img src="https://4282324958-files.gitbook.io/~/files/v0/b/gitbook-x-prod.appspot.com/o/spaces%2F-MXep_PEmh8mDPVWj49x%2Fuploads%2FV8BBfwgEqhbN4zd8R7Fo%2F13.png?alt=media" alt=""><figcaption></figcaption></figure>

### Quickly Edit and Resubmit Travel Advance Requests

We've added a new page where employee can easily see all the pending travel advance requests. The user can also view any rejected requests on this page and use the new EDIT option to make changes and resubmit them, or simply resubmit without any changes. Eliminating the need to create a new request from the scratch if the previous one is rejected, making the process faster and more efficient.

![](https://4282324958-files.gitbook.io/~/files/v0/b/gitbook-x-prod.appspot.com/o/spaces%2F-MXep_PEmh8mDPVWj49x%2Fuploads%2Fs6CyfjC9YRNdlDTadnUP%2F14.png?alt=media)

### Informative and Efficient Learning Cards

Get better clarity with our new simpler and easy to understand cards. Now, the Learning Card layout also gives you quick options to easily edit, archive, copy, or delete cards

The Learning Card shows important information, including:

* Trainer details
* Learning mode
* Learning period
* Duration in hours and days

![](https://4282324958-files.gitbook.io/~/files/v0/b/gitbook-x-prod.appspot.com/o/spaces%2F-MXep_PEmh8mDPVWj49x%2Fuploads%2Fvf6GeTUTf4uPndXaak83%2F15.png?alt=media)

### **Sort Fields by Module and Order with Ease**

Pocket HRMS now provides is an option to sort fields by module name and order number. Making it quicker to identify which fields were created for each module and simpler to find the information you need.

<figure><img src="https://4282324958-files.gitbook.io/~/files/v0/b/gitbook-x-prod.appspot.com/o/spaces%2F-MXep_PEmh8mDPVWj49x%2Fuploads%2FH7vChRjGn6Qe8XizqqIP%2Fkkkk.png?alt=media&amp;token=b01c9819-4ab0-45ab-950e-c1a63441cd97" alt=""><figcaption></figcaption></figure>

### **More Clarity in Probation & Training Decisions**

Now in addition to the Extend and Confirm button, we’ve added a separate **Reject** button in the probation and training decision interface. Managers can easily reject an employee during their probation or training period, change their status, and send a notification. The confirmation page will also show if an employee has been rejected.

![](https://4282324958-files.gitbook.io/~/files/v0/b/gitbook-x-prod.appspot.com/o/spaces%2F-MXep_PEmh8mDPVWj49x%2Fuploads%2F5dBQ4YD6dPkiCEhagOY5%2F1.png?alt=media)

### **User-Friendly Employee Confirmation Form**

Now we make it easier to use Employee Confirmation Form. The new design is clearer and better organized, helping HR managers and team leads evaluate employee performance more effectively. This updated form incorporates your feedback and follows best practices from the previous version.

![Previous Format ](https://4282324958-files.gitbook.io/~/files/v0/b/gitbook-x-prod.appspot.com/o/spaces%2F-MXep_PEmh8mDPVWj49x%2Fuploads%2Frf8y9SRSNKgE6W1cKUdk%2F2.png?alt=media) ![New Format](https://4282324958-files.gitbook.io/~/files/v0/b/gitbook-x-prod.appspot.com/o/spaces%2F-MXep_PEmh8mDPVWj49x%2Fuploads%2FtErrV7qj7OMNWfLq2lqq%2F3.png?alt=media)

### **Streamlined Separation Process for Managers**

With our latest update HR can now let managers change the Last Working Date when they approve an employee’s Separation request. The request for change will be communicated to higher-level managers, department heads, and HR during the approval process.

The access can be easily controlled from the ‘Exit Notification Settings’ page.

![](https://4282324958-files.gitbook.io/~/files/v0/b/gitbook-x-prod.appspot.com/o/spaces%2F-MXep_PEmh8mDPVWj49x%2Fuploads%2FMYOEJE0uyzDmqQJRRScL%2F4.png?alt=media)

![](https://4282324958-files.gitbook.io/~/files/v0/b/gitbook-x-prod.appspot.com/o/spaces%2F-MXep_PEmh8mDPVWj49x%2Fuploads%2FQshDZ1gA5dPDrIPPEpYv%2F5.png?alt=media)

![](https://4282324958-files.gitbook.io/~/files/v0/b/gitbook-x-prod.appspot.com/o/spaces%2F-MXep_PEmh8mDPVWj49x%2Fuploads%2FVxqoDMgX3KUt1s5QwefP%2F6.png?alt=media)

### **Customize Your Exit Reports with New Fields**

We’ve added new fields to the Separation Module in Data Wizard! Now, HR can easily create a customized Exit Report based on their needs. This way you always get complete exit report as per your company policies.

![](https://4282324958-files.gitbook.io/~/files/v0/b/gitbook-x-prod.appspot.com/o/spaces%2F-MXep_PEmh8mDPVWj49x%2Fuploads%2FYRkNNSwPxTPomteAevW8%2F7.png?alt=media)

### **Streamline Resignation Requests with Mobile App**

Experience the seamless exit process from the mobile app. Employees can now submit their resignation requests directly from their mobile apps. Managers and Department Heads can approve or reject these requests right from their phones as well. This feature is available on both Android and iOS, and it works just like it does on the web. Providing consistent & uniform experience.

![](https://4282324958-files.gitbook.io/~/files/v0/b/gitbook-x-prod.appspot.com/o/spaces%2F-MXep_PEmh8mDPVWj49x%2Fuploads%2FaPY7G0bzgL4wlSQCnCZP%2F8.png?alt=media) ![](https://4282324958-files.gitbook.io/~/files/v0/b/gitbook-x-prod.appspot.com/o/spaces%2F-MXep_PEmh8mDPVWj49x%2Fuploads%2FYKOTkmT0IsKy9afyMX8C%2F9.png?alt=media) ![](https://4282324958-files.gitbook.io/~/files/v0/b/gitbook-x-prod.appspot.com/o/spaces%2F-MXep_PEmh8mDPVWj49x%2Fuploads%2FRnfIHKkjT3pQ6XZtVWbR%2F10.png?alt=media)

### **Personalize Headers and Footers Effortlessly**

Admins and HR can now change the Header and Footer in each Email and CTC template for the recruitment module. If the main Header and Footer are set to Custom, they can update the images in each template without affecting the primary setting. You can also delete images from individual templates if needed.

![](https://4282324958-files.gitbook.io/~/files/v0/b/gitbook-x-prod.appspot.com/o/spaces%2F-MXep_PEmh8mDPVWj49x%2Fuploads%2FVzQOIDZB40d5L0XNI83x%2F11.png?alt=media)

### **Easily Add Attachments to Your FnF Settlement**

Now, Admins and HR can easily add custom attachments when handling the Full and Final Settlement. They can upload one file at a time or several files together in a .zip format, with a maximum size of 5 MB. Later, these files can be downloaded using the ‘Preview’ option, which will include both the files and the FnF checklist.

![](https://4282324958-files.gitbook.io/~/files/v0/b/gitbook-x-prod.appspot.com/o/spaces%2F-MXep_PEmh8mDPVWj49x%2Fuploads%2FjBDidPiuw2bLT9cXGqJV%2F12.png?alt=media)

### Clear Salary Tags for Easy Understanding

The system will now display tags on the Salary Details screen to show how salaries were processed. For instance, if the salary includes Income Tax, a tag will appear to indicate this. This feature will help HR easily understand how each salary was calculated. You’ll also see these tags on the Salary Summary page.

![](https://4282324958-files.gitbook.io/~/files/v0/b/gitbook-x-prod.appspot.com/o/spaces%2F-MXep_PEmh8mDPVWj49x%2Fuploads%2FJcDEt31rTYps1s3zSY5T%2F13.png?alt=media)

<figure><img src="https://4282324958-files.gitbook.io/~/files/v0/b/gitbook-x-prod.appspot.com/o/spaces%2F-MXep_PEmh8mDPVWj49x%2Fuploads%2FAnXcRV2kCU3ZKv7sYs2o%2F14.png?alt=media" alt=""><figcaption></figcaption></figure>

For any queries, contact <support@pockethrms.com>


# August 2024

We are thrilled to present our Monthly Update, with enhanced user-friendly tools to elevate your HR experience. Our commitment to innovation and efficiency drives us to bring you seamless updates that transform your HR processes. For the month of August, we have the following enhancements.

### Easily Manage Job Openings with Job Tracker Report

Our new and improved Job Tracker Report offers a complete view of all job openings in one place. It includes key details like Job Code, Title, Location, Department, Salary Range, Experience Requirements, Recruiters, Interviewers, Hiring Managers, and Candidate Progress (from application to hiring). Plus, we've unified all recruitment trackers into one, making everything easier to access and manage. You can search for data on-screen or export it to Excel for in-depth analysis.<br>

<figure><img src="https://4282324958-files.gitbook.io/~/files/v0/b/gitbook-x-prod.appspot.com/o/spaces%2F-MXep_PEmh8mDPVWj49x%2Fuploads%2FAYMkllsPcUmkBOASjaeQ%2F0.png?alt=media" alt=""><figcaption></figcaption></figure>

### Effortlessly Track Employee Departures

The Exit Tracker helps HR create detailed reports on employee exits. It includes important details like employee code, resignation date, notice period, last working day, approval statuses, and HR remarks. This tool streamlines the exit process and approval tracking. You can easily search, filter, and export the data to Excel for further analysis.

![](https://4282324958-files.gitbook.io/~/files/v0/b/gitbook-x-prod.appspot.com/o/spaces%2F-MXep_PEmh8mDPVWj49x%2Fuploads%2Fq0SNrwq8qqw5ni9eTUfm%2F1.png?alt=media)

### Automatic Question Migration for Exit Interviews

With the new 'Form Master' system, all existing exit interview questions will automatically move from the old 'Dynamic Form' to the new setup. If a Form Master doesn’t exist, the system will create one and transfer all questions and options without any extra effort. This update removes the need to manually recreate questions, saving time and reducing manual work.

![](https://4282324958-files.gitbook.io/~/files/v0/b/gitbook-x-prod.appspot.com/o/spaces%2F-MXep_PEmh8mDPVWj49x%2Fuploads%2FAv3AqwTciA254xyBY22o%2F2.png?alt=media)

![](https://4282324958-files.gitbook.io/~/files/v0/b/gitbook-x-prod.appspot.com/o/spaces%2F-MXep_PEmh8mDPVWj49x%2Fuploads%2FF4siCBzHfBtUiHOFd7gU%2F3.png?alt=media)

### Clear Workforce Insights with Head Count Report

We've added a Head Count Report that gives you a clear view of your workforce during a specific period. It shows key details like how many employees were added or left, changes in total headcount, and important rates like retention and attrition. You can also generate a list of all employees for more detailed analysis.

![](https://4282324958-files.gitbook.io/~/files/v0/b/gitbook-x-prod.appspot.com/o/spaces%2F-MXep_PEmh8mDPVWj49x%2Fuploads%2FLysGEkK8LRulXWRbLKPq%2F4.png?alt=media)

<br>

<figure><img src="https://4282324958-files.gitbook.io/~/files/v0/b/gitbook-x-prod.appspot.com/o/spaces%2F-MXep_PEmh8mDPVWj49x%2Fuploads%2FAha3vCs8o5bPFt6tzX02%2F5.png?alt=media" alt=""><figcaption></figcaption></figure>

### Customizable Job Offer Approval Flow

\
We’ve created a flexible approval process for job offers. The system allows two options:

* Serial Approval: Both the Job Offer Approval Manager and Department Head approve the offer one after the other.
* Single Approval: Either the Job Offer Approval Manager or Department Head can approve the offer on their own.

With customizable approval settings, multiple managers or department heads can be included. Each approver can:

* Approve the offer as is.
* Reject the offer.
* Modify details like the offer letter, salary, or validity before approving.

The final approver can send the offer directly to the candidate, without needing further input from the recruiter.

<figure><img src="https://4282324958-files.gitbook.io/~/files/v0/b/gitbook-x-prod.appspot.com/o/spaces%2F-MXep_PEmh8mDPVWj49x%2Fuploads%2FMqmSJm97MkhUbxHk4QLu%2F6.png?alt=media" alt=""><figcaption></figcaption></figure>

<figure><img src="https://4282324958-files.gitbook.io/~/files/v0/b/gitbook-x-prod.appspot.com/o/spaces%2F-MXep_PEmh8mDPVWj49x%2Fuploads%2FEjZo0Ik9LaQm7V5uJyY9%2F7.png?alt=media" alt=""><figcaption></figcaption></figure>

<figure><img src="https://4282324958-files.gitbook.io/~/files/v0/b/gitbook-x-prod.appspot.com/o/spaces%2F-MXep_PEmh8mDPVWj49x%2Fuploads%2FqvDbAoxUREC1KZgpiUoO%2F8.png?alt=media" alt=""><figcaption></figcaption></figure>

<figure><img src="https://4282324958-files.gitbook.io/~/files/v0/b/gitbook-x-prod.appspot.com/o/spaces%2F-MXep_PEmh8mDPVWj49x%2Fuploads%2FVdw4c3cumXEqV7Kem0xO%2F9.png?alt=media" alt=""><figcaption></figcaption></figure>

### ‘Select All’ for Faster Stop Payment Reports

You can now choose all stop payment types at once when downloading reports. Previously, you had to select each type individually. This new option saves time by letting you include all stop payment types in a single report.

![](https://4282324958-files.gitbook.io/~/files/v0/b/gitbook-x-prod.appspot.com/o/spaces%2F-MXep_PEmh8mDPVWj49x%2Fuploads%2FIPXlhu7EW8xn3mMJmWFO%2F10.png?alt=media)

### Compact Pending Joining Document Report

We've updated the Pending Joining Document Report to show all document details in a single row. Now, each document's name appears in the heading, with its status (Received or Not Received) listed below. Previously, each document was displayed across multiple rows, but the new format makes it easier to view all details at once.

![](https://4282324958-files.gitbook.io/~/files/v0/b/gitbook-x-prod.appspot.com/o/spaces%2F-MXep_PEmh8mDPVWj49x%2Fuploads%2FJBDNu8qcA4aSnsRbDvhh%2F11.png?alt=media)

### Flexible Date Range Selection Week for Off

Now you can set custom week offs using the new date range option in the Week Off Setting screen. Instead of being limited to the default financial year, you can choose any start and end date to manage week offs more flexibly.

* **Custom Date Range:** Define your own start and end dates for week offs.
* **Enhanced Flexibility:** No need to set week offs for the entire financial year; adjust them for your preferred dates.
* **Easier Management:** Save time by setting week offs only for the period you need.

![](https://4282324958-files.gitbook.io/~/files/v0/b/gitbook-x-prod.appspot.com/o/spaces%2F-MXep_PEmh8mDPVWj49x%2Fuploads%2FIcY6YbA3kRHUPX0iinOP%2F12.png?alt=media)

### Count-Based Leave Debit Functionality

Users can now debit leaves by simply entering the number of days instead of picking a date range. This makes leave management easier and more flexible.

* **Count-Based Leave Debit:** Enter the number of days (e.g., 0.5, 1, 2), and the system automatically calculates the dates within the leave year.
* **Automatic Date Adjustment:** The system selects the start and end dates based on the number of days entered.
* **Simplified Interface:** No need to manually select a date range for standard leave deductions.
* **Complex Adjustments:** For advanced options like Fractional or Split Hours, use the 'Import Debit' tool for precise entries.
* **User Guidance:** Hover over the 'i' icon for detailed leave debit instructions.

![](https://4282324958-files.gitbook.io/~/files/v0/b/gitbook-x-prod.appspot.com/o/spaces%2F-MXep_PEmh8mDPVWj49x%2Fuploads%2F3XHHIMaMf2oQ01eqdtS7%2F13.png?alt=media)

![](https://4282324958-files.gitbook.io/~/files/v0/b/gitbook-x-prod.appspot.com/o/spaces%2F-MXep_PEmh8mDPVWj49x%2Fuploads%2F8qGfurLDYuLaLJ6jI8hy%2F14.png?alt=media)

### Flexible Header/Footer Options for Recruitment PDFs

We’ve introduced a new Header/Footer feature for Recruitment Email and CTC Templates, allowing users to choose how to display headers and footers in generated PDFs:

* **No Header/Footer**: PDFs will be created without any headers or footers.
* **System-Generated Header/Footer**: Automatically includes a header with the company logo and name, and a footer with the company name and address.
* **Custom Header/Footer**: Users can upload their own header and footer images to be included in the PDFs.

![](https://4282324958-files.gitbook.io/~/files/v0/b/gitbook-x-prod.appspot.com/o/spaces%2F-MXep_PEmh8mDPVWj49x%2Fuploads%2FvLq08KCySe8WYm0uqvTR%2F15.png?alt=media)

### Auto 20% Tax for Unlinked PAN with Aadhar

The system allows user deduction of 20% tax if an employee's PAN is not linked with Aadhar. Admin/HR can define in employee’s profile whether the PAN is linked with Aadhar or not and taxes will be calculated based on this during payroll processing.

![](https://4282324958-files.gitbook.io/~/files/v0/b/gitbook-x-prod.appspot.com/o/spaces%2F-MXep_PEmh8mDPVWj49x%2Fuploads%2F47Ldg7ATXy9bL3svtgyl%2F16.png?alt=media)

![](https://4282324958-files.gitbook.io/~/files/v0/b/gitbook-x-prod.appspot.com/o/spaces%2F-MXep_PEmh8mDPVWj49x%2Fuploads%2FmH3wlDFTCuYoLcGa9uep%2F17.png?alt=media)

### New Tax Regime updates <a href="#toc177340854" id="toc177340854"></a>

The tax slabs and the standard deduction for the new regime has been updated as per the Union Budget 2024.

| **Revised Tax Slabs (New Regime)** |                |              |
| ---------------------------------- | -------------- | ------------ |
| **2023**                           | **2024**       | **Tax Rate** |
| Up to ₹3 lakh                      | Up to ₹3 lakh  | Nil          |
| ₹3-6 lakh                          | ₹3-7 lakh      | 5%           |
| ₹6-9 lakh                          | ₹7-10 lakh     | 10%          |
| ₹9-12 lakh                         | ₹10-12 lakh    | 15%          |
| ₹12-15 lakh                        | ₹12-15 lakh    | 20%          |
| Above ₹15 lakh                     | Above ₹15 lakh | 30%          |

| **Standard Deduction** |          |
| ---------------------- | -------- |
| **2023**               | **2024** |
| ₹ 50,000               | ₹ 75,000 |

### Simplify Employee Tax Details with Descriptions

HR/Admin can now add descriptions to Tax Sections, Sub Sections, and Income Heads. These descriptions appear as tooltips (on the 'i' button) on employees’ TDS Declaration and Proof pages, helping them understand the details.

Also, HR/Admin can choose which Sub Sections and Income Heads to show when an employee selects the New Regime by toggling the 'Include in New Regime' setting to ‘Yes’ or ‘No.’

![](https://4282324958-files.gitbook.io/~/files/v0/b/gitbook-x-prod.appspot.com/o/spaces%2F-MXep_PEmh8mDPVWj49x%2Fuploads%2FSEhEnqRxwLbfaA8TJo05%2F18.png?alt=media)

![](https://4282324958-files.gitbook.io/~/files/v0/b/gitbook-x-prod.appspot.com/o/spaces%2F-MXep_PEmh8mDPVWj49x%2Fuploads%2FbDV6kMww149dzyE9rGT5%2F19.png?alt=media)

For any queries, contact <support@pockethrms.com>


# July 2024

We are thrilled to present our Monthly Update, with enhanced user-friendly tools to elevate your HR experience. Our commitment to innovation and efficiency drives us to bring you seamless updates that transform your HR processes. For the month of July, we have the following enhancements.

### Instant Department Visibility

Now it’s easier to get a complete view of employee details, as alongside the employee's designation, you will also see their ‘Department’ on the top section of their profile. This means you can instantly know both their role and the department they belong to, all in one glance.

![](https://4282324958-files.gitbook.io/~/files/v0/b/gitbook-x-prod.appspot.com/o/spaces%2F-MXep_PEmh8mDPVWj49x%2Fuploads%2FwZmqUJtiikkyifEVKpEZ%2F0.png?alt=media)

### Pre-configured Joining Documents

Pocket HRMS streamlines your onboarding process with a pre-configured list of the employee joining documents. That gives you,

* **Simplified Employee Mapping -** Our pre-configured list makes document mapping quick and easy, saving you time and effort.
* **Seamless Cross-Company Integration -** If a field is missing in your cross-company setup, a pop-up alert will appear. You can simply click on the 'Proceed' and the system will automatically create the necessary field.

![A screenshot of a computer](https://4282324958-files.gitbook.io/~/files/v0/b/gitbook-x-prod.appspot.com/o/spaces%2F-MXep_PEmh8mDPVWj49x%2Fuploads%2F5QP0GSVsGYNoApJKIunQ%2F1.png?alt=media)

### In-depth Trip Report

Now you can get all the trip details in expense with our new ‘Trip Detailed Report’. It enables you to get employee information, including their location and shift times. Plus, you get all the trip-specific information you need—like Start KM, End KM, and Total KM in a single report making it easy and time-efficient to analyse all the details.

![](https://4282324958-files.gitbook.io/~/files/v0/b/gitbook-x-prod.appspot.com/o/spaces%2F-MXep_PEmh8mDPVWj49x%2Fuploads%2FUv2Gfo5XwSQP6WqAc9Z7%2F2.png?alt=media)

### Leave Cycle Reflected in Attendance Settings

Now the ‘Maximum Count’ for the Regularization and On Duty will be aligned with existing leave calendar configurations i.e. ‘Month-wise’ or ‘Date-wise’. The option to set the maximum leave calendar will also reflect the leave configurations.

For example,

1. Let’s consider a case where leave calendar is set ‘Date-wise’, from 21st of current month to 20th of next month. Then the system will show this specific this date range in the option to set ‘Maximum Count’ for Regularization and on Duty. The system will also the consider the value you put in maximum count feature for this specific date range only.

![](https://4282324958-files.gitbook.io/~/files/v0/b/gitbook-x-prod.appspot.com/o/spaces%2F-MXep_PEmh8mDPVWj49x%2Fuploads%2F3MhvbXwvhtykvsFvBM50%2F3.png?alt=media)

<figure><img src="https://4282324958-files.gitbook.io/~/files/v0/b/gitbook-x-prod.appspot.com/o/spaces%2F-MXep_PEmh8mDPVWj49x%2Fuploads%2Fh96nIuqQUWIr7uOlfZ0E%2F4.png?alt=media" alt=""><figcaption></figcaption></figure>

In case, the leave calendar is set ‘Month-wise’, the maximum Regularization and On Duty count will be set and considered according to the respective months. (Standard Calendar Month).

![](https://4282324958-files.gitbook.io/~/files/v0/b/gitbook-x-prod.appspot.com/o/spaces%2F-MXep_PEmh8mDPVWj49x%2Fuploads%2FUMDWmMUrrJ4hFkfp3IZS%2F5.png?alt=media)

![](https://4282324958-files.gitbook.io/~/files/v0/b/gitbook-x-prod.appspot.com/o/spaces%2F-MXep_PEmh8mDPVWj49x%2Fuploads%2F3Xy4G8PMuWnGC1jkFLdX%2F6.png?alt=media)

### Effortless Email Composition with New Placeholders

Now, you can quickly draft comprehensive Recruitment and CTC emails with new & efficient placeholders. That enrich the email templates and makes your communication seamless and precise. Our newly introduced placeholders include:

* Job Title
* Job Code
* Job Department
* Job Type
* Job Cost Center
* Job Grade/Level
* Job Position

Along with that, you get Annual and Monthly CTC placeholders in both words and numbers format making the template more convenient than ever before.

![](https://4282324958-files.gitbook.io/~/files/v0/b/gitbook-x-prod.appspot.com/o/spaces%2F-MXep_PEmh8mDPVWj49x%2Fuploads%2FWz8CPFPwedJyXPMtYgyl%2F7.png?alt=media)

![](https://4282324958-files.gitbook.io/~/files/v0/b/gitbook-x-prod.appspot.com/o/spaces%2F-MXep_PEmh8mDPVWj49x%2Fuploads%2FIK0ZybcD5XmXlZEtzhTV%2F8.png?alt=media)

### Lock Resignation Date

Managing employee resignation is now made easier with the ‘Lock Resignation Date’ feature. That makes the resignation date non-editable for employees. So, the day on which an employee requests separation from the ESS portal, the same date will be considered as a resignation date for them and they can’t change it later. That gives more structured approach to the separation management process and improve efficiency.

![](https://4282324958-files.gitbook.io/~/files/v0/b/gitbook-x-prod.appspot.com/o/spaces%2F-MXep_PEmh8mDPVWj49x%2Fuploads%2FWPNuOpvRVh7iRL1yLxEI%2F9.png?alt=media)

### Separation Report includes Pending Requests

With our latest update, when you go to Data Wizard go get a Separation Report, it gives you a complete view. As, now along with the approved entries you will also get details for requests that are pending for approval. So, you get informed about a complete picture and then you can act quickly on any pending requests.

![](https://4282324958-files.gitbook.io/~/files/v0/b/gitbook-x-prod.appspot.com/o/spaces%2F-MXep_PEmh8mDPVWj49x%2Fuploads%2F86sbSYsMZ8p9tEqdTdqB%2F10.png?alt=media)

### Simplified Leave Credits with UI Enhancements

Pocket HRMS now provides you with greater flexibility. You can configure leave credit based on attendance, using various date parameters, such as the Date of Confirmation, Date of Joining, and more.

In addition to that, we made UI improvements such as:

* Explanation of how the leave credit works in attendance-based scenarios
* Option to choose leave credit based on leave balance or credited days
* An easy-to-access guide with a 'How it Works' link

These UI enhancements provide more flexibility and accuracy in managing leave credits.

![](https://4282324958-files.gitbook.io/~/files/v0/b/gitbook-x-prod.appspot.com/o/spaces%2F-MXep_PEmh8mDPVWj49x%2Fuploads%2FbRJaQ3bhdpLrgsiQCiAR%2F11.png?alt=media)

For any queries, contact <support@pockethrms.com>


# June 2024

We are thrilled to present our Monthly Update, with enhanced user-friendly tools to elevate your HR experience. Our commitment to innovation and efficiency drives us to bring you seamless updates that transform your HR processes. For the month of June, we have the following enhancements.

### Clarity with Data Segregation

Pocket HRMS now offers you better flexibility while exporting reporting manager details from the Data Wizard. You can choose whether you want to keep the Manager’s name and Manager’s code in a single column or segregate these two in the separate columns.

![](https://4282324958-files.gitbook.io/~/files/v0/b/gitbook-x-prod.appspot.com/o/spaces%2F-MXep_PEmh8mDPVWj49x%2Fuploads%2FRGwpztnRPVesUwBvFvad%2F0.png?alt=media)

### Date-Range Based Passwords Generation

Pocket HRMS allows you to generate passwords for new employees who joined in a particular date range. You also get an option to overwrite the existing password for comprehensive coverage. Make it easier to generate password for new employee with a well-organized system.

![](https://4282324958-files.gitbook.io/~/files/v0/b/gitbook-x-prod.appspot.com/o/spaces%2F-MXep_PEmh8mDPVWj49x%2Fuploads%2FlrNYxAZ19SeOfgyfzyWt%2F1.png?alt=media)

### Multiple SMTPs for Birthday E-mails

Now, you can create and manage multiple SMTP configurations for birthday email templates. You can now define several SMTP settings with unique server details and authentication credentials. The required the SMTP setting option can be selected from the ‘Sender's Email’ field during template creation.

![](https://4282324958-files.gitbook.io/~/files/v0/b/gitbook-x-prod.appspot.com/o/spaces%2F-MXep_PEmh8mDPVWj49x%2Fuploads%2FRj0GGK92QymQsF6MZzJX%2F2.png?alt=media)

![](https://4282324958-files.gitbook.io/~/files/v0/b/gitbook-x-prod.appspot.com/o/spaces%2F-MXep_PEmh8mDPVWj49x%2Fuploads%2FTHVDrWHDacdl0BivCudC%2F3.png?alt=media)

### Effortless Exit Form & Enhanced Flexibility

Now, exit forms can be generated directly from the general form creation page by simply selecting the ‘Exit Management’ option. Pocket HRMS provides you the flexibility to add multiple questions and customize those to gather relevant feedback making it more convenient.&#x20;

<figure><img src="https://4282324958-files.gitbook.io/~/files/v0/b/gitbook-x-prod.appspot.com/o/spaces%2F-MXep_PEmh8mDPVWj49x%2Fuploads%2FhUktcsRlIct1gcqqjbRS%2F4.png?alt=media" alt=""><figcaption></figcaption></figure>

### Optimized Employee Separation

Pocket HRMS will block the separation if the employee has any pending requests for

Leaves, On-Duty, Regularizations, Expenses, Reimbursements, or Loans. The system will display the 10 most recent pending requests in each category and also provide you with an option to download an Excel report. That makes the process of reviewing pending requests and taking the necessary steps to proceed with the separation, quick and effortless.

![](https://4282324958-files.gitbook.io/~/files/v0/b/gitbook-x-prod.appspot.com/o/spaces%2F-MXep_PEmh8mDPVWj49x%2Fuploads%2FCA24qWdLl3M5XYa1fYDs%2F5.png?alt=media)

![](https://4282324958-files.gitbook.io/~/files/v0/b/gitbook-x-prod.appspot.com/o/spaces%2F-MXep_PEmh8mDPVWj49x%2Fuploads%2F6fNetcO7OaKxUyTy68Md%2F6.png?alt=media)

![](https://4282324958-files.gitbook.io/~/files/v0/b/gitbook-x-prod.appspot.com/o/spaces%2F-MXep_PEmh8mDPVWj49x%2Fuploads%2Fd0JMcRjGb4Ovqt6pjOHF%2F7.png?alt=media)

### Inclusive Marital Status Options

We've updated the marital status field to offer employees more choices that better reflect their situations. This change provides greater flexibility and inclusivity, allowing employees to accurately represent their status.

![](https://4282324958-files.gitbook.io/~/files/v0/b/gitbook-x-prod.appspot.com/o/spaces%2F-MXep_PEmh8mDPVWj49x%2Fuploads%2FaZwNn6ZML7JmEcO6B97F%2F8.png?alt=media)

### Recruitment Templates with Candidate Info

We have enhanced our recruitment templates with master fields so you can get essential candidate information with ease. This includes job code, job position, job cost centre, Aadhar number, PAN (Permanent Account Number) long with the ‘additional information’ fields allowing to add other relevant details.

![](https://4282324958-files.gitbook.io/~/files/v0/b/gitbook-x-prod.appspot.com/o/spaces%2F-MXep_PEmh8mDPVWj49x%2Fuploads%2FQnVBqECZTaOvhnN4UX6T%2F9.png?alt=media)

### Hassle-Free Document Uploads

Now we enhanced the user-experience for the bulk employee document upload page contains a dedicated drop zone for easy uploads. If files don’t meet criteria the system will show an error and the files won't be uploaded so you can make the necessary corrections.

<figure><img src="https://4282324958-files.gitbook.io/~/files/v0/b/gitbook-x-prod.appspot.com/o/spaces%2F-MXep_PEmh8mDPVWj49x%2Fuploads%2Fi7zschEBGpM3sfpkyZ4L%2F10.png?alt=media" alt=""><figcaption></figcaption></figure>

### Adjust the Last Working Day with Ease <a href="#hlk170910702" id="hlk170910702"></a>

If an employee's Last Working Day (LWD) falls on a weekend or holiday, use the 'Last Working Day Adjustment' setting to shift the LWD based on the following options:

• Move to Next Working Day

• Move to Previous Working Day

• Stay on Holiday/Weekend

This feature allows better alignment with company policies and simplifies exit formalities for employees.

![](https://4282324958-files.gitbook.io/~/files/v0/b/gitbook-x-prod.appspot.com/o/spaces%2F-MXep_PEmh8mDPVWj49x%2Fuploads%2FsDbsOqIhmTyUrPrDtViE%2F11.png?alt=media)

![](https://4282324958-files.gitbook.io/~/files/v0/b/gitbook-x-prod.appspot.com/o/spaces%2F-MXep_PEmh8mDPVWj49x%2Fuploads%2FC6qxJw7aa7tnafZXKUKt%2F12.png?alt=media)

### Effortless Shift Assignment on Week-Offs

The Pocket HRMS roster management screen enables you to assign shifts on week-offs without replacing the week-off. This ensures accurate calculation of compensatory offs.

![](https://4282324958-files.gitbook.io/~/files/v0/b/gitbook-x-prod.appspot.com/o/spaces%2F-MXep_PEmh8mDPVWj49x%2Fuploads%2F17jMSGO4XebjUet2U4Wz%2F13.png?alt=media)

### Show Only Relevant Leave Option

Pocket HRMS now allows you to make your employee’s leave application experience clutter-free. You can choose to show gender-specific leave options only to the relevant users. For example, you can choose to show the ‘Maternity Leave’ option to only ‘Female’ users and the male users won’t see options that isn’t applicable to them.

<figure><img src="https://4282324958-files.gitbook.io/~/files/v0/b/gitbook-x-prod.appspot.com/o/spaces%2F-MXep_PEmh8mDPVWj49x%2Fuploads%2F7lsJpx2aBb9BUctEQL2w%2F14.png?alt=media" alt=""><figcaption></figcaption></figure>

### Flexible Attendance Summary Display

You can customize how to show the ‘Annual Attendance Summary’ to employees offering greater flexibility and makes it easier to grasp the information. You can now choose from three options:

* **Default View**: Shows summaries from the 1st to the 31st of each month.
* **Leave Calendar View**: Reflect summaries based on leave calendar settings, like from the 26th to the 25th of the next month.
* **Month Days View**: Shows the summary based on the number of days in the month. This setting is category-specific, so the view on the employee screen will reflect the appropriate category.

<figure><img src="https://4282324958-files.gitbook.io/~/files/v0/b/gitbook-x-prod.appspot.com/o/spaces%2F-MXep_PEmh8mDPVWj49x%2Fuploads%2FpQSRDIJcp7OS4WcTL6if%2F15.png?alt=media" alt=""><figcaption></figcaption></figure>

### Effortless Grace Time Adjustments

We have enhanced time-based leave deductions with an option for additional flexibility.

* **Set grace time bypass limit**- Allows users to specify how many times employees can bypass the limit without getting penalized.
* **Review grace time settings** - The link quickly redirects you to the ‘Late Setting’ screen where you can manage grace time configurations.
* **Allow grace time bypass** - Selecting this checkbox allows to apply grace time bypass limit for the individual custom Range.
* **Consider Half Day Deduction if Less than Grace Time** – If deduction ‘Full Day’ is selected for any range. Selecting this checkbox allows the system to deduct the ‘Half Day’ if the employee has arrived in the grace time but did not cross the grace time bypass limit.

<figure><img src="https://4282324958-files.gitbook.io/~/files/v0/b/gitbook-x-prod.appspot.com/o/spaces%2F-MXep_PEmh8mDPVWj49x%2Fuploads%2FnpBc88vlfo8KewJoQ0qV%2F16.png?alt=media" alt=""><figcaption></figcaption></figure>

### Bulk Peer Uploads Transform Appraisal Process

Pocket HRMS now saves you a lot of time in the appraisal process with a bulk upload feature. Now, users can upload multiple peers at once, making the appraisal process much smoother.

<figure><img src="https://4282324958-files.gitbook.io/~/files/v0/b/gitbook-x-prod.appspot.com/o/spaces%2F-MXep_PEmh8mDPVWj49x%2Fuploads%2Fx8rTufjLU0pUET94EhFg%2F17.png?alt=media" alt=""><figcaption></figcaption></figure>

### Precise Break-Shift Reports: Defined In/Out Flags

Now, the user can download the break-shift reports based on specific In/Out flags. You can choose whether the alternate punches should be classified as In and Out in the report or to generate the report according to defined In/Out flags, ensuring to reflect accuracy in punch received.

![](https://4282324958-files.gitbook.io/~/files/v0/b/gitbook-x-prod.appspot.com/o/spaces%2F-MXep_PEmh8mDPVWj49x%2Fuploads%2FifeRXjs15ecuCmElR8X6%2F18.png?alt=media)

### Boosted Appraisal Flexibility: Quick Data Transfer

Experience improved flexibility and efficiency in the appraisal process through a quick transfer of all configured data. This includes stages, parameters, questions, and the approval matrix for the new year, ensuring greater efficiency.

<figure><img src="https://4282324958-files.gitbook.io/~/files/v0/b/gitbook-x-prod.appspot.com/o/spaces%2F-MXep_PEmh8mDPVWj49x%2Fuploads%2FKp0bbtEDWkjTG5kPHPpW%2F19.png?alt=media" alt=""><figcaption></figcaption></figure>

For any queries, contact <support@pockethrms.com>


# May 2024

We are thrilled to present our Monthly Update, with enhanced user-friendly tools to elevate your HR experience. Our commitment to innovation and efficiency drives us to bring you seamless updates that transform your HR processes. For the month of May, we have the following enhancements:

### Priority-Based Time Range Leave Deductions

Pocket HRMS offers flexible settings of leave deductions based on employees' attendance punch times. You can do the following customizations with ease.

* Define auto deduction criteria for individual shifts
* Set multiple time ranges of deductions for each shift
* Set priorities with multiple leave types for deductions for each time range
* Delete settings for individual time ranges without disturbing other settings
* Delete all the custom settings for the particular shift when you no longer need it

These settings provide better control and efficiency for attendance and leave management.

<figure><img src="https://4282324958-files.gitbook.io/~/files/v0/b/gitbook-x-prod.appspot.com/o/spaces%2F-MXep_PEmh8mDPVWj49x%2Fuploads%2FTg2twgCOAORbMJnekdM9%2F0.png?alt=media" alt=""><figcaption></figcaption></figure>

![](https://4282324958-files.gitbook.io/~/files/v0/b/gitbook-x-prod.appspot.com/o/spaces%2F-MXep_PEmh8mDPVWj49x%2Fuploads%2F9mMQ4IYhFnr3WLntuO33%2F1.png?alt=media)

### Extension for Leave and Attendance Requests

Our new feature allows employees to submit requests such as, Leave, Attendance Regularization, On-duty, and Permission requests up to 5 days after the previous leave cycle ends.

**Example:**

* **Current Date**: 30th May 2024
* **Current Leave Cycle**: 26th May to 25th June
* **Previous Leave Cycle**: 26th Apr to 25th May

Employees want to submit a request for dates that fall under the previous cycle such as 24th May.

**Case A**:

If you select the check box for ‘Limit requests to current and future date range only’ and set ‘5’ as ‘Extended Days’, employees can submit requests for dates within the 5-day buffer. That means employee can submit request for 24th May on current date of 30th may.

**Case B**:

If you select the check box for ‘Limit requests to current and future date range only’ and set ‘4’ as ‘Extended Days’, the buffer ends on 29th May, so employees cannot submit requests for 24th May on present date 30th may.

![](https://4282324958-files.gitbook.io/~/files/v0/b/gitbook-x-prod.appspot.com/o/spaces%2F-MXep_PEmh8mDPVWj49x%2Fuploads%2Fd84bnnEYKuJKpFqOvVKr%2F2.png?alt=media)

Optimized Sandwich Leave Rule Based on Leave Taken

Sandwich Leave deductions now follow the order in which employees apply for them and not the predefined order. If an employee lacks the balance for a particular leave type, Loss of Pay (LOP) will be applied.

**Example**,

* Employee requests 'Paid Leave' for Friday and 'Sick Leave' for Monday.
* Resulting leave pattern: Paid Leave, Week off, Week off, Sick Leave.

**Scenarios**:

* **If the remaining Paid Leave balance is 2 or more** - Both week off are deducted as Paid Leave.
* **If the remaining Paid Leave balance is 1** -First week off as Paid Leave; the system checks Sick Leave for the second week off.
* **If there is no remaining Sick Leave balance** - The second week off will be considered LOP.

<figure><img src="https://4282324958-files.gitbook.io/~/files/v0/b/gitbook-x-prod.appspot.com/o/spaces%2F-MXep_PEmh8mDPVWj49x%2Fuploads%2FYJKTrKLrDxr1Wp6AIjKk%2F3.png?alt=media" alt=""><figcaption></figcaption></figure>

### Simplified Appraisal Reports in Modern PDF Format

We've revamped the PMS module with major upgrades. You can now get clearer and more readable appraisal reports in a modern PDF format. Also, we've introduced a new ‘New Detailed Report’ type with a user-friendly layout, making it easier to understand and enhancing your overall appraisal experience.<br>

![A screenshot of a computer](https://4282324958-files.gitbook.io/~/files/v0/b/gitbook-x-prod.appspot.com/o/spaces%2F-MXep_PEmh8mDPVWj49x%2Fuploads%2FQ8gvFbvwVHmfYyOg3WBk%2F4.png?alt=media)

![](https://4282324958-files.gitbook.io/~/files/v0/b/gitbook-x-prod.appspot.com/o/spaces%2F-MXep_PEmh8mDPVWj49x%2Fuploads%2FBzc5WIRmJPgUJ2HRUs7T%2F5.png?alt=media)

### Streamlined Peer Appraisal Interface

We have enhanced the Appraisal Peer Screen with several UI improvements and new features to make it easier to use,

* Send emails to multiple peers at once
* Delete individual or multiple entries simultaneously with proper validation to prevent errors
* Auto-fill for email IDs for better accuracy
* Edit auto-filled email IDs if needed.

These updates streamline the peer appraisal process and improve the overall user experience.

<figure><img src="https://4282324958-files.gitbook.io/~/files/v0/b/gitbook-x-prod.appspot.com/o/spaces%2F-MXep_PEmh8mDPVWj49x%2Fuploads%2FbRUjII2ijrJbLLL4SxIR%2F6.png?alt=media" alt=""><figcaption></figcaption></figure>

### Offer Letter & CTC Break-up in Single PDF Attachment

Our new feature in the 'Make an Offer' function allows you to send an offer letter and CTC break-up as a single PDF when you select the 'Attachment File' option.

![](https://4282324958-files.gitbook.io/~/files/v0/b/gitbook-x-prod.appspot.com/o/spaces%2F-MXep_PEmh8mDPVWj49x%2Fuploads%2FgdiJHFuDjHTgb64LC67a%2F7.png?alt=media)

### Travel Report in Summary and Detailed Format

We have introduced two new reports to better manage and analyze travel data:

1. **Travel Detailed Report**: Provides a detailed view of each travel entry, including reimbursement details, approval status, travel dates, and more.
2. **Travel Summary Report**: Offers a summary of travel activities, highlighting key details for quick insights.

These reports enhance travel data tracking and streamline reimbursement processes.

<figure><img src="https://4282324958-files.gitbook.io/~/files/v0/b/gitbook-x-prod.appspot.com/o/spaces%2F-MXep_PEmh8mDPVWj49x%2Fuploads%2FNBJj8CGPiEPK8iKc7FmP%2Fa.png?alt=media&amp;token=3d41d960-fd90-4ee1-a7cd-7e76d6add4f2" alt=""><figcaption></figcaption></figure>

### Integrated Training Period with Confirmation Module

Our new training period configurations allow you flexibility to add training period before probation and ensures that employee receives adequate training with better user experience.

* To set a training period by defining the ‘End Date’ as the ‘Joining Date’ is considered as the start date.
* Probation begins right after the training period ends.
* Extend the training by adding more days.
* Both the employee and manager will be notified of the new end date.<br>

<figure><img src="https://4282324958-files.gitbook.io/~/files/v0/b/gitbook-x-prod.appspot.com/o/spaces%2F-MXep_PEmh8mDPVWj49x%2Fuploads%2FI4ZBG1ty0Oecu4Bpo1Pv%2F9.png?alt=media" alt=""><figcaption></figcaption></figure>

### Bulk Approval & Rejection for Expense Entries

Our new ‘Approve All’ and ‘Reject All’ features let you approve or reject all expense entries at once, across all pages. This saves time by eliminating the need to review each entry individually.<br>

<figure><img src="https://4282324958-files.gitbook.io/~/files/v0/b/gitbook-x-prod.appspot.com/o/spaces%2F-MXep_PEmh8mDPVWj49x%2Fuploads%2FDe53qszaKNycZyPLGTYI%2F10.png?alt=media" alt=""><figcaption></figcaption></figure>

### Improved Project Tracking with Timesheet Attachments

The new "**Attachment** **Option**" for timesheet entries in the project module allows users to attach files directly to their timesheet entries. This enhancement, enables better documentation and support for timesheet data, improving project tracking and record-keeping.

<figure><img src="https://4282324958-files.gitbook.io/~/files/v0/b/gitbook-x-prod.appspot.com/o/spaces%2F-MXep_PEmh8mDPVWj49x%2Fuploads%2FAXzrctNZrA2waJsdb75v%2F11.png?alt=media" alt=""><figcaption></figcaption></figure>

For any queries, contact <support@pockethrms.com>


# April 2024

We are thrilled to present our Monthly Update, with enhanced user-friendly tools to elevate your HR experience. Our commitment to innovation and efficiency drives us to bring you seamless updates that transform your HR processes. For the month of April, we have the following enhancements:

### Maximize Efficiency with Candidate Tracker

Now, the candidate tracker can be used to retrieve all the candidate-related information that is included in the candidate report. You can use multiple filters to get up to 100 entries per page with the ability to get up to 6 months of data. Furthermore, you can use the 'Export To Excel' button which has no limit for a date range.

![](https://4282324958-files.gitbook.io/~/files/v0/b/gitbook-x-prod.appspot.com/o/spaces%2F-MXep_PEmh8mDPVWj49x%2Fuploads%2FADKoK1aJBFQHohfjETnf%2F0.png?alt=media)

### Automated State Selection

With our latest enhancement in the hire module, you don’t need to manually enter the sate name while adding or editing the job. Once you select the ‘Country’ the system will fetch the state names accordingly making the process hustle-free.

![](https://4282324958-files.gitbook.io/~/files/v0/b/gitbook-x-prod.appspot.com/o/spaces%2F-MXep_PEmh8mDPVWj49x%2Fuploads%2F53VlkKZDAGclh0VO7zOo%2F1.png?alt=media)

### Bulk Pop-up Data Import

Pocket HRMS now enables you to import the Pop-up Data for multiple business units at once using the Excel sheet. That avoids a lot of repeated data entry saving you plenty of time and effort.

![](https://4282324958-files.gitbook.io/~/files/v0/b/gitbook-x-prod.appspot.com/o/spaces%2F-MXep_PEmh8mDPVWj49x%2Fuploads%2F9hsb1sBN6Jpm9a9aXHmG%2FFrame%2023.png?alt=media\&token=0c7912a4-111a-4115-be76-0926866b2798)

<figure><img src="https://4282324958-files.gitbook.io/~/files/v0/b/gitbook-x-prod.appspot.com/o/spaces%2F-MXep_PEmh8mDPVWj49x%2Fuploads%2FaPEhgKNxuYrMOexHKMXe%2FFrame%2024.png?alt=media&amp;token=d0edc249-03d0-4725-9a7a-b0b937d60023" alt="" width="300"><figcaption></figcaption></figure>

### Seamless Separation Across Companies

Now you can assign a cross company manager for employee separation. The cross-company employee separation feature is now fully functional for the admin portal as well as the self-service portal.

<figure><img src="https://4282324958-files.gitbook.io/~/files/v0/b/gitbook-x-prod.appspot.com/o/spaces%2F-MXep_PEmh8mDPVWj49x%2Fuploads%2FZARzXaUKrt4eY66GcbDY%2F5.png?alt=media" alt=""><figcaption></figcaption></figure>

### Predefined Remarks for On-duty Applications

While applying for on-duty applications now employee can select their remark from the predefined field. You can also customize these remarks according to the requirements. If employee don’t select any of the predefined remarks they also have an option to type in their reason, ensuring adaptability to various situations.

![](https://4282324958-files.gitbook.io/~/files/v0/b/gitbook-x-prod.appspot.com/o/spaces%2F-MXep_PEmh8mDPVWj49x%2Fuploads%2FghNEjXMc2JEiEIljkOKu%2FFrame%2025.png?alt=media\&token=3c65ed5c-6f1d-4455-8e68-c06d408ce564)

<figure><img src="https://4282324958-files.gitbook.io/~/files/v0/b/gitbook-x-prod.appspot.com/o/spaces%2F-MXep_PEmh8mDPVWj49x%2Fuploads%2FvaT0qtB5L5sVAKwqn7lm%2F7.png?alt=media" alt=""><figcaption></figcaption></figure>

### Flexible Leave Deductions for Invalid Punches

The system now enables you to use the leave deduction feature for invalid punches. For example, if the system detects Invalid Punch i.e., single punch entries after the time consolidation process has been executed, leave deductions will be executed based on your configurations for Invalid Punch.

<figure><img src="https://4282324958-files.gitbook.io/~/files/v0/b/gitbook-x-prod.appspot.com/o/spaces%2F-MXep_PEmh8mDPVWj49x%2Fuploads%2Fl4A6lomSCWWo2SpYdlrh%2FFrame%2026.png?alt=media&amp;token=fe61ae7f-7043-4695-8b03-eda6ce3d572a" alt=""><figcaption></figcaption></figure>

### Specific Leave Credits for Your Probation Period

You can customize leave credit configurations for the probation period. Now you can tailor various leave types with specific credit counts for the probation period. Additionally, dependency can be added for probation period completion i.e., probation completion depends on the Confirmation date. Furthermore, HR can specify whether unused leaves should be Elapsed or Carried Forward upon confirmation.

<figure><img src="https://4282324958-files.gitbook.io/~/files/v0/b/gitbook-x-prod.appspot.com/o/spaces%2F-MXep_PEmh8mDPVWj49x%2Fuploads%2FFDBnPKXjxzv1DgpjMuGE%2FFrame%2027.png?alt=media&amp;token=cf6c3592-e7ca-4f53-b670-324a0c83fbfc" alt=""><figcaption></figcaption></figure>

For any queries, contact <support@pockethrms.com>


# March 2024

### Late Mark Deductions with Customizable Settings

We've upgraded the late mark customization to now include deductions for late days, which are determined by shift settings and prioritize different types of leave. Admin/HR can now save specific settings for various shifts, enabling them to prioritize the deduction of certain types of leave before others.

<br>

<figure><img src="https://4282324958-files.gitbook.io/~/files/v0/b/gitbook-x-prod.appspot.com/o/spaces%2F-MXep_PEmh8mDPVWj49x%2Fuploads%2FX8RG0tGw6ZnxJLhNdxjp%2F0.png?alt=media" alt=""><figcaption></figcaption></figure>

### Shift Permissions: Set Once, Apply Everywhere

We've simplified permission settings for employees working different shifts. Now, you can set permissions once for an employee to apply across all their shifts. For example, if an employee is allowed 2 hours monthly for both Morning and Evening shifts, the system ensures this limit isn't exceeded even if he requests different hours for each shift.

![](https://4282324958-files.gitbook.io/~/files/v0/b/gitbook-x-prod.appspot.com/o/spaces%2F-MXep_PEmh8mDPVWj49x%2Fuploads%2FbsC0fHufKUUyJGl9IhOB%2F1.png?alt=media)

### Streamlined Punch-Out Automation

If the shift setting is 'Current In-Tomorrow Out' and there's no punch-out recorded, perhaps due to reasons like a holiday, a day off, an unassigned shift, or a modified punch, activating this setting will make the system automatically fill in the punch-out time when the 'In-Out Import' operation is carried out.

![](https://4282324958-files.gitbook.io/~/files/v0/b/gitbook-x-prod.appspot.com/o/spaces%2F-MXep_PEmh8mDPVWj49x%2Fuploads%2FrrWIII0VxIlkP7rIUPTd%2F2.png?alt=media)

![](https://4282324958-files.gitbook.io/~/files/v0/b/gitbook-x-prod.appspot.com/o/spaces%2F-MXep_PEmh8mDPVWj49x%2Fuploads%2Fqjhj9MGleJS9pejssdCn%2F3.png?alt=media)

### Enhanced Travel Alerts with Instant Updates

We've introduced a new email template and app notifications for our travel modules. The template makes it easy to communicate travel plans and updates clearly, while app notifications provide instant alerts for any changes to the itinerary. These improvements simplify our processes, increase efficiency, and enhance the overall user experience within our organization.

![](https://4282324958-files.gitbook.io/~/files/v0/b/gitbook-x-prod.appspot.com/o/spaces%2F-MXep_PEmh8mDPVWj49x%2Fuploads%2FvfGEHV5yPeCPCfVZILke%2F4.png?alt=media)

![](https://4282324958-files.gitbook.io/~/files/v0/b/gitbook-x-prod.appspot.com/o/spaces%2F-MXep_PEmh8mDPVWj49x%2Fuploads%2Fann4CBoRq6ld7VSFglxb%2F5.png?alt=media)

### Simplify: Pending Employee Confirmations

The ‘Employee Confirmation Pending’ tab shows tasks awaiting employee feedback for approval or rejection, while the ‘Action Pending’ column indicates how long the task has been awaiting confirmation when the manager extends the confirmation period, streamlining communication and ensuring timely task completion.

![](https://4282324958-files.gitbook.io/~/files/v0/b/gitbook-x-prod.appspot.com/o/spaces%2F-MXep_PEmh8mDPVWj49x%2Fuploads%2FAvXn7B7lds23ZUN6u57j%2F6.png?alt=media)

### Approval Menu Boosts Mobile App Convenience

In the mobile app an Approval menu is added to the Profile section, matching the web ESS functionality. This update allows for Shift and Permission approvals. It streamlines mobile experience with essential approval features.

![](https://4282324958-files.gitbook.io/~/files/v0/b/gitbook-x-prod.appspot.com/o/spaces%2F-MXep_PEmh8mDPVWj49x%2Fuploads%2FxVJMylRo8f0Fnqnr8KnT%2F10.png?alt=media) ![](https://4282324958-files.gitbook.io/~/files/v0/b/gitbook-x-prod.appspot.com/o/spaces%2F-MXep_PEmh8mDPVWj49x%2Fuploads%2FyJ3GzuQUphKXvzczprWg%2F11.png?alt=media) ![](https://4282324958-files.gitbook.io/~/files/v0/b/gitbook-x-prod.appspot.com/o/spaces%2F-MXep_PEmh8mDPVWj49x%2Fuploads%2FoJFg9XOpjfTth7IUBMuO%2F12.png?alt=media)

* **Permission Approval – Hourly based**

![](https://4282324958-files.gitbook.io/~/files/v0/b/gitbook-x-prod.appspot.com/o/spaces%2F-MXep_PEmh8mDPVWj49x%2Fuploads%2FBRUsfLkqZUsYpddfRTq1%2F13.png?alt=media) ![](https://4282324958-files.gitbook.io/~/files/v0/b/gitbook-x-prod.appspot.com/o/spaces%2F-MXep_PEmh8mDPVWj49x%2Fuploads%2FvSiFLNyJGo1UZ4zErAAH%2F14.png?alt=media)

### Simplified Employee Task Breakdown

The Task-Based Employee Work Hour Report offers a comprehensive breakdown of individual work. It includes essential information such as employee names, task/project details, dates and total hours worked per task. That helps managers in resource optimization, project tracking, and productivity enhancement while promoting transparency, accountability, and compliance with labor regulations.

![](https://4282324958-files.gitbook.io/~/files/v0/b/gitbook-x-prod.appspot.com/o/spaces%2F-MXep_PEmh8mDPVWj49x%2Fuploads%2FT8zsHIIcWvpf6UtPjWg2%2F15.png?alt=media)

![](https://4282324958-files.gitbook.io/~/files/v0/b/gitbook-x-prod.appspot.com/o/spaces%2F-MXep_PEmh8mDPVWj49x%2Fuploads%2F4bSF4UdDasHU21LW8qRP%2F16.png?alt=media)

### &#x20;Enhanced Training Insights

The learning reports now provide detailed breakdown, including pre-test and post-test percentages, and success statuses for the both. This thorough report offers clear insights into learners' progress and performance, enabling more accurate assessment of training effectiveness and individual proficiency. Administrators can use these added metrics to make informed decisions, optimizing learning outcomes and customizing future training programs.

![](https://4282324958-files.gitbook.io/~/files/v0/b/gitbook-x-prod.appspot.com/o/spaces%2F-MXep_PEmh8mDPVWj49x%2Fuploads%2FkkV2O8tKtuQpNUqbcRar%2F17.png?alt=media)

![](https://4282324958-files.gitbook.io/~/files/v0/b/gitbook-x-prod.appspot.com/o/spaces%2F-MXep_PEmh8mDPVWj49x%2Fuploads%2FH0b26duH3beJAlCGeXhO%2F18.png?alt=media)

### Clear Company Hierarchy Chart

Our system's organization chart visually displays the company's hierarchy, detailing departments and job titles for each employee; users can easily access comprehensive information on any individual, fostering clear communication and collaboration across the organization.

<figure><img src="https://4282324958-files.gitbook.io/~/files/v0/b/gitbook-x-prod.appspot.com/o/spaces%2F-MXep_PEmh8mDPVWj49x%2Fuploads%2FMkKB5GoeEa91hTE1lZkJ%2F19.png?alt=media" alt=""><figcaption></figcaption></figure>

### Cross Company Employee Separation

Employee separation platform now incorporates a Cross-Company feature, enabling managers to approve requests from employees in different departments or subsidiaries, streamlining coordination and decision-making across the organization. With this feature integrated into employee profiles, ensures secure management of cross-company operations.

<figure><img src="https://4282324958-files.gitbook.io/~/files/v0/b/gitbook-x-prod.appspot.com/o/spaces%2F-MXep_PEmh8mDPVWj49x%2Fuploads%2FV8nA4Vt53fw7U6ZPe5jw%2F20.png?alt=media" alt=""><figcaption></figcaption></figure>

### Clear Reimbursement Insights

Before, rejected reimbursement reports didn't show up in travel reports, but now users can see reimbursement details regardless of rejection, enhancing transparency and facilitating better tracking and management of travel expenses.

![](https://4282324958-files.gitbook.io/~/files/v0/b/gitbook-x-prod.appspot.com/o/spaces%2F-MXep_PEmh8mDPVWj49x%2Fuploads%2FVpspE7EegPlWu3kmjV68%2F21.png?alt=media)

### Simplify Candidate Management: Prioritize & Exclude

Our upgraded recruitment module now allows recruiters to blacklist or whitelist candidates, streamlining candidate management. Blacklisting bars undesirable candidates from future consideration, while whitelisting prioritizes preferred candidates, optimizing recruitment efficiency by focusing on the most suitable candidates for available positions.

<figure><img src="https://4282324958-files.gitbook.io/~/files/v0/b/gitbook-x-prod.appspot.com/o/spaces%2F-MXep_PEmh8mDPVWj49x%2Fuploads%2F32CHOy3HehbEWKUG2At7%2F22.png?alt=media" alt=""><figcaption></figcaption></figure>

### Job Insights Made Easy

We've introduced a new 'Job Report' within the Hire Module of ESS, offering Admins, HR, and Recruiters comprehensive insights into company job listings. With the ability to download the report based on selected filters, users can efficiently gather and analyze job-related data.

• Job Code

• Job Title

• Hiring Manager

• Added By

• Department Name

• No of Positions

• Requisition Date

• Published Date

• Closure Date

• Job Status

• Position Type

• Job Type

<figure><img src="https://4282324958-files.gitbook.io/~/files/v0/b/gitbook-x-prod.appspot.com/o/spaces%2F-MXep_PEmh8mDPVWj49x%2Fuploads%2FrhIPHwq4k7l41sVkLUaj%2F23.png?alt=media" alt=""><figcaption></figcaption></figure>

### Enhanced Reapplication Management

A new feature allows companies to control how often candidates can reapply for a position, preventing the reuse of Mobile, Email ID, and Aadhar ID by default across all jobs. Admin/HR can set waiting periods of 30, 60, or 90 days, or customize the duration before reapplication is allowed, either for specific jobs or all. The system ensures candidates fill in required parameters to prevent skipping, notifies them of waiting periods, and prompts updates if duplicate profiles are detected after the waiting period. This feature ensures fair and efficient candidate management, preventing spam and encouraging updated candidate information.

### Streamlined Job Modifications Approval

Admins now have the ability to directly approve or reject Job Modifications, similar to Job Requisitions, with notifications promptly informing the Recruiter of the decision from the Admin Profile, ensuring smoother and more efficient workflow management.

For any queries, contact <support@pockethrms.com>


# February 2024

### Effortless Bulk LOP Credit Entry

Now you can do bulk LOP credit input, making it easier than ever to manage Loss of Pay. No more manual entry for each employee - simply enter credits in bulk for multiple employees at once. This saves time, improves efficiency, and enhances workflow management. As an HR professional or organization, you'll enjoy smoother processes and increased productivity.

<figure><img src="https://4282324958-files.gitbook.io/~/files/v0/b/gitbook-x-prod.appspot.com/o/spaces%2F-MXep_PEmh8mDPVWj49x%2Fuploads%2FOpTivOf1M8dfZQaP7QBz%2F0.png?alt=media" alt=""><figcaption></figcaption></figure>

### Efficiency Upgrade: Detailed Leave Balance View

Now, users can select the 'Summary' checkbox in the Leave Tracker report to access a more detailed view. This includes additional columns like 'Credit' and 'Debit,' alongside existing ones such as 'Opening,' 'Used,' and 'Balance.' This enhancement offers a comprehensive overview of leave balances and transactions, enabling informed decision-making for better leave management.

<figure><img src="https://4282324958-files.gitbook.io/~/files/v0/b/gitbook-x-prod.appspot.com/o/spaces%2F-MXep_PEmh8mDPVWj49x%2Fuploads%2FAzavVQ6GjVLunWzEUjk8%2F1.png?alt=media" alt=""><figcaption></figcaption></figure>

<figure><img src="https://4282324958-files.gitbook.io/~/files/v0/b/gitbook-x-prod.appspot.com/o/spaces%2F-MXep_PEmh8mDPVWj49x%2Fuploads%2FqqHQNlF1VZ8IGp3P8QCw%2F2.png?alt=media" alt=""><figcaption></figcaption></figure>

### Flexible Requirements for Leave Attachments

Pocket HRMS enables you to set attachment mandatory for the leaves exceeding specified number of days based on a certain group of dates, such as retirement or confirmation. This feature offers flexibility and control in managing attachment requirements for different leave types, ensuring compliance and proper documentation making leave management hassle-free.

![](https://4282324958-files.gitbook.io/~/files/v0/b/gitbook-x-prod.appspot.com/o/spaces%2F-MXep_PEmh8mDPVWj49x%2Fuploads%2F3mogJfWz1jUBOBCaHXoN%2F3.png?alt=media)

### Streamlined Multi-Company ESS Access

Our HRMS now allows users to access and perform actions across multiple companies. With defined roles or groups, users can view data, make changes, or initiate transactions across entities. This enhancement ensures efficient operations and data security, enabling seamless management across multiple company contexts. It gives you streamlined processes and improved data segregation, enhancing overall productivity.

<figure><img src="https://4282324958-files.gitbook.io/~/files/v0/b/gitbook-x-prod.appspot.com/o/spaces%2F-MXep_PEmh8mDPVWj49x%2Fuploads%2FvRtGdZPiMYMtVdg8h9oP%2F4.png?alt=media" alt=""><figcaption></figcaption></figure>

### Geolocation with Easy Access & Tagging <a href="#hlk160701859" id="hlk160701859"></a>

You will get easier access to geolocation data with a global search option. Employee tagging within locations is also simplified with a dedicated search feature, displaying the count of tagged employees. This enhancement streamlines location management, making it easier to track and manage personnel across different locations. Providing improved accessibility and efficiency in geolocation settings for smoother HR operations.

![](https://4282324958-files.gitbook.io/~/files/v0/b/gitbook-x-prod.appspot.com/o/spaces%2F-MXep_PEmh8mDPVWj49x%2Fuploads%2FjdzMvb5pmZ1VrxDOQqQO%2F5.png?alt=media)

![](https://4282324958-files.gitbook.io/~/files/v0/b/gitbook-x-prod.appspot.com/o/spaces%2F-MXep_PEmh8mDPVWj49x%2Fuploads%2F6EVaJUXLbJUhmtRA0Fbd%2F6.png?alt=media)

### Geolocation Integration: Enhanced Reporting

Now, geolocation fields are included in the data export wizard, covering aspects like name, radius, longitude, and latitude. This enhancement empowers users to include location-specific data in their reports, aiding analysis and interpretation.

![](https://4282324958-files.gitbook.io/~/files/v0/b/gitbook-x-prod.appspot.com/o/spaces%2F-MXep_PEmh8mDPVWj49x%2Fuploads%2F8ktLJypgMboLzv4toQHn%2F7.png?alt=media)

### Improved Monitoring with Geolocation

The ‘In Out Detail’ report now features two new columns, 'IN geolocation' and 'OUT geolocation,'. These columns show where employees enter and exit specified areas, aiding in tracking their movements. This enhancement offers a detailed overview of employee activities based on geolocation data, enhancing monitoring.

![](https://4282324958-files.gitbook.io/~/files/v0/b/gitbook-x-prod.appspot.com/o/spaces%2F-MXep_PEmh8mDPVWj49x%2Fuploads%2Fq6Zy4NlCY9lXV8rq7cOz%2F8.png?alt=media)

### Accountability in Attendance with IP Address

Pocket HRMS now records employees' IP addresses when they punch in and out, included in both individual and team reports. This enables managers and administrators to review attendance records thoroughly, ensuring greater oversight and accountability within the organization.

![](https://4282324958-files.gitbook.io/~/files/v0/b/gitbook-x-prod.appspot.com/o/spaces%2F-MXep_PEmh8mDPVWj49x%2Fuploads%2F4gguLQlja8A72ES0nvzD%2F9.png?alt=media)

### Improved Collaboration in Offer Management

Recruiters can include managers in CC while sending offers to candidates. This keeps managers informed about offers sent out, streamlining communication, collaboration and transparency in the offer process.

<figure><img src="https://4282324958-files.gitbook.io/~/files/v0/b/gitbook-x-prod.appspot.com/o/spaces%2F-MXep_PEmh8mDPVWj49x%2Fuploads%2FX7ADnKGHowlFu5voork8%2F10.png?alt=media" alt=""><figcaption></figcaption></figure>

### Flexible Job Approval Settings

Pocket HRMS offers three enhanced flexibility in job approval workflows, ensuring efficient management of job creation and modification requests.

1. **Approval Required**

All new job creation and modifications will need approval from assigned job manager. If a job manager is not assigned, job creation or modification will not be allowed.

1. **Approval Not Required**

All new job creation/modification requests will be directly approved by the system, irrespective of whether a job manager is assigned.

1. **As per the assigned Job Manager**

All new job creation/modification requests will be sent for approval to the assigned job manager. If no job manager is assigned, requests will be directly approved by the system

<figure><img src="https://4282324958-files.gitbook.io/~/files/v0/b/gitbook-x-prod.appspot.com/o/spaces%2F-MXep_PEmh8mDPVWj49x%2Fuploads%2FGh0M59NBW4Lp5kipgUrM%2F11.png?alt=media" alt=""><figcaption></figcaption></figure>

![](https://4282324958-files.gitbook.io/~/files/v0/b/gitbook-x-prod.appspot.com/o/spaces%2F-MXep_PEmh8mDPVWj49x%2Fuploads%2Fj0gL12aFOHIkap0QMO39%2F12.png?alt=media)

### Effortless Module Selection Across Companies

We provide you 'Select/Deselect All' option for module selection in Cross-Company Manager. Modules not applicable will be automatically deselected and disabled. This streamlines module management, ensuring only relevant options are available, saving time and improving user experience.

![](https://4282324958-files.gitbook.io/~/files/v0/b/gitbook-x-prod.appspot.com/o/spaces%2F-MXep_PEmh8mDPVWj49x%2Fuploads%2F8a28A2kotp2QgWpnRTYL%2F13.png?alt=media)

### Improved Oversight for Job Requisition Approval

Our HRMS now allows Super Admins to approve or reject Job Requisition requests directly. A new screen named 'Job Admin Approval' displays all pending requests for quick review and action. Notifications inform employees of approval or rejection by the admin. This increases oversight, and ensures efficient management of job requisitions.

<figure><img src="https://4282324958-files.gitbook.io/~/files/v0/b/gitbook-x-prod.appspot.com/o/spaces%2F-MXep_PEmh8mDPVWj49x%2Fuploads%2FM9Kp4CVOpuEiY6NFIaHI%2F14.png?alt=media" alt=""><figcaption></figcaption></figure>

### Efficient Onboarding: Approval Across Companies

Now new hires can be approved across different company entities. This simplifies the approval process, enabling administrators to review and approve new employee requests efficiently, regardless of their organizational affiliation. Ensuring efficient new hire onboarding, regardless of their specific company or department within the organization.

<figure><img src="https://4282324958-files.gitbook.io/~/files/v0/b/gitbook-x-prod.appspot.com/o/spaces%2F-MXep_PEmh8mDPVWj49x%2Fuploads%2FWmAPmEc0Oc7PtonLcu7p%2F15.png?alt=media" alt=""><figcaption></figcaption></figure>

### Enhanced Flexibility in Expense Details

Users now are allowed to edit expense modes and purposes, offering greater flexibility and accuracy in expense management. This enhancement simplifies the process, enabling users to make necessary adjustments as needed, improving overall control and accuracy in expense tracking.

![](https://4282324958-files.gitbook.io/~/files/v0/b/gitbook-x-prod.appspot.com/o/spaces%2F-MXep_PEmh8mDPVWj49x%2Fuploads%2F71kHmjOfDoRaqrp8qE3V%2F16.png?alt=media)

![](https://4282324958-files.gitbook.io/~/files/v0/b/gitbook-x-prod.appspot.com/o/spaces%2F-MXep_PEmh8mDPVWj49x%2Fuploads%2FMYIpyOc5bIclHNlckkID%2F17.png?alt=media)

For any queries, contact <support@pockethrms.com>


# January 2024

This document describes the release notes for major and minor enhancements released for Pocket HRMS in the month of January 2024.

### Precision in Travel Requests with Unique IDs

For each travel request the system will assign a unique 'Travel ID,' which acts as a digital signature to track its journey from initiation to approval. This ID ensures smooth monitoring, offering a clear reference point throughout the request process, ensuring precision and efficiency until formal approval.<br>

<figure><img src="https://4282324958-files.gitbook.io/~/files/v0/b/gitbook-x-prod.appspot.com/o/spaces%2F-MXep_PEmh8mDPVWj49x%2Fuploads%2FRz1tVAQyAsCFhIKqAFQG%2F0.png?alt=media" alt=""><figcaption></figcaption></figure>

### Modify Expenses Securely

The expense eligibility feature lets users edit certain values in an expense record while keeping expense types fixed. Users can adjust numerical values like amounts or quantities for accuracy and customization, without altering predefined expense categories.

<figure><img src="https://4282324958-files.gitbook.io/~/files/v0/b/gitbook-x-prod.appspot.com/o/spaces%2F-MXep_PEmh8mDPVWj49x%2Fuploads%2FjzpM2YJWt7CPQHfa1uJO%2F1.png?alt=media" alt=""><figcaption></figcaption></figure>

### Instant Approval: Self-Service Permissions

Now we have a self-service permission option integrated into the manager/admin approval page. This provides managers and administrators greater convenience by allowing them to easily approve permission requests directly from the interface, simplifying the process.

<figure><img src="https://4282324958-files.gitbook.io/~/files/v0/b/gitbook-x-prod.appspot.com/o/spaces%2F-MXep_PEmh8mDPVWj49x%2Fuploads%2FBSo04wGImoKYsyeh9Aml%2F3.png?alt=media" alt=""><figcaption></figcaption></figure>

### Simplify Log in: Toggle Your Password Visibility

The login screen now includes a 'Show/Hide Password' option for improved user experience. Users can toggle between revealing and hiding their password as they type it in, helping them ensure accuracy and reducing login errors.

![](https://4282324958-files.gitbook.io/~/files/v0/b/gitbook-x-prod.appspot.com/o/spaces%2F-MXep_PEmh8mDPVWj49x%2Fuploads%2FdCWJedgiXhdCECNOKPtq%2F4.png?alt=media) ![](https://4282324958-files.gitbook.io/~/files/v0/b/gitbook-x-prod.appspot.com/o/spaces%2F-MXep_PEmh8mDPVWj49x%2Fuploads%2FjFpcTPKMesFNUtx5MLUS%2F5.png?alt=media)

### Delete Auto-Approved Projects Entries with Ease

We introduce a key administrative function for project management. Admin users can now directly delete auto-approved project entries from the admin panel. This enhancement offers improved control and flexibility in project administration by allowing efficient removal of auto-approved entries.

***For example**: An employee has no approval manager*

![](https://4282324958-files.gitbook.io/~/files/v0/b/gitbook-x-prod.appspot.com/o/spaces%2F-MXep_PEmh8mDPVWj49x%2Fuploads%2FgVGs0JpqBe1elAwZRP4O%2F6.png?alt=media)

*The Person with admin approval credits can delete these entries with ease.*

<figure><img src="https://4282324958-files.gitbook.io/~/files/v0/b/gitbook-x-prod.appspot.com/o/spaces%2F-MXep_PEmh8mDPVWj49x%2Fuploads%2F7ztGKvwJKNM39kk3EtDA%2F7.png?alt=media" alt=""><figcaption></figcaption></figure>

### Streamlined Time Tracking with Leave Integration

The Auto Time Sheet Project now incorporates Leave settings directly within the Project Menu. Approved leaves are seamlessly integrated into timesheet entries, while unconfigured leave settings are excluded. This integration simplifies reporting and tracking by aligning with the existing timesheet integration with leave.\
\
\ <br>

<figure><img src="https://4282324958-files.gitbook.io/~/files/v0/b/gitbook-x-prod.appspot.com/o/spaces%2F-MXep_PEmh8mDPVWj49x%2Fuploads%2FyiORo6nsIl94MMw0fWSU%2F9.png?alt=media" alt=""><figcaption></figcaption></figure>

<figure><img src="https://4282324958-files.gitbook.io/~/files/v0/b/gitbook-x-prod.appspot.com/o/spaces%2F-MXep_PEmh8mDPVWj49x%2Fuploads%2F9ZyZfelZnF4iMppCvTIg%2F8.png?alt=media" alt=""><figcaption></figcaption></figure>

### LOP Deduction in Sandwich Rule

The sandwich leave setting now includes LOP leave within the leave deduction options. You can select the LOP leaves with ease from the dropdown and improve leave management.

<br>

<figure><img src="https://4282324958-files.gitbook.io/~/files/v0/b/gitbook-x-prod.appspot.com/o/spaces%2F-MXep_PEmh8mDPVWj49x%2Fuploads%2FkE6ClZo5pTLh0qsZEECq%2F10.png?alt=media" alt=""><figcaption></figcaption></figure>

### Efficient Staff Scheduling: Bulk Assignment

Managers can efficiently assign shifts and week offs to employees using Bulk Import feature. Instead of manual entry, they can download a template for the selected date and make assignments as needed. The feature includes a grocery sheet listing configured shifts for easy selection.

<figure><img src="https://4282324958-files.gitbook.io/~/files/v0/b/gitbook-x-prod.appspot.com/o/spaces%2F-MXep_PEmh8mDPVWj49x%2Fuploads%2F5bERNYgC07S8EHoQAWI3%2F11.png?alt=media" alt=""><figcaption></figcaption></figure>

![](https://4282324958-files.gitbook.io/~/files/v0/b/gitbook-x-prod.appspot.com/o/spaces%2F-MXep_PEmh8mDPVWj49x%2Fuploads%2FdsXKpUnxVLXBl5Xd37aM%2F12.png?alt=media)

### Efficient Shift Management Across Companies

Roster Management's Cross-Company Integration allows managers to combine multiple companies, assigning shifts and days off to employees across different entities. It supports bulk import and seamlessly integrates with the shift schedule approval process for efficient approvals.

![](https://4282324958-files.gitbook.io/~/files/v0/b/gitbook-x-prod.appspot.com/o/spaces%2F-MXep_PEmh8mDPVWj49x%2Fuploads%2FRaPdGM8q2QV88uuzbv4Z%2F13.png?alt=media)

![](https://4282324958-files.gitbook.io/~/files/v0/b/gitbook-x-prod.appspot.com/o/spaces%2F-MXep_PEmh8mDPVWj49x%2Fuploads%2Fzdqif0SW5adMzbduvXgF%2F14.png?alt=media)

### &#x20;Versatile Uploads: Resumes in Word & PDF Accepted

Now, in the hiring module, you can upload resumes in both MS Word along with PDF formats, providing more options for applicants and hiring personnel. This allows individuals to submit their resumes seamlessly in either format, making the recruitment process within the system more inclusive and versatile.

<figure><img src="https://4282324958-files.gitbook.io/~/files/v0/b/gitbook-x-prod.appspot.com/o/spaces%2F-MXep_PEmh8mDPVWj49x%2Fuploads%2Fc8TWF5LGPbFc0EeUYjCZ%2F15.png?alt=media" alt=""><figcaption></figcaption></figure>

For any queries, contact <support@pockethrms.com>


# Updates 2025


# 2025 Major Product Highlights

2025 was about strengthening the foundation of everyday HR operations.Across payroll, compliance, attendance, exits, expenses, budgeting, performance, and employee experience, Pocket HRMS focused on one thing: helping HR teams move faster with confidence, accuracy, and control.

Here’s what’s new and why it matters.

### 1. **Everyday HR Tasks, Made Noticeably Easier**

Small improvements create big wins in day-to-day HR operations. These updates reduce clicks, reduce confusion, and improve speed across commonly used workflows.

<figure><img src="https://4282324958-files.gitbook.io/~/files/v0/b/gitbook-x-prod.appspot.com/o/spaces%2F-MXep_PEmh8mDPVWj49x%2Fuploads%2FiJplJJ1DEKi82LIIH4dL%2F1%20Everyday%20HR%20Tasks%2C%20Made%20Noticeably%20Easier.png?alt=media&amp;token=cd46f941-8fb6-4f16-b160-8eb60bd20f8a" alt=""><figcaption></figcaption></figure>

### 1.1 **Bring Structure to Appraisal Conversations**

HR teams can now control the order of appraisal questions so evaluations follow a clear flow. This improves the manager experience, encourages better responses, and reduces missed or inconsistent inputs.

### 1.2 **A More Intuitive PMS Experience**

Performance screens now have been refined to feel cleaner and easier to navigate. This reduces effort for managers during reviews and helps HR teams manage cycles with fewer support queries.

### 1.3 **Create a Professional Career Page in Minutes**

Organizations can now launch a fully branded, modern career page in just a click—no technical setup required. Hiring teams go live faster, while candidates enjoy a smooth, professional experience from their very first visit.

### 1.4 **Instant Access to Tax Details**

Tax details are now available instantly in a quick pop-up view, so teams can review information without navigating away from the screen. This speeds up payroll processing and enables faster, more confident responses to employee tax queries.

### 1.5 **HR Letters, Your Way**

HR teams can now design and manage custom letter formats with ease, ensuring consistent communication while still supporting organization-specific templates and dynamic data fields.

### 1.6 **Quick In–Out Summary**

In-out reports now give a clearer summary view for faster daily review. This reduces the need to open multiple screens just to confirm punch timelines.

### 1.7 **In-App ESS Announcements**

Important announcements are now delivered directly to employees through ESS pop-ups, ensuring higher visibility and reducing the chances of missing critical HR or policy updates.

### 1.8 **Better Control Over Approval Chains**

Approval workflows are now clearer and more streamlined, giving HR teams better visibility and control at every stage. This reduces approval bottlenecks and makes it easy to see exactly where requests are pending.

### 1.9 **More Secure, User-Friendly Password Resets**

Password reset emails are now clearer and easier to follow, helping employees regain access faster while reducing confusion and support requests related to login issues.

### 1.10 **Protected Document Delivery**

Sensitive documents can now be shared securely through ESS, strengthening confidentiality and minimizing the risks associated with manual or unsecured sharing methods.

### 1.11 **CTC That Adapts to Global Teams**

CTC structures now support multiple currencies, making compensation management smoother and more consistent for organizations operating across regions.

### 2. **Learning That Goes Beyond Attendance**

Training effectiveness depends on engagement and outcomes, not just completion.

<figure><img src="https://4282324958-files.gitbook.io/~/files/v0/b/gitbook-x-prod.appspot.com/o/spaces%2F-MXep_PEmh8mDPVWj49x%2Fuploads%2FG4xNkqaR0XT0XLzRklkE%2F2%20Learning%20That%20Goes%20Beyond%20Attendance.png?alt=media&amp;token=b980ebb1-439e-4f5a-abd7-48b4b3f88774" alt=""><figcaption></figcaption></figure>

### 2.1 **Learning Programs That Listen**

Now, with the built-in surveys within learning programs it is easy to capture participant feedback, helping organizations measure effectiveness and continuously improve future learning initiatives.

### 2.2 **Smarter Trainer Identification**

External trainers can now be tagged to training sessions, improving visibility, tracking, and reporting for vendor-led learning programs.

### 2.3 **Multi-Trainer Sessions, Simplified**

Training sessions can now include multiple trainers with enhanced attendance tracking, making it easier to manage larger and more complex learning programs with confidence.

### 2.4 **Measure Engagement Beyond Courses**

Track how learners engage with shared reference materials to gain deeper insights into participation and learning impact beyond attendance alone.

### 3. **Employee Exits, Finally Under Control**

Exits require structure, visibility, and coordination across teams.

<figure><img src="https://4282324958-files.gitbook.io/~/files/v0/b/gitbook-x-prod.appspot.com/o/spaces%2F-MXep_PEmh8mDPVWj49x%2Fuploads%2FKff8fdWBgaxAILk2EFfH%2F3%20Employee%20Exits%2C%20Finally%20Under%20Control.png?alt=media&amp;token=107f799c-4370-4fa0-907e-1fb9f03cc5d8" alt=""><figcaption></figcaption></figure>

### 3.1 **Approve Early, Exit Exactly on the Last Working Day**

HR teams can now approve separations in advance while ensuring the employee is officially separated only on their actual last working day. This allows smoother exit planning without triggering early payroll actions, access changes, or compliance processes.

### 3.2 **Exit with Clarity. Re-Hire with Confidence.**

HR teams can now capture re-hire eligibility directly during the exit process, creating a clear and structured outcome that supports future hiring decisions and removes reliance on informal notes or memory.

### 3.3 **Group-Wide FnF Approvals, Streamlined**

FnF approvals can now be managed centrally for employees linked to multiple legal entities, reducing duplication, speeding up approvals, and ensuring consistent exit handling across group companies.

### 3.4 **Clear Notifications at Every Exit Stage**

Automated notifications keep HR, managers, finance teams, and employees informed at every stage of the separation workflow, reducing follow-ups and ensuring no critical exit step is missed.

### 3.5 **Smarter Resignation and LWD Management**

Resignation and last working day tracking is now clearer and more structured, giving HR teams better visibility into notice periods, timelines, and status. This helps manage exits with confidence and avoids confusion during the closure process.

### 3.6 **Dedicated HR Ownership for Exits**

Each exit case can now be assigned to a dedicated HR owner, bringing clear accountability, smoother coordination, and timely completion of FnF activities.

### 4. **More Accurate Work Hours, Even for Complex Shifts**

Accurate attendance becomes critical when work patterns are not linear.

<figure><img src="https://4282324958-files.gitbook.io/~/files/v0/b/gitbook-x-prod.appspot.com/o/spaces%2F-MXep_PEmh8mDPVWj49x%2Fuploads%2FUzn5zTiJaO5qeZbgNK0j%2F4%20More%20Accurate%20Work%20Hours%2C%20Even%20for%20Complex%20Shifts.png?alt=media&amp;token=0b8d95d7-2f32-4060-ac8c-a988bf1a310a" alt=""><figcaption></figcaption></figure>

### 4.1 **Work Hour Precision for Break-Based Shifts**

Now you can define structured breaks and split shifts within a workday using Break Shift functionality. Productive hours are calculated automatically by excluding defined breaks, ensuring attendance reflects actual working time. This delivers fairer work-hour evaluation and payroll-ready attendance data without manual adjustments.

### 5. **Expense and Travel, Without the Back-and-Forth**

Expense processing becomes smoother when automation replaces manual checks.

<figure><img src="https://4282324958-files.gitbook.io/~/files/v0/b/gitbook-x-prod.appspot.com/o/spaces%2F-MXep_PEmh8mDPVWj49x%2Fuploads%2FErzn4NDz3gvYf0NVDrUz%2F5%20Expense%20and%20Travel%2C%20Without%20the%20Back-and-Forth.png?alt=media&amp;token=c71bb841-4ae1-4bcd-adac-7c2dac68511f" alt=""><figcaption></figcaption></figure>

### 5.1 **Consistent Daily Expense Governance**

you can set daily expense caps that are enforced automatically at the time of submission. This reduces rejections, minimizes manual validation, and keeps expense claims aligned with company policy from the start.

### 5.2 **Fair Travel Distance, Every Time**

Now you can track trip distances automatically using location-based kilometre calculation, eliminating manual entries and calculation errors. Claims are submitted faster, visibility improves with smart indicators for exceeded limits, and exceptions can be managed through controlled overrides.

### 5.3 **Handle Exceptions Without Breaking Policy**

You can now allow authorized users to override expense eligibility rules in justified cases, maintaining structured policies while enabling the flexibility needed to handle real-world exceptions.

### 6. **Promotion Updates Made Simple & Quick**

Promotions without paperwork chaos.

<figure><img src="https://4282324958-files.gitbook.io/~/files/v0/b/gitbook-x-prod.appspot.com/o/spaces%2F-MXep_PEmh8mDPVWj49x%2Fuploads%2FUdXljlrZL5oWbNiJpFze%2F6%20Promotion%20Updates%20Made%20Simple%20%26%20Quick.png?alt=media&amp;token=c5c6d6f3-c4ac-44ec-9293-8652a0fb65cf" alt=""><figcaption></figcaption></figure>

### 6.1 **Quicker Promotions, Less Admin Effort**

Designation, role, and related updates are now handled faster through structured system workflows, reducing manual effort and ensuring timely, accurate changes.

### 7. **Payroll That Feels Safer and More Predictable**

Payroll accuracy is not just about calculations. It is about governance, accountability, and trust across HR, finance, and leadership.

<figure><img src="https://4282324958-files.gitbook.io/~/files/v0/b/gitbook-x-prod.appspot.com/o/spaces%2F-MXep_PEmh8mDPVWj49x%2Fuploads%2FFSpqApb9dsW5c84hyItc%2F7%20Payroll%20That%20Feels%20Safer%20and%20More%20Predictable.png?alt=media&amp;token=5bf98361-a424-4ef8-b10f-7d0327755154" alt=""><figcaption></figcaption></figure>

### 7.1 **Payroll Approvals You Can Trust**

Now you can run payroll with enterprise-grade approval and control. Once payroll is prepared, it flows through a clearly defined, multi-level approval process where authorized stakeholders review and validate details before finalization. Salaries are released only after all required approvals are completed, helping identify discrepancies, compliance risks, and calculation issues early for a more reliable payroll cycle.

### 7.2 **Secure Attendance for Error-Free Payroll**

Now you can lock attendance data as soon as payroll processing begins, preventing changes to punches, leave adjustments, or work hours. This keeps payroll figures consistent throughout the cycle and eliminates rework caused by last-minute edits.

### 7.3 **Faster, Hassle-Free Salary Disbursement**

Disburse salaries directly through bank integration once payroll is finalized. Pocket HRMS automatically generates a secure, bank-compliant pay-out file with verified employee details and accurate net pay amounts. This eliminates Excel-based salary files, reduces errors, strengthens data security, and ensures faster, more reliable salary pay-outs.

### 8. **Performance That Directly Impacts Pay**

Performance outcomes should translate clearly into compensation decisions.

<figure><img src="https://4282324958-files.gitbook.io/~/files/v0/b/gitbook-x-prod.appspot.com/o/spaces%2F-MXep_PEmh8mDPVWj49x%2Fuploads%2F1drKSjURQ3iQHOyjwYT5%2F8%20Performance%20That%20Directly%20Impacts%20Pay.png?alt=media&amp;token=72a5b240-7fe1-49b3-83aa-a35f7cf8fc06" alt=""><figcaption></figcaption></figure>

### 8.1 **Performance-Linked Increments, automated**

Automatically derive increment percentages from PMS outcomes, reducing manual intervention and ensuring consistent, fair salary revisions driven by appraisal results.

### 8.2 **PMS Feedback Process Overview**

Now you can run appraisals on a structured feedback framework that brings greater clarity and consistency across cycles, making evaluations more transparent and easier to understand for both employees and managers.

### 9. **Budgets That Tell You What’s Really Happening**

Managing budgets across multiple companies should not require multiple spreadsheets.

<figure><img src="https://4282324958-files.gitbook.io/~/files/v0/b/gitbook-x-prod.appspot.com/o/spaces%2F-MXep_PEmh8mDPVWj49x%2Fuploads%2FHNostHws0FQ5ov2hQtcT%2F9%20Budgets%20That%20Tell%20You%20What%E2%80%99s%20Really%20Happening.png?alt=media&amp;token=253b3253-59e2-4add-a349-de0c766ece1c" alt=""><figcaption></figcaption></figure>

### 9.1 **Data-Driven Budgeting Made Simple**

Now get a clear, consolidated view of turnover, budgets, and workforce data across group companies through intelligent dashboards. With simple summaries, easy data updates, and role-based access, HR teams and leadership can review group-level insights with clarity and confidence.

### 10. **Compliance Built into Everyday HR**

Compliance becomes easier when visibility and control are built into the system.

<figure><img src="https://4282324958-files.gitbook.io/~/files/v0/b/gitbook-x-prod.appspot.com/o/spaces%2F-MXep_PEmh8mDPVWj49x%2Fuploads%2FnONAHz3OAQFKVZ2lnFL9%2F10%20Compliance%20Built%20into%20Everyday%20HR.png?alt=media&amp;token=55cff97f-fe92-480c-a824-79caad1e79e2" alt=""><figcaption></figcaption></figure>

### 10.1 **Compliance Management, Fully Centralized**

Manage statutory compliance from a single, consolidated dashboard. The Compliance Dashboard brings PF, ESIC, PT, TDS, salary registers, and other statutory reports together in one secure screen, making it easy to access, download, and store filings for any selected period. This improves audit readiness while reducing operational complexity.

### 10.2 **Trusted eKYC for Compliance-Ready Payroll**

Now verify employee identity using Bank, PAN, and Aadhaar validation, improving the authenticity of master data while strengthening compliance readiness. This reduces issues during audits and statutory checks and builds greater trust in employee records.

For any queries, contact <support@pockethrms.com>


# December 2025

### Product Update December 2025

We are thrilled to present our Monthly Update, with enhanced user-friendly tools to elevate your HR experience. Our commitment to innovation and efficiency drives us to bring you seamless updates that transform your HR processes. For the month of December 2025, we have the following enhancements.

### Leave Lapse Configuration

Leave Credit settings have been enhanced with a Leave Lapse option, allowing admins to decide whether unused leave should automatically lapse as per company policy. Currently, this applies to leaves credited on the 1st of the month across all credit frequencies, helping prevent unintended accumulation of leave balances.

![](https://content.gitbook.com/content/-MXep_PEmh8mDPVWj49x/blobs/WoCCnNM865j582skc19X/Unknown%20image)

### Age-Based Leave Credit

An Age Criteria for Leave Credit has been introduced, allowing admins to define a maximum employee age for leave eligibility. Leave will be credited only to employees who meet the configured age requirement.

![](https://content.gitbook.com/content/-MXep_PEmh8mDPVWj49x/blobs/0srIzzz59k1FRWMk214G/Unknown%20image)

### Custom Maternity Leave Categories

Earlier, the system supported only a single maternity leave category. This has now been enhanced to allow multiple maternity leave categories, giving organizations the same flexibility available for Paternity Leave and enabling more tailored maternity leave policies.

![](https://content.gitbook.com/content/-MXep_PEmh8mDPVWj49x/blobs/tMTZud81naA9so2BtMdK/Unknown%20image)

### Contextual Remarks for Punch Imports

A Remarks field has been added to both Unpunch Import and Invalid Punches Import. Any remarks entered during import are now saved and reflected in the Employee Profile on the Cloud portal, improving auditability and providing clearer context for attendance corrections.

![](https://content.gitbook.com/content/-MXep_PEmh8mDPVWj49x/blobs/UPTLLD3SIU5ZQnZqJCJN/Unknown%20image)

![](https://content.gitbook.com/content/-MXep_PEmh8mDPVWj49x/blobs/gB1a3RP1tVRUTSIVZ5VY/Unknown%20image)

![](https://content.gitbook.com/content/-MXep_PEmh8mDPVWj49x/blobs/W4nRZU5iD59P9uBAuaEG/Unknown%20image)

### Real-Time Shift Update

Employees can now receive real-time notifications on both web and mobile whenever a manager updates their shift through Roster Management. The notification includes updated shift details along with the manager’s name, ensuring clear visibility and timely awareness.

<figure><img src="https://content.gitbook.com/content/-MXep_PEmh8mDPVWj49x/blobs/3dAxgBdq0dKg98aXD4xb/Unknown%20image" alt=""><figcaption></figcaption></figure>

### Smarter Employee Report Filtering

Leave and Attendance reports—including Leave, On Duty, Permission, and Regularization—now come with a Generic Filter option. Users can apply advanced, condition-based filters using employee master fields, enabling more precise analysis and easier, more effective reporting.

![](https://content.gitbook.com/content/-MXep_PEmh8mDPVWj49x/blobs/xtqUP6yzX2YeTNn4zs2K/Unknown%20image)

![](https://content.gitbook.com/content/-MXep_PEmh8mDPVWj49x/blobs/tlWMWivCnlqe0pjp1nZf/Unknown%20image)

### Proactive Unpunch Monitoring

The Continuous Unpunch Report has been enhanced to provide deeper insights. In addition to employee code and name, the report now includes Category, Department, Location, and Reporting Manager details, helping HR teams analyse unpunch patterns more effectively.

![](https://content.gitbook.com/content/-MXep_PEmh8mDPVWj49x/blobs/w5JnQ7TWZ01I3ISX8QWG/Unknown%20image)

For any queries, contact <support@pockethrms.com>


# November 2025

We are thrilled to present our Monthly Update, with enhanced user-friendly tools to elevate your HR experience. Our commitment to innovation and efficiency drives us to bring you seamless updates that transform your HR processes. For the month of November 2025, we have the following enhancements.

### 1. Out-Time based Leave Deduction

A new enhancement allows leave deduction based on the employee’s Out-Time range for each shift. This is configured through the Go Rule Engine, where different deduction rules can be set per shift.

Based on the defined Out-Time windows, the system will auto-apply Full-Day or Half-Day Leave. If the employee has already used their permission limit, the deduction will move to Half-Day as configured. Out-Times beyond shift end will not trigger any deduction.

This provides shift-wise flexibility and accurate attendance handling.

**Example – Morning Shift (09:00 to 17:30):**

<table data-header-hidden><thead><tr><th valign="top"></th><th valign="top"></th></tr></thead><tbody><tr><td valign="top">Out Time Range</td><td valign="top">System Action</td></tr><tr><td valign="top">09:00 AM – 12:59 PM</td><td valign="top">Full-Day Leave Deducted</td></tr><tr><td valign="top">13:00 PM – 17:29 PM</td><td valign="top">Half-Day Leave Deducted</td></tr><tr><td valign="top">After 17:30 PM</td><td valign="top">No Deduction</td></tr></tbody></table>

### 2. Priority-based Leave Application

A new Leave Consideration Matrix decides the order in which employees can apply for leave. Based on the priority configured in the Go Rule Engine, the system will automatically allow only the highest-priority leave type with available balance. Lower-priority leave types will be disabled and shown in grey. Leave types not covered in the matrix will continue to work as usual.

Current validations like “Leave limit exceeded” and non-priority confirmation pop-ups remain the same. This enhancement ensures policy-based leave usage and a smoother experience on both ESS and Mobile App.

![](https://content.gitbook.com/content/-MXep_PEmh8mDPVWj49x/blobs/QOeAta0IGJKBM8TxUjbt/Unknown%20image)

### 3. Allowance via Go Rule Engine

The Allowance feature now supports client-specific rules through the Go Rule Engine. Clients can share their allowance policies, and the Pocket HRMS team will configure the rules accordingly.

Below are examples of how different allowance types can be set up:

<figure><img src="https://content.gitbook.com/content/-MXep_PEmh8mDPVWj49x/blobs/HkimkE8a3nYiX4xTkRrS/Unknown%20image" alt=""><figcaption></figcaption></figure>

### 4. Punctuality Pay via Go Rule configuration

A new Punctuality Pay feature allows companies to give monthly incentives for regular and on-time attendance. The Pocket HRMS team will configure it through the Go Rule Engine based on the client’s policy. The system checks punctuality for the full L\&A cycle, allows limited grace time and permissions, and stops the pay-out if any leave, deduction, on-duty entry, or early exit occurs.

![](https://content.gitbook.com/content/-MXep_PEmh8mDPVWj49x/blobs/n6WSLTG1W0YPVDFwtDBk/Unknown%20image)

### 5. PMS UI Enhancements

### a) Improved Employee Search

Employee Search has been improved across all PMS screens to correctly detect and match Employee Code and Name, similar to the updated behaviour in the Weekly Off screen under Leave Settings.

<figure><img src="https://content.gitbook.com/content/-MXep_PEmh8mDPVWj49x/blobs/GBOlu3BLALYAu5HbRSih/Unknown%20image" alt=""><figcaption></figcaption></figure>

### b) Parameter Refresh Enhancement

Earlier, the screen refreshed after every add or edit, which interrupted the process. Now the screen refreshes if you search for different employees, allowing users to add or edit multiple parameters without reloads.

### c) Parameter & Question Progress

A new Stage-wise and Employee-wise Progress widget has been added to show:

* Employees **Not Yet Started**
* Employees **Partially Completed**
* Employees **Fully Completed**

The widget lets users jump directly between Questions and Parameters and shows how many employees still have pending parameters, helping HR track and close appraisals faster.

**Parameter-wise widget:**

<figure><img src="https://content.gitbook.com/content/-MXep_PEmh8mDPVWj49x/blobs/ih96MlmUtQp506uLyAQc/Unknown%20image" alt=""><figcaption></figcaption></figure>

<figure><img src="https://content.gitbook.com/content/-MXep_PEmh8mDPVWj49x/blobs/UTEEPEwvyxQRjCw3SqIf/Unknown%20image" alt=""><figcaption></figcaption></figure>

**Question-wise widget:**

<figure><img src="https://content.gitbook.com/content/-MXep_PEmh8mDPVWj49x/blobs/ArQM2MKG1aximhV78dNu/Unknown%20image" alt=""><figcaption></figcaption></figure>

<figure><img src="https://content.gitbook.com/content/-MXep_PEmh8mDPVWj49x/blobs/oyGSjF0ix4xjtBfSVFgh/Unknown%20image" alt=""><figcaption></figcaption></figure>

### d) Consolidated Appraisal Import

All appraisal import options are now combined under one menu called \*\*“Appraisal Import.”\*\*Users can select the required template from a dropdown instead of using multiple separate import menus.

![](https://content.gitbook.com/content/-MXep_PEmh8mDPVWj49x/blobs/kO20CVnEBiF6ErhrX2YJ/Unknown%20image)

### e) Re-Grouping Approval Menu

Earlier, all approval options were shown under the Request section in ESS. Now, based on the user’s role (Manager/Admin), the related appraisal approval options appear under the Approval section, making navigation cleaner and more organised.

<figure><img src="https://content.gitbook.com/content/-MXep_PEmh8mDPVWj49x/blobs/2zxqEtAYI0Cl3rmdF6eC/Unknown%20image" alt=""><figcaption></figcaption></figure>

### f) New ESS Status Labels

The ESS action button now changes based on the appraisal status:• For **Up for review**, it shows **Add rating**• For **Yet to be submitted**, it shows **View details**

This gives clearer next steps for the manager.

![](https://content.gitbook.com/content/-MXep_PEmh8mDPVWj49x/blobs/fuSJEVFcdPUVLd6TuoO5/Unknown%20image)

### 6. Auto PMS Driven Increment percent

The increment percentage is auto-calculated from the Go Rule Engine based on Final Score, Department, or Business Unit. The Admin starts the cycle, the Manager reviews and confirms the percentage, and final approval stays with the Admin. If re-submitted, the Admin can revise the percentage and resend the flow.

![](https://content.gitbook.com/content/-MXep_PEmh8mDPVWj49x/blobs/94qyTrixWePJDTWq1WC9/Unknown%20image)

![](https://content.gitbook.com/content/-MXep_PEmh8mDPVWj49x/blobs/Y3dT7VTUseixTbpKHsIi/Unknown%20image)

![](https://content.gitbook.com/content/-MXep_PEmh8mDPVWj49x/blobs/FzwLyulroBAh01NS0bpq/Unknown%20image)

### 7. FnF – All Departments Acceptance Notification

A new event has been added in Exit Notification Settings. The system will now send an email once FnF No Dues is approved by all Department Heads, making it easier for HR to proceed with final clearance.

<figure><img src="https://4282324958-files.gitbook.io/~/files/v0/b/gitbook-x-prod.appspot.com/o/spaces%2F-MXep_PEmh8mDPVWj49x%2Fuploads%2FqZw3xFOKYKcytOPWjlfL%2F7%20(1).png?alt=media&amp;token=4895a87c-5e8e-4ed5-a434-14f1068c2167" alt=""><figcaption></figcaption></figure>

### 8. Custom Fields in Emails Templates

HR can now add custom Job and Candidate fields in recruitment email templates. Two new placeholder sections let HR drag and drop these custom fields into email templates and attachments.

![](https://content.gitbook.com/content/-MXep_PEmh8mDPVWj49x/blobs/CKraHtS42dCnku6zZma3/Unknown%20image)

### 9. Corrective Increment

Three new automation fields—Increment %, Increment, and Correction—have been added along with a Recalculate button for instant percentage-based calculation. The system now applies the percentage to eligible components, updates new values, and auto-splits the difference between Increment and Correction.

This replaces the earlier manual updates and ensures accurate and consistent salary revisions. HR now gets a clear post-save view and an updated Increment Register with Increment and Adjustment Summary, making the process faster, error-free, and easier to control.

<figure><img src="https://4282324958-files.gitbook.io/~/files/v0/b/gitbook-x-prod.appspot.com/o/spaces%2F-MXep_PEmh8mDPVWj49x%2Fuploads%2FXAbbJAOrso3UbxNx15FC%2Fimage.png?alt=media&amp;token=bc0869fb-7147-4be4-aa4a-3894115b29d8" alt=""><figcaption></figcaption></figure>

For any queries, contact <support@pockethrms.com>


# October 2025

We are thrilled to present our Monthly Update, with enhanced user-friendly tools to elevate your HR experience. Our commitment to innovation and efficiency drives us to bring you seamless updates that transform your HR processes. For the month of October 2025, we have the following enhancements.

### Unassigned Shift & Week Off Email Trigger

This feature automatically sends emails to managers based on Go Rule Engine settings.

* **Unassigned Shift Alerts:**
  * Sent daily within the configured date range (e.g., 17th–22nd of each month).
  * Lists employees without assigned shifts.
  * Sent to managers as per the Shift Schedule Approval Matrix.
* **Week Off Alerts:**
  * Sent after each week ends (Monday–Sunday).
  * Lists employees without assigned week offs.
  * Sent to managers as per the Leave Approval Matrix.

The email format can be customized in the **Email Template Setup**. Each email includes an **Excel attachment** showing the respective employees.

![](https://content.gitbook.com/content/-MXep_PEmh8mDPVWj49x/blobs/9lG5SkERLbZ0Kdnj7B91/Unknown%20image)

![](https://content.gitbook.com/content/-MXep_PEmh8mDPVWj49x/blobs/fueuR0rvdiQf6jiaqFtO/Unknown%20image)

### Master Absenteeism Report

The report can be generated for the full financial year, with filters for **Live**, **Separated**, or **All** employees. It shows a **month-wise count of absences** based on data from the Time Consolidation process. The report can be **downloaded in Excel, PDF, or Word format**.

![](https://content.gitbook.com/content/-MXep_PEmh8mDPVWj49x/blobs/pynECzphFjEBY7VnT99R/Unknown%20image)

### Enhanced Permission Flow

The **Permission Approval Flow** is now available under the **Leave module** for easier access. Managers can **approve or reject** permissions directly from **Leave → Approval**, instead of the Profile section.

Label updates for better clarity:

* “From Hour – To Hour” → **Time-Based Permission**
* “Single Hour” → **Hourly-Based Permission**

Status updates (Approved, Rejected, Skipped) appear **in real time**, and managers can add **remarks** while approving or rejecting.

Permission Configuration:

![](https://content.gitbook.com/content/-MXep_PEmh8mDPVWj49x/blobs/62PKD6qLflnK8GKYznSe/Unknown%20image)

Approval Time-based UI:

![](https://content.gitbook.com/content/-MXep_PEmh8mDPVWj49x/blobs/gi4lSa4nahi2KvNrIDtt/Unknown%20image)

Approval Hourly-Based UI:

![](https://content.gitbook.com/content/-MXep_PEmh8mDPVWj49x/blobs/xYm7RjMFTuHoToXdnyrP/Unknown%20image)

View Details UI:

<figure><img src="https://4282324958-files.gitbook.io/~/files/v0/b/gitbook-x-prod.appspot.com/o/spaces%2F-MXep_PEmh8mDPVWj49x%2Fuploads%2FiCmIbparc5SeXrvZ9cIq%2Fimage.png?alt=media&amp;token=3d85125b-b02f-4afa-bbf0-e25229de860c" alt=""><figcaption></figcaption></figure>

### Final Rating Rounding

This feature lets you **show final ratings as whole numbers** instead of decimals using a Go Rule Engine setting.

* **Rounding logic:**
  * Values ≤ 0.5 → rounded down to the lower whole number.
  * Values > 0.5 → rounded up to the next whole number.

The rounded rating appears in both **Excel** and **PDF Detailed Reports** on the **ESS portal**.

![](https://content.gitbook.com/content/-MXep_PEmh8mDPVWj49x/blobs/RVzYLBDEGau6fYmlUyrC/Unknown%20image)

![A graph with text and numbers AI-generated content may be incorrect.](https://content.gitbook.com/content/-MXep_PEmh8mDPVWj49x/blobs/tA1p1iIZFgAFRoHQpk9i/Unknown%20image)

### Expense Eligibility Override

* A new **“Enable Eligibility Override”** option is added under **Expense Eligibility** in Cloud. When enabled, employees can **submit claims exceeding** the set limit.
* A **confirmation pop-up** appears in ESS if the amount is higher than eligibility.
* On confirmation, the claim goes to the manager for review. Managers see such claims marked with a **red upward arrow** and a tooltip showing the exceeded amount.
* This ensures **flexibility for genuine claims** while keeping **approval control and transparency**.

![](https://content.gitbook.com/content/-MXep_PEmh8mDPVWj49x/blobs/qyi9OivpEbdDYXGfI22t/Unknown%20image)

![](https://content.gitbook.com/content/-MXep_PEmh8mDPVWj49x/blobs/DKPkw0Z99UD3uZGeRppX/Unknown%20image)

![](https://content.gitbook.com/content/-MXep_PEmh8mDPVWj49x/blobs/ifkGBL1lx78vFXmCxVHu/Unknown%20image)

### Bulk Expense Control

* A new **Expense Lock screen** allows admins to **lock or unlock expenses in bulk** for a selected date range. Locks can be applied by **Business Unit** and **Expense Type**.
* When locked, employees **cannot submit claims** for that expense type until the period ends.
* Added filters to view **All**, **Locked**, or **Unlocked** expenses.
* Displays key details like **Business Unit**, **Expense Type**, **Lock Date**, and **Status**.
* Added **“Select All Across Pages”** option to apply lock/unlock actions to all records at once.
* This update saves time and ensures **faster period closures** with **better control** over expense data.

![A screenshot of a computer AI-generated content may be incorrect.](https://content.gitbook.com/content/-MXep_PEmh8mDPVWj49x/blobs/ueDupMOYQMQmiqNLK7ek/Unknown%20image)

### Control Joining Document Access

Added a new checkbox **“Show document on ESS and Mobile App”** in the Joining Document window. It is **checked by default**, making documents visible to employees on both platforms.

* HR/Admin can **uncheck** it to hide specific documents.
* Existing documents can also be updated to change their visibility.
* This gives HR/Admin **better control** over which documents employees can view during onboarding.

![](https://content.gitbook.com/content/-MXep_PEmh8mDPVWj49x/blobs/fqu7w6QKex50qzilpWUJ/Unknown%20image)

### Random Quiz Feature in Learning

### **Current Behavior:**

* All learners can view and attempt every question in a quiz.
* There is no option to randomize or limit the number of questions.

### **Enhanced Behavior:**

Added a new field **“Randomized Quiz Set”** in the quiz configuration. Trainers can set how many questions (out of the total) each learner will see.

Example: If a quiz has 5 questions and the value is set to 3, only 3 random questions will appear. The system automatically selects the questions at random for each learner. Learners see only the randomly chosen questions in their ESS portal.

This update gives trainers **more flexibility**, creates **varied quiz experiences**, and makes learning **more dynamic**.

<figure><img src="https://4282324958-files.gitbook.io/~/files/v0/b/gitbook-x-prod.appspot.com/o/spaces%2F-MXep_PEmh8mDPVWj49x%2Fuploads%2F5stf8Qgpp6DooV7zVeXX%2Fimage.png?alt=media&amp;token=f81a7bec-8c81-4c09-bd67-dea76ab96729" alt=""><figcaption></figcaption></figure>

<figure><img src="https://4282324958-files.gitbook.io/~/files/v0/b/gitbook-x-prod.appspot.com/o/spaces%2F-MXep_PEmh8mDPVWj49x%2Fuploads%2FlmrF5s9Ppnj2szco2Hky%2Fimage.png?alt=media&amp;token=753333e3-c9d7-428c-9360-493cf8146611" alt=""><figcaption></figcaption></figure>

### Flexible FnF No Dues Trigger

Added new trigger option Earlier, FnF started **only after separation** (default). But now, HR/Admin can choose when to trigger **FnF No Dues**:

* * **On Employee Separation** (default)
  * **On HR Approval** (after HR approves separation)
  * **X Days before LWD** (auto-trigger before last working day)

**smHRt Recommended:** Use **“X Days before LWD”** for smoother and faster closure.

![A screenshot of a computer AI-generated content may be incorrect.](https://content.gitbook.com/content/-MXep_PEmh8mDPVWj49x/blobs/wPzmRLiz9d5vJCt8LoEc/Unknown%20image)

![](https://content.gitbook.com/content/-MXep_PEmh8mDPVWj49x/blobs/LvP6ZaxNIpiGUGUmRsDP/Unknown%20image)

### External CC in Make an Offer

Added a new field **“Additional CC Email ID(s)”** in the **Make an Offer** window. Recruiters can now **add external CC recipients** while sending offer letters.

* **Multiple email IDs** can be entered, separated by commas.
* All added IDs will appear in the **CC section** of the offer email.

![](https://content.gitbook.com/content/-MXep_PEmh8mDPVWj49x/blobs/P3poBtsbEyiQY9IufpOD/Unknown%20image)

### Additional Salary Details Field

Added a new text field **“Additional Info / Salary Benefits”** under **Apply Job** in:

* **Candidate Creation (ESS – Recruiter view)**
* **Career Portal (Candidate view)**

Used to mention **allowances, bonuses, or special benefits**. Helps capture **complete compensation details** during job application.

![A screenshot of a computer AI-generated content may be incorrect.](https://content.gitbook.com/content/-MXep_PEmh8mDPVWj49x/blobs/X4tmcjbXPDYbHsbcNnrf/Unknown%20image)

![A screenshot of a computer AI-generated content may be incorrect.](https://content.gitbook.com/content/-MXep_PEmh8mDPVWj49x/blobs/4CPRDHC1H9JO0KqZxwf0/Unknown%20image)

### ESS Disable Setting After Separation

Added a new control to set **when employee ESS and Mobile App access is disabled after separation**.

Options available:

* **After X Days:** Access auto-disables at midnight after the set number of days.
* **Instantly:** Access is removed immediately upon separation.

Applies to separations from both **ESS and Cloud**. HR can **override the default setting** while processing a separation.

![A screenshot of a chat box AI-generated content may be incorrect.](https://content.gitbook.com/content/-MXep_PEmh8mDPVWj49x/blobs/y9MGWbkVT0UzeJ4Ae9Su/Unknown%20image)

![A screenshot of a computer screen AI-generated content may be incorrect.](https://content.gitbook.com/content/-MXep_PEmh8mDPVWj49x/blobs/eRrrXU4v0jr5Bo0kCxjb/Unknown%20image)

<figure><img src="https://4282324958-files.gitbook.io/~/files/v0/b/gitbook-x-prod.appspot.com/o/spaces%2F-MXep_PEmh8mDPVWj49x%2Fuploads%2FJ28PwUA1FxhVvxxjqUss%2Fimage.png?alt=media&amp;token=7ba0b010-fbb9-4b40-8671-8b88e010179e" alt=""><figcaption></figcaption></figure>

<figure><img src="https://4282324958-files.gitbook.io/~/files/v0/b/gitbook-x-prod.appspot.com/o/spaces%2F-MXep_PEmh8mDPVWj49x%2Fuploads%2FmBE2xwzgRCgXhL5puhdS%2Fimage.png?alt=media&amp;token=4f62f274-259f-4942-8661-22dc294450c8" alt=""><figcaption></figcaption></figure>

For any queries, contact <support@pockethrms.com>


# August 2025

We are thrilled to present our Monthly Update, with enhanced user-friendly tools to elevate your HR experience. Our commitment to innovation and efficiency drives us to bring you seamless updates that transform your HR processes. For the month of August 2025, we have the following enhancements.

### Yearly Cap on Compensatory Off

A new option has been added in Leave Configuration for Compensatory Off (Comp-Off). This lets admins set the maximum number of Comp-Off leaves an employee can take in a year.

* A setting is available: “Maximum \[x] leaves of this type are allowed in a year.”
* Example: If the limit is 5, an employee can take up to 5 Comp-Off leaves in that financial year.
* After the limit is reached, the system will block new requests and show a message: “Leave limit is exceeded. Allowed yearly limit is: 5.”
* The check happens instantly when applying, so no extra requests can go through.

![](https://4282324958-files.gitbook.io/~/files/v0/b/gitbook-x-prod.appspot.com/o/spaces%2F-MXep_PEmh8mDPVWj49x%2Fuploads%2FrPW9o0mba80ZZR0Tw5kc%2F0.png?alt=media)

The system shows a message when a leave request goes over the 5-day limit.

![](https://4282324958-files.gitbook.io/~/files/v0/b/gitbook-x-prod.appspot.com/o/spaces%2F-MXep_PEmh8mDPVWj49x%2Fuploads%2FydqJEcDrR4qMV0BKOSZY%2F1.png?alt=media)

![](https://4282324958-files.gitbook.io/~/files/v0/b/gitbook-x-prod.appspot.com/o/spaces%2F-MXep_PEmh8mDPVWj49x%2Fuploads%2F6PcxPDIoPwz1WJHtMO0y%2F2.png?alt=media)

### Remarks for Updated Punch and Attendance Report

We have improved the Modified Punch feature by adding a Remarks field. Now, whenever an employee’s in/out punch is changed, the user can record a reason or note.

* A Remarks field is shown when editing a punch.
* The remarks are saved with the modified punch details.
* These remarks also appear in the Attendance Summary Report.
* Example: If a punch is changed with the note “Informed I’ll be late but completed working hours”, it will be shown in the Remarks column of the report.

![](https://4282324958-files.gitbook.io/~/files/v0/b/gitbook-x-prod.appspot.com/o/spaces%2F-MXep_PEmh8mDPVWj49x%2Fuploads%2FQ098hbtJKKv7WbeILWbK%2F3.png?alt=media)

![](https://4282324958-files.gitbook.io/~/files/v0/b/gitbook-x-prod.appspot.com/o/spaces%2F-MXep_PEmh8mDPVWj49x%2Fuploads%2FDtlXB1srdb3mkHEJZqHx%2F4.png?alt=media)

### Orientation Added to Learning Certificate

A new option is available in Learning Program → Certification Details to set the certificate orientation.

* Admins can choose Portrait or Landscape mode for certificates.
* This helps match certificates with company branding and design needs.
* When changing the orientation, the system shows a warning: “Warning: Watermark may shift with orientation. Check format before continuing.”
* This ensures the watermark and layout are checked before finalizing.

![](https://4282324958-files.gitbook.io/~/files/v0/b/gitbook-x-prod.appspot.com/o/spaces%2F-MXep_PEmh8mDPVWj49x%2Fuploads%2Ff3QEvUND5fUaRIUJ6kk2%2F5.png?alt=media)

### Monthly Headcount Analysis

A new report called Monthly Headcount Trend Report has been added under the Headcount section. It shows male and female employee counts month by month.

* Compare male vs. female headcount across months.
* Filter by status:
  * Active – current employees
  * Inactive – employees who have left
  * All – both active and inactive
* The report generates three sheets:
  * Active Data Sheet – detailed view of active employees
  * Inactive Data Sheet – detailed view of inactive employees
  * Overall Headcount Sheet – combined monthly headcount trends

![](https://4282324958-files.gitbook.io/~/files/v0/b/gitbook-x-prod.appspot.com/o/spaces%2F-MXep_PEmh8mDPVWj49x%2Fuploads%2FybXqqsu9I5Zxycklae7v%2F6.png?alt=media)

### Currency Choice in CTC Fields

We have added a currency selection option before entering Current and Expected CTC values.

**Display:**

* Candidate Profile
* Candidate Cards (Candidate List Page)

**Customization:**

* By default, only INR is enabled.
* Other currencies can be added on request through consultants.

![](https://4282324958-files.gitbook.io/~/files/v0/b/gitbook-x-prod.appspot.com/o/spaces%2F-MXep_PEmh8mDPVWj49x%2Fuploads%2FTVn286riOTKu1bOyj5a1%2F7.png?alt=media)

![](https://4282324958-files.gitbook.io/~/files/v0/b/gitbook-x-prod.appspot.com/o/spaces%2F-MXep_PEmh8mDPVWj49x%2Fuploads%2FD6Of4fUqZkuq2LyZ2pPB%2F8.png?alt=media)

![](https://4282324958-files.gitbook.io/~/files/v0/b/gitbook-x-prod.appspot.com/o/spaces%2F-MXep_PEmh8mDPVWj49x%2Fuploads%2FEeG2Gccggolc3iLZABPZ%2F9.png?alt=media)

![](https://4282324958-files.gitbook.io/~/files/v0/b/gitbook-x-prod.appspot.com/o/spaces%2F-MXep_PEmh8mDPVWj49x%2Fuploads%2Ffdj2QHPzEQmcXl6GRl2L%2F10.png?alt=media)

### Dynamic States in Candidate Creation

We have added a dynamic state list that updates automatically based on the selected country.

* **Current coverage:** India, Australia, and Malaysia
* **Customization:** Additional country–state mappings can be set up on request through consultants.

![](https://4282324958-files.gitbook.io/~/files/v0/b/gitbook-x-prod.appspot.com/o/spaces%2F-MXep_PEmh8mDPVWj49x%2Fuploads%2FrViAOossug9Bx4SGDlBE%2F11.png?alt=media)

![](https://4282324958-files.gitbook.io/~/files/v0/b/gitbook-x-prod.appspot.com/o/spaces%2F-MXep_PEmh8mDPVWj49x%2Fuploads%2FCPlyCj85pkQJaXF6ZrV5%2F12.png?alt=media)

For any queries, contact <support@pockethrms.com>


# July 2025

We are thrilled to present our Monthly Update, with enhanced user-friendly tools to elevate your HR experience. Our commitment to innovation and efficiency drives us to bring you seamless updates that transform your HR processes. For the month of July 2025, we have the following enhancements.

### Regularization & On-Duty Limits by BU/Employee Wise (via Rule Engine)

The system now allows flexible Regularization and On-Duty limits by enabling configurations at two additional levels — Business Unit-wise and Employee-wise — in addition to the existing Company-wise setup. Previously, limits could only be defined at the company level, but now users have greater control and flexibility.

#### &#x20;1. Business Unit-wise Limits:

Admins can assign different limits for each Business Unit based on roles.

Example:

* Manager: On Duty – 1, Regularization – 1
* HR: On Duty – 2, Regularization – 3

#### 2.  Employee-wise Limits:

Specific limits can be set for individual employees.

Example:

* EMP0004: On Duty – 2, Regularization – 1
* EMP0900: On Duty – 1, Regularization – 1

#### 3. Rule Engine Controlled:

All configurations are handled through the Rule Engine. Setup details can be shared with the Development Team for implementation as needed.

### Apply Category-Based L\&A Rules via Rule Engine

#### What’s New:

* Previously, Leave & Attendance (L\&A) restrictions were company-wide with only one attendance cycle (either Month-wise or Date-wise like 26–25).
* Now, multiple attendance cycles can be configured per employee category, as long as they match the Month Days setting.

#### Category-Specific Restriction Days:

Admin/HR can now set different L\&A submission cut-off periods for each category.

#### Examples:

* Category 1: Cycle – Month-wise | Restriction – 5 days after month-end
* Category 2: Cycle – 26–25 | Restriction – 10 days after 25th

After the restriction period, employees cannot submit L\&A requests for the previous cycle.

#### Benefits:

* More flexible attendance cycle management across employee categories
* Stronger payroll compliance by preventing post-cycle changes
* Controlled entirely through the Rule Engine for accuracy and customization

### Customize OT Remark Settings

Now you can set mandatory OT remarks with dropdown options to ensure consistent and standardized approvals.

#### What’s New:

* OT approval can now include mandatory remarks.
* HR/Admin defines dropdown values for managers to select from.
* In ESS, managers must choose a remark from the dropdown (if mandatory) while approving OT.
* This ensures consistency in justification for OT approvals.

![](https://4282324958-files.gitbook.io/~/files/v0/b/gitbook-x-prod.appspot.com/o/spaces%2F-MXep_PEmh8mDPVWj49x%2Fuploads%2FXciJi99Em8pLOUAL9pek%2F0.png?alt=media)

![](https://4282324958-files.gitbook.io/~/files/v0/b/gitbook-x-prod.appspot.com/o/spaces%2F-MXep_PEmh8mDPVWj49x%2Fuploads%2FhbFfAyiyIoY46VCl4nwi%2F1.png?alt=media)

### Improved Week Off Export

* Users can export week off data for a selected date range.
* Export is available for employee-wise week off settings only.
* The data is downloaded in Excel format.

![](https://4282324958-files.gitbook.io/~/files/v0/b/gitbook-x-prod.appspot.com/o/spaces%2F-MXep_PEmh8mDPVWj49x%2Fuploads%2F0U0jBE5yPdWtxERYPV4E%2F2.png?alt=media)

### PMS Review Workflow

PMS Feedback Process – Overview

#### Features Overview:

* Admins can set custom feedback fields for each appraisal stage.
* Fields may include questions or inputs like Activities and Recommendations.
* Option to add Instructions to guide can be added to the feedback form.

#### Manager Access:

Managers can view their team and fill feedback forms via ESS.

#### The form includes:

* Title & Feedback Period
* KPI-based questions under KRAs
* Input areas for Activities, and Recommendations
* Manager Remarks

**Supports daily, monthly, quarterly, and yearly cycles.**

* New form auto-generates daily.
* Latest feedback is shown by default; older ones can be viewed via Feedback History tab.

#### Additional Features:

* "Copy to All Stages" option for quick field setup.
* Feedback reports are accessible to both managers and admins from ESS.

![](https://4282324958-files.gitbook.io/~/files/v0/b/gitbook-x-prod.appspot.com/o/spaces%2F-MXep_PEmh8mDPVWj49x%2Fuploads%2FgPW2JqsC7vWow2cEC5SO%2F3.png?alt=media)

![](https://4282324958-files.gitbook.io/~/files/v0/b/gitbook-x-prod.appspot.com/o/spaces%2F-MXep_PEmh8mDPVWj49x%2Fuploads%2FBpoSMZUziiJzhvPtldmM%2F4.png?alt=media)

![](https://4282324958-files.gitbook.io/~/files/v0/b/gitbook-x-prod.appspot.com/o/spaces%2F-MXep_PEmh8mDPVWj49x%2Fuploads%2FwjpNIBICCbbKkvwvnvCV%2F5.png?alt=media)

![](https://4282324958-files.gitbook.io/~/files/v0/b/gitbook-x-prod.appspot.com/o/spaces%2F-MXep_PEmh8mDPVWj49x%2Fuploads%2FW2DmBZdLRCXgiNnaPDeY%2F6.png?alt=media)

![](https://4282324958-files.gitbook.io/~/files/v0/b/gitbook-x-prod.appspot.com/o/spaces%2F-MXep_PEmh8mDPVWj49x%2Fuploads%2FR7XiLrij9j7dTP2bI2lW%2F7.png?alt=media)

### Email Confidential Docs via ESS

We’ve added a secure way to send sensitive documents like Payslips, TDS Worksheets, and Form 16 via ESS.

* Files are emailed to employees’ personal IDs in encrypted format.
* Even downloads from ESS (My Salary Details / My Tax Details) stay encrypted for security.
* This protects confidential financial data from unauthorized access.

#### To enable encryption and secure delivery:

* Open the Payslip tab and go to "Other Options" while editing settings.
* Turn on encryption based on your company’s policy.

<figure><img src="https://4282324958-files.gitbook.io/~/files/v0/b/gitbook-x-prod.appspot.com/o/spaces%2F-MXep_PEmh8mDPVWj49x%2Fuploads%2F4JqAwXssax8HfGWsEWw7%2F8.png?alt=media" alt=""><figcaption></figcaption></figure>

![](https://4282324958-files.gitbook.io/~/files/v0/b/gitbook-x-prod.appspot.com/o/spaces%2F-MXep_PEmh8mDPVWj49x%2Fuploads%2FaO36ZV4p62v2EvrEzKN8%2F9.png?alt=media)

![](https://4282324958-files.gitbook.io/~/files/v0/b/gitbook-x-prod.appspot.com/o/spaces%2F-MXep_PEmh8mDPVWj49x%2Fuploads%2F76z7qq9XQ6QCdpXx4dRA%2F10.png?alt=media)

### Daily Expense Claim Limit setup

A new ‘Per-Day’ approval option is now available in Expense Eligibility settings to control duplicate claims. This prevents employees from submitting multiple claims of the same type on the same day.

* Now available along with existing Claim-Wise and Monthly option.

#### Validation Logic:

* Employees are allowed to submit only one claim per expense type each day.
* If they try to submit another claim of the same type on the same date, the system will block it and show a validation message.

![](https://4282324958-files.gitbook.io/~/files/v0/b/gitbook-x-prod.appspot.com/o/spaces%2F-MXep_PEmh8mDPVWj49x%2Fuploads%2Ft6e3FRwWPKaGwdbulTxK%2F11.png?alt=media)

### View/Edit Validations in Monthly Input

Smart validations have been added to help Admin/HR use the View and Edit options correctly in the Monthly Input screen.

* If data isn’t saved yet, the system prompts:

“Please click 'View' and save the Monthly Input first before editing.”

* If data is already saved, it prompts:

“Please click 'Edit' to overwrite the saved data.”

* These validations prevent accidental overwrites or incorrect actions.
* Helps avoid mistakes and makes the process smoother and more user-friendly.

![](https://4282324958-files.gitbook.io/~/files/v0/b/gitbook-x-prod.appspot.com/o/spaces%2F-MXep_PEmh8mDPVWj49x%2Fuploads%2FOURHGH8zjUL4rpfD1CAO%2F12.png?alt=media)

![](https://4282324958-files.gitbook.io/~/files/v0/b/gitbook-x-prod.appspot.com/o/spaces%2F-MXep_PEmh8mDPVWj49x%2Fuploads%2F6pLoiVxkA170f0hOqiUp%2F13.png?alt=media)

### Control Visibility of Limits in Tax & Income Heads

A new checkbox has been added to let Admin/HR control whether deduction/income limits are visible to employees in ESS.

* New Option: "Do not show Limit in TDS Declaration & Proof"
* Available for both Tax Sections and Other Income Heads, similar to Tax Sub Sections
* Helps Admin/HR hide limits to avoid confusion or bias during employee declarations
* Provides a cleaner and more focused declaration experience for employees

![](https://4282324958-files.gitbook.io/~/files/v0/b/gitbook-x-prod.appspot.com/o/spaces%2F-MXep_PEmh8mDPVWj49x%2Fuploads%2FTqocEV8QhQqVBNvkdoHo%2F14.png?alt=media)

![](https://4282324958-files.gitbook.io/~/files/v0/b/gitbook-x-prod.appspot.com/o/spaces%2F-MXep_PEmh8mDPVWj49x%2Fuploads%2F6luxhhXA2cQXIq75W9H8%2F15.png?alt=media)

### Email Alerts for FnF Approval/Rejection by Department Head

Two new email notifications have been added in the Exit & FnF module to improve communication when Department Heads take action:

#### New Triggers:

* Dept. Head Approves Resignation
* Dept. Head Rejects Resignation

#### Process:

* Emails are sent to selected recipients like Employee, Manager, HR, or custom email IDs
* Keeps everyone informed during the FnF No Dues process
* Ensures quicker and more transparent closure of exit cases

![](https://4282324958-files.gitbook.io/~/files/v0/b/gitbook-x-prod.appspot.com/o/spaces%2F-MXep_PEmh8mDPVWj49x%2Fuploads%2FoVjBGnTTl2qzWGtyf793%2F16.png?alt=media)

### Breakdown of Stopped Amounts in FnF Register

The Final Settlement Register now includes a detailed view of Stop Payment history for each employee:

* Displays month-wise On Hold entries with corresponding stopped amounts
* Separately shows the FnF Month and FnF Amount
* Final Amount includes the total of all amounts paid
* Enhances payroll transparency and ensures accurate reconciliation

![](https://4282324958-files.gitbook.io/~/files/v0/b/gitbook-x-prod.appspot.com/o/spaces%2F-MXep_PEmh8mDPVWj49x%2Fuploads%2FV7f8p3cD6Rj0UlfE080e%2F17.png?alt=media)

![](https://4282324958-files.gitbook.io/~/files/v0/b/gitbook-x-prod.appspot.com/o/spaces%2F-MXep_PEmh8mDPVWj49x%2Fuploads%2F05vTGsgm3Na1EXEHLUWM%2F18.png?alt=media)

### Change Log Added for Loan Perquisites

Change tracking is now available for all updates made to Loan Perquisite details in the employee profile:

#### Tracks changes to:

* Outstanding Amount / Loan Amount
* Monthly Repayment
* Interest Rat

#### Each log records:

* Date & time of the change
* User’s IP address

#### Ensures a clear audit trail for compliance and easy review.

![](https://4282324958-files.gitbook.io/~/files/v0/b/gitbook-x-prod.appspot.com/o/spaces%2F-MXep_PEmh8mDPVWj49x%2Fuploads%2FH6YHDdz4nFv5zRnAYCGm%2F19.png?alt=media)

### Email Alerts for Benefit Claim Actions

A new Benefit Notification Settings section has been added to manage email alerts for Benefit Claim actions:

#### Set up notifications for:

* Employee submits a claim
* Manager approves a claim
* Manager rejects a claim

#### Choose recipients such as:

* Specific employees or departments
* Custom email IDs
* Employee, Manager, or HR

#### Email templates can be previewed and customized for each event

#### Works just like the existing Exit Notification Settings for easy setup and consistency.

![](https://4282324958-files.gitbook.io/~/files/v0/b/gitbook-x-prod.appspot.com/o/spaces%2F-MXep_PEmh8mDPVWj49x%2Fuploads%2Fi3pVfcht5A6VTwe4bTtJ%2F20.png?alt=media)

For any queries, contact <support@pockethrms.com>


# June 2025

We are thrilled to present our Monthly Update, with enhanced user-friendly tools to elevate your HR experience. Our commitment to innovation and efficiency drives us to bring you seamless updates that transform your HR processes. For the month of June 2025, we have the following enhancements.

### Restriction on On-Duty during Week Offs and Holidays

This setting allows HR/Admin to prevent employees from applying for On-Duty on weekly offs and designated holidays. It includes two dropdown options to easily control and configure this restriction.

Dropdowns:

• On Duty Restrict – Holiday (Yes/No)

• On Duty Restrict – Week Off (Yes/No)

![](https://4282324958-files.gitbook.io/~/files/v0/b/gitbook-x-prod.appspot.com/o/spaces%2F-MXep_PEmh8mDPVWj49x%2Fuploads%2FVSy5yAy2hxuIORfkEAlO%2F0.png?alt=media)

### LWF and Prof. Tax Locations Added by Default

We’ve now added all LWF and Professional Tax locations to the Pop-Up Data by default. This removes the need to manually create them each time. HR/Admin can now simply choose from 16 pre-defined LWF Locations and 37 pre-defined Prof. Tax Locations while adding or editing employees.

![](https://4282324958-files.gitbook.io/~/files/v0/b/gitbook-x-prod.appspot.com/o/spaces%2F-MXep_PEmh8mDPVWj49x%2Fuploads%2FRbL6h77SPTJ05JtGMMyM%2F1.png?alt=media)

![](https://4282324958-files.gitbook.io/~/files/v0/b/gitbook-x-prod.appspot.com/o/spaces%2F-MXep_PEmh8mDPVWj49x%2Fuploads%2Focxk9nzF3q0faNepBQAs%2F2.png?alt=media)

### Gender Field Now Includes ‘Transgender’ Option

Admin/HR can now choose **Transgender** as a gender option, along with **Male** and **Female**, when creating or editing employee profiles.

![](https://4282324958-files.gitbook.io/~/files/v0/b/gitbook-x-prod.appspot.com/o/spaces%2F-MXep_PEmh8mDPVWj49x%2Fuploads%2F1bXIWKlBRaou74lpunse%2F3.png?alt=media)

### Email Notification for Monthly Attendance Summary

In the recent enhancement, the system sends each employee a monthly attendance summary email on the set date and time. It includes a link to download their personal Excel attendance report for the month.

![](https://4282324958-files.gitbook.io/~/files/v0/b/gitbook-x-prod.appspot.com/o/spaces%2F-MXep_PEmh8mDPVWj49x%2Fuploads%2Fez7Odjq19p2wNC6aQWRM%2F4.png?alt=media)

![](https://4282324958-files.gitbook.io/~/files/v0/b/gitbook-x-prod.appspot.com/o/spaces%2F-MXep_PEmh8mDPVWj49x%2Fuploads%2FUgkb8lqRD0rmGmL5bMqW%2F6.png?alt=media)

![](https://4282324958-files.gitbook.io/~/files/v0/b/gitbook-x-prod.appspot.com/o/spaces%2F-MXep_PEmh8mDPVWj49x%2Fuploads%2FkgVmykiZO0WgoIHTCuuU%2F5.png?alt=media)

### Improved Email Templates for Password Reset

Now a new option is available to send a ‘password generation’ or ‘reset’ email to employees when their Self-Service role is reset. This helps HR inform employees about their password change due to an update in their account (e.g., role change).

Email templates have been updated for the following cases:

* First-time password generation
* Password reset by Admin/HR
* Password reset requested by the employee
* Password successfully reset by the employee

![](https://4282324958-files.gitbook.io/~/files/v0/b/gitbook-x-prod.appspot.com/o/spaces%2F-MXep_PEmh8mDPVWj49x%2Fuploads%2FwM2zbl89HBBIbMF4L34j%2F7.png?alt=media)

![](https://4282324958-files.gitbook.io/~/files/v0/b/gitbook-x-prod.appspot.com/o/spaces%2F-MXep_PEmh8mDPVWj49x%2Fuploads%2FizNfwdLUIbccSlonjPmR%2F8.png?alt=media) ![](https://4282324958-files.gitbook.io/~/files/v0/b/gitbook-x-prod.appspot.com/o/spaces%2F-MXep_PEmh8mDPVWj49x%2Fuploads%2F7BKFDZmvxVyldYtlF5ov%2F9.png?alt=media)

<figure><img src="https://4282324958-files.gitbook.io/~/files/v0/b/gitbook-x-prod.appspot.com/o/spaces%2F-MXep_PEmh8mDPVWj49x%2Fuploads%2FbcrZ6u6atZzc7JM1yBFD%2F10.png?alt=media" alt=""><figcaption></figcaption></figure>

<figure><img src="https://4282324958-files.gitbook.io/~/files/v0/b/gitbook-x-prod.appspot.com/o/spaces%2F-MXep_PEmh8mDPVWj49x%2Fuploads%2FGQk4NWOzF81oMMsDwhvf%2F11.png?alt=media" alt=""><figcaption></figcaption></figure>

### &#x20;Enhancements in Managing Resignation and LWD

We have enhanced the management of Resignation Date and Last Working Date (LWD) with more control and flexibility. We’ve improved how you manage Resignation and Last Working Dates. You can now:

* Set how default dates should appear if they fall on a holiday or weekly off
* Allow or restrict Employees, Managers, and HRs from updating the Last Working Date
* Allow or restrict them from updating the Resignation Date
* Control whether these updates are allowed on holidays or weekly offs.

All these settings can be managed separately for Employees, Managers, and HRs.

![](https://4282324958-files.gitbook.io/~/files/v0/b/gitbook-x-prod.appspot.com/o/spaces%2F-MXep_PEmh8mDPVWj49x%2Fuploads%2FiqLiLEDwlDXiFnYDa8dQ%2F12.png?alt=media)

### Control Visibility of Sub-Section Limits in TDS Page

You can now choose to show or hide the sub-section limit in the TDS Declaration and Proof Entry pages. The limit stays active, but employees won’t see it while filling their declarations.

![](https://4282324958-files.gitbook.io/~/files/v0/b/gitbook-x-prod.appspot.com/o/spaces%2F-MXep_PEmh8mDPVWj49x%2Fuploads%2FgyoX2kSV2bIlSIyEFsRo%2F13.png?alt=media)

### Improved Worksheet Generation

In the recent enhancement, you can now generate worksheets for any monthly range within the current financial year. There's also an option to generate them for all employees or only for live/left employees. The system will create the latest Income Tax Processed worksheet based on your selection.

![](https://4282324958-files.gitbook.io/~/files/v0/b/gitbook-x-prod.appspot.com/o/spaces%2F-MXep_PEmh8mDPVWj49x%2Fuploads%2FJkvWBy2TFGeMRRzbEHIh%2F14.png?alt=media)

### Added Learning Details Placeholder to Email Template

This feature lets you add learning details into email templates using separate placeholders for each field like Learning Name, Duration, Start/End Date, Trainer Type, Learning Head, and Location. These placeholders automatically fill in based on the employee’s scheduled session.

**Example:**

Learning Name: Communication Skills | Duration: 2 Days | Start Date: 08 July 2025

Each field is filled automatically using system placeholders.

![](https://4282324958-files.gitbook.io/~/files/v0/b/gitbook-x-prod.appspot.com/o/spaces%2F-MXep_PEmh8mDPVWj49x%2Fuploads%2FrJip73U0myXnUANiC23P%2F15.png?alt=media)

### Helpdesk Tags Now Shown on Tickets

In the recent update, both the employees and agents can now see the tags added when a Helpdesk ticket is raised by an employee. The tags are visible on the ticket list page as well as inside the ticket.

![](https://4282324958-files.gitbook.io/~/files/v0/b/gitbook-x-prod.appspot.com/o/spaces%2F-MXep_PEmh8mDPVWj49x%2Fuploads%2FKdab9Jj1f4qwX04tYbJ2%2F17.png?alt=media)

![](https://4282324958-files.gitbook.io/~/files/v0/b/gitbook-x-prod.appspot.com/o/spaces%2F-MXep_PEmh8mDPVWj49x%2Fuploads%2Ff2CYUCm9qm86D5wMN2oS%2F16.png?alt=media)

### Confirmation Date Update in HR Letters

In the recent update a new dynamic field, “Confirmation Approved Date” has been added to the HR Letter template. It shows the actual date when the confirmation was approved by the manager or system, even if it’s different from the scheduled date.

<figure><img src="https://4282324958-files.gitbook.io/~/files/v0/b/gitbook-x-prod.appspot.com/o/spaces%2F-MXep_PEmh8mDPVWj49x%2Fuploads%2F8Zn2ZYGhajpWwz8XU2Yk%2F9%20(2).png?alt=media&amp;token=ec25fcb5-be3a-4390-894a-bd9f73c78efa" alt=""><figcaption></figcaption></figure>

For any queries, contact <support@pockethrms.com>


# May 2025

We are thrilled to present our Monthly Update, with enhanced user-friendly tools to elevate your HR experience. Our commitment to innovation and efficiency drives us to bring you seamless updates that transform your HR processes. For the month of May 2025, we have the following enhancements.

### Enhanced Weekly Off Upload Process

HR/Admin users can upload weekly offs in two ways: week-wise and date-wise, especially when weekly offs are set per employee. Earlier, only date-wise uploads were allowed. Now, users can:

* Assign weekly offs in bulk using a week-wise format
* Create reusable templates
* Set custom date ranges
* Map Excel columns easily based on format

Furthermore, the built-in checks ensure data accuracy, making the process faster and reducing manual work.

![](https://4282324958-files.gitbook.io/~/files/v0/b/gitbook-x-prod.appspot.com/o/spaces%2F-MXep_PEmh8mDPVWj49x%2Fuploads%2Fe4HLcZILthEE0FKJ4YtZ%2F0.png?alt=media)

### Shift-wise Data Now Available in Monthly Summary

A new “Show Shift Details” checkbox is now available in the Attendance Monthly Summary Report. When HR/Admin selects it, the downloaded Excel will include each employee’s shift name by date, along with attendance details — making shift verification easier.

![](https://4282324958-files.gitbook.io/~/files/v0/b/gitbook-x-prod.appspot.com/o/spaces%2F-MXep_PEmh8mDPVWj49x%2Fuploads%2F1C25IiK0MJMIXHeYWGJ9%2F1.png?alt=media)

<figure><img src="https://4282324958-files.gitbook.io/~/files/v0/b/gitbook-x-prod.appspot.com/o/spaces%2F-MXep_PEmh8mDPVWj49x%2Fuploads%2FFP0edAUvHmZcup46hvNu%2F2.png?alt=media" alt=""><figcaption></figcaption></figure>

### Export of Appraisal Parameters and Questions

Admins can now export Appraisal Parameters and Questions in Excel format. The report is generated Business Unit-wise and Stage-wise, based on selected filters, and shows the details configured in the system.

![](https://4282324958-files.gitbook.io/~/files/v0/b/gitbook-x-prod.appspot.com/o/spaces%2F-MXep_PEmh8mDPVWj49x%2Fuploads%2FC4rEIm9YcHVV1ZkVSkgX%2F3.png?alt=media)

![](https://4282324958-files.gitbook.io/~/files/v0/b/gitbook-x-prod.appspot.com/o/spaces%2F-MXep_PEmh8mDPVWj49x%2Fuploads%2FjUDUtoNIzrZ4wN6ccdC5%2F4.png?alt=media)

### Multi-trainer Setup for Learning Sessions & Enhanced Attendance Setting

#### Multiple Trainers per Session:

* Earlier, only one trainer could be assigned to a session.
* Now, you can assign multiple trainers to a single session.

#### Viewing Access:

* All assigned trainers can view the session under their employee sessions tab.

#### Attendance Marking Rights:

* Only one trainer (among the assigned ones) can mark attendance.
* This avoids confusion and ensures only one accurate status (Present or Absent) is recorded.

<figure><img src="https://4282324958-files.gitbook.io/~/files/v0/b/gitbook-x-prod.appspot.com/o/spaces%2F-MXep_PEmh8mDPVWj49x%2Fuploads%2FMqmDYqaqoMGGtLlCCrEB%2F5.png?alt=media" alt=""><figcaption></figcaption></figure>

### Progress Monitoring for Reference Materials

Now you can track progress on reference materials in a learning program.

* Admins can now add multiple reference documents while setting up the program from the Cloud portal.
* Once published, employees can view these materials in the ESS portal under the assigned program.
* Progress starts at 0% and updates as employees click “NEXT” on each material, marking it as read.
* A progress bar shows how much has been completed (e.g., reading 2 of 4 files = 50% progress).

This helps both employees and managers monitor engagement and ensure assigned materials are read.

![](https://4282324958-files.gitbook.io/~/files/v0/b/gitbook-x-prod.appspot.com/o/spaces%2F-MXep_PEmh8mDPVWj49x%2Fuploads%2FDnXUyfhIV2NzaRuauVrC%2F6.png?alt=media)

![](https://4282324958-files.gitbook.io/~/files/v0/b/gitbook-x-prod.appspot.com/o/spaces%2F-MXep_PEmh8mDPVWj49x%2Fuploads%2FSVDOaLRaFz1vfc22b0xG%2F7.png?alt=media)

### Detailed Training Overview Report

We’ve added three new training reports in the Cloud portal:

* Training Master Report – Full training history with quiz scores and feedback
* Employee Training Card Report – Employee-wise summary with average score
* Training Progress Report – Real-time progress with % completed and time taken

You can filter by employee, training name, date, or learning type. Reports are available in PDF and Excel formats with the ease to track quiz marks, grades, feedback, and exam attempts, with color-coded bars to show progress at a glance.

![](https://4282324958-files.gitbook.io/~/files/v0/b/gitbook-x-prod.appspot.com/o/spaces%2F-MXep_PEmh8mDPVWj49x%2Fuploads%2Fl7Im6NsiuGvaiKwYcgT1%2F8.png?alt=media)

**Training Master Report:**

<figure><img src="https://4282324958-files.gitbook.io/~/files/v0/b/gitbook-x-prod.appspot.com/o/spaces%2F-MXep_PEmh8mDPVWj49x%2Fuploads%2FWyORo6zcJlwVVuklskkL%2F9.png?alt=media" alt=""><figcaption></figcaption></figure>

**Employee Training Card:**

<figure><img src="https://4282324958-files.gitbook.io/~/files/v0/b/gitbook-x-prod.appspot.com/o/spaces%2F-MXep_PEmh8mDPVWj49x%2Fuploads%2FtcVcJ9vWE5mBsEIEuKqi%2F10.png?alt=media" alt=""><figcaption></figcaption></figure>

**Training Progress Report:**

![](https://4282324958-files.gitbook.io/~/files/v0/b/gitbook-x-prod.appspot.com/o/spaces%2F-MXep_PEmh8mDPVWj49x%2Fuploads%2FGQYQMCBJFW1SiVGril4P%2F11.png?alt=media)

### Date Range Filtering Added to HR Reports for Applied and Expense Dates

You can now select a date range for Applied Date and Expense Date in HR reports instead of just one day. This helps you view more entries at once and get accurate results within the valid date range.

#### Earlier Limitation:

* Users could only select a single date for Applied Date and Expense Date, showing data for just one day.

#### New Enhancement:

* You can now choose a date range for both fields to view more expense records at once.

#### Validation Check:

* The selected range must be within the actual available dates to ensure accurate results.

![](https://4282324958-files.gitbook.io/~/files/v0/b/gitbook-x-prod.appspot.com/o/spaces%2F-MXep_PEmh8mDPVWj49x%2Fuploads%2F7E4Ps8c406J2lv6Qo9U4%2F12.png?alt=media)

### Track Active/Inactive Employees in Joined List Report

You can now easily track employee status in the Joined List Report with the added option to view active or inactive records. This enhancement improves visibility and helps in better workforce analysis.

#### New Filter Added:

* An Employee Status filter has been added to the Joined List report.

#### Filter Options Available:

* Active (Default)
* Inactive
* Both

#### Purpose:

* Enables users to generate the joined employee list based on the selected employee status for more targeted reporting.
* Reports can be downloaded in PDF or Excel format.

![](https://4282324958-files.gitbook.io/~/files/v0/b/gitbook-x-prod.appspot.com/o/spaces%2F-MXep_PEmh8mDPVWj49x%2Fuploads%2F7A6TitwEPaCGGr6xa1Zd%2F13.png?alt=media)

### New Separation Type Field Introduced with Updated Labels

A new field called Separation Type has been added to classify employee exit as ‘Voluntary’ (employee’s choice) or ‘Involuntary’ (otherwise).

The list of options like Resignation, Termination, Absconding is now called Separation Category, and reasons like Better Opportunity or Better Pay are now grouped under Separation Reason.

These options are available to HR during employee separation from both Cloud and ESS.

<figure><img src="https://4282324958-files.gitbook.io/~/files/v0/b/gitbook-x-prod.appspot.com/o/spaces%2F-MXep_PEmh8mDPVWj49x%2Fuploads%2FsfX4x3zI8GwjYV3VJndf%2Fimage.png?alt=media&amp;token=362ee201-1908-41df-b9bf-171c763fb1d3" alt=""><figcaption></figcaption></figure>

For any queries, contact <support@pockethrms.com>


# April 2025

We are thrilled to present our Monthly Update, with enhanced user-friendly tools to elevate your HR experience. Our commitment to innovation and efficiency drives us to bring you seamless updates that transform your HR processes. For the month of April 2025, we have the following enhancements.

### Manager Details Included in Reports

We have updated a new feature where the leave, on-duty and regularization reports will include detailed manager-level information such as individual manager status, approval/action date, and remarks. Earlier, the downloaded report had limited data that reflected the approval status. However, in the new enhancement, user can view and track the multi-level approvals.

![](https://4282324958-files.gitbook.io/~/files/v0/b/gitbook-x-prod.appspot.com/o/spaces%2F-MXep_PEmh8mDPVWj49x%2Fuploads%2Fag74W6e6w8K4LgSUk6hW%2F0.png?alt=media)

### Timestamp for Leave Application

The Leave Approval screen (Manager/Admin view) now shows both the date and exact time a leave request was submitted. Earlier, only the date was shown. This update gives approvers better clarity for making informed decisions.

![](https://4282324958-files.gitbook.io/~/files/v0/b/gitbook-x-prod.appspot.com/o/spaces%2F-MXep_PEmh8mDPVWj49x%2Fuploads%2FNwEEjxTRkJH5QOXfLkGi%2F1.png?alt=media)

### Yearly Leave Credit Based on Joining Date

Pro-rata and mid-joining leave credit, previously limited to monthly and quarterly frequencies, is now available for yearly leave credits as well. The new setting allows leave to be credited proportionally based on the joining date, or users can define a fixed leave credit for mid-joiners. The system will apply either method based on the selected configuration, offering more flexibility and fairness in leave allocation for mid-year joiners.

![](https://4282324958-files.gitbook.io/~/files/v0/b/gitbook-x-prod.appspot.com/o/spaces%2F-MXep_PEmh8mDPVWj49x%2Fuploads%2F4fnzE6kINz7bBcoYvjTO%2F2.png?alt=media)

### Late Mark Deduction Applied Across All Shifts

Earlier, late mark deductions were calculated separately for each shift assigned to an employee. Now, with the recent enhancement of unified late rule deduction, the late marks will be counted cumulatively across all shifts unlike separate deductions per shifts, ensuring fair and consistent deductions for multi-shift employees. This is powered by the Go Rule Engine for better flexibility and easier management.

**Example:**

**Before the update:**

An employee working 10 days in General Shift (allowing 3 late marks) and 10 days in Night Shift (allowing 4 late marks) would get a total of 7 late marks for the month before deductions.

**After the update (with new setting enabled):**

If the monthly limit is set to 4 late marks, the employee will be allowed a total of 4 late marks for the entire month, regardless of shifts worked. Any extra late marks beyond this limit will result in deductions.

### Enhanced Appraisal Report

The Appraisal Detailed Report now shows stage-wise data based on the configured settings. Only defined appraisal parameters appear in the PDF; undefined ones are excluded. If employee ratings aren’t part of the flow or not submitted, their details won’t show under the Evaluator section.

The report also includes the date and time of form submission by the employee and/or manager, depending on the appraisal flow. If the flow includes only the manager, then only the manager’s submission date and time will be displayed.

![](https://4282324958-files.gitbook.io/~/files/v0/b/gitbook-x-prod.appspot.com/o/spaces%2F-MXep_PEmh8mDPVWj49x%2Fuploads%2Fd6zqS3wXzfuBiBqmhSuH%2F3.png?alt=media)

### External Trainer Tagging

Now you can add/tag external trainer details to the learning programs. Earlier only internal trainer details were allowed for tagging however, in the recent enhancement enables uses to tag/add and tag external trainers to both learning programs and individual sessions. You can record key details of external trainers like name, email, contact number, and skills for better tracking and management.

![](https://4282324958-files.gitbook.io/~/files/v0/b/gitbook-x-prod.appspot.com/o/spaces%2F-MXep_PEmh8mDPVWj49x%2Fuploads%2FkoWZUl0Ts2oxHelMlCS0%2F4.png?alt=media)

![](https://4282324958-files.gitbook.io/~/files/v0/b/gitbook-x-prod.appspot.com/o/spaces%2F-MXep_PEmh8mDPVWj49x%2Fuploads%2F4PGWvuYpJR72JILCqLSW%2F5.png?alt=media)

### Revoking Learning Programs

The learning programs can now be revoked or unassigned to employees with the recent enhancement. Previously, learning programs could only be assigned and cannot be unassigned. The recent update enables admins to unassign upcoming learning programs either individually or in bulk before they begin. However, the learning programs that are in progress cannot be unassigned ensuring its consistency and continuity in the flow.

![](https://4282324958-files.gitbook.io/~/files/v0/b/gitbook-x-prod.appspot.com/o/spaces%2F-MXep_PEmh8mDPVWj49x%2Fuploads%2FxO3f1Mub32Jh3trD4rAM%2F6.png?alt=media)

### Survey Added to Learning Programs

The Survey Module is now integrated with the Learning Module, allowing users to link feedback forms to each learning program. To set this up, choose the 'Learning Program Completion' event when configuring the form.

![](https://4282324958-files.gitbook.io/~/files/v0/b/gitbook-x-prod.appspot.com/o/spaces%2F-MXep_PEmh8mDPVWj49x%2Fuploads%2Fj46z0z63nFKPfxWFkpbZ%2F7.png?alt=media)

If no form exists, you can create one directly from the setup screen. Once linked, the form will automatically be sent to employees after they complete their learning program. Employees can fill it out through the ESS Portal, and individual feedback reports are generated as PDFs. Admins can also download consolidated feedback reports in Excel or PDF from the ‘Training Reports’ section in the Cloud Portal.

![](https://4282324958-files.gitbook.io/~/files/v0/b/gitbook-x-prod.appspot.com/o/spaces%2F-MXep_PEmh8mDPVWj49x%2Fuploads%2Fjs3txdurhh1hoayXUerI%2F8.png?alt=media)

![](https://4282324958-files.gitbook.io/~/files/v0/b/gitbook-x-prod.appspot.com/o/spaces%2F-MXep_PEmh8mDPVWj49x%2Fuploads%2F6ZEfcL7hR3Ns3ScEWVoq%2F9.png?alt=media)

### Benefit Module Added to Approval Matrix

We’ve streamlined the approval process by integrating the Benefit Module with the centralized Approval Matrix. Previously, approval managers had to be added manually within the module. Now, you can easily configure and import approval managers directly through the Approval Matrix. This enhancement enables faster, more consistent, and priority-based approval setups—saving time and improving efficiency.

![](https://4282324958-files.gitbook.io/~/files/v0/b/gitbook-x-prod.appspot.com/o/spaces%2F-MXep_PEmh8mDPVWj49x%2Fuploads%2FAi36yWbqgfVqWP53EjYD%2F10.png?alt=media)

### Rounding Adjustments in CTC Calculator

We’ve added a Rounding Adjustment Component to all CTC Calculators in the Cloud to handle minor rounding differences that may arise due to decimal precision.

**How It Works:**

* The Rounding Adjustment Component is available in every CTC Calculator.
* It adjusts small rounding differences (typically between ₹3 and ₹6) that may occur when calculating CTC values.
* These adjustments are automatically made in the Annual section of the selected component.

![](https://4282324958-files.gitbook.io/~/files/v0/b/gitbook-x-prod.appspot.com/o/spaces%2F-MXep_PEmh8mDPVWj49x%2Fuploads%2FCiAzhShFqzhVpB5eFPXc%2F11.png?alt=media)

![](https://4282324958-files.gitbook.io/~/files/v0/b/gitbook-x-prod.appspot.com/o/spaces%2F-MXep_PEmh8mDPVWj49x%2Fuploads%2FOD6LSzoa6XUsdrbTYxWp%2F12.png?alt=media)

### Assign Dedicated HR in Exit Module

We’ve introduced a new enhancement in the Exit Module to support the assignment of Dedicated HRs (DHRs) for employees.

**Key Highlights:**

* **Dedicated HR Field**: A new field is now available in the employee profile, allowing the Head HR or Admin to assign a Dedicated HR to each employee.
* **Separation Approvals**: When such employees submit a separation request, it will be routed to both the assigned DHR and Head HR for approval.
* **Dedicated HR View:** DHRs have access to a new screen— ‘DHR Separation Approval Data’—which shows only the separation requests of their assigned employees (not company-wide data).
* **Role-Based Access**: Access to this screen is controlled via Role Allocation and DHR assignment.
* **Approval Logic:** The system will process the first approval received—either from the DHR or the Head HR.

![](https://4282324958-files.gitbook.io/~/files/v0/b/gitbook-x-prod.appspot.com/o/spaces%2F-MXep_PEmh8mDPVWj49x%2Fuploads%2Fp5ZUVB4uCH5m6349Ksxn%2F13.png?alt=media)

### Automatic NPS Rate Based on Tax Regime

A default NPS Rate deduction component has been added. It automatically limits the NPS rate to 14% for employees in the New Regime and 10% for those in the Old Regime. Admins/HR cannot change these limits. This component can also be used in other sections if needed. The restriction is applied when adding or editing employee details.

**Example:**

* If an employee is in the New Regime, the NPS rate will be automatically set to 14%.
* If an employee is in the Old Regime, the NPS rate will be automatically set to 10%. Admins/HR cannot update these rates beyond the set limits."

This feature ensures accurate and consistent NPS deductions based on the applicable tax regime.

![](https://4282324958-files.gitbook.io/~/files/v0/b/gitbook-x-prod.appspot.com/o/spaces%2F-MXep_PEmh8mDPVWj49x%2Fuploads%2FeFjgihHWHFLDVmKrSTKK%2F14.png?alt=media)

### Re-Hire Eligibility During Employee Separation

An option has been added to mark an employee as eligible or not for re-hire during separation. When separating an employee in Cloud or ESS, Admin/HR can select ‘Yes’ or ‘No’ for re-hire eligibility and add mandatory remarks. These remarks will be shown when re-hiring the employee, helping Admin/HR make an informed decision. Additionally, the final settlement (FnF) remarks will also be visible during re-hiring.

![](https://4282324958-files.gitbook.io/~/files/v0/b/gitbook-x-prod.appspot.com/o/spaces%2F-MXep_PEmh8mDPVWj49x%2Fuploads%2Fbjy91knewAigkeXk9ZDX%2F15.png?alt=media)

For any queries, contact <support@pockethrms.com>


# March 2025

We are thrilled to present our Monthly Update, with enhanced user-friendly tools to elevate your HR experience. Our commitment to innovation and efficiency drives us to bring you seamless updates that transform your HR processes. For the month of March, we have the following enhancements.

### Quick Attendance Summary Now in In-Out Reports

We’ve added a new ‘Show/Hide Summary’ checkbox in the In-Out Details report. When turned on, it shows a clear summary of key attendance data like:

* Total working hours
* Leaves taken
* Late arrivals and more

The summary changes automatically based on the date range and what you’re viewing—whether it’s one employee, a team, or multiple employees. It helps you understand the numbers better and tooltips are available with extra info for each metric.

![](https://4282324958-files.gitbook.io/~/files/v0/b/gitbook-x-prod.appspot.com/o/spaces%2F-MXep_PEmh8mDPVWj49x%2Fuploads%2FHmZXoIvuRqkEV8Ny8UX5%2F0.png?alt=media)

### Advanced Leave Tracking with Smaller Deductions

We've improved the leave deduction system to allow for more flexible options. Now, leave can be deducted in smaller incremental portions, 0.25 or 0.75 days based on your company’s leave policy. This update helps ensure leave records are more accurate and better aligned with your organization’s rules. It also works smoothly with attendance and payroll systems, so everything stays in sync.

### Apply On-Duty for Multiple Dates—All at Once

Now user can apply on-duty for multiple dates and also choose the Day Type for each selected date in one go. Based on this, the system will automatically pick the right shift timings.

In addition to that for Night Shifts, there’s a new option to set whether the ‘To Time’ should be considered for the same date or the next day. This gives you more control over how night shifts are managed and saves you time and effort.

![](https://4282324958-files.gitbook.io/~/files/v0/b/gitbook-x-prod.appspot.com/o/spaces%2F-MXep_PEmh8mDPVWj49x%2Fuploads%2F8ra6QgnJVhbjT1WRM3rE%2F1.png?alt=media)

### Set Sequence for Appraisal Questions

Now through ‘Order Number’ field, you can set appraisal questions in specific order to be shown in ESS Portal. This makes the appraisal process more organized and easier to follow.

You can assign order numbers while uploading questions in bulk, and the system will keep everything in the right order automatically.

![](https://4282324958-files.gitbook.io/~/files/v0/b/gitbook-x-prod.appspot.com/o/spaces%2F-MXep_PEmh8mDPVWj49x%2Fuploads%2FhcP7TkHV99sQHNVD6i6P%2F2.png?alt=media)

![](https://4282324958-files.gitbook.io/~/files/v0/b/gitbook-x-prod.appspot.com/o/spaces%2F-MXep_PEmh8mDPVWj49x%2Fuploads%2FIswcjSWi4UCnsDI1psXN%2F3.png?alt=media)

### Boosted Accuracy in Shift & Punch Management

This enhancement ensures that attendance punches are accurately captured and assigned to the most appropriate shift, while also incorporating flag-based punch recognition for improved attendance management.

**Smarter Auto-Shift Assignment**

When a punch doesn’t match any shift, the system now uses reverse logic to assign the most suitable one.

It checks shifts in order and assigns the first one where punch time is before the shift’s start time.

This works regardless of the existing auto shift detection settings.

For Example:

Punch is at 14:43

Shift A- (08:00–10:00): Punch is after → skipped

Shift B- (20:00–23:00): Punch is before → Shift B → assigned

**Improved Accuracy with Flag-Based Punches**

Instead of just using the first IN and last OUT, the system now reads flag data from punches. This helps in more accurate shift mapping and reporting.

**Better In-Out Punch Import**

Once a shift is assigned, the system records the actual punch time as IN, even if it’s outside the shift range.

OUT time is calculated based on the assigned shift’s logic.

For Example: (continuing the above example)

Assigned shift is ‘Shift B’

IN punch: 14:13 → Recorded as IN

OUT: 08:07 AM (based on shift logic)

![](https://4282324958-files.gitbook.io/~/files/v0/b/gitbook-x-prod.appspot.com/o/spaces%2F-MXep_PEmh8mDPVWj49x%2Fuploads%2FjmjTTvb9xU1Tj1V7l6B6%2F4.png?alt=media)

### Speed Up with Bulk Delete for Appraisal Parameters & Questions

Earlier, users had to delete Appraisal Parameters and Questions one by one, which took a lot of time. Now, with our new bulk delete option, users can select and delete multiple Appraisal Parameters and Questions items at once. This improves efficiency by making the process faster and much easier.

![](https://4282324958-files.gitbook.io/~/files/v0/b/gitbook-x-prod.appspot.com/o/spaces%2F-MXep_PEmh8mDPVWj49x%2Fuploads%2FptmUDfnsFrbB4DEajxuE%2F5.png?alt=media)

![](https://4282324958-files.gitbook.io/~/files/v0/b/gitbook-x-prod.appspot.com/o/spaces%2F-MXep_PEmh8mDPVWj49x%2Fuploads%2Fu7MwESn4Tp1CFgliiRev%2F6.png?alt=media)

### Effective News Display with ESS Pop-Ups

Now the news updates will be displayed in the pop-up window, so employees won’t miss them in the ESS portal. That ensures that employee gets the updates instantly. Admins can check and select the news items as well as control how and when the news is shown through the settings from the cloud portal. Ensuring that the news is delivered to employees appropriately.<br>

<figure><img src="https://4282324958-files.gitbook.io/~/files/v0/b/gitbook-x-prod.appspot.com/o/spaces%2F-MXep_PEmh8mDPVWj49x%2Fuploads%2FFfSBww8pPZm7Bcq3bWkg%2F7.png?alt=media" alt=""><figcaption></figcaption></figure>

![](https://4282324958-files.gitbook.io/~/files/v0/b/gitbook-x-prod.appspot.com/o/spaces%2F-MXep_PEmh8mDPVWj49x%2Fuploads%2F2hD54VTHQ8TVDRItinj3%2F8.png?alt=media)

### Smart Consent: Upload and Review Files with Ease

Previously, employees couldn’t upload files in the consent settings. Now, we’ve added a file upload feature. This lets employees view the attached document before giving their acknowledgement on the ESS portal.

![](https://4282324958-files.gitbook.io/~/files/v0/b/gitbook-x-prod.appspot.com/o/spaces%2F-MXep_PEmh8mDPVWj49x%2Fuploads%2FJlntoPZ0hMEGnSPa8DM6%2F9.png?alt=media)

![](https://4282324958-files.gitbook.io/~/files/v0/b/gitbook-x-prod.appspot.com/o/spaces%2F-MXep_PEmh8mDPVWj49x%2Fuploads%2Fk109t65x9t3qrd4zABkv%2F10.png?alt=media)

### Approval Matrix Manager: Now More Insightful

The Approval Matrix Manager screen has been updated with some helpful new features that give all the relevant information at a glance

* **Created Date:** You can now see when each approval entry was added, making it easier to track them.
* **Module Name:** Each entry now shows which module it belongs to, like Attendance Regularization, Daily Working Hours, or Earning Deduction, so it's clearer.
* **Company Info:** Shows if an approver is from the same company or a different one, helping you understand the workflow better.
* **Search & Filter:** A search bar lets you quickly find entries by employee name, module, or priority.
* **Action Buttons:** You can now easily add, export, or delete entries with the new buttons, making the tool more user-friendly.

![](https://4282324958-files.gitbook.io/~/files/v0/b/gitbook-x-prod.appspot.com/o/spaces%2F-MXep_PEmh8mDPVWj49x%2Fuploads%2F61xgDWkU2lK8Yd5devNG%2F11.png?alt=media)

### Keep Emails Relevant: Exclude Employees with Ease

A new feature lets administrators choose specific employees and the types of emails to exclude them from. In other words, which employees should not receive certain email notifications. Admins can configure multiple exclusion rules, based on employee’s role, department and specific needs. This helps HR teams send the right messages to the right people, keeping communication focused and relevant.

![](https://4282324958-files.gitbook.io/~/files/v0/b/gitbook-x-prod.appspot.com/o/spaces%2F-MXep_PEmh8mDPVWj49x%2Fuploads%2FyyuMm9JJJS1fzzCRkXhd%2F12.png?alt=media)

![](https://4282324958-files.gitbook.io/~/files/v0/b/gitbook-x-prod.appspot.com/o/spaces%2F-MXep_PEmh8mDPVWj49x%2Fuploads%2FZmfxUixyeP9E21QbD1hE%2F13.png?alt=media)

### Easily Filter and Export Finance Data

Now can can filter finance reports more easily with the new employee-based filter options and export this information. Here is how you can do that.

* **Choose key employee information**: Bank Account Number, Blood Group, Branch, Category, Employee ID, Cost Centre, Department and Designation.
* **Set your own filter rules:** Use AND/OR conditions to combine filters. Also, you can add multiple filters easily with the ‘Insert Row’ option.
* **Export Your Data:** Search, view, and export the filtered results to Excel.

![](https://4282324958-files.gitbook.io/~/files/v0/b/gitbook-x-prod.appspot.com/o/spaces%2F-MXep_PEmh8mDPVWj49x%2Fuploads%2FnZeo585oUSCtl7AhUULN%2F14.png?alt=media)

### Everyone Notified, Every Step of the Exit

Multiple new reminder events have been added to the Exit Notification Settings. Employees will now get automatic email alerts for each event. Admins and HRs can also set up email notifications for others involved—like Managers, HRs, and Department Heads—making the exit process smoother and more organized.

![](https://4282324958-files.gitbook.io/~/files/v0/b/gitbook-x-prod.appspot.com/o/spaces%2F-MXep_PEmh8mDPVWj49x%2Fuploads%2Fw9PfeNtIpkUUigthILWd%2F15.png?alt=media)

For any queries, contact <support@pockethrms.com>


# February 2025

We are thrilled to present our Monthly Update, with enhanced user-friendly tools to elevate your HR experience. Our commitment to innovation and efficiency drives us to bring you seamless updates that transform your HR processes. For the month of February, we have the following enhancements.

### Monthly Count Report: More Clarity, Better Decisions

We’ve added a Monthly Count Report to the Attendance module, making it easier to track and analyse attendance.

* **Detailed Insights**: View punch records (Biometric, Web, etc.), attendance regularization, and leave status.
* **Better Visibility**: Easily track present and absent days for a specific period.
* **Flexible Data Access**: Retrieve attendance data for any selected month and year.
* **Excel Export**: Download reports in Excel for deeper analysis.
* **Advanced Filtering**: Use multiple filters to refine report generation.

This update provides accurate and flexible attendance reporting, helping HR and management make informed decisions.

<figure><img src="https://4282324958-files.gitbook.io/~/files/v0/b/gitbook-x-prod.appspot.com/o/spaces%2F-MXep_PEmh8mDPVWj49x%2Fuploads%2FnedmWgaEqGBAre6YuF2o%2FFrame%20147.png?alt=media&amp;token=11b0667d-54c2-4765-b1c9-7b7a4e7c5ef7" alt=""><figcaption></figcaption></figure>

![](https://4282324958-files.gitbook.io/~/files/v0/b/gitbook-x-prod.appspot.com/o/spaces%2F-MXep_PEmh8mDPVWj49x%2Fuploads%2FUEwmB0uBGpRpVRdLWUcK%2F1.png?alt=media)

### Prevent Overlapping Deductions in Sandwich Leave

Now you get an option to ensure that sandwich deduction will not be applied when ‘Working Hour’ or ‘Invalid Leave Deduction Rule’ are applicable. You can simply click the checkboxes to exclude these scenarios being calculated in the sandwich rule deduction. This removes confusion and unnecessary deductions.

<figure><img src="https://4282324958-files.gitbook.io/~/files/v0/b/gitbook-x-prod.appspot.com/o/spaces%2F-MXep_PEmh8mDPVWj49x%2Fuploads%2FJvr0FPc6yVfbd5mivAlW%2FFrame%20148.png?alt=media&amp;token=2f659354-8e1a-48e0-a120-98ea67e197f9" alt=""><figcaption></figcaption></figure>

### Repeat Employee Detail for Better Clarity

We have added a ‘Repeat Data Format’ checkbox to enhance our monthly summary report further. Selecting this checkbox ensures that the Code, Name, Category, Department, and Designation will be replicated and displayed against all entries. So, you get a consistent and structured report, making it easier to analyze and interpret data.

![](https://4282324958-files.gitbook.io/~/files/v0/b/gitbook-x-prod.appspot.com/o/spaces%2F-MXep_PEmh8mDPVWj49x%2Fuploads%2FByUwCS9Zzm9Cud048j8q%2F3.png?alt=media)

![](https://4282324958-files.gitbook.io/~/files/v0/b/gitbook-x-prod.appspot.com/o/spaces%2F-MXep_PEmh8mDPVWj49x%2Fuploads%2Ff8K3hWpmWjdLh9UGA2ZP%2F4.png?alt=media)

![](https://4282324958-files.gitbook.io/~/files/v0/b/gitbook-x-prod.appspot.com/o/spaces%2F-MXep_PEmh8mDPVWj49x%2Fuploads%2FIdnNrgxISJRQkQRZpwIp%2F5.png?alt=media)

### Flexible Leave Deductions for Unassigned Shift

Ensure employees aren’t paid for unassigned shifts unless a leave deduction rule applies. HR/Admins can set accurate deduction rules, choose leave type (Paid/Unpaid), apply Half-Day or Full-Day deductions, and control weekend/holiday deductions. If leave is exhausted, the system deducts an alternative type. This ensures fair and accurate payroll management.

<figure><img src="https://4282324958-files.gitbook.io/~/files/v0/b/gitbook-x-prod.appspot.com/o/spaces%2F-MXep_PEmh8mDPVWj49x%2Fuploads%2F3ySMITJad51Ld9UW27lH%2FM4%20(2).png?alt=media&amp;token=2143ba33-a0b7-417e-aed3-a9538fec1be3" alt=""><figcaption></figcaption></figure>

### Quarterly Leave Credit Made Flexible for Mid-Joiners

The **Pro-rata & Mid-Joining Leave Credit** feature now supports **Quarterly Frequency**. This allows proportionate or fixed leave credits for mid-joiners within a quarter, ensuring flexible and fair leave allocation. The system applies either **pro-rata credit** or a **fixed mid-joining credit**, based on your settings.

<figure><img src="https://4282324958-files.gitbook.io/~/files/v0/b/gitbook-x-prod.appspot.com/o/spaces%2F-MXep_PEmh8mDPVWj49x%2Fuploads%2FoJ5qVjdrOeLZ5GePOfpd%2FFrame%20146%20(1).png?alt=media&amp;token=a1e4ccd1-7780-47d6-a474-048b00f5d9dc" alt=""><figcaption></figcaption></figure>

### Customized HR Letters Made Simple

Now along with the custom predefined template the system allows you to create custom HR letters under the newly added option ‘Others’. Selecting the template type as ‘**Others’ from the dropdown** allows you to name and define your own template.

![](https://4282324958-files.gitbook.io/~/files/v0/b/gitbook-x-prod.appspot.com/o/spaces%2F-MXep_PEmh8mDPVWj49x%2Fuploads%2FiUjyT71lBoJBGvsxXowN%2F8.png?alt=media)

### Easily View Tax Details in a Pop-Up

We have changed the way an employee can view the description of the Tax Sections on their declaration page. As compared to earlier where the description was being shown in a tool tip hover, it is now shown in a pop-up enhancing the readability of the same.

![](https://4282324958-files.gitbook.io/~/files/v0/b/gitbook-x-prod.appspot.com/o/spaces%2F-MXep_PEmh8mDPVWj49x%2Fuploads%2FDgsIQM9xl9KHCjQ6i46e%2F9.png?alt=media)

![](https://4282324958-files.gitbook.io/~/files/v0/b/gitbook-x-prod.appspot.com/o/spaces%2F-MXep_PEmh8mDPVWj49x%2Fuploads%2FtdrLMEJY4X4V51YQmlsh%2F10.png?alt=media)

### Boost Action in Confirmation with Multi-Level Reminder CC

With the help of a simple drop down, you can add senior managers (Level 2, Level 3, HR, Admin) according to your company’s hierarchy to be CC’d in the 2nd and 3rd reminder emails for employee confirmation.

That means if the 1st level manager doesn’t act over the 1st reminder the selected seniors will also get notified in 2nd and 3rd reminder emails ensuring accountability and prompt action.

![](https://4282324958-files.gitbook.io/~/files/v0/b/gitbook-x-prod.appspot.com/o/spaces%2F-MXep_PEmh8mDPVWj49x%2Fuploads%2F9l4DW9xKMo97jTlTrFDZ%2F11.png?alt=media)

### Approve Today, Separate on the Last Working Day

HR can now pre-approve resignation requests with a future Last Working Day (LWD) instead of waiting until the actual date. The system will automatically separate the employee on the approved LWD. For example, if the LWD is 21/03/2025, the employee will be separated on 22/03/2025 in the morning.

HR can also track Manager and Department Head approvals more efficiently with our new structured view. Additionally, they have the option to immediately separate an employee by updating the LWD to today.

![](https://4282324958-files.gitbook.io/~/files/v0/b/gitbook-x-prod.appspot.com/o/spaces%2F-MXep_PEmh8mDPVWj49x%2Fuploads%2F4wUZAikH6pr0pORm3OvY%2F12.png?alt=media)

![](https://4282324958-files.gitbook.io/~/files/v0/b/gitbook-x-prod.appspot.com/o/spaces%2F-MXep_PEmh8mDPVWj49x%2Fuploads%2Fq4CFn7D6tMq0ydhFDIUB%2F13.png?alt=media)

![](https://4282324958-files.gitbook.io/~/files/v0/b/gitbook-x-prod.appspot.com/o/spaces%2F-MXep_PEmh8mDPVWj49x%2Fuploads%2FZBGGjZgtNZK86jNFIvGK%2F14.png?alt=media)

### Multi-Company FnF Approvals Made Easy

HRs can now assign cross-company department heads for Full & Final approvals, either individually or in bulk. Department heads will also see the company name for approvals received, keeping them well informed and improving FnF management.

<figure><img src="https://4282324958-files.gitbook.io/~/files/v0/b/gitbook-x-prod.appspot.com/o/spaces%2F-MXep_PEmh8mDPVWj49x%2Fuploads%2FFTmP6MA42WwZJUx6JvEI%2FFrame%20137.png?alt=media&amp;token=d98de1a9-ce8b-437c-a698-ac3e3011cce2" alt=""><figcaption></figcaption></figure>

### Customize Career Page Branding

Now the Admin/HR can decide whether or not to show the company name on the career page along with the company profile. This enhancement will be useful for the customers who host the Pocket HRMS career page on their websites.

<figure><img src="https://4282324958-files.gitbook.io/~/files/v0/b/gitbook-x-prod.appspot.com/o/spaces%2F-MXep_PEmh8mDPVWj49x%2Fuploads%2FzUfkYSPnc5B3IqqMX0K2%2Fm11%20(3).png?alt=media&amp;token=6fea1290-78c7-4506-90ea-4576e7364a8f" alt=""><figcaption></figcaption></figure>

### Instant Payslip Notifications

Now, simply toggle to ensure that your employees will receive an email and ESS notification when their payslips are posted. Admin/HR can enable or disable these notifications during the Web Post. Providing ease, efficiency and convenience to everyone.

![](https://4282324958-files.gitbook.io/~/files/v0/b/gitbook-x-prod.appspot.com/o/spaces%2F-MXep_PEmh8mDPVWj49x%2Fuploads%2FfpW0xWoQXBFizilOMqdA%2F17.png?alt=media)

![](https://4282324958-files.gitbook.io/~/files/v0/b/gitbook-x-prod.appspot.com/o/spaces%2F-MXep_PEmh8mDPVWj49x%2Fuploads%2FMJp1mfRs2a48KZVn2iWf%2F18.png?alt=media)

### Double-Check Payroll with Maker-Checker

We’ve added Maker-Checker functionality to smHRt Payroll! Now, you Can assign a Maker who is responsible for processing the payroll. In addition to that, there can be multiple checkers, who can review and approve it before finalization. This feature adds an extra layer of checks to eliminate possibilities for errors.&#x20;

<figure><img src="https://4282324958-files.gitbook.io/~/files/v0/b/gitbook-x-prod.appspot.com/o/spaces%2F-MXep_PEmh8mDPVWj49x%2Fuploads%2FVCMd8tiM9tUks08INsph%2F19.png?alt=media" alt=""><figcaption></figcaption></figure>

### **Lock Attendance Data for Payroll Accuracy**

A new feature lets you disable Attendance Payroll Components from manual edits in Monthly Input screens. This ensures that only approved data will go to Payroll, preventing unauthorized changes.

![](https://4282324958-files.gitbook.io/~/files/v0/b/gitbook-x-prod.appspot.com/o/spaces%2F-MXep_PEmh8mDPVWj49x%2Fuploads%2FYTEy1wcUjlaCc8pDhSgn%2F20.png?alt=media)

For any queries, contact <support@pockethrms.com>


# January 2025

We are thrilled to present our Monthly Update, with enhanced user-friendly tools to elevate your HR experience. Our commitment to innovation and efficiency drives us to bring you seamless updates that transform your HR processes. For the month of January, we have the following enhancements.

### Set It & Forget It: Auto-Approve or Reject Pending Entries

Now, you can set rules to automate approval or rejection of pending Regularization and On-Duty entries during time consolidation. All the entries will be automatically approved or rejected accordingly without manager intervention, saving time and boosting efficiency.

<figure><img src="https://4282324958-files.gitbook.io/~/files/v0/b/gitbook-x-prod.appspot.com/o/spaces%2F-MXep_PEmh8mDPVWj49x%2Fuploads%2FXfFWWHADeAKtC7m2ADoQ%2F0.png?alt=media" alt=""><figcaption></figcaption></figure>

### **Set & Manage Monthly Week-Off Limits**

Easily limit the maximum week-offs employees can take each month to ensure compliance with company policies. A simple settings page lets you define the limit, and the system automatically prevents excess week-offs.

![](https://4282324958-files.gitbook.io/~/files/v0/b/gitbook-x-prod.appspot.com/o/spaces%2F-MXep_PEmh8mDPVWj49x%2Fuploads%2FAtrpq881EORazwcOAGnY%2F1.png?alt=media)

![](https://4282324958-files.gitbook.io/~/files/v0/b/gitbook-x-prod.appspot.com/o/spaces%2F-MXep_PEmh8mDPVWj49x%2Fuploads%2Fvr13hBL3Je8CURLoTFd4%2F2.png?alt=media)

### **Flexible Sandwich Rules for Half-day’s Deduction**

Now, the Sandwich Rule is more flexible! You can choose whether it applies to half-day leaves. Furthermore, you can apply it for any half-day or only when part of a continuous leave pattern. This prevents unnecessary leave deductions, aligns better with company policies, and makes leave management more precise and hassle-free.

![](https://4282324958-files.gitbook.io/~/files/v0/b/gitbook-x-prod.appspot.com/o/spaces%2F-MXep_PEmh8mDPVWj49x%2Fuploads%2FTyv99bLNaLvInjuvZnaR%2F3.png?alt=media)

![](https://4282324958-files.gitbook.io/~/files/v0/b/gitbook-x-prod.appspot.com/o/spaces%2F-MXep_PEmh8mDPVWj49x%2Fuploads%2FY3wOZFguooWjTw30DyXc%2F4.png?alt=media)

### **Locate Employees in Seconds with Filters**

Finding employees just got easier! We've added a filter option that lets you search based on specific criteria, so you no longer have to scroll through long lists. This saves time, improves usability, and makes manual attendance management faster and more efficient for managers and admins.

![](https://4282324958-files.gitbook.io/~/files/v0/b/gitbook-x-prod.appspot.com/o/spaces%2F-MXep_PEmh8mDPVWj49x%2Fuploads%2FiPF69SmCOvYeiVcNlg1M%2F5.png?alt=media)

![](https://4282324958-files.gitbook.io/~/files/v0/b/gitbook-x-prod.appspot.com/o/spaces%2F-MXep_PEmh8mDPVWj49x%2Fuploads%2FMJutZu8J71QEMTKLknfO%2F6.png?alt=media)

### Efficiently Assign Weekly off by Employees Name or Code

While in weekly off setting you will get both the Employee Code and Name together in the Employee Code field. Plus, the field is now searchable. You can simply type an Employee Code or Name to quickly find the right employee. This update reduces errors and makes managing weekly offs much smoother for HR and admins.

![](https://4282324958-files.gitbook.io/~/files/v0/b/gitbook-x-prod.appspot.com/o/spaces%2F-MXep_PEmh8mDPVWj49x%2Fuploads%2FNoAaiQDa1XPDFjKjFtap%2F7.png?alt=media)

### Break Shift: Get Control with Precise Work Hour

Easily manage work hours with break-shift configuration. HR/Admin can enable ‘Break Shift Required?’ to calculate hours using detailed break patterns or a simple first-in/last-out method. Employees can regularize missed punches, check shortfalls or extra hours, and request approvals.

Managers and HR/Admin can approve or reject requests, with mandatory comments for rejections. Missed punches are highlighted for better visibility. Detailed reports provide insights for employees, managers, and HR/Admin, ensuring accurate calculations, smoother workflows, and better tracking.

<figure><img src="https://4282324958-files.gitbook.io/~/files/v0/b/gitbook-x-prod.appspot.com/o/spaces%2F-MXep_PEmh8mDPVWj49x%2Fuploads%2FoWsUvDm6s7e13P3cYnKF%2F8.png?alt=media" alt=""><figcaption></figcaption></figure>

<figure><img src="https://4282324958-files.gitbook.io/~/files/v0/b/gitbook-x-prod.appspot.com/o/spaces%2F-MXep_PEmh8mDPVWj49x%2Fuploads%2FhAFsmfxjWiyLaPLFV6dr%2F9.png?alt=media" alt=""><figcaption></figcaption></figure>

### Ensure Employee Consent for Nominee Details

The ESS Consent Validation ensures employees confirm their consent before saving nominee details. If the checkbox isn’t checked, an alert prompts them to do so before proceeding.

In the Cloud Portal, the checkbox is pre-checked when submitted via ESS, and HR can manually check it while adding or editing details. For bulk imports, the consent is processed as ‘Yes’ if checked and ‘No’ if unchecked, ensuring smooth handling in all cases.

<figure><img src="https://4282324958-files.gitbook.io/~/files/v0/b/gitbook-x-prod.appspot.com/o/spaces%2F-MXep_PEmh8mDPVWj49x%2Fuploads%2FbNKzhe1KWtHMcnbJKMxe%2F10.png?alt=media" alt=""><figcaption></figcaption></figure>

<figure><img src="https://4282324958-files.gitbook.io/~/files/v0/b/gitbook-x-prod.appspot.com/o/spaces%2F-MXep_PEmh8mDPVWj49x%2Fuploads%2Fm2nN3HgKlsqL8FssQAGy%2F11.png?alt=media" alt=""><figcaption></figcaption></figure>

### **A Sleek, Modern Career Page in One Click**

Give your Career Page a fresh, modern look with our new ‘**Modern’ layout** option. Simply select it from the Layout dropdown in Career Page settings, and enjoy a sleek, updated design that makes a great first impression.

![](https://4282324958-files.gitbook.io/~/files/v0/b/gitbook-x-prod.appspot.com/o/spaces%2F-MXep_PEmh8mDPVWj49x%2Fuploads%2F2o2vZMn7D5fuBxpp3rwv%2F12.png?alt=media)

![](https://4282324958-files.gitbook.io/~/files/v0/b/gitbook-x-prod.appspot.com/o/spaces%2F-MXep_PEmh8mDPVWj49x%2Fuploads%2F7EWurKrHrwlZcols8H7A%2F13.png?alt=media)

### **Promotion Updates Made Simple & Quick**

Easily manage employee promotions with our new **Promotion Tab**. Update an employee’s **designation, department, or both** in just a few clicks. Once a promotion is added, the changes instantly reflect on their profile. Plus, employees can view their full **promotion history** anytime on the **Employee Self-Service (ESS) portal.**

<figure><img src="https://4282324958-files.gitbook.io/~/files/v0/b/gitbook-x-prod.appspot.com/o/spaces%2F-MXep_PEmh8mDPVWj49x%2Fuploads%2FMZFLgDPPQQIY2tJ8NiDF%2F14.png?alt=media" alt=""><figcaption></figcaption></figure>

<figure><img src="https://4282324958-files.gitbook.io/~/files/v0/b/gitbook-x-prod.appspot.com/o/spaces%2F-MXep_PEmh8mDPVWj49x%2Fuploads%2FIyesAU5DiknyMgHIKkSt%2F15.png?alt=media" alt=""><figcaption></figcaption></figure>

<figure><img src="https://4282324958-files.gitbook.io/~/files/v0/b/gitbook-x-prod.appspot.com/o/spaces%2F-MXep_PEmh8mDPVWj49x%2Fuploads%2FOmsgmAAYSGib4G2A8Vuz%2F16.png?alt=media" alt=""><figcaption></figcaption></figure>

<figure><img src="https://4282324958-files.gitbook.io/~/files/v0/b/gitbook-x-prod.appspot.com/o/spaces%2F-MXep_PEmh8mDPVWj49x%2Fuploads%2F4CM8gujCeLPiDmJ1LO0b%2F17.png?alt=media" alt=""><figcaption></figcaption></figure>

For any queries, contact <support@pockethrms.com>


# Updates 2026


# August 2026

### **August 2026**

We are thrilled to present our Monthly Update, with enhanced user-friendly tools to elevate your HR experience. Our commitment to innovation and efficiency drives us to bring you seamless updates that transform your HR processes. For the month of **August 2026**, we have the following enhancements.

### **Asset Notification Settings**

**Asset Notification Settings** let you control email alerts for asset assignment and de-assignment. Assigning or de-assigning an asset sends an immediate email, with a separate email per asset when several are handled in one transaction. If multiple assets are assigned or de-assigned to an employee in a day, one consolidated email goes out via the daily scheduler instead. Notifications can go to the employee, reporting manager, HRs, Admins, selected employees, or specific email IDs, and email templates can be edited or restored to default, giving real-time visibility into asset movements without manual tracking.

<figure><img src="https://4282324958-files.gitbook.io/~/files/v0/b/gitbook-x-prod.appspot.com/o/spaces%2F-MXep_PEmh8mDPVWj49x%2Fuploads%2FzoPN16rdNvqZZxXeK3xw%2FFrame%201%20(95).png?alt=media&amp;token=cf3a8390-d7b8-4466-b1ad-1da6676c1ed3" alt=""><figcaption></figcaption></figure>

### **People Connect – Profile Card Privacy Controls**

HR can now choose to hide **Work Email**, **Personal Email**, **Work Mobile**, and **Personal Mobile** independently from employee profile cards in People Connect on the ESS Portal. The setting applies uniformly across all cards shown in People Connect, giving HR control over contact-detail visibility organisation-wide without configuring it employee by employee.

<figure><img src="https://4282324958-files.gitbook.io/~/files/v0/b/gitbook-x-prod.appspot.com/o/spaces%2F-MXep_PEmh8mDPVWj49x%2Fuploads%2FdzoFebUnRlktXJ9WCc7g%2FFrame%201%20(96).png?alt=media&amp;token=472532cc-93cc-4ef3-a17a-6621c5e6223d" alt=""><figcaption></figcaption></figure>

<figure><img src="https://4282324958-files.gitbook.io/~/files/v0/b/gitbook-x-prod.appspot.com/o/spaces%2F-MXep_PEmh8mDPVWj49x%2Fuploads%2F1IpDPx8IYbj5C1db8p2i%2FFrame%201%20(97).png?alt=media&amp;token=5eaa5b4e-eb6f-4932-a770-d45c28bba244" alt=""><figcaption></figcaption></figure>

<figure><img src="https://4282324958-files.gitbook.io/~/files/v0/b/gitbook-x-prod.appspot.com/o/spaces%2F-MXep_PEmh8mDPVWj49x%2Fuploads%2Fdq0Ap7PebDBqO8BujfhE%2FFrame%201%20(98).png?alt=media&amp;token=a93f9769-888c-400e-a555-1575965ef84b" alt=""><figcaption></figcaption></figure>

### **Daily Survey Submission Report**

HR and Admin users now get a **Daily Survey Submission Report** — one consolidated email listing all employees who submitted a survey the previous day, sent automatically at **12:00 AM** with a clickable Excel file link. No email is sent if there are no valid survey submissions in the reporting period, which reduces email clutter compared to individual submission alerts.

<figure><img src="https://4282324958-files.gitbook.io/~/files/v0/b/gitbook-x-prod.appspot.com/o/spaces%2F-MXep_PEmh8mDPVWj49x%2Fuploads%2FMlhNaUjcb4m5y26JR2Mg%2FFrame%201%20(99).png?alt=media&amp;token=b620b754-19ce-4898-9ef7-4c2cbc763ca0" alt=""><figcaption></figcaption></figure>

### **KPI Report Enhancement**

The **KPI Report** now shows each employee's Key Result Area (**KRA**, listed as Sub-Parameter) and **KPI** (Question) rows alongside their weightage percentages, along with **KPI Status** (such as KPI Approved or Employee Submitted) and Manager Remarks for each entry. This gives Managers and HR a clearer view of how an appraisal score breaks down, instead of just the final score.

<figure><img src="https://4282324958-files.gitbook.io/~/files/v0/b/gitbook-x-prod.appspot.com/o/spaces%2F-MXep_PEmh8mDPVWj49x%2Fuploads%2Fl8kbCZKlh4kocm7fl0ny%2FFrame%201%20(100).png?alt=media&amp;token=d5ac1c5e-1626-4b0a-b9d0-211373816f32" alt=""><figcaption></figcaption></figure>

### **PMS Analytics Dashboard**

The newly Introduced **PMS (Performance Management System) Analytics Dashboard,** gives role-based views under **My Dashboard**, **Manager Dashboard**, and **Admin/HR Dashboard**.

* **Employees** can track their appraisal journey, approved KPIs, pending activities, performance scores, and goals.
* **Managers** get visibility into team appraisal progress, pending reviews, employee eligibility, bottlenecks, and action items.
* **Admin and HR** users can view organisation-level performance analytics, grading distribution, top performers, and employees needing improvement, along with auto-generated performance summaries and visual analytics for quicker decisions.

<figure><img src="https://4282324958-files.gitbook.io/~/files/v0/b/gitbook-x-prod.appspot.com/o/spaces%2F-MXep_PEmh8mDPVWj49x%2Fuploads%2FBVsyT47MaJ7P3BtQyK25%2FFrame%201%20-%202026-09-07T100005.500.png?alt=media&amp;token=9268577a-5d23-4fa5-8db7-d5a4d88ff94a" alt=""><figcaption></figcaption></figure>

<figure><img src="https://4282324958-files.gitbook.io/~/files/v0/b/gitbook-x-prod.appspot.com/o/spaces%2F-MXep_PEmh8mDPVWj49x%2Fuploads%2FGCkVEyQqnDl9TfJviXnR%2FFrame%201%20-%202026-09-07T100053.072.png?alt=media&amp;token=47b39c4f-64b7-428b-92a2-4a4d5a06fb24" alt=""><figcaption></figcaption></figure>

### **Roster Shift Count and Working Minutes**

Two new payroll components, **Roster Shift Count** and **Roster Working Minutes**, capture the shift count and working minutes as assigned through Roster by the manager. You can map these fields in **payroll formulas,** letting compensation tie directly to roster-assigned shift data without manual reconciliation.

<figure><img src="https://4282324958-files.gitbook.io/~/files/v0/b/gitbook-x-prod.appspot.com/o/spaces%2F-MXep_PEmh8mDPVWj49x%2Fuploads%2FkUg3PpOcg77hQGY15NIv%2FFrame%201%20-%202026-09-07T100133.752.png?alt=media&amp;token=c284225f-422f-405a-916f-3a549404b2cf" alt=""><figcaption></figcaption></figure>

### **OT Working Hours Configuration**

You can now configure OT Working Hours separately for Weekdays, Week-Offs, and Holidays, each with its own minimum and maximum OT limits. For Week-Off and Holiday OT, choose between **From Start** and **Considering After Shift Hours** calculation methods. OT can be rounded using **Standard, Lower Value, Higher Value, or Nil options**, with contextual help and validations to guide setup, and a controlled Delete option for saved configurations. Existing OT setups and Comp-Off functionality stay unchanged unless you update them, giving Payroll and HR precise, day-type-specific control over overtime calculations.

<figure><img src="https://4282324958-files.gitbook.io/~/files/v0/b/gitbook-x-prod.appspot.com/o/spaces%2F-MXep_PEmh8mDPVWj49x%2Fuploads%2FvawBcsvUhYYkxHS6yhS3%2FFrame%201%20-%202026-09-07T100619.833.png?alt=media&amp;token=09f86b1b-3a62-44cd-a0ea-8dde294eb3bf" alt=""><figcaption></figcaption></figure>

<figure><img src="https://4282324958-files.gitbook.io/~/files/v0/b/gitbook-x-prod.appspot.com/o/spaces%2F-MXep_PEmh8mDPVWj49x%2Fuploads%2F22QTWtIbrOwCyLbIultg%2FFrame%201%20-%202026-09-07T100640.720.png?alt=media&amp;token=2444841a-ee5d-4922-bcc7-0f6d14b4144f" alt=""><figcaption></figcaption></figure>

### **Attendance Regularization Without a Punch Entry**

You can now submit an **Attendance Regularization** request even when there is no punch entry for the day, adding both the In and Out date and time yourself. Previously, at least one punch entry was required, and you could only update the missing one. This removes the need to involve IT or HR when you miss punching in and out entirely.

<figure><img src="https://4282324958-files.gitbook.io/~/files/v0/b/gitbook-x-prod.appspot.com/o/spaces%2F-MXep_PEmh8mDPVWj49x%2Fuploads%2FPQggagYldxN36cexjjOx%2FFrame%201%20-%202026-09-07T100657.663.png?alt=media&amp;token=a8e22e4d-4e21-4698-9fa7-cad5bc2ebb11" alt=""><figcaption></figcaption></figure>

### **Candidate Digital Signing of Offer Letters on Career Portal**

Candidates can now digitally sign **Offer Letters** directly on the **CSS Career Portal**, using the same configuration as the existing HR Letter signing setup. On **View Offer**, candidates get the same signing options employees already have for their HR Letters. Once accepted, the offer is signed and the signed offer letter is saved to the candidate's profile — speeding up offer acceptance and removing manual print-sign-scan steps for Candidates and Recruiters.

<figure><img src="https://4282324958-files.gitbook.io/~/files/v0/b/gitbook-x-prod.appspot.com/o/spaces%2F-MXep_PEmh8mDPVWj49x%2Fuploads%2Fe9xPHEGbyvvgymf7QLZQ%2FFrame%201%20-%202026-09-07T100916.963.png?alt=media&amp;token=aa2653ce-083a-4527-bfff-b5cc7e92737e" alt=""><figcaption></figcaption></figure>

<figure><img src="https://4282324958-files.gitbook.io/~/files/v0/b/gitbook-x-prod.appspot.com/o/spaces%2F-MXep_PEmh8mDPVWj49x%2Fuploads%2FtTZ0xMyE2zeZohXEGeHS%2FFrame%201%20-%202026-09-07T101003.716.png?alt=media&amp;token=6e69cc3f-3f68-499d-a74b-11685ae285e1" alt=""><figcaption></figcaption></figure>

### **Job Identification Types**

You can now publish a job as **Public (Career Portal)**, open to anyone; **Internal Job Posting (IJP)**, visible only to internal employees; or **Invite Only**, shared privately via a link or QR code. This gives Recruiters more control over exactly who can see and apply for a job.

<figure><img src="https://4282324958-files.gitbook.io/~/files/v0/b/gitbook-x-prod.appspot.com/o/spaces%2F-MXep_PEmh8mDPVWj49x%2Fuploads%2FohOy67E66zK4zAv0ppfr%2FFrame%201%20-%202026-09-07T101021.819.png?alt=media&amp;token=b7347810-b825-4391-a6bc-9c17bf254d9e" alt=""><figcaption></figcaption></figure>

### **HR Resignation Withdrawal Rules**

Resignation withdrawal by HR is now configurable instead of following a single fixed rule. You can allow withdrawal **at any stage before employee separation**, **after manager approval**, or **after departmental approval** (the current/Previous Behaviour). This gives HR the flexibility to match company policy instead of being tied to one fixed approval stage.

<figure><img src="https://4282324958-files.gitbook.io/~/files/v0/b/gitbook-x-prod.appspot.com/o/spaces%2F-MXep_PEmh8mDPVWj49x%2Fuploads%2FDswvtoFASV7ia5tpH4Kg%2FFrame%201%20-%202026-09-07T101100.524.png?alt=media&amp;token=408d8c28-6163-40ac-9467-2ee3833ae250" alt="" width="563"><figcaption></figcaption></figure>

**For any queries, contact** [**support@pockethrms.com**](mailto:support@pockethrms.com)


# July 2026

### **July 2026**

We are thrilled to present our Monthly Update, with enhanced user-friendly tools to elevate your HR experience. Our commitment to innovation and efficiency drives us to bring you seamless updates that transform your HR processes. For the month of **July 2026**, we have the following enhancements.

### **Sticky Header in Monthly Attendance Summary**

The **Monthly Attendance Summary report** now has a sticky header. Employee details and date columns stay visible as you scroll, so you never lose track of which column you are reading in a long report. The sticky header works for both manager and HR views, and the report layout is otherwise unchanged.

<figure><img src="https://4282324958-files.gitbook.io/~/files/v0/b/gitbook-x-prod.appspot.com/o/spaces%2F-MXep_PEmh8mDPVWj49x%2Fuploads%2FX1O4lFFwv3CO3EJfjIp2%2FFrame%201%20(90).png?alt=media&amp;token=38d58f90-b4ba-4aeb-b8e7-2d5a56d6a7e2" alt=""><figcaption></figcaption></figure>

### **Absent Status in Half Day Settings**

Attendance now marks an employee **Absent** automatically when their working hours fall below the configured Half Day hours. Earlier, attendance considered only Full Day and Half Day criteria based on the configured working hours. The system now also checks for hours below the Half Day threshold, and the updated status appears consistently across attendance reports. Muster Roll Wizard and Report Wizard are both affected, so your attendance policy is applied without manual correction.

### **Enhanced PMS PDF Report**

The appraisal PDF report has been redesigned into a more structured and complete summary. Role-wise remarks submitted during the appraisal workflow are now clearly displayed, and ratings, scores and numerical appraisal data are presented in a more organised layout. Employee performance details are easier to review and compare across appraisal stages. The new format is available to all users with access to appraisal reports.

<figure><img src="https://4282324958-files.gitbook.io/~/files/v0/b/gitbook-x-prod.appspot.com/o/spaces%2F-MXep_PEmh8mDPVWj49x%2Fuploads%2FVSsicE3fZrIrGWdCHoQT%2FFrame%203.png?alt=media&amp;token=49100998-8965-4d9a-aa2e-b5bfaed5b44b" alt="" width="563"><figcaption></figcaption></figure>

<figure><img src="https://4282324958-files.gitbook.io/~/files/v0/b/gitbook-x-prod.appspot.com/o/spaces%2F-MXep_PEmh8mDPVWj49x%2Fuploads%2FqG93ITdyQdp0LVTKeehC%2Fimage.png?alt=media&amp;token=7c164fb6-f1a2-4b73-9052-f2fd3a086e33" alt=""><figcaption></figcaption></figure>

<figure><img src="https://4282324958-files.gitbook.io/~/files/v0/b/gitbook-x-prod.appspot.com/o/spaces%2F-MXep_PEmh8mDPVWj49x%2Fuploads%2FV1wLALusnLiHt27ueFhA%2Fimage.png?alt=media&amp;token=647c02a5-c060-4e27-b96c-0f50d5dd1e0c" alt=""><figcaption></figcaption></figure>

<figure><img src="https://4282324958-files.gitbook.io/~/files/v0/b/gitbook-x-prod.appspot.com/o/spaces%2F-MXep_PEmh8mDPVWj49x%2Fuploads%2FQFPECv1nSv9bQxnsd0nL%2Fimage.png?alt=media&amp;token=8f891860-c205-4f7a-99f5-c9352b96efab" alt=""><figcaption></figcaption></figure>

### **Detailed Appraisal Status in PMS**

Appraisal status now shows the exact pending level in the workflow instead of only Yet to Be Submitted, Manager Review and Completed. You will see statuses such as **Employee Pending**, **Manager 1 Pending**, **Manager 2 Pending** and any further manager levels you have configured, along with the latest completed remarks. Action buttons change with the stage: submitted appraisals show **View Details**, and appraisals awaiting manager action show **Evaluate**. The same status information appears across appraisal reports.

<figure><img src="https://4282324958-files.gitbook.io/~/files/v0/b/gitbook-x-prod.appspot.com/o/spaces%2F-MXep_PEmh8mDPVWj49x%2Fuploads%2FFxpUcffrEF10VAAMw7YF%2FFrame%202%20-%202026-08-03T120640.269.png?alt=media&amp;token=0db9e922-86c0-477b-a003-978b81b2a38a" alt=""><figcaption></figcaption></figure>

<figure><img src="https://4282324958-files.gitbook.io/~/files/v0/b/gitbook-x-prod.appspot.com/o/spaces%2F-MXep_PEmh8mDPVWj49x%2Fuploads%2FDMFFvpOh9fhRSj4tBhHP%2FFrame%202%20-%202026-08-03T120807.221.png?alt=media&amp;token=cef84a41-2d9e-4a38-aea1-b104f8d30e3b" alt=""><figcaption></figcaption></figure>

### **People Connect and Dashboard Attendance Settings**

You can now configure whether the **Team Attendance** card, the **People Connect** card, or both appear on the ESS dashboard. With only Team Attendance active, the card shows attendance data for team members only. With only People Connect active, the card appears without any attendance data. With both active, Team Attendance follows its own configuration while People Connect shows employees by All, Business Unit or Category. If both settings are inactive, no card is displayed.

<figure><img src="https://4282324958-files.gitbook.io/~/files/v0/b/gitbook-x-prod.appspot.com/o/spaces%2F-MXep_PEmh8mDPVWj49x%2Fuploads%2F5Y3E6po1CE1cHZzYrVpy%2Fppc.png?alt=media&amp;token=e51dcfc9-836f-4430-9fa4-11a82675ad22" alt=""><figcaption></figcaption></figure>

<figure><img src="https://4282324958-files.gitbook.io/~/files/v0/b/gitbook-x-prod.appspot.com/o/spaces%2F-MXep_PEmh8mDPVWj49x%2Fuploads%2FDuFHCw7epyFLOYmlFfyj%2FFrame%202%20-%202026-08-03T121342.752.png?alt=media&amp;token=081c6361-6c08-4687-916d-64e7ae2c9cef" alt=""><figcaption></figcaption></figure>

<figure><img src="https://4282324958-files.gitbook.io/~/files/v0/b/gitbook-x-prod.appspot.com/o/spaces%2F-MXep_PEmh8mDPVWj49x%2Fuploads%2FAgUDr8KgMOjq4Wm0GVxJ%2FFrame%202%20-%202026-08-03T121348.678.png?alt=media&amp;token=1ef0360f-7a75-439c-8e80-6242d47cb870" alt="" width="351"><figcaption></figcaption></figure>

### **Manager Contact Details in Approval Matrix**

Hovering over a manager's name in the Approval Matrix now shows their official email ID and registered phone number. HR and Admin users can check contact details instantly, without opening the manager's employee profile separately. The hover view is available within Approval Matrix details on the employee profile, which helps when verifying reporting hierarchies during approval setup.

<figure><img src="https://4282324958-files.gitbook.io/~/files/v0/b/gitbook-x-prod.appspot.com/o/spaces%2F-MXep_PEmh8mDPVWj49x%2Fuploads%2F1vBkJraesYfBxLUF4XIB%2FFrame%202%20-%202026-08-03T121354.941.png?alt=media&amp;token=ddc69112-dda8-449c-a4b0-1c4ff10ffbbc" alt=""><figcaption></figcaption></figure>

### **First-Time Login Consent for ESS Portal**

You can now require employees to acknowledge a consent message the first time they log in to the ESS Portal. The pop-up can carry a pre-configured acknowledgement message, attached documents, or both, and employees must scroll through the complete content before the **Proceed** option becomes available. Until the acknowledgement is completed, employees cannot use the ESS Portal.

<figure><img src="https://4282324958-files.gitbook.io/~/files/v0/b/gitbook-x-prod.appspot.com/o/spaces%2F-MXep_PEmh8mDPVWj49x%2Fuploads%2Fr2hwdbaDge3MMfDMRlOo%2FFrame%201%20-%202026-08-03T121521.674.png?alt=media&amp;token=1b643e77-960b-41e0-9a82-6765e17c8d1d" alt=""><figcaption></figcaption></figure>

### **First-Time Login Consent for Career Portal**

The same first-time consent acknowledgement can be configured for candidates logging in to the Career Portal. Candidates see a pre-configured acknowledgement message with any attached documents, and must scroll through the complete content before proceeding. The **Proceed** option becomes available only after the consent has been reviewed, and until it is acknowledged, candidates cannot use the Career Portal.

<figure><img src="https://4282324958-files.gitbook.io/~/files/v0/b/gitbook-x-prod.appspot.com/o/spaces%2F-MXep_PEmh8mDPVWj49x%2Fuploads%2FV3tLUo2eL7EYaLlViJ0Z%2FFrame%201%20-%202026-08-03T121551.672.png?alt=media&amp;token=2a4fbcda-bae4-4bb8-b4e5-6b6748a6f3a2" alt=""><figcaption></figcaption></figure>

### **Bulk Resume Parsing with smHRt AI**

Recruiters can now upload and parse several resumes at once instead of adding candidates one by one. The system reads each resume and displays the captured details for review; fields that cannot be read stay blank and must be filled in before upload, and the wizard flags duplicate details that match existing candidate records. You can start the process from the Candidate Master by selecting the jobs to add candidates to, or directly from a job by adding candidates through resume upload.

<figure><img src="https://4282324958-files.gitbook.io/~/files/v0/b/gitbook-x-prod.appspot.com/o/spaces%2F-MXep_PEmh8mDPVWj49x%2Fuploads%2Fy2cG23pKOYhCjlF3FS0A%2FFrame%201%20-%202026-08-03T121536.169.png?alt=media&amp;token=99aa7103-ff68-4a30-a82a-8f2737798e61" alt=""><figcaption></figcaption></figure>

### **Candidate Profile Completion on Career Portal**

A centralised **My Profile** section on the Career Portal lets candidates complete and manage their profile even before applying to any job, and it updates automatically from details entered while applying. The section shows real-time completion status based on the fields filled across the whole profile, with an overall completion percentage and section-wise percentages so candidates can identify and finish whatever is still pending.

<figure><img src="https://4282324958-files.gitbook.io/~/files/v0/b/gitbook-x-prod.appspot.com/o/spaces%2F-MXep_PEmh8mDPVWj49x%2Fuploads%2F5FpqmJMJ4bGlr06yeMyU%2FFrame%201%20-%202026-08-03T121723.137.png?alt=media&amp;token=12eac3a6-d6da-4252-98a6-62afc1151f56" alt=""><figcaption></figcaption></figure>

### **Candidate Profile Completion Status in ESS**

The same profile completion wizard has been added to the Candidate Profile in ESS for HR and recruiter users. You can see how much of a candidate's profile is complete and which sections are still incomplete and need updating, without switching to the Career Portal. The completion status stays synced directly with the candidate's own profile information.

<figure><img src="https://4282324958-files.gitbook.io/~/files/v0/b/gitbook-x-prod.appspot.com/o/spaces%2F-MXep_PEmh8mDPVWj49x%2Fuploads%2FQNBMbPlHUi26tkTxRBb3%2FFrame%201%20-%202026-08-03T121730.506.png?alt=media&amp;token=52c4532c-e16b-4116-b782-5c7ce09d785c" alt=""><figcaption></figcaption></figure>

### **My Documents Section on Career Portal**

A centralised **My Documents** section on the Career Portal lets candidates submit and manage requested documents, either before applying to any job or when HR requests them. It works in the same way as the centralised My Profile section. Documents uploaded here are shared across all of that candidate's job applications, so the same document does not have to be uploaded again for every job.

<figure><img src="https://4282324958-files.gitbook.io/~/files/v0/b/gitbook-x-prod.appspot.com/o/spaces%2F-MXep_PEmh8mDPVWj49x%2Fuploads%2FLKCXUprCJl454QELWm73%2FFrame%201%20-%202026-08-03T121749.004.png?alt=media&amp;token=66f980d5-45db-49f6-9ac3-8c158c3dc14a" alt=""><figcaption></figcaption></figure>

### **Candidate Documents in ESS**

A similar centralised documents section has been added to the Candidate Profile in ESS for HR and recruiter users. You can view and manage candidate documents, request specific documents that have not been submitted yet, and review submitted documents to mark them approved or rejected. Rejected documents can be re-requested from the candidate, and the same uploads can be reused for the Background Verification process.

<figure><img src="https://4282324958-files.gitbook.io/~/files/v0/b/gitbook-x-prod.appspot.com/o/spaces%2F-MXep_PEmh8mDPVWj49x%2Fuploads%2FOBWlPJpsEPq3Rjvtw2dx%2FFrame%201%20-%202026-08-03T121909.495.png?alt=media&amp;token=8c7d4d8e-7469-4b6b-9278-fe1bbb67b189" alt=""><figcaption></figcaption></figure>

### **Job Stage Configuration and Initiate BGV Trigger**

The Job Stage Template screen in Recruitment V2 has been redesigned from a horizontally stacked layout into a cleaner vertical workflow view, making the full hiring pipeline easier to see while you configure it. Adding stages and sub-stages is simpler through the new stage pipeline interface, and workflow automation triggers can be set directly within each stage, with stages, sub-stages and triggers all visible together. A new **Initiate BGV** trigger starts Background Verification when a candidate reaches the configured stage.

<figure><img src="https://4282324958-files.gitbook.io/~/files/v0/b/gitbook-x-prod.appspot.com/o/spaces%2F-MXep_PEmh8mDPVWj49x%2Fuploads%2Fs7Zi8th4oPE8v9RXkW6X%2FFrame%201%20-%202026-08-03T121923.711.png?alt=media&amp;token=52ba2ee5-1d51-40cd-83f7-4f28c8809ebd" alt=""><figcaption></figcaption></figure>

### **Background Verification (BGV) with Multiple Rounds**

Background Verification can now be run inside Pocket HRMS, started directly from the Candidate Profile. A six-step wizard covers Identity & Address Verification, Education Verification, Employment History Verification, Professional Reference Check, Criminal Record Check and Additional Check. Each stage must be marked complete, with a completion remark and a supporting document, before the overall BGV can be completed. Documents can be picked from the candidate's existing Documents section or uploaded during verification. Multiple rounds can be run for the same candidate and are tracked separately, with only one BGV active at a time.

<figure><img src="https://4282324958-files.gitbook.io/~/files/v0/b/gitbook-x-prod.appspot.com/o/spaces%2F-MXep_PEmh8mDPVWj49x%2Fuploads%2Fm2WaBOjvBbHVxGMKAQbi%2FFrame%201%20-%202026-08-03T121941.942.png?alt=media&amp;token=3ff734ad-7698-429a-bd28-09dab28ff9fe" alt=""><figcaption></figcaption></figure>

<figure><img src="https://4282324958-files.gitbook.io/~/files/v0/b/gitbook-x-prod.appspot.com/o/spaces%2F-MXep_PEmh8mDPVWj49x%2Fuploads%2Fx0IbxG1IYqEktN2qCtc1%2FFrame%201%20-%202026-08-03T122014.982.png?alt=media&amp;token=ed64bd27-5fde-47bd-86ab-ca6177d4082c" alt=""><figcaption></figcaption></figure>

**For any queries, contact** [**support@pockethrms.com**](mailto:support@pockethrms.com)


# June 2026

### **June 2026**

We are thrilled to present our Monthly Update, with enhanced user-friendly tools to elevate your HR experience. Our commitment to innovation and efficiency drives us to bring you seamless updates that transform your HR processes. For the month of June 2026, we have the following enhancements.

### **Dormant Shift Management**

A new Dormant Shift option has been introduced to help users manage inactive shifts more effectively. Users can now mark active shifts as dormant, which removes them from active dropdowns and future scheduling while keeping all past attendance and historical records unchanged. Any future schedules linked to the dormant shift will be deleted, and the shift can be restored later if required. This helps keep the shift master clean and updated without affecting previous attendance data or reports.

![](https://content.gitbook.com/content/-MXep_PEmh8mDPVWj49x/blobs/FXqSvfgHV0OsZ71KMv4q/Unknown%20image)

<img src="https://content.gitbook.com/content/-MXep_PEmh8mDPVWj49x/blobs/gHgVgtpaUO3tIP3MCOAB/Unknown%20image" alt="" width="563">

![](https://content.gitbook.com/content/-MXep_PEmh8mDPVWj49x/blobs/IUTMPVfVgzecavU2bJvz/Unknown%20image)

![](https://content.gitbook.com/content/-MXep_PEmh8mDPVWj49x/blobs/MAg44pAS9PC4zKt5bu2x/Unknown%20image)

### **Configure KPI Flow by Appraisal Type**

An Appraisal Type configuration has been introduced to define the KPI flow during appraisal setup. Users can select either Predefined KPI Flow or Employee Driven KPI Flow based on the appraisal process. In Employee Driven KPI Flow, the Business Unit will be set as Employee Wise, and ESS-based KPI creation settings will be enabled for employees. In Predefined KPI Flow, the admin can configure the Business Unit as required, while ESS KPI flow settings will remain restricted since KPIs are predefined through the Cloud portal.

<figure><img src="https://content.gitbook.com/content/-MXep_PEmh8mDPVWj49x/blobs/km6Wr0SH1P3ODa6wYcgv/Unknown%20image" alt=""><figcaption></figcaption></figure>

![](https://content.gitbook.com/content/-MXep_PEmh8mDPVWj49x/blobs/eNo7ehvACrvF62bTNJXt/Unknown%20image)

### **Exit Letter Trigger After FnF Settlement**

Exit Letters can now be triggered automatically after a defined number of days from FnF Settlement. HR can configure the required number of days before the letter is shared with the employee, ensuring it is not generated immediately after FnF completion. This gives HR additional time to review and correct the FnF Settlement, if required, before triggering the Exit Letter.

![](https://content.gitbook.com/content/-MXep_PEmh8mDPVWj49x/blobs/YIE8s1qVK208fWRo1fE8/Unknown%20image)

### **FnF No Dues Form - UI/UX Enhancement**

The FnF No Dues Form layout has been updated from a single-column view to a two-column layout for better usability. This reduces scrolling, improves space utilization, and makes it easier for Department Heads and HR users to review and complete the form. Key employee details such as **Employee Code**, **Employee Name**, **Last Working Date**, **Employee Tenure**, and **Employee Status**are now displayed directly on the form for quick reference.

![](https://content.gitbook.com/content/-MXep_PEmh8mDPVWj49x/blobs/gGW7wYbD6QnDr5dcaXR5/Unknown%20image)

### **Enhanced Job Card Customization for Career Portal**

The Job Card view on the Career Portal can now be customized to display additional job information for candidates. Users can select up to 6 fields from Job Master, including radio, dropdown, or range type fields, and show them directly on the Job Card. This gives HR’s more flexibility to decide which job details should be visible to candidates, instead of using a fixed Job Card format.

![](https://content.gitbook.com/content/-MXep_PEmh8mDPVWj49x/blobs/50U2JuzO9nuBvMsTGsK5/Unknown%20image)

![](https://content.gitbook.com/content/-MXep_PEmh8mDPVWj49x/blobs/aE9ZwjMUck9SU4Clitcy/Unknown%20image)

### **Request Multiple Candidate Documents with Select All**

A Select All option has been added in the Candidate Documents request wizard to make document requests faster and easier. HR and Recruiters can now select all required documents at once instead of choosing each document manually. This helps save time, reduce manual effort, and simplify the process when multiple documents need to be requested from a candidate.

<img src="https://content.gitbook.com/content/-MXep_PEmh8mDPVWj49x/blobs/ni01Y01Z5LMQahh8BNKa/Unknown%20image" alt="" width="375">

### **Add Remarks on Candidate Profile**

A new Add Remark option has been introduced on the Candidate Profile for HR, Recruiters, and Interviewers. Users can add generic remarks such as candidate preferences, interview notes, recruiter notes, or other observations. These remarks will be stored in the candidate’s timeline along with the name of the user who added them, helping recruitment teams maintain important candidate-related notes in one place for better tracking and visibility.

<figure><img src="https://content.gitbook.com/content/-MXep_PEmh8mDPVWj49x/blobs/yXt5VAT7SrBb7DT12s4F/Unknown%20image" alt="" width="375"><figcaption></figcaption></figure>

![](https://content.gitbook.com/content/-MXep_PEmh8mDPVWj49x/blobs/7qzT9jqnzhOG9QewkWtA/Unknown%20image)

### **Add Candidates Without Job Assignment**

Candidates can now be added to the system or candidate pool without assigning them to a specific job. These candidates will appear in the candidate pool with no job assigned, and HR or Recruiters can link a relevant job to their profile later, if required. This helps recruitment teams create and maintain candidate profiles in advance without waiting for a suitable job opening

![](https://content.gitbook.com/content/-MXep_PEmh8mDPVWj49x/blobs/6SmMnC9r0GFkDlLoMXF9/Unknown%20image)

### **Bulk Stage Update for Candidates**

Candidates can now be moved between stages in bulk within a job. Recruitment teams can select multiple candidates and move them to another stage, such as from Screening to Interview, in a single action. Once completed, the stage of all selected candidates will be updated accordingly. Additional bulk actions such as Qualify, Disqualify, Add to another Job, and other related actions will also be introduced to further reduce manual effort.

![](https://content.gitbook.com/content/-MXep_PEmh8mDPVWj49x/blobs/V12BJ1UmmOUKJAz3jUSR/Unknown%20image)

**For any queries, contact** [**support@pockethrms.com**](mailto:support@pockethrms.com)


# May 2026

### **May 2026**

We are thrilled to present our Monthly Update, with enhanced user-friendly tools to elevate your HR experience. Our commitment to innovation and efficiency drives us to bring you seamless updates that transform your HR processes. For the month of May 2026, we have the following enhancements.

### **Overtime Limit Alerts**

OT entries now warn users when they exceed the **maximum OT hours**. Inline alerts appear on the OT Entry Multi screen, and on saving, a **modal**shows all exceeded entries with options to **Adjust to Limit** or **Proceed with Save**. OT Reports also **highlight exceeded entries** for easy review, ensuring accurate tracking and full HR visibility.

<figure><img src="https://content.gitbook.com/content/-MXep_PEmh8mDPVWj49x/blobs/thuAj8vw8GA8Uhq76hed/Unknown%20image" alt=""><figcaption></figcaption></figure>

![](https://content.gitbook.com/content/-MXep_PEmh8mDPVWj49x/blobs/IsDQikWtZZDNZyufOnpJ/Unknown%20image)

![](https://content.gitbook.com/content/-MXep_PEmh8mDPVWj49x/blobs/pMPpvotdM360PFiAkcwx/Unknown%20image)

### **OT Settings Validation**

OT settings now ensure that each shift or category can have only one **OT type** (**Time-Based** or **Working-Hours-Based**). If a conflicting OT type is selected, an inline warning appears, and the system blocks saving. This prevents duplicate or contradictory configurations, keeps OT setups consistent, and ensures accurate tracking for payroll and reporting.

![](https://content.gitbook.com/content/-MXep_PEmh8mDPVWj49x/blobs/K1GlJG0HZSjFfkN0A4kG/Unknown%20image)

![](https://content.gitbook.com/content/-MXep_PEmh8mDPVWj49x/blobs/OIxVdsaazWyrUuErP0U1/Unknown%20image)

### **Appraisal Form Re-Submission**

**Employees** or **Managers** can **re-submit a completed appraisal** at any required stage of the workflow. However, **only Admin/HR users** have the authority to **execute the re-submit action**, ensuring **proper control and oversight**. Both employees and managers can re-submit the submitted Appraisal Form. This keeps the **appraisal process secure** while allowing flexibility for **corrections or updates**.

![](https://content.gitbook.com/content/-MXep_PEmh8mDPVWj49x/blobs/ugCUs77NjLZyOI2GFHE8/Unknown%20image)

### **Peer Credential Report for Appraisal**

A **new Peer Credential Report** has been added for appraisals, allowing users to generate it directly from the **Appraisal Peer screen** by clicking the peer credential report button. The report includes **Peer Code, Name, Designation, Email, Contact Number, and system-generated password**, enabling **Admin’s** to quickly access and share peer login details for appraisals efficiently and securely.

<figure><img src="https://content.gitbook.com/content/-MXep_PEmh8mDPVWj49x/blobs/72RumFLfyjAawwuPveKU/Unknown%20image" alt=""><figcaption></figcaption></figure>

<img src="https://content.gitbook.com/content/-MXep_PEmh8mDPVWj49x/blobs/fpKIXW68zkgELeOC1olM/Unknown%20image" alt="" width="375">

### **Consolidated Appraisal – Summary Report Sheet**

A **new Summary Report sheet** has been added to the **Consolidated Appraisal Report**. It provides **employee-wise and stage-wise details**, showing each stage’s **rating and score percentage**, along with the **consolidated score and final rating**. This allows HR and Managers to easily review appraisal performance and get a complete overview of each employee’s appraisal results in a single view.

<img src="https://content.gitbook.com/content/-MXep_PEmh8mDPVWj49x/blobs/itknTBe8GQQb0pfuGTBR/Unknown%20image" alt="" width="563">

### **KPI Status Report for Appraisal**

A **new KPI Report** has been added under **Appraisal Reports**. Whenever KPI is enabled in the appraisal setup, users can access this report to view detailed KPI status for employees. It helps HR and Managers to track KPI performance effectively, review progress, and make informed decisions. The report is available for **all user roles**, ensuring transparency across the appraisal process.

![](https://content.gitbook.com/content/-MXep_PEmh8mDPVWj49x/blobs/0uzimieHQWhjawiwOsiT/Unknown%20image)

### **Approval Matrix – Module Selection Enhancements**

The **Approval Matrix settings screen** has been improved to make module selection faster and more user-friendly, especially when configuring multiple modules. A **Select All** option allows users to choose all modules in one click, and a **selection counter** shows the exact number of modules selected. If some modules remain unselected, a **confirmation popup** lists them for review, allowing users to update selections or proceed. These enhancements help reduce missed selections and make the setup process more efficient.

<figure><img src="https://content.gitbook.com/content/-MXep_PEmh8mDPVWj49x/blobs/2PdtTMJHxjQ9UJdmu285/Unknown%20image" alt=""><figcaption></figcaption></figure>

<img src="https://content.gitbook.com/content/-MXep_PEmh8mDPVWj49x/blobs/zIXeMfHVyRqWqEPR6Y7E/Unknown%20image" alt="" width="375">

### **Employee Master Field Dependency Setup**

A new **Field Dependency** feature allows HR to make employee master fields depend on one another, ensuring cleaner data entry and preventing invalid combinations. The feature supports two models:

**Chain**, a multilevel hierarchy where each field filters the next (e.g., Business Unit → Department → Team),

<figure><img src="https://content.gitbook.com/content/-MXep_PEmh8mDPVWj49x/blobs/jjHQIlKxmFejWjoC4nSb/Unknown%20image" alt=""><figcaption></figcaption></figure>

and **Multi-Child**, where multiple child fields depend on the same parent independently (e.g., Location controls Holiday Calendar, Shift Timing, and Local Policy). This setup guides HR users and improves accuracy during employee data entry.

![](https://content.gitbook.com/content/-MXep_PEmh8mDPVWj49x/blobs/Uen6FFCbAxMqdNVkfb3z/Unknown%20image)

### **Automatic Exit Interview Opening in Separation**

Exit Interview Forms can now be **automatically opened** a set number of days before an employee’s **Last Working Date**, for separations initiated from both **Cloud and ESS**. Once opened, the form appears in the employee’s **ESS Portal**, reducing manual effort for HR. Previously, forms had to be manually opened for ESS separations. This update ensures **timely availability** of exit forms and streamlines HR processes.

<figure><img src="https://content.gitbook.com/content/-MXep_PEmh8mDPVWj49x/blobs/PvNmSyfifV8J96EF8jmL/Unknown%20image" alt=""><figcaption></figcaption></figure>

### **Exit Interview Form Reminders to Employees**

A new **reminder configuration** automatically notifies employees responsible for completing Exit Interview Forms. The first reminder is sent when the form opens, and subsequent reminders are sent up to the employee’s **Last Working Day** based on the defined frequency (e.g., every 2 days). Reminders **stop automatically** once the form is submitted, helping improve **completion rates** and reducing **manual follow-up** by HR.

<figure><img src="https://content.gitbook.com/content/-MXep_PEmh8mDPVWj49x/blobs/HbUnQB00z6wut37zCrv0/Unknown%20image" alt=""><figcaption></figcaption></figure>

### **Enhanced Exit Letter Configuration for Employees**

The **Exit Letter configuration** now allows HR to send letters with greater flexibility during the separation process. Letters can be sent for **ESS or Cloud Employee Separation**, or after **Full and Final Settlement**, to either the employee’s **official or personal email**. Multiple letters can now be selected in a single configuration. Previously, sending multiple letters was limited to SMTP-based ESS separations. This enhancement gives HR **more control** over triggers, recipients, and letter selection.

<figure><img src="https://content.gitbook.com/content/-MXep_PEmh8mDPVWj49x/blobs/LBgmu7MkJI3FW86PKG6B/Unknown%20image" alt=""><figcaption></figcaption></figure>

### **FnF No Dues Clearance Reminders**

A new **reminder configuration** automatically notifies Department Heads and HR responsible for completing an employee’s **FnF No Dues Clearance**. The first reminder is sent when the form opens, with additional reminders sent up to the employee’s **Last Working Day** based on the defined frequency (e.g., every 2 days). Reminders **stop automatically** once the clearance is submitted. This helps improve **accountability**, reduce delays, and minimize **manual follow-up** by HR.

<figure><img src="https://content.gitbook.com/content/-MXep_PEmh8mDPVWj49x/blobs/UjdvzI8AzT76scjtfEDL/Unknown%20image" alt=""><figcaption></figcaption></figure>

### **Bulk Percentage-wise Increment Import**

A new **Bulk Import option** allows HR teams to process **percentage-wise increments** for multiple employees at once. Previously, increments had to be applied individually, which was time-consuming. With this enhancement, HR can upload increment details via an **Excel file**, and the system applies the percentage to all eligible salary components for each employee. This reduces manual effort, improves processing speed, and makes managing large-scale increments more efficient.

<figure><img src="https://content.gitbook.com/content/-MXep_PEmh8mDPVWj49x/blobs/vMblDxPn1z26mqNnueOo/Unknown%20image" alt="" width="375"><figcaption></figcaption></figure>

### **Payroll Maker-Checker – Approval Timeline**

A new **Payroll History page** provides complete visibility into the payroll approval process, allowing HR and Payroll teams to track the current status and review the approval flow for any payroll cycle. Users can filter by **Payroll Month, Year, and Business Unit**. The system displays who processed payroll, approval timestamps, and the current stage. A **timeline view** shows progress across Maker and multiple Checker levels, while past payroll cycles are maintained for easier review and improved **audit readiness**.

<img src="https://content.gitbook.com/content/-MXep_PEmh8mDPVWj49x/blobs/gNtsD7QPZh3xD01yFUSu/Unknown%20image" alt="" width="563">

<img src="https://content.gitbook.com/content/-MXep_PEmh8mDPVWj49x/blobs/RFX9jyIfSey5WeuSKNOD/Unknown%20image" alt="" width="375">

### **Odisha Professional Tax Repeal Compliance**

As per the **Odisha Gazette notification** dated 21 April 2026, Professional Tax has been **repealed** in Odisha effective from 1 April 2026. Pocket HRMS automatically applies **zero Professional Tax deductions** for all employees mapped to Odisha PTax locations in May 2026 payroll and future cycles. If April payroll is deleted and reprocessed, the updated logic applies automatically. This ensures **compliance** from the start of the financial year and during payroll reprocessing without manual intervention.

<img src="https://content.gitbook.com/content/-MXep_PEmh8mDPVWj49x/blobs/BMBYQV0R0ebU75jXtKEW/Unknown%20image" alt="" width="375">

**For any queries, contact**[**support@pockethrms.com**](mailto:support@pockethrms.com)


# April 2026

### April 2026

We are thrilled to present our Monthly Update, with enhanced user-friendly tools to elevate your HR experience. Our commitment to innovation and efficiency drives us to bring you seamless updates that transform your HR processes. For the month of April 2026, we have the following enhancements.

### Leave Balance Report Filter Update

A generic filter has been added in the Leave Balance Report for Admin users. Earlier, the report included all employees without any filter. Now, admins can apply filters such as employee status, like Active Employees, before downloading the report. This helps generate more accurate and targeted reports.

![](https://content.gitbook.com/content/-MXep_PEmh8mDPVWj49x/blobs/um8MxodmRUFziBwe03eN/Unknown%20image)

![](https://content.gitbook.com/content/-MXep_PEmh8mDPVWj49x/blobs/YxNzngoHjH4mUMuqAWeE/Unknown%20image)

### Breakshift-Based Leave Deduction

The system has been enhanced to deduct leave based on productive working hours for employees assigned to Breakshift-enabled shifts.

Earlier, leave deduction did not fully consider total productive hours from multiple punch pairs. Now, the system calculates total valid working hours and applies the required attendance or leave deduction through GO Rule configuration.

Benefit:This ensures accurate leave deduction for Breakshift employees and improves payroll accuracy.

<figure><img src="https://content.gitbook.com/content/-MXep_PEmh8mDPVWj49x/blobs/eyv71HDJUawIR3hGXyw4/Unknown%20image" alt=""><figcaption></figcaption></figure>

![](https://content.gitbook.com/content/-MXep_PEmh8mDPVWj49x/blobs/T14d7DAIBn7nEox1XK2O/Unknown%20image)

### Attendance Report Upgrade

The report now shows all dates, even when Auto-Shift is enabled and no shift is assigned. Such dates are marked as “NA” or “Shift not assigned,” ensuring complete attendance visibility. Previously, when Auto-Shift was enabled and no shift was assigned, those dates were not shown in the Attendance Summary and Monthly Status report.

<figure><img src="https://content.gitbook.com/content/-MXep_PEmh8mDPVWj49x/blobs/0VZ2ngXHEN0hGSi3iNRY/Unknown%20image" alt=""><figcaption></figcaption></figure>

<figure><img src="https://content.gitbook.com/content/-MXep_PEmh8mDPVWj49x/blobs/0g5Vcf22ksLcW3ra6Ams/Unknown%20image" alt=""><figcaption></figcaption></figure>

<figure><img src="https://content.gitbook.com/content/-MXep_PEmh8mDPVWj49x/blobs/6p2mOIs5lI1eKf5EqE20/Unknown%20image" alt=""><figcaption></figcaption></figure>

### In-Out Details – View Only Access

A new rights-based control has been added for the **In-Out Details** screen in user-wise login.

Earlier, users could access actions from the three-dot menu, such as **On Duty Entry, Permission Entry, Modified Punch, Raw Punch, Week Off, and Delete**.

Now, through **Go-Rule configuration**, users can be given **View-Only Rights**. When this is applied, the three-dot action menu will not be visible, preventing users from editing or performing any action from the screen.

<figure><img src="https://content.gitbook.com/content/-MXep_PEmh8mDPVWj49x/blobs/zSYk2Xqm7UHgwPNIFTcu/Unknown%20image" alt=""><figcaption></figcaption></figure>

![](https://content.gitbook.com/content/-MXep_PEmh8mDPVWj49x/blobs/bALFdN4eWTaD4icomtZQ/Unknown%20image)

### In-Out Details – Productive Hours

In the **In-Out Details** screen, a new column named **Productive Hours** has been introduced.

This column will display the employee’s actual working hours or productive hours for the day. It will be applicable for employees whose shift is configured as a **Break Shift**. With this update, users can easily view the total productive time of Break Shift employees directly from the In-Out Details screen.

<figure><img src="https://content.gitbook.com/content/-MXep_PEmh8mDPVWj49x/blobs/3yeXFPGdoDp6m9goenhW/Unknown%20image" alt=""><figcaption></figcaption></figure>

### Auto Leave Credit Based on Attendance

In **Leave Credit Attendance Basis**, a new **Auto Credit** feature has been introduced, similar to the existing frequency-wise leave credit process.

This feature allows attendance-based leave credit to be processed automatically as per the configuration. Users can set the auto process to run on the **First Date, Last Date, or a Particular Date**. Based on the selected setup, the system will automatically credit leaves without manual processing.

<figure><img src="https://content.gitbook.com/content/-MXep_PEmh8mDPVWj49x/blobs/fkDoW9R4us8q1VJ4GQoi/Unknown%20image" alt=""><figcaption></figcaption></figure>

![](https://content.gitbook.com/content/-MXep_PEmh8mDPVWj49x/blobs/91EeMZz7fvHO4l3NB6H0/Unknown%20image)

### PMS Rating Configuration Update

In the **Performance Management System (PMS)**, users now have more flexibility while configuring ratings. Earlier, ratings were available only in whole numbers, such as **1, 2, 3, 4, and 5**. Now, users can configure decimal rating options in two ways:

**0.25 increments:** 1, 1.25, 1.5, 1.75, 2, etc.**0.5 increments:** 1, 1.5, 2, 2.5, 3, etc.

Additionally, users can also enter any decimal value manually, such as **1.10 or 3.79**, using the open input field. This enhancement provides more control and flexibility while assigning PMS ratings.

<figure><img src="https://content.gitbook.com/content/-MXep_PEmh8mDPVWj49x/blobs/UTlactUEnckd8h3h8lvg/Unknown%20image" alt=""><figcaption></figcaption></figure>

### Calculated Fields Update in PMS Reports

In the **Performance Management System (PMS)**, calculated fields in reports were earlier available as **text fields**, which made calculations slower and difficult.

Now, these fields have been changed to **Numerical field types**, making calculations faster and easier. This enhancement is applicable to all relevant reports in both **ESS** and **Cloud**.

![](https://content.gitbook.com/content/-MXep_PEmh8mDPVWj49x/blobs/ObMDhPt8bP6Po7jKATqn/Unknown%20image)

![](https://content.gitbook.com/content/-MXep_PEmh8mDPVWj49x/blobs/i7VFG5j529kG9Umz8467/Unknown%20image)

### Separation Validation for Pending Approvals

The **Separation Validation** pop-up has been enhanced to show pending approvals more clearly and provide quick action options.

Earlier, all pending entries were shown in one section. Now, they are shown separately as:

1. Entries raised by the employee and pending with managers.
2. Entries raised by subordinates and pending with the separating employee.

Additional updates:

* Employee details are now shown in the validation pop-up.
* HR can send reminders or notifications to managers for pending approvals.
* HR can approve or reject pending entries in bulk.
* HR can transfer pending approvals from the separating employee to another manager.
* Separation can be processed only after all pending entries are cleared.

  <figure><img src="https://content.gitbook.com/content/-MXep_PEmh8mDPVWj49x/blobs/4srVFkmHMTyGSImClrY7/Unknown%20image" alt=""><figcaption></figcaption></figure>

![](https://content.gitbook.com/content/-MXep_PEmh8mDPVWj49x/blobs/CeNJnamngkQ5Dy2vummU/Unknown%20image)

For any queries, contact <support@pockethrms.com>


# March 2026

### Product Update March 2026

We are thrilled to present our Monthly Update, with enhanced user-friendly tools to elevate your HR experience. Our commitment to innovation and efficiency drives us to bring you seamless updates that transform your HR processes. For the month of March 2026, we have the following enhancements.

### Restricted Leave in Notice Period

* This feature limits how many leaves an employee can take after resignation.
* Once an employee resigns, the system calculates the Last Working Day (LWD) based on the notice period.
* Employees can take only the allowed number of leaves during this period.
* Any leave request beyond this limit will be blocked, but leaves outside the notice period are allowed.

![](https://content.gitbook.com/content/-MXep_PEmh8mDPVWj49x/blobs/MFp9nhF9CxhVTqw4n45J/Unknown%20image)

### Improved Leave History Report

The Leave History Report is now updated to include leaves applied by both employees (ESS) and Admin/HR (Cloud). It also shows the requested date and user login details for better tracking.

**Key Benefits:**

* Includes leaves applied by Admin/HR from the Cloud.
* Shows requested date for all leave entries.
* Displays user login details for better tracking.
* Improves overall visibility of leave records.

  <figure><img src="https://content.gitbook.com/content/-MXep_PEmh8mDPVWj49x/blobs/o0fO0doexBF4UdXA47iU/Unknown%20image" alt=""><figcaption></figcaption></figure>

### Leave Menu Renamed to "Leave and Attendance"

The Leave menu in ESS is now renamed to **"Leave and Attendance"** to better reflect its features.

**Key Benefits:**

* The new name clearly represents both leave and attendance activities.
* No changes in functionality; only the name is updated.

**Availability:**

* Available on ESS Web.
* Mobile App update coming soon.

![](https://content.gitbook.com/content/-MXep_PEmh8mDPVWj49x/blobs/9H88j0rR5Hk2JzJrtfvZ/Unknown%20image)

### Configuration Limits for Leave, Attendance & Payroll

To ensure accurate leave, attendance, and payroll processing, all settings like Leave Calendar, Leave Credit, Time Consolidation, and Payroll Month Days must be aligned. Mismatched settings can lead to incorrect leave deductions (LOP) and payroll errors.

**Key Points:**

* **Recommended:** Keep all settings aligned (Month-wise or Date-to-Date) for accurate results.
* **Not Recommended:** Mismatched settings may cause incorrect deductions.
* Manual changes are required if mismatched settings are used.

<figure><img src="https://4282324958-files.gitbook.io/~/files/v0/b/gitbook-x-prod.appspot.com/o/spaces%2F-MXep_PEmh8mDPVWj49x%2Fuploads%2FbJgngFijKUazyWNGXduK%2Fimage.png?alt=media&amp;token=97ffed16-a8aa-411c-aa5a-041435f7bedd" alt=""><figcaption></figcaption></figure>

<figure><img src="https://4282324958-files.gitbook.io/~/files/v0/b/gitbook-x-prod.appspot.com/o/spaces%2F-MXep_PEmh8mDPVWj49x%2Fuploads%2F8wlwgnRVwzRfCirKfsUT%2Fimage.png?alt=media&amp;token=9b32ad79-ffaa-495d-b02e-b747ba08a53f" alt=""><figcaption></figcaption></figure>

<figure><img src="https://4282324958-files.gitbook.io/~/files/v0/b/gitbook-x-prod.appspot.com/o/spaces%2F-MXep_PEmh8mDPVWj49x%2Fuploads%2Fb2QFSwRoY8RWWxs8K6ib%2Fimage.png?alt=media&amp;token=fcb9552e-14b2-4330-9011-c18313a707d9" alt=""><figcaption></figcaption></figure>

<figure><img src="https://4282324958-files.gitbook.io/~/files/v0/b/gitbook-x-prod.appspot.com/o/spaces%2F-MXep_PEmh8mDPVWj49x%2Fuploads%2F0UAAZhRGeTI6U0RTYgrs%2Fimage.png?alt=media&amp;token=c91fea78-296a-4ea4-a5b2-bcc0f670768b" alt=""><figcaption></figcaption></figure>

<figure><img src="https://4282324958-files.gitbook.io/~/files/v0/b/gitbook-x-prod.appspot.com/o/spaces%2F-MXep_PEmh8mDPVWj49x%2Fuploads%2FZ4k2hJiqhkeeTbv2hr0T%2Fimage.png?alt=media&amp;token=3265b671-d8f8-4c72-b2e3-77836530177e" alt=""><figcaption></figcaption></figure>

### Auditor Mobile Punch Enhancement (WFH & Audit Mode)

* A new mobile attendance feature is introduced for Auditors with two modes: **WFH (2 punches)** and **Audit Mode (4 punches)**.
* Users start in WFH mode and can switch to Audit Mode before punching. Each punch uses face recognition and location tracking.
* The system adjusts the punch flow based on the selected mode and tracks working hours.
* All data is available in a Custom Punch Report with access for Admin, Manager, and Employee.

**Benefit:** Improves flexibility, accuracy, and visibility of audit activities.

<figure><img src="https://content.gitbook.com/content/-MXep_PEmh8mDPVWj49x/blobs/yf7dhbzaepjadq0w7pad/Unknown%20image" alt=""><figcaption></figcaption></figure>

### Daily Attendance Report for Managers

The Daily Attendance Report is an automated email sent to managers with a summary of their team’s attendance for the day. It includes an Excel report with key attendance details.

**Report Includes:**

* Employees who logged in late
* Absent employees
* Employees on leave (with leave type)
* Employees who worked overtime
* Employees with only one punch (incomplete data)
* Employees who did not complete working hours

\*\*Note:\*\*To enable this feature, the company must share the preferred time to send the report along with company details.

![](https://content.gitbook.com/content/-MXep_PEmh8mDPVWj49x/blobs/rsfDwlyOearj0dmFttaS/Unknown%20image)

### Decimal Values in Ratings

Previously, ratings were limited to whole numbers, which restricted evaluation flexibility. With this update, users can now use half-step decimal ratings (e.g., 1.5, 2.5), allowing for more precise and accurate performance assessments.

**Key Benefits:**

* Allows decimal ratings like 1.5, 2.5, etc.
* Improves accuracy and flexibility in appraisals.
* Can be configured in Appraisal Settings.

<figure><img src="https://content.gitbook.com/content/-MXep_PEmh8mDPVWj49x/blobs/DXgFll1SSdwvlwMrZ4h7/Unknown%20image" alt=""><figcaption></figcaption></figure>

<figure><img src="https://content.gitbook.com/content/-MXep_PEmh8mDPVWj49x/blobs/ozy77EZjoyRX1dbkUxaq/Unknown%20image" alt=""><figcaption></figcaption></figure>

### PMS Display Banner

The PMS Info Banner feature allows organizations to display important messages at the top of appraisal and approval screens. It helps communicate key instructions and updates directly to users during the appraisal process. This ensures that Employees, Managers, and Admins are well-informed at every stage. By showing messages on relevant screens, it reduces confusion and improves overall clarity. It also helps in guiding users to take the right actions on time.

**Key Benefits:**

* Shows important messages for better communication
* Ensures visibility on relevant screens
* Highlights key appraisal instructions

**How it Works:**

* Can be enabled for selected screens (e.g., Appraisal, Review)
* Users can add and format messages
* The banner appears at the top for selected users

  <figure><img src="https://content.gitbook.com/content/-MXep_PEmh8mDPVWj49x/blobs/aj5JCb6aivc0BpyokJMW/Unknown%20image" alt=""><figcaption></figcaption></figure>

![](https://content.gitbook.com/content/-MXep_PEmh8mDPVWj49x/blobs/R6RAb4PrbzwQyGImVXbT/Unknown%20image)

### PMS Overall Report

The PMS Consolidated Report is a new Excel report that combines data from all appraisal stages into one. It is available to Employees, Managers, and Admins, offering a complete view of the appraisal process.

**Key Benefits:**

* Shows all appraisal stages in a single report
* Available for all user roles
* Easy access through ESS
* Helps track employee performance and progress easily

![](https://content.gitbook.com/content/-MXep_PEmh8mDPVWj49x/blobs/Oy6eKpXagUMtckHVdfWI/Unknown%20image)

![](https://content.gitbook.com/content/-MXep_PEmh8mDPVWj49x/blobs/Cba7VmGcwM5Ltg0tUFe7/Unknown%20image)

### File Upload at Stage Level

The File Upload feature, which was earlier limited to the question level, is now enhanced to support uploads at the stage level. This allows users to upload files at the end of the form, offering more flexibility in appraisal and performance processes.

**Key Benefits:**

* Enables file uploads at the stage level
* Allows uploads at the end of the form, not just per question
* Improves ease of use for admins and employees

  <figure><img src="https://content.gitbook.com/content/-MXep_PEmh8mDPVWj49x/blobs/uVoZBNjXEzoqeXuV2bMY/Unknown%20image" alt=""><figcaption></figcaption></figure>

### New Hire Alert Notification

The New Joinee Notification feature sends an email to all HR users when a new employee is added. It informs them about the PMS setup and prompts them to complete the required configuration.

**Key Benefits:**

* Sends automatic email alerts to HR users on new employee addition
* Email template can be customized as per requirements
* Helps HR ensure timely completion of onboarding steps

<figure><img src="https://content.gitbook.com/content/-MXep_PEmh8mDPVWj49x/blobs/08euQBq7BPpZEePFObPo/Unknown%20image" alt=""><figcaption></figcaption></figure>

<figure><img src="https://content.gitbook.com/content/-MXep_PEmh8mDPVWj49x/blobs/YsEg5shrIJaGFkBooytG/Unknown%20image" alt=""><figcaption></figcaption></figure>

### Custom KPI Weightage Setup

Earlier, KPI weightage was fixed and could only be assigned as a default value through the employee KPI flow. This limited the flexibility to adjust weightage based on the importance of each KPI. With the new update, employees can now assign custom weightage to individual KPIs, allowing a more flexible and tailored approach to performance evaluation. This ensures that each KPI is weighted appropriately based on its relevance and impact.

Additionally, the system provides an option to restrict the assigned weightage based on the overall KRA (Key Result Area) or sub-parameter weightage, helping maintain consistency and alignment with organizational goals.

**Key Benefits:**

* Allows employees to assign custom weightage to each KPI
* Provides flexibility to align KPIs with specific goals
* Ensures weightage control based on KRA/Sub-parameter limits

  <figure><img src="https://content.gitbook.com/content/-MXep_PEmh8mDPVWj49x/blobs/D5bfDhH6GOVrbIF5zlG9/Unknown%20image" alt=""><figcaption></figcaption></figure>

### CTC Template Duplication Across Companies

A new feature allows HRs to copy the complete CTC template, including components, structure, and formulas, within the same company or across different companies.

 This reduces time and effort by removing the need to create templates from scratch.

 HRs can easily copy and then modify the template as per their requirements, making the process more efficient.

<figure><img src="https://content.gitbook.com/content/-MXep_PEmh8mDPVWj49x/blobs/nhAOcJoGNUWPY97BFKpV/Unknown%20image" alt=""><figcaption></figcaption></figure>

### Revoke Offer Feature

The Revoke Offer feature allows HRs and recruiters to withdraw offers sent to candidates when required. This helps manage situations like no response from candidates or changes in hiring requirements, ensuring better control over the recruitment process.

**Key Points:**

* HRs can revoke offers sent to candidates
* A remark is required before revoking the offer
* All actions are recorded in the candidate’s timeline for transparency
* Helps manage offer changes or cancellations efficiently

<figure><img src="https://content.gitbook.com/content/-MXep_PEmh8mDPVWj49x/blobs/Fq8bCUBN3aXW7ol6kqAb/Unknown%20image" alt=""><figcaption></figcaption></figure>

<figure><img src="https://content.gitbook.com/content/-MXep_PEmh8mDPVWj49x/blobs/NDRoWw9ZX5pCtEyrGQDI/Unknown%20image" alt=""><figcaption></figcaption></figure>

<figure><img src="https://content.gitbook.com/content/-MXep_PEmh8mDPVWj49x/blobs/cWf6K9aPPSq19qs2WHwy/Unknown%20image" alt=""><figcaption></figcaption></figure>

### Digital Signature for HR Letter Acknowledgement

A new feature has been introduced to enable HR Letter Acknowledgement with digital signature capture, allowing organizations to manage document acknowledgements in a secure and paperless manner. HR can now send letters directly through the system and track employee acknowledgements efficiently.

**Key Points:**

* HR can send letters (policies, notices, declarations, etc.) directly from the system
* Option to mark letters as “Acknowledgement Required” with a disclaimer
* Employees can view, acknowledge, and digitally sign documents via ESS
* Multiple signature options: Draw, Type, or Upload
* Status updates to “Acknowledged” after completion, with downloadable signed PDF
* HR can track and download employee-wise acknowledged documents
* Ensures compliance, audit trail, and paperless documentation

**Link:** <https://docs.pockethrms.com/feature-guides/hr-letter-acknowledgement#hr-letter-acknowledgement>

### Increment Letter with CTC Breakdown (Old, New & Difference)

A new Increment Letter template has been introduced to help HRs clearly show salary changes by displaying old, new, and difference CTC values. This improves transparency and makes it easier for employees to understand their increment details.

**Key Points:**

* New template includes Old, New, and Difference salary placeholders
* Helps present salary changes in a clear and structured format
* HRs can preview the letter by selecting employee, month, and year
* System auto-generates a PDF with actual values
* Letter can be issued through the Employee Document screen

<figure><img src="https://content.gitbook.com/content/-MXep_PEmh8mDPVWj49x/blobs/s5iPdmOuxOeazROk53Vw/Unknown%20image" alt=""><figcaption></figcaption></figure>

<figure><img src="https://content.gitbook.com/content/-MXep_PEmh8mDPVWj49x/blobs/DrUvkYtcXAdogmYqEg3a/Unknown%20image" alt=""><figcaption></figcaption></figure>

### Payroll-Independent Appointment Letter Generation

The Appointment Letter feature has been enhanced to allow HRs to create and issue letters without processing payroll. This makes it easier to generate appointment letters for new employees.

**Key Points:**

* Payroll processing is no longer required to issue appointment letters
* HRs can create and issue letters directly for new employees
* Supports employee and payroll-related placeholders
* Allows basic calculations (\*, +, -, /) for flexible value display
* HR can select employee, month, and year to auto-fill values
* Preview option available to verify the letter before issuing

![](https://content.gitbook.com/content/-MXep_PEmh8mDPVWj49x/blobs/20s1XoydgfvOvk79v6Eq/Unknown%20image)

![](https://content.gitbook.com/content/-MXep_PEmh8mDPVWj49x/blobs/86WiH3bhjASHTtsFjSse/Unknown%20image)

### Enhanced Exit Letter Settings

The Exit Letter feature has been enhanced to provide more flexibility and control over the exit communication process. HRs can now decide both the timing of when the exit letter should be generated and the recipient to whom it should be sent. This ensures better alignment with company policies and improves communication with employees during the exit process.

**Key Points:**

* HR can choose when to trigger the letter (on separation or after Full & Final)
* Option to send the letter to official or personal email ID
* Earlier, letters were triggered only at separation with fixed email settings
* Provides more flexibility to align with company policies and communication needs

  <figure><img src="https://content.gitbook.com/content/-MXep_PEmh8mDPVWj49x/blobs/a5cuWwCPw9wYsQWXtvn3/Unknown%20image" alt=""><figcaption></figcaption></figure>

For any queries, contact <support@pockethrms.com>


# February 2026

### Product Update February 2026

We are thrilled to present our Monthly Update, with enhanced user-friendly tools to elevate your HR experience. Our commitment to innovation and efficiency drives us to bring you seamless updates that transform your HR processes. For the month of February 2026, we have the following enhancements.

### Shift Information in Regularization

• The **Attendance Regularization** menu has been enhanced to display **Shift Details** for better clarity. This feature is available on both **Mobile and Web** platforms.

• **Shift Details:** The shift information is now visible in the attendance regularization form, helping users clearly view the **shift timings and related details**.

![](https://content.gitbook.com/content/-MXep_PEmh8mDPVWj49x/blobs/8WuQ6e10CNcHVF28Z3HI/Unknown%20image)

![](https://content.gitbook.com/content/-MXep_PEmh8mDPVWj49x/blobs/DBFNzOIDbaY9QE3Jg0Ou/Unknown%20image)

### Punch-In Alert

1. The **Punch-In Reminder** feature sends shift-based reminders to employees through the **ESS/Mobile portal**.
2. Notifications can be configured in two ways through the **Go Rule Engine**:

* **Interval-based:** reminders are sent before and after shift start at a fixed interval (e.g., every 10 minutes).
* **Time-based:** HR can set specific times to send reminders.• Reminders are sent only if the employee is assigned to the shift and has **not punched in yet**.• Once the employee **punches in**, the reminders stop automatically.

![](https://content.gitbook.com/content/-MXep_PEmh8mDPVWj49x/blobs/S5pgJ08Kwao89HG0YKdo/Unknown%20image)

### Leave Credit Lapse for Multiple Frequencies

The **Leave Credit Lapse** feature, earlier available only for **monthly frequency**, has now been enhanced to support **Yearly, Quarterly, and Half-Yearly** frequencies.

\*\*Example:\*\*For **Half-Yearly frequency**, any unused leave balance will **lapse at the end of the half-year**, and the leave balance will be adjusted as per the defined credit cycle.

<figure><img src="https://content.gitbook.com/content/-MXep_PEmh8mDPVWj49x/blobs/mtCyNAX2zQotSZMpsPyV/Unknown%20image" alt=""><figcaption></figcaption></figure>

### Last Manager Approval Flow in PMS

The **PMS workflow** has been enhanced to include an **Approve/Reject option for the Last Manager**, which was not available earlier.

• If the **Last Manager rejects** the review form, the workflow will return to the **previous manager’s stage** for review and resubmission.

• The **previous manager must review and submit the form again** until it is finally approved by the Last Manager.

• Once the **Last Manager approves the form**, it will be included in the **final appraisal calculation**.

• A **mandatory “Remarks” field** has been added for the Last Manager while approving or rejecting the form to ensure proper justification and transparency.

• The **ratings given by the Previous Manager** will automatically be **copied to the “Last Manager Rating” column** after approval.

• These ratings will also be used in the **PMS reports** for accurate reporting and analysis.

![](https://content.gitbook.com/content/-MXep_PEmh8mDPVWj49x/blobs/3qsuMRqqkcTeAmgpMiV2/Unknown%20image)

### Duplicate Employee Check for Group Companies

The **Duplicate Employee Identification – Group Company** feature helps organizations detect and prevent duplicate employee records across multiple companies within the same group. It ensures data accuracy and maintains consistency in employee information across the system.

• Helps **prevent duplicate employee records** for the same person across multiple companies.

• **Alerts HR** if a possible duplicate is detected while creating or editing an employee profile.

• Maintains **clean and accurate employee data**, reducing errors in payroll and compliance.

• Prevents duplication of key records such as **PAN, PF, and ESI**.

• Enables **better tracking of an employee’s lifecycle** across group companies.

![](https://content.gitbook.com/content/-MXep_PEmh8mDPVWj49x/blobs/M0J5niPBZfR26Kyta1wD/Unknown%20image)

### HR Letter Copy Function

The **HR Letter Copy** feature allows HR teams to copy HR letter templates from one entity to another, including the current entity. This helps maintain consistency and reduces the effort required to recreate the same letters across multiple companies.

• HR can **copy one HR letter at a time** and select **multiple companies**, including the current company, where the letter needs to be copied.

• Option available to **include Header and Footer** while copying the letter.

• A **unique template name** can be assigned to the copied letter, and both the **email body and attachment** will be copied.

• Helps **reduce manual effort** and maintain **consistent HR letter formats** across entities.

• Saves time by allowing HR teams to **replicate complete templates quickly** without recreating them manually.

<figure><img src="https://content.gitbook.com/content/-MXep_PEmh8mDPVWj49x/blobs/xnG2z0ucnaUkYT1bzDKF/Unknown%20image" alt=""><figcaption></figcaption></figure>

For any queries, contact <support@pockethrms.com>


# January 2026

### Product Update January 2026

### Auto Comp-Off Expiry

Earlier, the comp-off lapse had to be processed manually through a separate screen. This has now been automated. Based on the configured lapse days, eligible comp-off balances will automatically expire after the defined period, removing the need for manual action and ensuring timely and accurate balance updates.

![](https://content.gitbook.com/content/-MXep_PEmh8mDPVWj49x/blobs/1O37wg62W363IoNIgxsC/Unknown%20image)

**Comp off Lapse Days Configuration:**

<figure><img src="https://content.gitbook.com/content/-MXep_PEmh8mDPVWj49x/blobs/sz2gyu5QKX6eocK7iqsb/Unknown%20image" alt=""><figcaption></figcaption></figure>

### Leave Balance Extraction

The Leave Balance screen now includes a Download (Excel) option. Earlier, users could only view team leave balances on the screen. With this update, managers and HR users can export leave balance details to Excel for easier review, sharing, and offline record-keeping.

![](https://content.gitbook.com/content/-MXep_PEmh8mDPVWj49x/blobs/HjMCGJSt7zDCRbIS4ja5/Unknown%20image)

### Manager Break Shift Report

The Break Shift Report in the ESS Portal allows managers to view and download break-shift attendance details of their direct reporting employees.

Managers can select one or multiple employees, choose an optional date range, and generate the report in either of the following formats:• Alternate In/Out Punches• Dedicated In/Out Flags

If no employee is selected, the report includes all employees under the manager. If no date range is selected, all available data is considered.

![](https://content.gitbook.com/content/-MXep_PEmh8mDPVWj49x/blobs/pNSxFpXNSpuKLTfiAg2m/Unknown%20image)

### Unpunched Report – Email Upgrade

The Continuous Unpunched Report email has been enhanced to include more employee details when someone has not punched in for three consecutive days.

In addition to Employee Code and Name, the email now also shows:• Reporting Manager Name• Location• Department• Category

This helps stakeholders quickly identify the employee and take necessary action without checking the system separately.

![](https://content.gitbook.com/content/-MXep_PEmh8mDPVWj49x/blobs/nShx1EIRk9V7MPFfKTlI/Unknown%20image)

### PMS Stage Activation Alert

A new notification feature has been added in PMS to inform employees when a stage becomes active in the workflow. Once a stage is activated, the system automatically notifies the relevant employees, ensuring better visibility, timely action, and smoother communication throughout the PMS cycle.

<figure><img src="https://content.gitbook.com/content/-MXep_PEmh8mDPVWj49x/blobs/1QmVErV292vJ8Od6dSgC/Unknown%20image" alt=""><figcaption></figcaption></figure>

### Custom Event Notifications

* Added configurable email and ESS notifications for key events like Profile Updates and Device Reset Requests.
* Automatically informs HR, approvers, and employees when an action is triggered or completed.
* Prevents unnoticed profile changes and pending device reset requests.
* Reduces manual follow-ups and dependency on HR calls.
* Minimizes attendance and payroll issues caused by delays.
* Improves transparency, response time, and overall employee experience.

![](https://content.gitbook.com/content/-MXep_PEmh8mDPVWj49x/blobs/LkgboZcXizRZ0Zq0fgnG/Unknown%20image)

![](https://content.gitbook.com/content/-MXep_PEmh8mDPVWj49x/blobs/iYhTy6pi2kFkOy26Y9ot/Unknown%20image)

### Draft Option for Travel & Reimbursement

* Added a **Save as Draft** option for Travel and Reimbursement Requests, allowing employees to save entries without submitting them.
* Employees can partially fill details and continue later without losing data.
* Draft requests are shown separately under **Drafted Entries**.
* Employees can edit or delete drafts before final submission.
* Only complete requests are submitted to approvers, reducing errors and rework.
* Improves flexibility, accuracy, and overall user experience.

<figure><img src="https://4282324958-files.gitbook.io/~/files/v0/b/gitbook-x-prod.appspot.com/o/spaces%2F-MXep_PEmh8mDPVWj49x%2Fuploads%2F51uuMyPGFWnqiNMIPLQj%2Fimage.png?alt=media&amp;token=6d7c4138-a55f-4019-86a0-1300d4c566b8" alt=""><figcaption></figcaption></figure>

<figure><img src="https://4282324958-files.gitbook.io/~/files/v0/b/gitbook-x-prod.appspot.com/o/spaces%2F-MXep_PEmh8mDPVWj49x%2Fuploads%2FPWvHs91ZzlF0z7QDMdFW%2Fimage.png?alt=media&amp;token=03f9cd4e-f667-431e-81e5-eb6f07bc9d81" alt=""><figcaption></figcaption></figure>

<figure><img src="https://4282324958-files.gitbook.io/~/files/v0/b/gitbook-x-prod.appspot.com/o/spaces%2F-MXep_PEmh8mDPVWj49x%2Fuploads%2FlGPcvLFlPhe82dEALtE0%2Fimage.png?alt=media&amp;token=6f036c4b-6b67-4d0b-91b9-a52198968ad8" alt=""><figcaption></figcaption></figure>

For any queries, contact <support@pockethrms.com>


# Module Guides

Detailed step-by-step guides for various modules in Pocket HRMS


# Benefit Module

### **Benefit Module**

The **Benefit Module** lets you manage employee reimbursement and flexible benefit components that form part of an employee's CTC — for example Fuel, Telephone, Driver, Medical, Internet Reimbursement, and LTA. These benefits are non-taxable when the employee submits valid supporting documents against the eligible amount.

**How benefits work**

* The company allocates a benefit amount to the employee.
* The employee submits claims with supporting documents.
* The reporting manager or admin approves the claims.
* The approved (supported) amount stays non-taxable.
* Any unclaimed or unsupported amount becomes taxable and is moved to the mapped taxable head during Year-End processing.

**For example:**

if an employee is eligible for ₹10,000 and submits support for ₹8,000, then ₹8,000 is tax-free and the remaining ₹2,000 becomes taxable.

### **How to Configure the Benefit Module?**

This section covers everything needed to set up the Benefit Module before any transactions begin — from creating the components to configuring settings and notifications.

**1. Create the Benefit Components**

**Path:** Settings > Payroll > Salary Components.

**Step 1:** Log in to the **Cloud portal**, go to **Settings**, then **Payroll**, and open **Salary Components.**

<figure><img src="https://content.gitbook.com/content/-MXep_PEmh8mDPVWj49x/blobs/uufMJPbQvvNiPpB4qG8f/Unknown%20image" alt=""><figcaption></figcaption></figure>

**Step 2:** Click the **+ (Add Component)** button.

<figure><img src="https://content.gitbook.com/content/-MXep_PEmh8mDPVWj49x/blobs/XFOMQKANOMh6lgSYTqaI/Unknown%20image" alt=""><figcaption></figcaption></figure>

**Step 3:** Create the benefit component with these details

**Field Name** (short code), **Label Name** (full benefit name), **Component Type** (Reimbursement)

![](https://content.gitbook.com/content/-MXep_PEmh8mDPVWj49x/blobs/0h8K51b12mmg9nDe4emC/Unknown%20image)

**Frequency** (Monthly or Annual),

<figure><img src="https://content.gitbook.com/content/-MXep_PEmh8mDPVWj49x/blobs/ZnFbA6TKMxGydoS1qHBp/Unknown%20image" alt=""><figcaption></figcaption></figure>

and **LOP Effect** (applies to Monthly benefits only).

![](https://content.gitbook.com/content/-MXep_PEmh8mDPVWj49x/blobs/4PRO0aWd7MGyJDutyJ5E/Unknown%20image)

**Step 4:** Create a **matching taxable component** for the benefit.

Name it **after the benefit** (for example, **Telephone Reimbursement Taxable**), set its behaviour to **Monthly** Input Component, and mark it as **Taxable**. This is used to transfer unsupported amounts during Year-End.

<figure><img src="https://content.gitbook.com/content/-MXep_PEmh8mDPVWj49x/blobs/XmAgdeLa2WdCkyyg9OOO/Unknown%20image" alt=""><figcaption></figcaption></figure>

**Step 5 (optional):** To show the benefit amount on **payslips or salary registers**, create a display component set to Include in **Gross**, with a **Percentage** formula mapped to the benefit component.

![](https://content.gitbook.com/content/-MXep_PEmh8mDPVWj49x/blobs/wGqtxLl4G4NyCjuWsahy/Unknown%20image)

**2. Map Components to the Salary Structure**

**Path:** Payroll > Salary Structure

**Step 1:** Go to **Payroll,** then open **Salary Structure.**

<figure><img src="https://content.gitbook.com/content/-MXep_PEmh8mDPVWj49x/blobs/0gNPQrZGah8DACMMJoJb/Unknown%20image" alt=""><figcaption></figcaption></figure>

**Step 2:** Select the appropriate category, Locate the **benefit component**, click the **three dots**, and click **Edit**. Set the component as **Direct**, then **Save**.

![](https://content.gitbook.com/content/-MXep_PEmh8mDPVWj49x/blobs/sMR6mDaUZFVvAWbWmXn7/Unknown%20image)

<figure><img src="https://content.gitbook.com/content/-MXep_PEmh8mDPVWj49x/blobs/TvgJftL1733F0Svh3gSR/Unknown%20image" alt=""><figcaption></figcaption></figure>

**Step 3:** Locate the corresponding **taxable component** and do the same — set it as **Direct** and **Save**.

![](https://content.gitbook.com/content/-MXep_PEmh8mDPVWj49x/blobs/ISmZExtXrCyga8yFXHEZ/Unknown%20image)

**Step 4 (optional):** If you created a **payslip component**, locate it, set it as **Percentage**, add the benefit component in the **Percentage Formula**, and **Save**.

![](https://content.gitbook.com/content/-MXep_PEmh8mDPVWj49x/blobs/P6JmnRwbkh5a74Y1DMR6/Unknown%20image)

**3. Configure Benefit Settings**

**Financial Year Settings**

Path: Benefit > Settings > Financial Year Settings

set the **financial year, payroll cut-off, posting dates, and benefit processing rules**.

![](https://content.gitbook.com/content/-MXep_PEmh8mDPVWj49x/blobs/hSOBKoZ6D7nu1ArpZNgN/Unknown%20image)

<figure><img src="https://content.gitbook.com/content/-MXep_PEmh8mDPVWj49x/blobs/DfO5R0oQm6fXEb7zxeqc/Unknown%20image" alt=""><figcaption></figcaption></figure>

**Categories**

Path: Benefit > Categories

assign benefits by category (for example, Management gets Fuel, Telephone, and Driver). For each category, set the component mapping, display sequence, income tax matching, and order number.

![](https://content.gitbook.com/content/-MXep_PEmh8mDPVWj49x/blobs/ZODL951KvjKCaZlaJjXo/Unknown%20image)

**Notification Settings**

Path: Benefit > Notification Settings) —

set up notifications for claim submission, manager approval, claim rejection, and final approval.

![](https://content.gitbook.com/content/-MXep_PEmh8mDPVWj49x/blobs/T7OTdZPnGHyROhmaRUIR/Unknown%20image)

**Tax Matching**

Income Tax > Income Matching

map each **benefit component** to its **taxable component**. Set Projection to **No**, Section **to Gross 17(1),** and **Tax Deduction Mode** to **Normal** or **One-Time**

![](https://content.gitbook.com/content/-MXep_PEmh8mDPVWj49x/blobs/G1fGviJfMxZU4iJ8SE43/Unknown%20image)

**4. Approval Matrix**

Before approving claim entries, you need to assign managers through the Approval Matrix.

**Follow the process given here to configure Approval Matrix:** [https://docs.pockethrms.com/hr-and-admin-portal/cloud-configuration/employee-management/approval-matrix#how-to-view-or-add-approver-for-an-employee](https://docs.pockethrms.com/hr-and-admin-portal/cloud-configuration/employee-management/approval-matrix%23how-to-view-or-add-approver-for-an-employee)

<figure><img src="https://content.gitbook.com/content/-MXep_PEmh8mDPVWj49x/blobs/7eeQP4IgbbWPostm3VrP/Unknown%20image" alt=""><figcaption></figcaption></figure>

### **How To Do Transactions in Benefit Module?**

This section covers the day-to-day operations — allocating benefits, entering and approving claims, running the payout and payroll, reporting, and year-end and exit settlements.

**5. Allocate Benefits to Employees**

**Path:** Employee Profile > Salary > Benefit Components

**Step 1:** Open the **employee's profile**, go to **Salary**, then **Benefit Components**.

![](https://content.gitbook.com/content/-MXep_PEmh8mDPVWj49x/blobs/Z0p4wHO0EQSqmZ3Rrs7J/Unknown%20image)

**Step 2:** Set the **Opening Amount** (their eligibility), the **Effective Date**, and the **Component Type** (Monthly or Annual).

<figure><img src="https://content.gitbook.com/content/-MXep_PEmh8mDPVWj49x/blobs/ZmiRCgDvpYJVwkfQu7sw/Unknown%20image" alt=""><figcaption></figcaption></figure>

The effective date is 1st April for existing employees, or the date of joining for new joiners.

**Step 3:** For large numbers of employees, use **Bulk Import** instead (Benefit > Import). Use the component's Field Name in the import file, with columns for Employee Code, Benefit Field Name, Fixed Current Entitlement, Effective Date, Opening Accumulative Amount, and Opening Balance Excess Amount.

**6. Enter Claims**

Path: Benefit > Claim Entry

**Step 1:** **HR/Admin** can enter a claim,

filling in the **benefit component, claim date, bill date, bill number, claimed amount, remarks,and supporting documents.**

<figure><img src="https://content.gitbook.com/content/-MXep_PEmh8mDPVWj49x/blobs/Nn15a4jsifFpDWAJSHnh/Unknown%20image" alt=""><figcaption></figcaption></figure>

**Step 2:** Employees can submit their own claims via ESS under Benefit > Request Claim Entry — select the component, enter the bill details and amount, upload documents, add remarks, save, then final submit.

![](https://content.gitbook.com/content/-MXep_PEmh8mDPVWj49x/blobs/XhtQ3CLRNwcmZ5tdrH9M/Unknown%20image)

**How claims are handled**

* The bill date must fall within the claim month (a September claim needs a September bill).
* Over-claiming is allowed, but only the eligible amount is processed; the rest adjusts in future cycles.
* Unused amounts carry forward and add to the next month's eligibility.
* Monthly benefits are prorated for LOP, based on present days out of total days.

**7. Approve Claims**

**Step 1:** Make sure the **Approval Matrix** is configured, with Benefit Module set to Yes, Approval Required set to Yes, and Approval on Cancel set to Yes.

**Step 2:** The manager reviews claims under Benefit, the Unapproved Claims viewing the claim, checking the documents, adding remarks, and approving or rejecting.

![](https://content.gitbook.com/content/-MXep_PEmh8mDPVWj49x/blobs/KzTXROFnOGV0owp6I6Rv/Unknown%20image)

**8. Run the Monthly Payout**

**Path:** Benefit > Utilities > Monthly Payout

**Step 1:** Go to **Benefit**, then **Utilities**, and open **Monthly Payout**.

![](https://content.gitbook.com/content/-MXep_PEmh8mDPVWj49x/blobs/wihUcX6NyRDi4hWwW1dr/Unknown%20image)

**Step 2:** Select the month and process the payout.

![](https://content.gitbook.com/content/-MXep_PEmh8mDPVWj49x/blobs/i7SPl6SX8REVvRVBsIaL/Unknown%20image)

**Important Note:** Monthly Payout is mandatory before payroll processing. Payroll will not run until the payout has been executed — and it must be run even when the claim value is zero.

**9. Payroll**

After the monthly payout, approved benefits reflect in salary, benefit components appear on the payslip (if configured), and taxable amounts appear under their taxable heads. Payroll then processes normally.

**10. Reports**

The module provides several reports: Benefit Claim Report, Manager Remarks Report, Approval Status Report, Benefit Register, Employee Benefit Ledger, and Monthly Payout Report. Between them they show claim amounts, approved amounts, pending claims, manager remarks, and taxable transfer details.

<img src="https://content.gitbook.com/content/-MXep_PEmh8mDPVWj49x/blobs/9qvLXmbaKyO5HD1LaL9d/Unknown%20image" alt="" width="375">

**My Report** — employee's own benefit and claim details.

![](https://content.gitbook.com/content/-MXep_PEmh8mDPVWj49x/blobs/O9EoZOCpWGtntKLuMz53/Unknown%20image)

**My Team Report** — manager's view of their team's claims.

**Employee Report** — admin's view across all employees.

<figure><img src="https://content.gitbook.com/content/-MXep_PEmh8mDPVWj49x/blobs/xEuQr92P79Ghj2lRO60v/Unknown%20image" alt=""><figcaption></figcaption></figure>

**11. Year-End Process**

**Path:** Benefit > Utilities > Year End Process

**Step 1:** Go to Benefit, then Utilities, and open Year End Process.

**Step 2:** For March, run the Year-End Process instead of the Monthly Payout — for a single employee or all employees.

![](https://content.gitbook.com/content/-MXep_PEmh8mDPVWj49x/blobs/opsAH3PAEMbFk13ukcRz/Unknown%20image)

The system then calculates total eligibility, claimed amount, supported amount, and unclaimed amount, and transfers the balance to the mapped taxable head.

**12. Full & Final (F\&F) Process**

**Path:** Benefit > Utilities > F\&F Process

Run this when an employee exits the organization.

**Step 1:** Complete any pending claim entries.

**Step 2:** Process the employee's separation.

**Step 3:** Run the Benefit F\&F Process (Benefit > Utilities > F\&F Process).

**Step 4:** Execute the Full & Final settlement.

**Step 5:** Compute the income tax impact.

![](https://content.gitbook.com/content/-MXep_PEmh8mDPVWj49x/blobs/QAQNhPsXqQd2jNj6Jzip/Unknown%20image)

**Best Practices**

* Create the benefit and taxable heads together.
* Set up income tax matching right after creating the components.
* Run the monthly payout before every payroll cycle.
* Make sure the Approval Matrix is configured.
* Check that bill dates belong to the claim month.
* Use bulk import for large employee populations.
* Run the year-end process before March payroll closure.
* Complete claim processing before F\&F settlement.

**Path Link:** [**https://cloud.pockethrms.com/Employee/Employee/Profile?module=monthlypayout\&employeeID=10327\&empstatus=1**](https://cloud.pockethrms.com/Employee/Employee/Profile?module=monthlypayout\&employeeID=10327\&empstatus=1)

**For any queries, contact** <support@pockethrms.com>


# Confirmation Module

### Confirmation Module

The confirmation module is designed to effectively manage employee confirmations, extensions, and rejections. The module helps managers and HR to coordinate better and keeps everyone appropriately informed about various stages in the confirmation process.

The confirmation module can be configured according to your company policies with the help of various settings. You can set priorities whether the first-level manager (L1) and second-level manager (L2) are involved, followed by HR through approval matrix.

The system also allows you to configure criteria, reminders, select letter templates, and feedback systems to ensure a smooth and efficient employee status transition. Below is a complete step-by-step guide on how the process operates based on these settings.

### 1. How to do settings or configurations for employee confirmation?

**Step 1**: Log into the cloud portal and to configure the confirmation module, go to the ‘Settings’ menu and under the ‘HR’ tab click on the ‘Confirmation Module’ subtab.

On this page, you can do various settings.

![](https://4282324958-files.gitbook.io/~/files/v0/b/gitbook-x-prod.appspot.com/o/spaces%2F-MXep_PEmh8mDPVWj49x%2Fuploads%2FJsOgebK7VUWHOlqm9jOG%2F0.png?alt=media)

**Step 2**: Fill in the details in various fields according to your requirements.

Given below is a on various fields and options, and how you can use those to improve your confirmation process.

#### Confirmation Date Based On:

In this field select a suitable parameter option on which your confirmation process in based. For example, ‘Confirmation Date’.

#### Training Period:

If your company has a training period, slide on the toggle for the ‘Training Period’ field.

If the company doesn’t have a training period, move directly to the ‘Probation Period’ field.

#### Manager Approval Required:

* No - If manager approval is not required for the confirmation
* Click on the ‘Save’ button and the employee will be confirmed automatically once their probation period is completed.

![](https://4282324958-files.gitbook.io/~/files/v0/b/gitbook-x-prod.appspot.com/o/spaces%2F-MXep_PEmh8mDPVWj49x%2Fuploads%2Fr6Lkq84OerMqXO5zgpUS%2F1.png?alt=media)

* Yes - If manager approval is required to confirm the employee.

The additional fields will appear below, so you can configure various aspects such as approval, rejection, reminders and notifications efficiently.

![](https://4282324958-files.gitbook.io/~/files/v0/b/gitbook-x-prod.appspot.com/o/spaces%2F-MXep_PEmh8mDPVWj49x%2Fuploads%2FAA1y571NMMsXpFPkxDQ9%2F2.png?alt=media)

#### HR Approval Required (Yes/No):

* No -The status selected by the manager will be considered as the final decision. (confirm/reject/extend).
* Yes - The confirmation will flow to HR after the manager, and HR will take the final decision.

![](https://4282324958-files.gitbook.io/~/files/v0/b/gitbook-x-prod.appspot.com/o/spaces%2F-MXep_PEmh8mDPVWj49x%2Fuploads%2Fe2iNcBO6CyKPIpHBAfSH%2F3.png?alt=media)

#### Reminder Configuration:

* Yes – The system allows you to set the frequency for reminders to notify the manager about the employee's upcoming confirmation date.
* ‘+’ (Plus Icon) - Add additional reminders.
* ‘-‘ (Minus Icon) - Remove a reminder.
* Notify Higher Managers – Allows you to dd Level 2, Level 3 managers and HR to be notified in the reminder.

So, they can take action on the confirmation if the Level 1 manager does not.

Example:

* If the first frequency field is set to ‘2’ days, as the first reminder before the confirmation date, the manager will receive an email and ESS notification.
* Click on the ‘+’ button to add another reminder, ‘1’ day before the confirmation date.
* Through the ‘Notify Higher Managers’ field, we select ‘HR’ and ‘Level 2’ managers. They will be notified ‘1’ day before along with the manager. If the first level manager doesn’t act on the confirmation then they can.

![](https://4282324958-files.gitbook.io/~/files/v0/b/gitbook-x-prod.appspot.com/o/spaces%2F-MXep_PEmh8mDPVWj49x%2Fuploads%2FWilCiVTnYdtVECde0M86%2F4.png?alt=media)

#### Probation Extension Period:

Set the ‘number of days’ the probation will be extended for

#### Probation Extended Letter Required:

No - If you don’t want to send a probation extension letter to the employee.

Yes - If you want to be sent a probation extension letter to the employee.

#### Select HR Letter:

From the dropdown select the ‘Extension Letter Template’ to be sent to employees.

**Note**: If the letter template is not created in the HR Letter, please create it first.

![](https://4282324958-files.gitbook.io/~/files/v0/b/gitbook-x-prod.appspot.com/o/spaces%2F-MXep_PEmh8mDPVWj49x%2Fuploads%2FySF7XXxs0ZgCtyKXS1EI%2F5.png?alt=media)

#### Feedback Required from Employee If Rejected:

No - Feedback won’t be sent to the employee in case of rejection.

Yes – In case you want to send a feedback to the employee if the manager rejects or extends the confirmation.

* If the employee accepts the rejection/extension, the process will stop, and the status will be marked as rejected/extended.
* If the employee does not accept, it will go to HR for final confirmation/extension/rejection.

![](https://4282324958-files.gitbook.io/~/files/v0/b/gitbook-x-prod.appspot.com/o/spaces%2F-MXep_PEmh8mDPVWj49x%2Fuploads%2FzGh2yFMRyeWhxKWiBYNc%2F6.png?alt=media)

#### If Manager Extends, HR Approval

Required – HR will be involved in the final confirmation/extension/rejection process.

Not Required - HR will not be involved, and the process will only depend on the manager's decision.

![](https://4282324958-files.gitbook.io/~/files/v0/b/gitbook-x-prod.appspot.com/o/spaces%2F-MXep_PEmh8mDPVWj49x%2Fuploads%2F54w5w4yftqNyeF5lra6o%2F7.png?alt=media)

#### Custom Form Required:

Yes - A custom form needs to be created.

No - The default form will be used.

#### Confirmation Letter Required

No – A Confirmation letter will not be sent to the employee.

Yes – A Confirmation letter will be sent to the employee.

#### Select HR Letter:

Choose the Confirmation Letter to be sent to the employee

**Note**: If the confirmation letter template is not created in the HR Letter, please create it.

![](https://4282324958-files.gitbook.io/~/files/v0/b/gitbook-x-prod.appspot.com/o/spaces%2F-MXep_PEmh8mDPVWj49x%2Fuploads%2FBkqlDktVGdnarkQQSNPJ%2F8.png?alt=media)

#### Notification for Extended Confirmation to HR:

Set the number of days before the extended confirmation end date when the manager will be notified.

**Example**: If set to 2 days, the manager will be notified 2 days before the employee’s extended confirmation end date via email and on the ESS portal.

#### Share Notification with HR (Confirmation Extension):

Yes – A notification will be sent to HR about the confirmation extension.

No - HR will not be notified of confirmation extension.

![](https://4282324958-files.gitbook.io/~/files/v0/b/gitbook-x-prod.appspot.com/o/spaces%2F-MXep_PEmh8mDPVWj49x%2Fuploads%2FgtzqE3i7smoHLwFWlMBj%2F9.png?alt=media)

#### Probation Rejection Letter Required:

* No – A rejection letter will not be sent.
* Yes - The rejection letter will be sent to the employee.

#### Select HR Letter

Select the rejection letter template to be sent to the employee.

![](https://4282324958-files.gitbook.io/~/files/v0/b/gitbook-x-prod.appspot.com/o/spaces%2F-MXep_PEmh8mDPVWj49x%2Fuploads%2FlpkBh8MyXac6xUkXCkHC%2F10.png?alt=media)

#### Required Probation Rating:

* **Yes** - Dropdown will appear to select probation ratings (e.g., Rating 1: Poor Performance, Rating 5: Excellent Performance).

The selected ratings will be displayed on the employee's confirmation page so they can view their performance evaluation.

* **No** – Ratings won’t be displayed in the rating overview.

**Step 3**: Once all the required configurations are made click on the ‘Save’ button and the settings will be saved for the confirmation module accordingly.

![](https://4282324958-files.gitbook.io/~/files/v0/b/gitbook-x-prod.appspot.com/o/spaces%2F-MXep_PEmh8mDPVWj49x%2Fuploads%2Fg0CXUKOdZZUI0ZDZTlrg%2F11.png?alt=media)

### 2. How to create a custom form for the confirmation module?

**Step 1**: Log into the cloud portal, go to the ‘Settings’ menu, and under the ‘HR’ tab click on the ‘Field Creation’ subtab.

**Step 2**: Click the ‘+’ icon towards the upper right side of the screen. The Field Creation pop-up window will open which allows you to create a new parameter.

![](https://4282324958-files.gitbook.io/~/files/v0/b/gitbook-x-prod.appspot.com/o/spaces%2F-MXep_PEmh8mDPVWj49x%2Fuploads%2F2BQsKkKySBiAu3eS87JF%2F12.png?alt=media)

**Step 3**: Fill in the details in the Field creation pop-up as described below.

![](https://4282324958-files.gitbook.io/~/files/v0/b/gitbook-x-prod.appspot.com/o/spaces%2F-MXep_PEmh8mDPVWj49x%2Fuploads%2FO3tpNV1v4cws3grWH3AU%2F13.png?alt=media)

**Select Module**

Choose ‘Confirmation’ from the drop-down list. This will indicate that the new parameter belongs to the Confirmation Module.

**Field Name**:

Provide a Unique Identifier for the field. This will be used in the backend system to store and reference the field's value.

**Field Type**:

Select the Field Type based on the kind of input or data expected from the user. For example, Text, Checkbox, Date, Dropdown, and Text Area.

**Field Value**:

For the selected Field Type, provide the corresponding value or options.

For example:

* If it's a Dropdown, input the options from which the user can choose such as Approve, Reject, Pending.
* If it’s a Checkbox, it may only have Yes or No options.
* Example: If the Field Type is ‘Dropdown’, the field values can be ‘Approved’, ‘Reject’ and ‘Pending’.

**Label Name**:

A label name is a description that will be displayed to the user alongside the field on the confirmation form to help them understand the purpose of the field.

**Panel Name**:

Panel Name helps break the form into smaller manageable sections of relatable fields. That makes it easier for users to navigate and fill out the form.

**Step 4**: Fill in additional fields as required to enhance the field configurations.

**Is Mandatory**:

Select the checkbox to make the field mandatory. This ensures that the user cannot submit the form without completing the field.

**Order:**

Specify the order number for this field or question to determine its position in the sequence of questions or sections on the confirmation form.

**Step 5:** Click on the ‘Save’ button to save the Field Configuration. The new field will be added to the Confirmation Form accordingly.

**Step 6**: Repeat the process above to create more fields according to the requirements.

Summary of Key Fields

**Field Name**: Unique system identifier for the field (backend reference).

**Field Type**: Type of input expected (e.g., Text, Date, Dropdown).

**Field Value**: Values or options for the field (e.g., Yes/No, list of options).

**Label Name**: The label is displayed to the user alongside the field.

**Panel Name**: Logical grouping or section name for the field.

**Is Mandatory**: Marks to make field mandatory.

**Order**: The position of the field in the form.

This is the process for creating a Custom Form for the Confirmation Module in the system.

### 3. How to view, provide ratings and approve or reject employee confirmation as manager?

**Step 1**: Log into the ESS portal with the manager’s credentials (rights). Go to the ‘Confirm’ menu and click on the ‘Approval’ submenu.

![](https://4282324958-files.gitbook.io/~/files/v0/b/gitbook-x-prod.appspot.com/o/spaces%2F-MXep_PEmh8mDPVWj49x%2Fuploads%2F9O4oU0CpNzWQr4W4ne2T%2F14.png?alt=media)

**Step 2**: Under the ‘Manager Approval’ tab you will find the list of pending employee confirmation entries. Click on the ‘Manager Status’ button to fill out the Confirmation form configured in the system.

![](https://4282324958-files.gitbook.io/~/files/v0/b/gitbook-x-prod.appspot.com/o/spaces%2F-MXep_PEmh8mDPVWj49x%2Fuploads%2FWwWeeuuqBq5pw4F1jJ5W%2F15.png?alt=media)

**Step 3**: Select appropriate options to evaluate the employee’s performance.

**Step 4**: Choose your ‘Final Recommendation’ option from the drop down such as Confirm, Probation Extended or Probation Rejected.

![](https://4282324958-files.gitbook.io/~/files/v0/b/gitbook-x-prod.appspot.com/o/spaces%2F-MXep_PEmh8mDPVWj49x%2Fuploads%2Fx8n60kp1cem9cSRvYhEz%2F16.png?alt=media)

**Step 5**: Click on the ‘Submit’ button and your response to employee confirmation will be saved accordingly.

Based on the approval matrix the confirmation request will then flow to L2 (Level 2) and L3 (level 3) managers for approval, before being sent to HR.

**Note**: The L2 and L3 managers can follow the above steps for employee confirmation.

### 4. How to view responses by the managers, provide ratings and approve or reject employee confirmation as an HR?

**Step 1**: Log into the ESS portal with the manager’s credentials (rights). Go to the ‘Confirm’ menu and click on the ‘HR Approval’ submenu.

![](https://4282324958-files.gitbook.io/~/files/v0/b/gitbook-x-prod.appspot.com/o/spaces%2F-MXep_PEmh8mDPVWj49x%2Fuploads%2FERbDCu5HtQyTlCimx0Xu%2F17.png?alt=media)

**Step 2**: Under the ‘HR Approval’ tab, you will find the list of pending employee confirmation entries.

**Step 3**: Click on the ‘Details’ button to view the forms submitted by the managers at various levels.

![](https://4282324958-files.gitbook.io/~/files/v0/b/gitbook-x-prod.appspot.com/o/spaces%2F-MXep_PEmh8mDPVWj49x%2Fuploads%2FUnHtbN2foufbO89nJZnj%2F18.png?alt=media)

**Step 4**: Click the ‘Download’ button to view the forms submitted by the managers at various levels.

![](https://4282324958-files.gitbook.io/~/files/v0/b/gitbook-x-prod.appspot.com/o/spaces%2F-MXep_PEmh8mDPVWj49x%2Fuploads%2FrioCWg2vddGGtPendaGi%2F19.png?alt=media)

**Step 5**: Click the ‘Manager Status’ button to fill out the Confirmation form configured in the system.

![](https://4282324958-files.gitbook.io/~/files/v0/b/gitbook-x-prod.appspot.com/o/spaces%2F-MXep_PEmh8mDPVWj49x%2Fuploads%2FVSTU1jVBRTFcpmMD7pjH%2F20.png?alt=media)

**Step 6**: Select the details, ‘Final Recommendation’ and enter Remarks as required. Click the ‘Submit’ button and your response to employee confirmation will be saved accordingly.

**Note**: Below the ‘Submit’ button you can view the Remark and Recommendation by the manager along with the manager’s name.

According to the Final Recommendation selected by HR, the process will flow as listed below.

**Confirm**

* The employee will receive the Confirmation Letter in their ESS Portal and via email.

**Probation Extended**

* The employee's confirmation date will be extended as configured.
* The employee will receive a Probation Extension Letter (if configured), in their ESS Portal and via email.

**Probation Rejected**

* The employee will receive a Probation Rejection Letter (if configured) in their ESS Portal and via email
* The HR will initiate the separation process.

### How To View My Confirmation As An Employee?

The Employee is notified of any changes in their probationary period by the system. In both cases, they are required to perform some steps to acknowledge the same. Hence, we need to consider 2 different cases:

* Confirmation
* Probation Extension

### **How to view my Confirmation for the job?**

**Step 1**: Log into the ESS portal and go to Confirm > My Confirmation.

![](https://4282324958-files.gitbook.io/~/files/v0/b/gitbook-x-prod.appspot.com/o/spaces%2F-MXep_PEmh8mDPVWj49x%2Fuploads%2FVHa3rXoQQdIFy5USllgo%2FConfirmation%20Employee%201.1.png?alt=media\&token=a6c7cf8d-0798-4414-ae59-2a847934e9df)

**Step 2:** Select the ‘Employee Confirmation’ tab.

![](https://4282324958-files.gitbook.io/~/files/v0/b/gitbook-x-prod.appspot.com/o/spaces%2F-MXep_PEmh8mDPVWj49x%2Fuploads%2FTx3CBTvSf250z7h7eEVj%2FConfirmation%20Employee%201.2.png?alt=media\&token=467d2e29-5278-4e21-98d3-362ab0693eb4)

**Step 3:** The following information will be visible. You can select the ‘Download Confirmation Letter’ button to download the confirmation letter or select the ‘Details’ button to view further details.

![](https://4282324958-files.gitbook.io/~/files/v0/b/gitbook-x-prod.appspot.com/o/spaces%2F-MXep_PEmh8mDPVWj49x%2Fuploads%2FqFvEIIaiodEa3xMvw1Cb%2FConfirmation%20Employee%201.3.png?alt=media\&token=c6b9918a-f29f-450b-b234-d6f08427884b)

### **How to view the Probation Extension?**

**Step 1**: Log into the ESS portal and go to Confirm > My Confirmation.

![](https://4282324958-files.gitbook.io/~/files/v0/b/gitbook-x-prod.appspot.com/o/spaces%2F-MXep_PEmh8mDPVWj49x%2Fuploads%2FVHa3rXoQQdIFy5USllgo%2FConfirmation%20Employee%201.1.png?alt=media\&token=a6c7cf8d-0798-4414-ae59-2a847934e9df)

**Step 2:** Select the ‘Employee Confirmation’ tab.

![](https://4282324958-files.gitbook.io/~/files/v0/b/gitbook-x-prod.appspot.com/o/spaces%2F-MXep_PEmh8mDPVWj49x%2Fuploads%2FTx3CBTvSf250z7h7eEVj%2FConfirmation%20Employee%201.2.png?alt=media\&token=467d2e29-5278-4e21-98d3-362ab0693eb4)

**Step 3:** The following information will be visible. If the employee agrees with the decision, they can select the ‘Agree’ button and the confirmation date will be extended.

![](https://4282324958-files.gitbook.io/~/files/v0/b/gitbook-x-prod.appspot.com/o/spaces%2F-MXep_PEmh8mDPVWj49x%2Fuploads%2FXGYVs2nWB6xjO3TEeZui%2FConfirmation%20Employee%202.3.png?alt=media\&token=298d119e-151f-48df-9b82-6cff48f66520)

**Step 4:** If the employee disagrees with the decision, they can select the ‘**Disagree**’ button, enter their comments and click on the ‘**Save**’ button.

![](https://4282324958-files.gitbook.io/~/files/v0/b/gitbook-x-prod.appspot.com/o/spaces%2F-MXep_PEmh8mDPVWj49x%2Fuploads%2FMm78mHIqtqUDAWdz1F4q%2FConfirmation%20Employee%202.4.png?alt=media\&token=d8f348ac-db8f-469e-9f5a-1388d94c8631)

### **Confirmation In Pocket HRMS 2.0 Mobile App**

### **How To Check Your Confirmation Status in Pocket HRMS 2.0 Mobile Application?** <a href="#how-to-check-your-confirmation-status-in-pocket-hrms-2.0-mobile-application" id="how-to-check-your-confirmation-status-in-pocket-hrms-2.0-mobile-application"></a>

**Path**: Login to mobile app of Pocket HRMS 2.0 > click on 3 horizontal lines > Confirmation > My Confirmation

**Step 1:** Login to **Pocket HRMS 2.0 mobile app**, then tap on the **three horizontal lines** (hamburger menu) located at the top left corner.

<img src="https://docs.pockethrms.com/~gitbook/image?url=https%3A%2F%2F4282324958-files.gitbook.io%2F%7E%2Ffiles%2Fv0%2Fb%2Fgitbook-x-prod.appspot.com%2Fo%2Fspaces%252F-MXep_PEmh8mDPVWj49x%252Fuploads%252FPjy2ENe4kdC4ciCAp59V%252F1.png%3Falt%3Dmedia%26token%3De869a95a-aaa8-4b82-94aa-05edbd2b5345&#x26;width=768&#x26;dpr=3&#x26;quality=100&#x26;sign=60961a4a&#x26;sv=2" alt="" width="375">

**Step 2:** Scroll down and select **'Confirmation’,** and Click on **'My Confirmation'**.

<img src="https://docs.pockethrms.com/~gitbook/image?url=https%3A%2F%2F4282324958-files.gitbook.io%2F%7E%2Ffiles%2Fv0%2Fb%2Fgitbook-x-prod.appspot.com%2Fo%2Fspaces%252F-MXep_PEmh8mDPVWj49x%252Fuploads%252FlBRroN6qAa4YsloRyjr9%252F2.png%3Falt%3Dmedia%26token%3D18608f82-9adc-4a92-8071-540ce91ab0a1&#x26;width=768&#x26;dpr=3&#x26;quality=100&#x26;sign=16e273d0&#x26;sv=2" alt="" width="375">

**Step 3:** View your confirmation status. You will see:

* Your **employee name**, **department**, **employee ID**, and **joining date**
* Your **confirmation status** (Confirmed, Extended, Pending, or Rejected)

<img src="https://docs.pockethrms.com/~gitbook/image?url=https%3A%2F%2F4282324958-files.gitbook.io%2F%7E%2Ffiles%2Fv0%2Fb%2Fgitbook-x-prod.appspot.com%2Fo%2Fspaces%252F-MXep_PEmh8mDPVWj49x%252Fuploads%252FUMzNnvj0bf415gN8v5VM%252F3.png%3Falt%3Dmedia%26token%3D7b37df04-95c2-4212-8c1a-9bc835bc78d9&#x26;width=768&#x26;dpr=3&#x26;quality=100&#x26;sign=352445a6&#x26;sv=2" alt="" width="375">

**Step 4:** If your status is **CONFIRMATION CONFIRMED** (green), tap **'DOWNLOAD CONFIRMATION LETTER'** to download and save your confirmation letter.

<img src="https://docs.pockethrms.com/~gitbook/image?url=https%3A%2F%2F4282324958-files.gitbook.io%2F%7E%2Ffiles%2Fv0%2Fb%2Fgitbook-x-prod.appspot.com%2Fo%2Fspaces%252F-MXep_PEmh8mDPVWj49x%252Fuploads%252FS9i4u8WmkOS5eghJ5LAS%252F4.png%3Falt%3Dmedia%26token%3D7549ea2a-0e0c-4255-9fd3-e7725c3bbc45&#x26;width=768&#x26;dpr=3&#x26;quality=100&#x26;sign=8ea2ad26&#x26;sv=2" alt="" width="375">

**Step 5:** To view the manager's feedback and evaluation, tap **'VIEW MANAGER REMARKS'**.

<img src="https://docs.pockethrms.com/~gitbook/image?url=https%3A%2F%2F4282324958-files.gitbook.io%2F%7E%2Ffiles%2Fv0%2Fb%2Fgitbook-x-prod.appspot.com%2Fo%2Fspaces%252F-MXep_PEmh8mDPVWj49x%252Fuploads%252FTtCf7y4fuXFpNcmgxqLz%252F5.png%3Falt%3Dmedia%26token%3D204a2176-1cba-4ae2-99e0-045fafe138fe&#x26;width=768&#x26;dpr=3&#x26;quality=100&#x26;sign=14fadbaf&#x26;sv=2" alt="" width="375">

**Step 6:** In the **Manager Remarks** screen, you can see:

* Manager's name and designation
* Manager's recommendation and review date
* **Detailed Evaluation tab** showing criteria assessed, ratings, and remarks
* Tap **'DOWNLOAD FORM'** to save the evaluation form as PDF

<img src="https://docs.pockethrms.com/~gitbook/image?url=https%3A%2F%2F4282324958-files.gitbook.io%2F%7E%2Ffiles%2Fv0%2Fb%2Fgitbook-x-prod.appspot.com%2Fo%2Fspaces%252F-MXep_PEmh8mDPVWj49x%252Fuploads%252FExJbD5tiaoTjewQHj3gm%252F6.png%3Falt%3Dmedia%26token%3D79bb9066-2ed0-4d1a-ae8e-6eeca2c9c82d&#x26;width=768&#x26;dpr=3&#x26;quality=100&#x26;sign=c90ec590&#x26;sv=2" alt="" width="375">

<img src="https://docs.pockethrms.com/~gitbook/image?url=https%3A%2F%2F4282324958-files.gitbook.io%2F%7E%2Ffiles%2Fv0%2Fb%2Fgitbook-x-prod.appspot.com%2Fo%2Fspaces%252F-MXep_PEmh8mDPVWj49x%252Fuploads%252FDXtOUORVjG2s0COJZ60o%252F7.png%3Falt%3Dmedia%26token%3D3becfba2-dafb-471d-ad44-5bd3b2bdb0d6&#x26;width=768&#x26;dpr=3&#x26;quality=100&#x26;sign=6be48b6e&#x26;sv=2" alt="" width="375">

**Step 7:** Scroll down to see the **'APPROVAL JOURNEY'** section showing HR approval status and date.

<img src="https://docs.pockethrms.com/~gitbook/image?url=https%3A%2F%2F4282324958-files.gitbook.io%2F%7E%2Ffiles%2Fv0%2Fb%2Fgitbook-x-prod.appspot.com%2Fo%2Fspaces%252F-MXep_PEmh8mDPVWj49x%252Fuploads%252F2cmnxJmoQlPM4WuYw4L0%252F8.png%3Falt%3Dmedia%26token%3Da8e972df-b408-49d5-abf5-6b1d9e494b7e&#x26;width=768&#x26;dpr=3&#x26;quality=100&#x26;sign=6c86b319&#x26;sv=2" alt="" width="375">

### **How To Respond To a Probation Extension in Pocket HRMS 2.0 Mobile Application?** <a href="#how-to-respond-to-a-probation-extension-in-pocket-hrms-2.0-mobile-application" id="how-to-respond-to-a-probation-extension-in-pocket-hrms-2.0-mobile-application"></a>

**Path**: Login to mobile app of Pocket HRMS 2.0 > click on 3 horizontal lines > Confirmation > My Confirmation.

**Step 1:** Login to **Pocket HRMS 2.0 mobile app**, then tap on the **three horizontal lines** (hamburger menu).

<img src="https://docs.pockethrms.com/~gitbook/image?url=https%3A%2F%2F4282324958-files.gitbook.io%2F%7E%2Ffiles%2Fv0%2Fb%2Fgitbook-x-prod.appspot.com%2Fo%2Fspaces%252F-MXep_PEmh8mDPVWj49x%252Fuploads%252F46DhfTijjvAUnRsP2Oqy%252F9.png%3Falt%3Dmedia%26token%3D40f4b181-59e7-4034-91b9-f7e1064c5fff&#x26;width=768&#x26;dpr=3&#x26;quality=100&#x26;sign=902d66b4&#x26;sv=2" alt="" width="375">

**Step 2:** Scroll down and select **'Confirmation'**, then tap on **'My Confirmation'**.

<img src="https://docs.pockethrms.com/~gitbook/image?url=https%3A%2F%2F4282324958-files.gitbook.io%2F%7E%2Ffiles%2Fv0%2Fb%2Fgitbook-x-prod.appspot.com%2Fo%2Fspaces%252F-MXep_PEmh8mDPVWj49x%252Fuploads%252FbpN8TWweh21Pi0HTwwgQ%252F10.png%3Falt%3Dmedia%26token%3Dea5ff835-71e3-4b6d-b564-d49deb389436&#x26;width=768&#x26;dpr=3&#x26;quality=100&#x26;sign=ff529262&#x26;sv=2" alt="" width="375">

**Step 3:** If your status shows **CONFIRMATION EXTENDED** (orange), you will see a message: "Your probation confirmation is extended by manager. Tap the button below to provide your feedback."

<img src="https://docs.pockethrms.com/~gitbook/image?url=https%3A%2F%2F4282324958-files.gitbook.io%2F%7E%2Ffiles%2Fv0%2Fb%2Fgitbook-x-prod.appspot.com%2Fo%2Fspaces%252F-MXep_PEmh8mDPVWj49x%252Fuploads%252FwZWPbSfjus7UEw12A6W0%252F11.png%3Falt%3Dmedia%26token%3Df6ddfba4-91ba-4cb5-b6b0-55fbf2a39484&#x26;width=768&#x26;dpr=3&#x26;quality=100&#x26;sign=20d9c366&#x26;sv=2" alt="" width="375">

**Step 4:** Click **'DOWNLOAD EXTENDED LETTER'** to download the extended probation letter.

<img src="https://docs.pockethrms.com/~gitbook/image?url=https%3A%2F%2F4282324958-files.gitbook.io%2F%7E%2Ffiles%2Fv0%2Fb%2Fgitbook-x-prod.appspot.com%2Fo%2Fspaces%252F-MXep_PEmh8mDPVWj49x%252Fuploads%252FXFTdVHnBZIM2ZZLiYsjF%252F12.png%3Falt%3Dmedia%26token%3Df90c3b20-90bd-4803-b60d-a868cb4ffcbc&#x26;width=768&#x26;dpr=3&#x26;quality=100&#x26;sign=b12b54bc&#x26;sv=2" alt="" width="375">

**Step 5:** Click **'TAKE ACTION'** to respond to the extension.

<img src="https://docs.pockethrms.com/~gitbook/image?url=https%3A%2F%2F4282324958-files.gitbook.io%2F%7E%2Ffiles%2Fv0%2Fb%2Fgitbook-x-prod.appspot.com%2Fo%2Fspaces%252F-MXep_PEmh8mDPVWj49x%252Fuploads%252FFPfcOX5GUsJjg40rDg13%252F13.png%3Falt%3Dmedia%26token%3D2c988507-ad75-4dfc-823e-16b3a2c2eafd&#x26;width=768&#x26;dpr=3&#x26;quality=100&#x26;sign=c545af03&#x26;sv=2" alt="" width="375">

**Step 6:** On the **Extension Response** screen, Choose your response:

* **AGREE WITH EXTENSION** (green button) - Extension is confirmed to the new date and cannot be changed
* **DISAGREE WITH EXTENSION** (red button) - HR will review your disagreement for final decision

<img src="https://docs.pockethrms.com/~gitbook/image?url=https%3A%2F%2F4282324958-files.gitbook.io%2F%7E%2Ffiles%2Fv0%2Fb%2Fgitbook-x-prod.appspot.com%2Fo%2Fspaces%252F-MXep_PEmh8mDPVWj49x%252Fuploads%252FChDFqwELTzjgfSRlnLhh%252F14.png%3Falt%3Dmedia%26token%3Ddfcf0b7c-ee38-43fa-9832-1a13cf631cf8&#x26;width=768&#x26;dpr=3&#x26;quality=100&#x26;sign=44ca0c78&#x26;sv=2" alt="" width="375">

**Step 7:** Scroll down and type your comments in the **'Comment'** field (required for both options).

* Explain why you agree or disagree with the extension
* Be clear and professional in your response

<img src="https://docs.pockethrms.com/~gitbook/image?url=https%3A%2F%2F4282324958-files.gitbook.io%2F%7E%2Ffiles%2Fv0%2Fb%2Fgitbook-x-prod.appspot.com%2Fo%2Fspaces%252F-MXep_PEmh8mDPVWj49x%252Fuploads%252FVTR3GXetp8FcNSBsCUjD%252F15.png%3Falt%3Dmedia%26token%3D71602132-36b3-40bb-86a5-337264022141&#x26;width=768&#x26;dpr=3&#x26;quality=100&#x26;sign=e33b175e&#x26;sv=2" alt="" width="375">

**Step 8:** Tap either **'AGREE WITH EXTENSION'**

<img src="https://docs.pockethrms.com/~gitbook/image?url=https%3A%2F%2F4282324958-files.gitbook.io%2F%7E%2Ffiles%2Fv0%2Fb%2Fgitbook-x-prod.appspot.com%2Fo%2Fspaces%252F-MXep_PEmh8mDPVWj49x%252Fuploads%252FYwiGncDyNzOd4LtULDlE%252F16.png%3Falt%3Dmedia%26token%3Dcbbf8b7b-565d-48a2-9d91-47716edd50f2&#x26;width=768&#x26;dpr=3&#x26;quality=100&#x26;sign=2d5ca042&#x26;sv=2" alt="" width="375">

or **'DISAGREE WITH EXTENSION'** to submit your response.

<img src="https://docs.pockethrms.com/~gitbook/image?url=https%3A%2F%2F4282324958-files.gitbook.io%2F%7E%2Ffiles%2Fv0%2Fb%2Fgitbook-x-prod.appspot.com%2Fo%2Fspaces%252F-MXep_PEmh8mDPVWj49x%252Fuploads%252FJcVTwmAQYhgyEapAcbTE%252F17.png%3Falt%3Dmedia%26token%3Dfba6449a-c150-4c1b-a156-0144ef63320c&#x26;width=768&#x26;dpr=3&#x26;quality=100&#x26;sign=449d9dd6&#x26;sv=2" alt="" width="375">

### **How To Approve Employee Confirmations As A Manager In Pocket HRMS 2.0 Mobile App?**

**Path**: Login to mobile app of Pocket HRMS 2.0> click on 3 horizontal lines (hamburger menu) > Confirmation > Approval.

**Step 1:** Open the **Pocket HRMS mobile app**, then tap the **hamburger menu** (three horizontal lines) at the top left corner.

<figure><img src="https://4282324958-files.gitbook.io/~/files/v0/b/gitbook-x-prod.appspot.com/o/spaces%2F-MXep_PEmh8mDPVWj49x%2Fuploads%2FZc2VurqkGov4pbyP0D9t%2F1.png?alt=media&amp;token=46e43fb9-e245-41c9-abd6-0a2cf607ac05" alt="" width="375"><figcaption></figcaption></figure>

**Step 2:** Scroll down and tap **'Confirmation'**, then tap **'Approval'.**

<figure><img src="https://4282324958-files.gitbook.io/~/files/v0/b/gitbook-x-prod.appspot.com/o/spaces%2F-MXep_PEmh8mDPVWj49x%2Fuploads%2F99lzkIW7gEo2QcXMXteF%2F2.png?alt=media&amp;token=0085d49e-5533-4662-97f5-14234fcaec2f" alt="" width="375"><figcaption></figcaption></figure>

**Step 3:** You will see a list of your team members pending confirmation. Each entry shows:

* **Employee name and code** - who needs your review
* **Joining date** - when they started
* **Confirmation end date** - when probation ends
* **Status** - shows "Pending"

<figure><img src="https://4282324958-files.gitbook.io/~/files/v0/b/gitbook-x-prod.appspot.com/o/spaces%2F-MXep_PEmh8mDPVWj49x%2Fuploads%2FJv742bp57XD1zCKplDFU%2F3.png?alt=media&amp;token=121c1992-b074-4f36-958a-691d50d6c287" alt="" width="375"><figcaption></figcaption></figure>

Click on **'TAKE ACTION'** on an employee to review their confirmation.

<figure><img src="https://4282324958-files.gitbook.io/~/files/v0/b/gitbook-x-prod.appspot.com/o/spaces%2F-MXep_PEmh8mDPVWj49x%2Fuploads%2Fc09qveOGpdLjA0w9ULTf%2F4.png?alt=media&amp;token=a6678298-d53b-4765-8a1a-60c071cad220" alt="" width="375"><figcaption></figcaption></figure>

**Step 4:** On the **Confirmation Review** screen, review the employee's:

* Name, employee code, date of joining
* Category, department, and confirmation date

<figure><img src="https://4282324958-files.gitbook.io/~/files/v0/b/gitbook-x-prod.appspot.com/o/spaces%2F-MXep_PEmh8mDPVWj49x%2Fuploads%2FQTypOgZBpm4sOzwbPlAa%2F5.png?alt=media&amp;token=c199f526-41a9-4078-b1ad-8059b4c7dac5" alt="" width="347"><figcaption></figcaption></figure>

**Step 5:** Make your decision by tapping one of three buttons:

* **APPROVE** (green) - confirm as permanent if employee performed well

<figure><img src="https://4282324958-files.gitbook.io/~/files/v0/b/gitbook-x-prod.appspot.com/o/spaces%2F-MXep_PEmh8mDPVWj49x%2Fuploads%2FIrmfebJB3gjceB3t3dFp%2F6.png?alt=media&amp;token=86070f5f-0e47-42a6-84b2-b30804ad77ff" alt="" width="307"><figcaption></figcaption></figure>

* **EXTEND** (orange) - extend probation if you need more assessment time

<figure><img src="https://4282324958-files.gitbook.io/~/files/v0/b/gitbook-x-prod.appspot.com/o/spaces%2F-MXep_PEmh8mDPVWj49x%2Fuploads%2Fv3k6PN5kQGCjYGWNkZSI%2F7.png?alt=media&amp;token=0be382e7-42bb-4001-963d-5b76f355e31f" alt="" width="306"><figcaption></figcaption></figure>

* **REJECT** (red) - reject if employee doesn't meet expectations
  * ⚠️ **Important**: Make sure you've discussed this with HR before rejecting

<figure><img src="https://4282324958-files.gitbook.io/~/files/v0/b/gitbook-x-prod.appspot.com/o/spaces%2F-MXep_PEmh8mDPVWj49x%2Fuploads%2FZhou25xdYZhGuA33S4Fr%2F8.png?alt=media&amp;token=e0417de1-474f-4701-b710-d8e148c4b34f" alt="" width="303"><figcaption></figcaption></figure>

**Step 6:** Scroll down and add your **remarks** (optional but recommended):

* Write your feedback or evaluation notes
* You can write up to 500 characters
* 💡 **Tip**: Write constructive feedback — the employee may see these remarks

<figure><img src="https://4282324958-files.gitbook.io/~/files/v0/b/gitbook-x-prod.appspot.com/o/spaces%2F-MXep_PEmh8mDPVWj49x%2Fuploads%2FdQwqKfiP9CmY9UrJfGaW%2F9.png?alt=media&amp;token=0e90f8a4-45eb-4dd4-a4f5-3163814ab1f1" alt="" width="300"><figcaption></figcaption></figure>

**Step 7:** Tap **'SUBMIT'** to send your decision to HR for final approval.

<figure><img src="https://4282324958-files.gitbook.io/~/files/v0/b/gitbook-x-prod.appspot.com/o/spaces%2F-MXep_PEmh8mDPVWj49x%2Fuploads%2FxAMYTRMJzSbNU8P1xur9%2F10.png?alt=media&amp;token=f83e1661-c2f2-4dff-b3b2-fa2086ecce33" alt="" width="315"><figcaption></figcaption></figure>

**What happens if the manager extends?**

* The probation period is extended (e.g., 1 month)
* After the extension expires, the confirmation request comes back to the manager for another review
* The manager will need to review again and make a final decision (APPROVE, EXTEND again, or REJECT)
* Each time the manager extends, a new review cycle begins

**After the manager submits:**

* If APPROVE or REJECT is selected, the decision goes to HR for final review (if HR approval is required)
* If EXTEND is selected, the confirmation request will reappear after the extension period ends
* The employee is not confirmed yet unless HR approves
* Check status by tapping the eye icon to see the Approval Journey

### **How To Approve Employee Confirmations As HR in Pocket HRMS 2.0 Mobile App?**

**Path**: Login to mobile app of Pocket HRMS 2.0 > click on 3 horizontal lines (hamburger menu)  > Confirmation > HR Approval

**Step 1:** Open the **Pocket HRMS mobile app**, then tap the **hamburger menu** (three horizontal lines) at the top left corner.

<figure><img src="https://4282324958-files.gitbook.io/~/files/v0/b/gitbook-x-prod.appspot.com/o/spaces%2F-MXep_PEmh8mDPVWj49x%2Fuploads%2F8JvRcRz22WILA6Pno9Ig%2F1.png?alt=media&amp;token=924ec9c3-782e-401b-bb2d-fa20fc2676d0" alt="" width="375"><figcaption></figcaption></figure>

**Step 2:** Scroll down and tap **'Confirmation'**, then tap **'HR Approval'**.

<figure><img src="https://4282324958-files.gitbook.io/~/files/v0/b/gitbook-x-prod.appspot.com/o/spaces%2F-MXep_PEmh8mDPVWj49x%2Fuploads%2FAOMGPMZtNKLCWaxLDto3%2F2.png?alt=media&amp;token=7eb183b8-4f1b-4ba5-99b6-e7344ccd308c" alt="" width="375"><figcaption></figcaption></figure>

**Step 3:** You will see a list of employees waiting for final HR approval. Each entry shows:

* **Employee name and code** - who needs approval
* **Joining date** - when they started
* **Confirmation end date** - when probation ends
* **Status** - shows "Pending"

<figure><img src="https://4282324958-files.gitbook.io/~/files/v0/b/gitbook-x-prod.appspot.com/o/spaces%2F-MXep_PEmh8mDPVWj49x%2Fuploads%2FVMsu5ZAhfiky9HsMQr9m%2F3.png?alt=media&amp;token=ce71552d-935d-4651-9926-ef4f88a38b05" alt="" width="373"><figcaption></figcaption></figure>

Click **'TAKE ACTION'** on an employee to review.

<figure><img src="https://4282324958-files.gitbook.io/~/files/v0/b/gitbook-x-prod.appspot.com/o/spaces%2F-MXep_PEmh8mDPVWj49x%2Fuploads%2F2vTfMbS4MsaFrbPDoeSz%2F5.png?alt=media&amp;token=a8826a73-dcc0-4e95-a8cb-dea14df7ad09" alt="" width="373"><figcaption></figcaption></figure>

**Step 4:** On the **Confirmation Review** screen, you'll see:

* Employee details (name, code, department, joining date)
* **LAST MANAGER'S REVIEW** section with:
  * Manager's name and code
  * Manager's recommendation (Approve/Extend/Reject)
  * Date of manager's review
  * Manager's remarks and feedback

<figure><img src="https://4282324958-files.gitbook.io/~/files/v0/b/gitbook-x-prod.appspot.com/o/spaces%2F-MXep_PEmh8mDPVWj49x%2Fuploads%2FJDm8BQsUqe9Loaf9uxaD%2F6.png?alt=media&amp;token=d5b65683-0cd2-4dd7-8634-028e3b221f13" alt="" width="375"><figcaption></figcaption></figure>

**Step 5:** To view the manager's complete evaluation, tap **'PREV DETAILS'**:

<figure><img src="https://4282324958-files.gitbook.io/~/files/v0/b/gitbook-x-prod.appspot.com/o/spaces%2F-MXep_PEmh8mDPVWj49x%2Fuploads%2FXjXn1iYpksDm95yR5baa%2Fprev.png?alt=media&amp;token=2df09b01-7d22-4547-b038-76b33382e3ba" alt="" width="365"><figcaption></figcaption></figure>

* Read the manager's full feedback
* See their detailed recommendation
* Tap **'DOWNLOAD FORM'** to save the evaluation form as PDF
* Tap **'CLOSE'** to return

<figure><img src="https://4282324958-files.gitbook.io/~/files/v0/b/gitbook-x-prod.appspot.com/o/spaces%2F-MXep_PEmh8mDPVWj49x%2Fuploads%2Fu2AW5IK0xWXOjhHqn3X3%2F8.png?alt=media&amp;token=eccc6267-26b9-4554-959a-48f3b6372896" alt="" width="324"><figcaption></figcaption></figure>

**Step 6:** Go back to the **Confirmation Review** screen and make your final decision:

* **APPROVE** (green) - confirm as permanent employee. They'll receive confirmation letter automatically.

<figure><img src="https://4282324958-files.gitbook.io/~/files/v0/b/gitbook-x-prod.appspot.com/o/spaces%2F-MXep_PEmh8mDPVWj49x%2Fuploads%2FRWG5UKbTqbRB3s1eP1Yk%2F9.png?alt=media&amp;token=2ae7cb5d-b215-4ca8-a390-141e1f72d453" alt="" width="360"><figcaption></figcaption></figure>

* **EXTEND** (orange) - extend probation if there are pending compliance or background checks

<figure><img src="https://4282324958-files.gitbook.io/~/files/v0/b/gitbook-x-prod.appspot.com/o/spaces%2F-MXep_PEmh8mDPVWj49x%2Fuploads%2F331V0Axr2OJmZE0M0xgv%2F10.png?alt=media&amp;token=f2ccef53-1a14-4e88-8aea-631d0bf961ff" alt="" width="375"><figcaption></figcaption></figure>

* **REJECT** (red) - reject confirmation
  * ⚠️ **Important**: This is a final decision affecting employment. Ensure all documentation is complete.

<figure><img src="https://4282324958-files.gitbook.io/~/files/v0/b/gitbook-x-prod.appspot.com/o/spaces%2F-MXep_PEmh8mDPVWj49x%2Fuploads%2FoSOA80VGY7o5uVoWMooX%2F11.png?alt=media&amp;token=e39a505c-1ac9-4ad6-a746-a95e813307de" alt="" width="375"><figcaption></figcaption></figure>

**Step 7:** Scroll down and add your **remarks** (optional but recommended):

* Write your final evaluation or comments
* You can write up to 500 characters
* 💡 **Tip**: If rejecting, explain the reason clearly in remarks

<figure><img src="https://4282324958-files.gitbook.io/~/files/v0/b/gitbook-x-prod.appspot.com/o/spaces%2F-MXep_PEmh8mDPVWj49x%2Fuploads%2FpXOIYqVEVJ5lsUtloq3G%2F12.png?alt=media&amp;token=b5065e3e-f452-497c-b19c-3e849371cbb9" alt="" width="375"><figcaption></figcaption></figure>

**Step 8:** Tap **'SUBMIT'** to finalize your decision.

**After you submit:**

* Your decision is final
* If approved, the employee gets a confirmation letter automatically
* System sends notifications to employee and manager
* The approval journey is complete

<figure><img src="https://4282324958-files.gitbook.io/~/files/v0/b/gitbook-x-prod.appspot.com/o/spaces%2F-MXep_PEmh8mDPVWj49x%2Fuploads%2F8jWr78nXr0nt3lDJmdqQ%2F13.png?alt=media&amp;token=42d1ace7-df10-4e9a-a6f0-3af0a65e3a52" alt="" width="375"><figcaption></figcaption></figure>

**How to check the approval journey:**

* On the Confirmation Review screen, tap the **eye** **icon**

<figure><img src="https://4282324958-files.gitbook.io/~/files/v0/b/gitbook-x-prod.appspot.com/o/spaces%2F-MXep_PEmh8mDPVWj49x%2Fuploads%2FrH56Rh3YQLSEZwbl6kl5%2F14.png?alt=media&amp;token=0eda9ba8-c0c1-4b19-8dcc-0b2e84edd57f" alt="" width="375"><figcaption></figcaption></figure>

<figure><img src="https://4282324958-files.gitbook.io/~/files/v0/b/gitbook-x-prod.appspot.com/o/spaces%2F-MXep_PEmh8mDPVWj49x%2Fuploads%2Fi0G5mevVfFAbd38GZrEZ%2F4.png?alt=media&amp;token=e54e660f-e043-4534-99c7-6cf97da35206" alt="" width="363"><figcaption></figcaption></figure>

* You'll see the complete approval chain showing manager and HR approval status

**What if you need to change your decision?**

* Cannot be changed directly in the mobile app
* Contact your admin or supervisor
* They can reopen the request if needed

**For any queries, contact** [**support@pockethrms.com**](mailto:support@pockethrms.com)


# Exit And FNF Settlement Module

### **Exit & FnF module**

The **Exit & FnF Module** brings structure and transparency to employee offboarding — managing every separation from request to final settlement through a single, connected workflow. It gives HR complete visibility and control at every approval stage, while keeping the process simple and transparent for the departing employee.

### **How to do Settings or Configurations for Employee Exit?**

**How to Configure Separation Setting?**

**Path**: Login into Cloud Portal > Settings > Payroll > Pay Settings > Separation Setting

The **Separation Setting** page controls how employee separations are handled, whether master details stay editable after a separation is recorded, how far in advance a separation date can be set, and whether separations can go through after payroll has already been processed for that period.

**Step 1:** Log in to the **Cloud Portal**, open **Payroll**, go to **Pay Settings**, and select **Separation Setting**.

<figure><img src="https://4282324958-files.gitbook.io/~/files/v0/b/gitbook-x-prod.appspot.com/o/spaces%2F-MXep_PEmh8mDPVWj49x%2Fuploads%2FgE9faz2JRQXRBJTCiyvn%2F1.png?alt=media&amp;token=9bcc202c-1411-42a3-acc0-4dcc71491f1f" alt="" width="375"><figcaption></figcaption></figure>

<figure><img src="https://4282324958-files.gitbook.io/~/files/v0/b/gitbook-x-prod.appspot.com/o/spaces%2F-MXep_PEmh8mDPVWj49x%2Fuploads%2F5BhgoSXobRIOjLMXp0DW%2F1.2.png?alt=media&amp;token=735bdfba-07dc-4d9a-9509-b774b8ed5253" alt="" width="192"><figcaption></figcaption></figure>

<figure><img src="https://4282324958-files.gitbook.io/~/files/v0/b/gitbook-x-prod.appspot.com/o/spaces%2F-MXep_PEmh8mDPVWj49x%2Fuploads%2FxPpXQJXj3Geil4srR9KD%2F1.3.png?alt=media&amp;token=f2585b52-eb06-4a2a-8d5f-2802af8f4a1b" alt="" width="193"><figcaption></figcaption></figure>

\
**Step 2**: Set **Master details** can be edited after separation made to **Yes** or **No**, depending on whether HR should still be able to edit an employee's master details once their separation is recorded.

<figure><img src="https://4282324958-files.gitbook.io/~/files/v0/b/gitbook-x-prod.appspot.com/o/spaces%2F-MXep_PEmh8mDPVWj49x%2Fuploads%2FMoOCyhUjhjKHImTwVCCQ%2F2.png?alt=media&amp;token=058280ec-dc2e-476d-b747-e75309dae4e3" alt=""><figcaption></figcaption></figure>

\
**Step 3:** Enter a **value in No. of months** upto which separation date can be given. This is mandatory — it sets how far into the future a separation date can be set.&#x20;

<figure><img src="https://4282324958-files.gitbook.io/~/files/v0/b/gitbook-x-prod.appspot.com/o/spaces%2F-MXep_PEmh8mDPVWj49x%2Fuploads%2FAgl9mtXLdlgVTb7uBhRD%2F3.png?alt=media&amp;token=3f81affb-a0f1-4456-ad75-0ecd2c4117d9" alt=""><figcaption></figcaption></figure>

**Step 4:** Set **Allow Separation After Payroll Process** to **Yes** or **No**, depending on whether separations can still be processed after payroll has already run for that period.

<figure><img src="https://4282324958-files.gitbook.io/~/files/v0/b/gitbook-x-prod.appspot.com/o/spaces%2F-MXep_PEmh8mDPVWj49x%2Fuploads%2F5No2LO6B2Mr3DVXG4XzL%2F4.png?alt=media&amp;token=f656381d-c55d-448a-984d-0dcef055c095" alt=""><figcaption></figcaption></figure>

**Step 5:** Under **Separation Processing Control (Cloud)**, choose Separate Now to process the separation immediately, or Approve & Separate Later to route it through approval first. Click **Save**.

<figure><img src="https://4282324958-files.gitbook.io/~/files/v0/b/gitbook-x-prod.appspot.com/o/spaces%2F-MXep_PEmh8mDPVWj49x%2Fuploads%2FLUgWLYxcJDQ3tplzebu6%2F5.png?alt=media&amp;token=e5f7646a-3581-4ff3-b2ff-6fcc877c2778" alt=""><figcaption></figcaption></figure>

**Important Note:** Separate Now processes the separation immediately. Approve & Separate Later first approves the resignation, then auto-separates the employee at the end of day on their Last Working Date — Separate Now can still be used afterward to separate them immediately if needed.

**Path Link:** <https://cloud.pockethrms.com/Settings/Employee/Index?module=payroll&submodule=SeparationSetting>

### **How to Configure Form Master?**

**Path:** Login into Cloud Portal > Settings > HR > Form Master

**Form Master** lets you create and manage configurable forms for different HR modules, grouped and ordered by department. For the Exit & FnF module, this is where Exit Interview Form (Exit Management module) and FnF No Dues Clearance Forms (Full & Final module) are set up.

**Step 1:** Log in to the **Cloud Portal**, open **Settings**, go to **HR**, and select **Form Master.**

<figure><img src="https://4282324958-files.gitbook.io/~/files/v0/b/gitbook-x-prod.appspot.com/o/spaces%2F-MXep_PEmh8mDPVWj49x%2Fuploads%2FVVWbZjspLTC4y8Xnovi8%2Fimage.png?alt=media&amp;token=a0ab9762-a2b6-4d01-b0d5-4a135ff58cff" alt="" width="337"><figcaption></figcaption></figure>

<figure><img src="https://4282324958-files.gitbook.io/~/files/v0/b/gitbook-x-prod.appspot.com/o/spaces%2F-MXep_PEmh8mDPVWj49x%2Fuploads%2FCNwlx0mSVMj8KnAnPH2j%2F2.png?alt=media&amp;token=7a15e16e-67d0-4934-bfec-8f8bf0753373" alt="" width="160"><figcaption></figcaption></figure>

**Step 2:** Click the **+ icon** to add a new form.

<figure><img src="https://4282324958-files.gitbook.io/~/files/v0/b/gitbook-x-prod.appspot.com/o/spaces%2F-MXep_PEmh8mDPVWj49x%2Fuploads%2FXb5ZxdXEnrOeu4jj6CDU%2F3.png?alt=media&amp;token=124a569e-8532-4943-a827-11596a26c002" alt=""><figcaption></figcaption></figure>

**Step 3:** In the Module Name dropdown, select the module the form belongs to — for example, **Exit Management for an exit interview form**, or **FullnFinal for a Full & Final no-dues form.**

<figure><img src="https://4282324958-files.gitbook.io/~/files/v0/b/gitbook-x-prod.appspot.com/o/spaces%2F-MXep_PEmh8mDPVWj49x%2Fuploads%2F8q6VAfZ4EugWFgxXAys9%2F4.png?alt=media&amp;token=d8000977-f3af-46f4-9ec4-00f991abbf00" alt=""><figcaption></figcaption></figure>

**Step 4:** For **ExitManagement** : Enter a **Form Name, Description, and Order**. Order sets the display sequence among other forms in the same module.

<figure><img src="https://4282324958-files.gitbook.io/~/files/v0/b/gitbook-x-prod.appspot.com/o/spaces%2F-MXep_PEmh8mDPVWj49x%2Fuploads%2FW6ueRMwT2EVDRhWWrkuQ%2F5.png?alt=media&amp;token=8b080f69-5bec-4e42-9c1c-d48bd3b97a21" alt=""><figcaption></figcaption></figure>

**Step 5:** For **FullnFinal** : Enter a **Form Name, Header, Description, and Order**. Order sets the display sequence among other forms in the same module.

<figure><img src="https://4282324958-files.gitbook.io/~/files/v0/b/gitbook-x-prod.appspot.com/o/spaces%2F-MXep_PEmh8mDPVWj49x%2Fuploads%2F9xHAhYdWr6OLgyFYbpe0%2F6.png?alt=media&amp;token=9fabfccc-9f18-47ec-8596-51369816118c" alt=""><figcaption></figcaption></figure>

**Step 6:** Click **Save**.

<figure><img src="https://4282324958-files.gitbook.io/~/files/v0/b/gitbook-x-prod.appspot.com/o/spaces%2F-MXep_PEmh8mDPVWj49x%2Fuploads%2FwRObSdeQh0ZKMPBnM8ZD%2F7.png?alt=media&amp;token=8b5d1ad2-6595-4f86-8180-f3f5f24599dc" alt=""><figcaption></figcaption></figure>

**Path Link:** [**https://cloud.pockethrms.com/Settings/Employee/Index?module=hr\&submodule=FormMaster**](https://cloud.pockethrms.com/Settings/Employee/Index?module=hr\&submodule=FormMaster)

**To Know how to add questions to the form? Refer:** [**https://docs.pockethrms.com/faqs/cloud-portal/settings/hr/form-master#id-1**](https://docs.pockethrms.com/faqs/cloud-portal/settings/hr/form-master#id-1)**.**

### **How to Assign Exit/Separation Department Head?**

**Path:** Login into Cloud Portal > Settings > HR > Exit/Separation Department Head Setting

This page assigns a **department head** and contact email for exit and separation processing, against each department. These Department Heads approve Employee Resignations, raised from ESS by the employees, after they are approved by the Self-Service Separation – Approval Matrix Manager. If no Department Head is assigned for a department, the Resignations of the employees from such departments are routed to HR approval directly after the Manager approval.

**Step 1:** Log in to the **Cloud Portal**, open **Settings**, go to **HR**, and select **Exit/Separation Department Head** Setting.

<figure><img src="https://4282324958-files.gitbook.io/~/files/v0/b/gitbook-x-prod.appspot.com/o/spaces%2F-MXep_PEmh8mDPVWj49x%2Fuploads%2FCkClBPPIdAYNeEPcSd2y%2F1.png?alt=media&amp;token=0379d582-c771-47ac-aaa4-924d4d866369" alt="" width="329"><figcaption></figcaption></figure>

<figure><img src="https://4282324958-files.gitbook.io/~/files/v0/b/gitbook-x-prod.appspot.com/o/spaces%2F-MXep_PEmh8mDPVWj49x%2Fuploads%2FfSZr6PflrOQL2CcoedoG%2F1.2.png?alt=media&amp;token=33c296b3-7efb-4ae9-8a56-082ac73f2794" alt="" width="187"><figcaption></figcaption></figure>

**Step 2:** For each **department row**, use **Department Head** to choose one or more employees.

<figure><img src="https://4282324958-files.gitbook.io/~/files/v0/b/gitbook-x-prod.appspot.com/o/spaces%2F-MXep_PEmh8mDPVWj49x%2Fuploads%2FyXTWnapCo7e3WErepsln%2F2.png?alt=media&amp;token=9f62fa24-f336-4a67-8304-6b81f0070a23" alt=""><figcaption></figcaption></figure>

**Step 3:** Enter a **Department Email** for that department. Check the **box** beside the row to select the row, and Click **Save**.

<figure><img src="https://4282324958-files.gitbook.io/~/files/v0/b/gitbook-x-prod.appspot.com/o/spaces%2F-MXep_PEmh8mDPVWj49x%2Fuploads%2FEs0dpVknKToD0UNoOdgh%2F3.png?alt=media&amp;token=017ac864-94f5-4711-b3e8-bca654972c1e" alt=""><figcaption></figcaption></figure>

The page lists all the Departments created in your system, each with a checkbox, a Department Head field (multiple employees can be selected), and a Department Email field. Selecting one or more row checkboxes and clicking Delete removes assigned department Managers

**Path Link:** [**https://cloud.pockethrms.com/Settings/Employee/Index?module=hr\&submodule=ExitSetting**](https://cloud.pockethrms.com/Settings/Employee/Index?module=hr\&submodule=ExitSetting)

### **How To Assign FnF Department Head Manager?**

**Path:** Login into Cloud Portal > Settings > HR > FnF Department Head Manager

This page assigns **FnF (Full and Final) No Dues Managers** for each department and business unit combination, so that no-dues clearance requests route to the right approver.

**Step 1:** Log in to the **Cloud Portal**, open **Settings**, go to **HR**, and select **FnF Department Head Manager.**

<figure><img src="https://4282324958-files.gitbook.io/~/files/v0/b/gitbook-x-prod.appspot.com/o/spaces%2F-MXep_PEmh8mDPVWj49x%2Fuploads%2F3wrr4w6J1mu8dyPjippA%2F1.png?alt=media&amp;token=46d82dfb-f948-4ecb-a8b6-03f9c6a18e06" alt="" width="370"><figcaption></figcaption></figure>

<figure><img src="https://4282324958-files.gitbook.io/~/files/v0/b/gitbook-x-prod.appspot.com/o/spaces%2F-MXep_PEmh8mDPVWj49x%2Fuploads%2F1kWY7Y38PO39JGyFelOc%2F1.2.png?alt=media&amp;token=1fd8a493-4f4e-4b7c-b7e6-50d1e805b72b" alt="" width="193"><figcaption></figcaption></figure>

**Step 2:** To find a specific **department's assignment**, choose it under **Department Filter** and click **Search**.

<figure><img src="https://4282324958-files.gitbook.io/~/files/v0/b/gitbook-x-prod.appspot.com/o/spaces%2F-MXep_PEmh8mDPVWj49x%2Fuploads%2FutDD3vO58AhiI29y8iiF%2Fimage.png?alt=media&amp;token=eb40530b-f592-4176-9496-e0ee07c722e5" alt=""><figcaption></figcaption></figure>

**Step 3:** Click **Add row** to add a new assignment, then fill in **Department**, **Manager**, **Priority**, and **Form** from the dropdowns (Exit Interview Form OR F\&F No Dues Form).

<figure><img src="https://4282324958-files.gitbook.io/~/files/v0/b/gitbook-x-prod.appspot.com/o/spaces%2F-MXep_PEmh8mDPVWj49x%2Fuploads%2FplZzAKNIsif78SAAqjIp%2F3.png?alt=media&amp;token=607bc065-174f-463a-a8c8-89d067c6fc94" alt=""><figcaption></figcaption></figure>

**Step 4:** To add an **extra column** (for example, Blood Group or Branch), select the unit under **Select Business Unit**(s), then click **Add Column.**

<figure><img src="https://4282324958-files.gitbook.io/~/files/v0/b/gitbook-x-prod.appspot.com/o/spaces%2F-MXep_PEmh8mDPVWj49x%2Fuploads%2Fd1dpUSP1J3Yq8M50R5BD%2F4.png?alt=media&amp;token=0da98987-476a-4326-9d1c-34fc3296c44f" alt=""><figcaption></figcaption></figure>

**Step 5:** Select the **checkbox next to a row** to act on it — for example, to **delete** it with **Delete Selected**. Click **Save**. Saving every row is necessary for the changes to take effect.

<figure><img src="https://4282324958-files.gitbook.io/~/files/v0/b/gitbook-x-prod.appspot.com/o/spaces%2F-MXep_PEmh8mDPVWj49x%2Fuploads%2FbErC3hwJVH6n51ubvGpG%2F5.png?alt=media&amp;token=483e9140-6409-421a-9332-15f6f0c66bd4" alt=""><figcaption></figcaption></figure>

**Step 6:** To replace the manager on a row, click its **Replace Manager** icon in the Action column, choose a replacement from the dropdown, and save. This shifts all pending approvals to the new manager.

<figure><img src="https://4282324958-files.gitbook.io/~/files/v0/b/gitbook-x-prod.appspot.com/o/spaces%2F-MXep_PEmh8mDPVWj49x%2Fuploads%2FNc0Pq8cIbfILug8H2tV6%2F6.png?alt=media&amp;token=d3093c8a-d1e1-4f4f-bf61-e2491b043053" alt=""><figcaption></figcaption></figure>

**Step 7:** To require the particular Department Head’s clearance before FnF No Dues can proceed with Final HR submission, click the **Clearance Lock icon** in the Action column and turn it on. It's off by default.

<figure><img src="https://4282324958-files.gitbook.io/~/files/v0/b/gitbook-x-prod.appspot.com/o/spaces%2F-MXep_PEmh8mDPVWj49x%2Fuploads%2F39DIrnUEflSItPQedeTc%2F7.png?alt=media&amp;token=7bfa143a-18f0-4e76-b7da-f655886afeb6" alt=""><figcaption></figcaption></figure>

**Step 8:** To **export** or **import** the current settings, use the two icons next to the **FnF Department Head Manager** title at the top of the page.

<figure><img src="https://4282324958-files.gitbook.io/~/files/v0/b/gitbook-x-prod.appspot.com/o/spaces%2F-MXep_PEmh8mDPVWj49x%2Fuploads%2Fc374UtpxeMQPLWpAR9id%2F8.png?alt=media&amp;token=269cf6e6-99e6-4738-a46c-31dc2ba7cce2" alt=""><figcaption></figcaption></figure>

**Path Link:** [**https://cloud.pockethrms.com/Settings/Employee/Index?module=hr\&submodule=AssignFormManager**](https://cloud.pockethrms.com/Settings/Employee/Index?module=hr\&submodule=AssignFormManager)

### **How To Import FnF Department Head Manager?**

**Path:** Login into Cloud Portal > Employee > Import > FnF Department Head Manager Import.

This screen bulk-imports **FnF Department Head Manager** assignments from an Excel file — the same assignments configured manually on the FnF Department Head Manager screen — by mapping spreadsheet columns to the required fields.

**Step 1:** Log in to the **Cloud Portal**, open **Employee**, go to **Import**, and select **FnF Department Head Manager Import,** Or **click on the Upload icon on the top right corner of the page.**

<figure><img src="https://4282324958-files.gitbook.io/~/files/v0/b/gitbook-x-prod.appspot.com/o/spaces%2F-MXep_PEmh8mDPVWj49x%2Fuploads%2Fw4li5JXLdbKJAHIgcpMH%2F1.png?alt=media&amp;token=7c2371ae-3f82-43d3-b255-2403eedebb70" alt="" width="285"><figcaption></figcaption></figure>

**Step 2:** Under **Select Import Template**, confirm **FnF Department Head Manager Import** is selected, then **download FnF Department Head Manager Sample Import** and fill it in.

<figure><img src="https://4282324958-files.gitbook.io/~/files/v0/b/gitbook-x-prod.appspot.com/o/spaces%2F-MXep_PEmh8mDPVWj49x%2Fuploads%2FZ6cLqbLbQmFUUmw8sJ8U%2F2.png?alt=media&amp;token=3103acda-1a38-4f15-b10c-9cdb4e858bda" alt=""><figcaption></figcaption></figure>

<figure><img src="https://4282324958-files.gitbook.io/~/files/v0/b/gitbook-x-prod.appspot.com/o/spaces%2F-MXep_PEmh8mDPVWj49x%2Fuploads%2FCHs37WCoAbwhLif51NaM%2F2.2.png?alt=media&amp;token=09f4ee31-77c9-4f91-a95b-f0052a891d27" alt=""><figcaption></figcaption></figure>

**Step 3:** Under **Select Settings**, choose an **existing setting**, or create one by entering a name under **Setting Name** and clicking **Add**. Click **Save Settings**.

<figure><img src="https://4282324958-files.gitbook.io/~/files/v0/b/gitbook-x-prod.appspot.com/o/spaces%2F-MXep_PEmh8mDPVWj49x%2Fuploads%2FGD3Ff6SPxk4uwiuBv1nN%2F3.png?alt=media&amp;token=76bf3374-3442-4d92-8fa4-eb89d8ec9da6" alt="" width="359"><figcaption></figcaption></figure>

**Step 4:** **drag and drop your file** into Import Templates, or click to browse, to upload it and run the import. Only .xlsx files are accepted Fill in **Starting - Ending** Row. The **sheet name** gets updated automatically.

<figure><img src="https://4282324958-files.gitbook.io/~/files/v0/b/gitbook-x-prod.appspot.com/o/spaces%2F-MXep_PEmh8mDPVWj49x%2Fuploads%2F7MuOlyhenG3FEPlcH1k7%2F4.png?alt=media&amp;token=23f2a26b-6778-42c3-b349-70d1e6a5ef0e" alt="" width="352"><figcaption></figcaption></figure>

**Step 5:** If this import should replace existing managers, check **Overwrite previous managers.** This replaces the previous managers and transfers all their pending approvals to the new ones, for the selected departments.

<figure><img src="https://4282324958-files.gitbook.io/~/files/v0/b/gitbook-x-prod.appspot.com/o/spaces%2F-MXep_PEmh8mDPVWj49x%2Fuploads%2FXdlz1XjNLM6AlSsn79mD%2F5.png?alt=media&amp;token=87910a21-e343-4b67-ba25-5f898858d557" alt="" width="375"><figcaption></figcaption></figure>

**Step 6**: **Map each required field to its matching column in your Excel file:** Department Name, Manager Code, Manager Company Code, Priority, Select Form, and Clearance Lock. All six are mandatory.

<figure><img src="https://4282324958-files.gitbook.io/~/files/v0/b/gitbook-x-prod.appspot.com/o/spaces%2F-MXep_PEmh8mDPVWj49x%2Fuploads%2FPYSexFnrWeqZT9T3W6Pt%2F6.png?alt=media&amp;token=cb558851-0f57-4ee0-a80d-5a6ff860c5c7" alt=""><figcaption></figcaption></figure>

The **Employee Master** panel on the right lists further fields you can also bring into the mapping — for example Bank Account Number, Blood group, Branch, Cost Centre, and Designation.

**Step 7:** Click on **Upload File.**

<figure><img src="https://4282324958-files.gitbook.io/~/files/v0/b/gitbook-x-prod.appspot.com/o/spaces%2F-MXep_PEmh8mDPVWj49x%2Fuploads%2FusAfaG2nHkIuFOgZqIeN%2F7.png?alt=media&amp;token=55ccbc67-588a-4f03-8477-d23b23b154fc" alt=""><figcaption></figcaption></figure>

.

**Path Link:** [**https://cloud.pockethrms.com/Employee/Employee/EmployeeImport?import=1#**](https://cloud.pockethrms.com/Employee/Employee/EmployeeImport?import=1%23)

### **How To Configure Exit Notification Settings?**

**Path:** Cloud > Settings > HR > Exit Notification Settings

This page is the control panel for the full separation lifecycle — how resignations are submitted, approved, documented, and closed, across ESS, Cloud Separation, and the Full & Final process. Settings apply company-wide and take effect immediately for new separation requests; separations already in progress keep the settings that were active when they were submitted.

**Settings**

* **Exit Interview Form** — Choose **Exit Dynamic Form** (the system's built-in questionnaire builder) or **Form Master** (a fully custom form for cases the dynamic form can't handle);

  switching to Form Master can't be undone without rebuilding the dynamic form from scratch. Upon switching, the form created in Form Builder will be automatically replicated into Form Master.
* **Open Exit Interview Form On** — Sets how many days before the Last Working Day the exit interview form becomes available to the employee.
* **Reminders for Exit Interview Form** — Enables automated reminder emails for employees who haven't completed the exit interview form.
* **Reminders for FnF No Due Form** — Enables automated reminder emails for pending FnF No Dues clearances to the respective Department Heads

<figure><img src="https://4282324958-files.gitbook.io/~/files/v0/b/gitbook-x-prod.appspot.com/o/spaces%2F-MXep_PEmh8mDPVWj49x%2Fuploads%2FGzxkhos9dSHzF7zT1F1e%2F1.png?alt=media&amp;token=965b2c3d-7198-4cca-996c-ac8ed7269692" alt=""><figcaption></figcaption></figure>

* **Select Email Notification** — Sends FnF approval emails only to the resigning employee's own department head (Employee Department), or to every department head in the company (All Department).
* **BCC Name** — A single email address silently copied on every exit notification email, for compliance monitoring; leave blank to disable.
* **Approval Assets** — Multi-select separations from which departments must require asset return confirmation by HR before separation can completed or processed..
* **Parallel Approval** - ‘True’ notifies all selected department heads at once so they can submit their FnF No Dues independently; ‘False’ routes them one after another in sequence.
* **Disclaimer Text** —Custom text the employee must read on the separation request page before after submitting the Resignation request, typically covering notice period and asset return obligations.
* **Withdraw Days** —Number of days after submission an employee can self-withdraw a resignation without HR involvement; 0 disables self-withdrawal entirely. Employee can only withdraw resignation before the Manager approves the same.

<figure><img src="https://4282324958-files.gitbook.io/~/files/v0/b/gitbook-x-prod.appspot.com/o/spaces%2F-MXep_PEmh8mDPVWj49x%2Fuploads%2F9EYABb16YO3pQ7qTCPnY%2F2.png?alt=media&amp;token=ff76bb93-6085-41fe-8353-22359ec723e6" alt=""><figcaption></figcaption></figure>

* **Select HR Letter** — Choose one or more HR Letter templates to auto-email the employee at the configured trigger point; leave blank to suppress automatic dispatch.
* **Send letter upon** — Sends the HR letter as soon as the employee is marked separated, or only after the Full and Final settlement is completed, with separate checkboxes for ESS-raised and Cloud-raised separations.
* **Send letter on** — Delivers the HR letter to the employee's official company email or their personal email on file.
* **Notice Period Days** — Selects the Employee Config field holding the notice period duration, which the system uses to auto-calculate the Last Working Date on resignation.
* **Disable Ess login After Separation** —Set number of days after separation when the ESS access should be revoked, or check Disable Instantly to revoke it the moment HR approves the separation and employee is separated.

<figure><img src="https://4282324958-files.gitbook.io/~/files/v0/b/gitbook-x-prod.appspot.com/o/spaces%2F-MXep_PEmh8mDPVWj49x%2Fuploads%2FQBt8RcHLwF0sSkTm03L7%2F3.png?alt=media&amp;token=dc7e894e-d342-4783-80bc-445d47e093d9" alt=""><figcaption></figcaption></figure>

* **Adjustment Behavior** — For both Last Working Date and Resignation Date, sets whether a default date falling on a holiday moves to the previous working day, the next working day, or stays unchanged; HR can still override manually, and this doesn't retroactively change dates already saved on in-progress separations. The Last Working Date as per Notice Period is saved independently in the reports.
* **Last Working and Resignation Date update Permission** — For both Last Working Date and Resignation Date, independently toggles whether Employees, and Managers and HR can edit the dates after submission, and whether they're restricted to working days only or allowed any day with a warning on Holiday / Week-offs.

<figure><img src="https://4282324958-files.gitbook.io/~/files/v0/b/gitbook-x-prod.appspot.com/o/spaces%2F-MXep_PEmh8mDPVWj49x%2Fuploads%2FPUcsNlZsTarCaEdzypwR%2F4.png?alt=media&amp;token=7b98c3da-05c8-42ca-8dd7-0098055d98bc" alt=""><figcaption></figcaption></figure>

* **Stop Payment Custom** — Yes automatically excludes separated employees from the next payroll run; No leaves payroll to stop payment manually.
* **Manager Approval Days** —Number of days a manager has to act on a resignation before moves further in the Approval Chain (Department Heads and HR); leave blank for no time limit.
* **Resignation Date can be added upto Days** — Sets how far back an employee can backdate a resignation date; Blank allows any past date.
* **Separation HR Approval Lock** — True restricts HR's ability to approve separations to the day-of-month window set in From / To below; False allows approval anytime. Saving this page while separations are pending updates only the lock settings — everything else waits until those records clear.

Each field below can be set to Mandatory (blocks submission until filled) or Optional, on the separation request form:

* **Employee Comments** — The reason/comments box the employee fills in when submitting their resignation.
* **Manager Comments** — The feedback field the manager fills in when accepting or rejecting a resignation.
* **Resignation Letter** — The file upload field for attaching a formal resignation letter document.
* **Personal No** — The employee's personal mobile number, used for contact after company systems are deactivated.
* **Email ID** — The employee's personal email address, used to send documents like relieving letters and FnF statements post-separation.
* **Designation** — The employee's current designation, shown on the form and used on relieving letters.
* **Address** — The employee's home address, used for mailing physical documents like PF forms or experience certificates.

  And Click on **Save**.

<figure><img src="https://4282324958-files.gitbook.io/~/files/v0/b/gitbook-x-prod.appspot.com/o/spaces%2F-MXep_PEmh8mDPVWj49x%2Fuploads%2FPb9I2yVLS5sRgkJ30cWG%2F5.png?alt=media&amp;token=25fd95da-1887-474e-b272-2f9a1db82985" alt=""><figcaption></figcaption></figure>

**Reminders**

**Path:** Cloud > Settings > HR > Exit Notification Settings > Reminders

Configures automated email reminders that fire on specific exit events; each row handles one event and lets you choose who gets notified.

Set Reminder Settings to **Yes** to reveal the configuration table below.

<figure><img src="https://4282324958-files.gitbook.io/~/files/v0/b/gitbook-x-prod.appspot.com/o/spaces%2F-MXep_PEmh8mDPVWj49x%2Fuploads%2F67ohjYrXRj8HYGojHjrX%2F6.png?alt=media&amp;token=8d51d263-e0cc-41db-8b26-797f07d7002c" alt=""><figcaption></figcaption></figure>

* **Entities** — Select specific employees who should always receive this reminder, regardless of their role in the exit process.
* **Emails** — Enter one or more comma-separated email addresses for external or additional recipients not in the system.
* **Manager** — Sends the reminder to the resigning employee's direct manager.
* **HRs** — Sends the reminder to the HR team.
* **Dpmt Head** — Sends the reminder to department heads; when checked, Type must also be set to specify which department heads.
* **Type** — Only relevant when Dpmt Head is checked: Exit sends to the department heads configured under Exit/Separation Department Head Setting (the resignation approval chain), FNF sends to the department managers configured for Full & Final clearance sign-off — these are different people, and both need to be configured for department head reminders to work.

<figure><img src="https://4282324958-files.gitbook.io/~/files/v0/b/gitbook-x-prod.appspot.com/o/spaces%2F-MXep_PEmh8mDPVWj49x%2Fuploads%2Fj1ktpclxtK8ul5nrefAZ%2F7.png?alt=media&amp;token=9aa16b5d-8932-4458-806f-7031c1c2a71a" alt=""><figcaption></figcaption></figure>

Each row below is one exit event that can trigger a reminder:

* **Employee Resigns** — The employee submits a separation request via ESS.
* **Manager Approves Resignation** — The manager approves the resignation.
* **Manager Rejects Resignation** — The manager rejects the resignation.
* **Last Working Day Alert** — An automated alert fires as the Last Working Date approaches, with the lead time set per row.
* **Full & Final HR Accepts** — HR completes and approves the Full & Final settlement.
* **HR Edits Last Working Date** — HR changes the Last Working Date after manager approval.
* **Full & Final Form Activated** — HR activates the Full & Final form for processing.
* **Dept. Head Approves Resignation** — A department head approves the resignation, as part of the Exit approval chain.
* **Dept. Head Rejects Resignation** — A department head rejects the resignation, as part of the Exit approval chain.
* **HR Approves Resignation** — HR approves the resignation.
* **HR Rejects Resignation** — HR rejects the resignation.
* **Full & Final Department Accepts** — A department head approves the FnF clearance step for their department.
* **Full & Final All Department Accepts** — Every department has now approved FnF clearance.

<figure><img src="https://4282324958-files.gitbook.io/~/files/v0/b/gitbook-x-prod.appspot.com/o/spaces%2F-MXep_PEmh8mDPVWj49x%2Fuploads%2FOvHUE0DI9rntTTjhk58A%2F8.png?alt=media&amp;token=bc914513-e229-4037-aa47-6d6daf087e34" alt=""><figcaption></figcaption></figure>

**Actions**

**Step 1:** Click the **eye icon** on a row to preview the email as it will be sent.

<figure><img src="https://4282324958-files.gitbook.io/~/files/v0/b/gitbook-x-prod.appspot.com/o/spaces%2F-MXep_PEmh8mDPVWj49x%2Fuploads%2FbQq7XzDs3hBdARRXfcF1%2F9.png?alt=media&amp;token=aeb31afd-3cfb-43c3-875e-4afa36b4957b" alt=""><figcaption></figcaption></figure>

**Step 2:** Click the **envelope** icon to open that row's email template for editing — subject, body, and merge-field categories like Master, Special, Dynamic, and Learning Details.

<figure><img src="https://4282324958-files.gitbook.io/~/files/v0/b/gitbook-x-prod.appspot.com/o/spaces%2F-MXep_PEmh8mDPVWj49x%2Fuploads%2FAn1lmJ8BKMzEeWL8R3bf%2F10.png?alt=media&amp;token=378033b0-1a95-4a46-b975-1a515d7facb2" alt=""><figcaption></figcaption></figure>

<figure><img src="https://4282324958-files.gitbook.io/~/files/v0/b/gitbook-x-prod.appspot.com/o/spaces%2F-MXep_PEmh8mDPVWj49x%2Fuploads%2FpkdGidAmF35EH45fO6BM%2F11.png?alt=media&amp;token=01b08073-4553-46bb-a49e-1b15b9f3fd25" alt=""><figcaption></figcaption></figure>

**Step 3:** Click the **trash** icon to delete the row.

<figure><img src="https://4282324958-files.gitbook.io/~/files/v0/b/gitbook-x-prod.appspot.com/o/spaces%2F-MXep_PEmh8mDPVWj49x%2Fuploads%2FmgcIUeWDIW0BJ2ISs08v%2F12.png?alt=media&amp;token=35bd2a29-c4b1-4737-9284-e9b619acc8d1" alt=""><figcaption></figcaption></figure>

**Path Link:** [**https://cloud.pockethrms.com/Settings/Employee/Index?module=hr\&submodule=ExitNotificationSettings**](https://cloud.pockethrms.com/Settings/Employee/Index?module=hr\&submodule=ExitNotificationSettings)

### **How To Configure Full And Final Settings?**

**Path:** Cloud > ESS Settings > Full & Final > Full And Final Settings

This page controls whether the Full & Final process is active, what triggers it, how long the clearance period runs, and which form HR uses for it.

**Step 1:** Log in to the **Cloud Portal**, open **ESS Settings**, go to **Full & Final**, and select **Full And Final Settings**.

<figure><img src="https://4282324958-files.gitbook.io/~/files/v0/b/gitbook-x-prod.appspot.com/o/spaces%2F-MXep_PEmh8mDPVWj49x%2Fuploads%2FQpamWgpk7lRseiOLX3tV%2F1.png?alt=media&amp;token=076abac6-4787-495e-b1d0-10f3c76209c2" alt=""><figcaption></figcaption></figure>

**Step 2:** Set **Full & Final Process Activate** to **Yes** or **No** to turn the process on or off.

<figure><img src="https://4282324958-files.gitbook.io/~/files/v0/b/gitbook-x-prod.appspot.com/o/spaces%2F-MXep_PEmh8mDPVWj49x%2Fuploads%2FkgiBZdiARPc7c5N4qGRf%2F2.png?alt=media&amp;token=e9dff0ed-fec9-42cf-adf3-e1d55988c0ac" alt=""><figcaption></figcaption></figure>

**Step 3:** Under **Full & Final** Activation Trigger, choose when the FnF No Dues process starts: **On Employee Separation** (right after the employee is separated from the system), On **HR Approval** (right after HR approves the separation request in ESS or cloud using Approve and Separate Later), or a **set number of days before the Last Working Date** when the process should start.

<figure><img src="https://4282324958-files.gitbook.io/~/files/v0/b/gitbook-x-prod.appspot.com/o/spaces%2F-MXep_PEmh8mDPVWj49x%2Fuploads%2FVeacdNAry4aiWlRcEsQM%2F3.png?alt=media&amp;token=38f31938-d189-4aa4-abf8-6e2de8892e50" alt=""><figcaption></figcaption></figure>

**Step 4:** **Enter Clearance Period Days** — the number of days allowed for the clearance process.

<figure><img src="https://4282324958-files.gitbook.io/~/files/v0/b/gitbook-x-prod.appspot.com/o/spaces%2F-MXep_PEmh8mDPVWj49x%2Fuploads%2FdMefoAjYqQAzSLQSuZ5y%2F4.png?alt=media&amp;token=5bfde01d-39e4-413d-a0bd-a5ad30cd15cb" alt=""><figcaption></figcaption></figure>

**Step 5:** Under **HR Form**, select which form should act as the Final FnF No Dues form for the HR. Click **Save**.

<figure><img src="https://4282324958-files.gitbook.io/~/files/v0/b/gitbook-x-prod.appspot.com/o/spaces%2F-MXep_PEmh8mDPVWj49x%2Fuploads%2FdF1ZWCVYaplodnojjW82%2F5.png?alt=media&amp;token=1ca11119-db68-4821-b15b-219eefe2c31c" alt=""><figcaption></figcaption></figure>

<figure><img src="https://4282324958-files.gitbook.io/~/files/v0/b/gitbook-x-prod.appspot.com/o/spaces%2F-MXep_PEmh8mDPVWj49x%2Fuploads%2F9A4NJdEbTEfWwoQnKQkA%2F6.png?alt=media&amp;token=4eb43e68-b800-42a1-a58c-4d01e9b1e62b" alt=""><figcaption></figcaption></figure>

**Important Note:** Pocket HRMS recommends X Days before LWD, since it avoids last-minute dependencies by starting FnF at a pre-planned time — On Employee Separation waits for a confirmed exit, On HR Approval starts right after validation.

**Path Link:** [**https://cloud.pockethrms.com/Settings/Employee/ESSIndex?module=FullFinal\&submodule=FullFinalSettings**](https://cloud.pockethrms.com/Settings/Employee/ESSIndex?module=FullFinal\&submodule=FullFinalSettings)

### **How To Assign Approval Matrix Manager For Employees?**

**Path:** Cloud > Employee > Employee List > Employee Profile > Approval Matrix

This screen assigns which manager approves which type of request for an employee — including the two separation-related approval roles — through a shared checklist of workflow types.

**Step 1:** Log in to the **Cloud Portal** and open **Approval Matrix Manager** (under Manager Details). Click **Add Approval Matrix Manager**, or **Import Approval Matrix Manager Details to bulk-upload** entries instead.

<figure><img src="https://4282324958-files.gitbook.io/~/files/v0/b/gitbook-x-prod.appspot.com/o/spaces%2F-MXep_PEmh8mDPVWj49x%2Fuploads%2FjQvCGUgdgo4KSWF3529d%2F1.png?alt=media&amp;token=69ccfd4d-0151-4f13-aada-1fdd85b994a4" alt=""><figcaption></figcaption></figure>

**Step 2:** Select the Employee, then search for and **select a Manager** under **Select** **Manager**.

<figure><img src="https://4282324958-files.gitbook.io/~/files/v0/b/gitbook-x-prod.appspot.com/o/spaces%2F-MXep_PEmh8mDPVWj49x%2Fuploads%2FLO3lJIJnVYBuKIIjA6S6%2F2.png?alt=media&amp;token=33879028-0470-4d14-9bf1-6833eb638bb0" alt=""><figcaption></figcaption></figure>

**Step 3:** From the checklist, check **Selfservice Separation Manager** if this manager should approve separations the employee raises themselves from their ESS Portal.

or check **Employee Separation Manager** if this manager should approve separations that HR or an admin raises on the employee's from Cloud Portal. Click **Save**.

<figure><img src="https://4282324958-files.gitbook.io/~/files/v0/b/gitbook-x-prod.appspot.com/o/spaces%2F-MXep_PEmh8mDPVWj49x%2Fuploads%2FU2k5O5qNaaghbgSSGgiz%2F3.png?alt=media&amp;token=cba3b7b8-ea70-4ad7-9793-b6a68de22687" alt=""><figcaption></figcaption></figure>

**Path Link:** [**https://cloud.pockethrms.com/Employee/employee/Profile?employeeID=17489\&module=profile\&empstatus=1**](https://cloud.pockethrms.com/Employee/employee/Profile?employeeID=17489\&module=profile\&empstatus=1)

### **How To Configure Role Allocation (Exit Module)?**

**Path:** Cloud > ESS Settings > Role Allocation > Module: Exit

This screen defines what each role **— HR, Manager, Admin, and others** — is allowed to do within a selected module.

**Step 1:** Log in to the **Cloud Portal**, open **ESS Settings**, and select **Role Allocation**.

<figure><img src="https://4282324958-files.gitbook.io/~/files/v0/b/gitbook-x-prod.appspot.com/o/spaces%2F-MXep_PEmh8mDPVWj49x%2Fuploads%2FimzUTQzPjZ2zktwS1o46%2F1.png?alt=media&amp;token=091ba2f5-ead5-49cb-855b-37d66859980b" alt="" width="232"><figcaption></figcaption></figure>

**Step 2:** Under **Select Module**, choose **Exit for the Exit/FnF module**. Under **Select Role**, choose the role to configure — for example HR, Manager, or Admin. Click **Search**.

<figure><img src="https://4282324958-files.gitbook.io/~/files/v0/b/gitbook-x-prod.appspot.com/o/spaces%2F-MXep_PEmh8mDPVWj49x%2Fuploads%2FO2YZhulctDFoqYrl1rN1%2F2.png?alt=media&amp;token=4ce5d887-50b5-4c19-bc45-2f777ba018c1" alt=""><figcaption></figcaption></figure>

**Step 3:** In the **checklist that appears**, check or uncheck items to control what that role can access — **for example**, for Manager under the Exit module:&#x20;

Report > Exit Tracker, Request > Employee Separation, and Approval > Separation Approval Data, HR Separation Approval Data, and Department Head Separation Approval, And Click **Save**.

<figure><img src="https://4282324958-files.gitbook.io/~/files/v0/b/gitbook-x-prod.appspot.com/o/spaces%2F-MXep_PEmh8mDPVWj49x%2Fuploads%2FaQvzbLsJXOHZfL7Yh1Lg%2F3.png?alt=media&amp;token=e59a40d0-00fd-4562-8aac-3ece5be334d0" alt=""><figcaption></figcaption></figure>

**Path Link:** [**https://cloud.pockethrms.com/Settings/Employee/ESSIndex?module=Profile\&submodule=RoleAllocation**](https://cloud.pockethrms.com/Settings/Employee/ESSIndex?module=Profile\&submodule=RoleAllocation)

### **How to Add Separation Reason?**

**Path:** Cloud > Settings > HR > Pop Up data > Separation Reason

This is where the list of selectable reasons for separation is maintained — the values that populate the Separation Reason dropdown elsewhere in the exit flow.

**Step 1:** Log in to the **Cloud Portal**, open **Settings**, go to **HR**,

<figure><img src="https://4282324958-files.gitbook.io/~/files/v0/b/gitbook-x-prod.appspot.com/o/spaces%2F-MXep_PEmh8mDPVWj49x%2Fuploads%2FuesaLj3KSwO7myRd4eJw%2F1.png?alt=media&amp;token=5a3652b9-b703-479b-90f1-eaab68035496" alt="" width="341"><figcaption></figcaption></figure>

and select **Pop Up data.**

<figure><img src="https://4282324958-files.gitbook.io/~/files/v0/b/gitbook-x-prod.appspot.com/o/spaces%2F-MXep_PEmh8mDPVWj49x%2Fuploads%2FQWpRyRlmLs0Zgo2vhjXX%2F2.png?alt=media&amp;token=228e1ca6-1097-45a0-bae9-bc4b70bf0cd9" alt="" width="191"><figcaption></figcaption></figure>

**Step 2:** Under **Select Component**, choose **Separation Reason**. Click the **+ icon** to add a new reason.

<figure><img src="https://4282324958-files.gitbook.io/~/files/v0/b/gitbook-x-prod.appspot.com/o/spaces%2F-MXep_PEmh8mDPVWj49x%2Fuploads%2FJdZW4vD8xaGfCJKjDHV6%2F3.png?alt=media&amp;token=37bceb12-0b87-46f5-ae2a-a7cd65b92279" alt=""><figcaption></figcaption></figure>

**Step 3:** enter the text under Value in the popup that appears, then click **Save**.

<figure><img src="https://4282324958-files.gitbook.io/~/files/v0/b/gitbook-x-prod.appspot.com/o/spaces%2F-MXep_PEmh8mDPVWj49x%2Fuploads%2F92DjArtKtR4J1t4xxn8j%2F4.png?alt=media&amp;token=905d2336-2c5f-4b8e-a9f5-bbfd7fabeb65" alt=""><figcaption></figcaption></figure>

**Step 4:** Use the other **two icons** at the top to export (download) or import (upload) the list of reasons.

<figure><img src="https://4282324958-files.gitbook.io/~/files/v0/b/gitbook-x-prod.appspot.com/o/spaces%2F-MXep_PEmh8mDPVWj49x%2Fuploads%2FNclSFWToukTKmAtmky6G%2F5.png?alt=media&amp;token=072a44c4-2215-4ac4-8553-c982375ba4ee" alt=""><figcaption></figcaption></figure>

**Step 5:** On an existing reason card, click the **pencil icon** to **edit** it, or the **trash icon** to **delete** it.

<figure><img src="https://4282324958-files.gitbook.io/~/files/v0/b/gitbook-x-prod.appspot.com/o/spaces%2F-MXep_PEmh8mDPVWj49x%2Fuploads%2FJCJPnjifjjusrVg9Vbud%2F6.png?alt=media&amp;token=aec16635-b29a-49f5-8b44-685432569547" alt=""><figcaption></figcaption></figure>

Existing reasons appear as cards, each showing an Employees Available count with avatar icons — Better Offer, Family Reason, Health Issues, Medical Issue, Personal Issue, and Salary Issue are already configured in this example.

**Path Link:** [**https://cloud.pockethrms.com/Settings/Employee/Index?module=hr\&submodule=popup**](https://cloud.pockethrms.com/Settings/Employee/Index?module=hr\&submodule=popup)

### **How to Separate an Employee Through the Cloud Portal?**

**Path:** Cloud > Payroll > Transactions > Separation.

The **Separation** screen is HR's entry point for formally initiating and processing an employee's exit from the organization.

**Step 1:** Log in to the **Cloud Portal**, open **Payroll**, Click on **Transactions**, and select **Separation**.

<figure><img src="https://4282324958-files.gitbook.io/~/files/v0/b/gitbook-x-prod.appspot.com/o/spaces%2F-MXep_PEmh8mDPVWj49x%2Fuploads%2Fup3ci6Ws86XF4LIkbVxd%2F1.png?alt=media&amp;token=c70c6de1-14e6-40bd-a205-20cd59259c21" alt="" width="341"><figcaption></figcaption></figure>

**Step 2:** Select the **Employee**. **Date of Joining** fills in automatically and is read-only.

<figure><img src="https://4282324958-files.gitbook.io/~/files/v0/b/gitbook-x-prod.appspot.com/o/spaces%2F-MXep_PEmh8mDPVWj49x%2Fuploads%2FxXK3zC2Nc2ijbj85CgfW%2F2.png?alt=media&amp;token=283eee36-0557-4422-bc04-e9e2131982b2" alt=""><figcaption></figcaption></figure>

**Step 3:** Set **Separation Type** to **Voluntary** or **Involuntary**, depending on whether the employee (Voluntary) or the employer (Involuntary) initiated the separation.

<figure><img src="https://4282324958-files.gitbook.io/~/files/v0/b/gitbook-x-prod.appspot.com/o/spaces%2F-MXep_PEmh8mDPVWj49x%2Fuploads%2FlBAy5iLJc0R5jZ2AKS8U%2F3.png?alt=media&amp;token=140ea720-9f03-4014-b668-2db2b8dba4b9" alt=""><figcaption></figcaption></figure>

\
**Step 4:** Set **Separation Status** — options include **Separation, Suspension, Resignation, Other, Termination, Retirement, ContractEnd, Abscond, Redundancy,** and **Expired.**

<figure><img src="https://4282324958-files.gitbook.io/~/files/v0/b/gitbook-x-prod.appspot.com/o/spaces%2F-MXep_PEmh8mDPVWj49x%2Fuploads%2Fyq4rPBPSxw4mnBZChMpI%2F4.png?alt=media&amp;token=1755ecd4-709a-4cdb-95fa-4d58d418b3d1" alt=""><figcaption></figcaption></figure>

&#x20;\
**Step 5:** Set **Separation Reason**, Enter **Last Working Date** and **Resignation Date**.

<figure><img src="https://4282324958-files.gitbook.io/~/files/v0/b/gitbook-x-prod.appspot.com/o/spaces%2F-MXep_PEmh8mDPVWj49x%2Fuploads%2FTlfn5w5OvksaJTK8C1Dp%2F5.png?alt=media&amp;token=00b1197e-bca8-44ab-bac2-f5ae40cff725" alt=""><figcaption></figcaption></figure>

**Step 6:** Under **Disable ESS Login After Separation**, choose one:

* Tick **Disable Instantly upon Separation** to remove access the moment the separation is processed.
* **Enter a number of days** — 1 disables login at 00:00 the next calendar day after separation, 2 disables it at 00:00 the day after that, and so on.
* If the **Last Working Date** is future-dated, login is disabled according to that date instead.

<figure><img src="https://4282324958-files.gitbook.io/~/files/v0/b/gitbook-x-prod.appspot.com/o/spaces%2F-MXep_PEmh8mDPVWj49x%2Fuploads%2FjZIf7q8wEKaSAv9S1hBV%2F6.png?alt=media&amp;token=6923f03b-b37f-4279-b1a7-65452c51c619" alt=""><figcaption></figcaption></figure>

**Step 7:** Set **Activate FNF No Dues Forms,** to **YES** or **NO.**

<figure><img src="https://4282324958-files.gitbook.io/~/files/v0/b/gitbook-x-prod.appspot.com/o/spaces%2F-MXep_PEmh8mDPVWj49x%2Fuploads%2FPmQ36cszVeGd0HtRCp5n%2F7.png?alt=media&amp;token=572b34b9-ef8e-48e9-abf8-7ffa85734fd4" alt=""><figcaption></figcaption></figure>

\
**Step 8:** Set **Employee Rehire** to **Yes** or **No**, and edit Employee Rehire Remark as needed. This mandatory field auto-fills a default remark based on the Rehire choice, but can be edited freely.

<figure><img src="https://4282324958-files.gitbook.io/~/files/v0/b/gitbook-x-prod.appspot.com/o/spaces%2F-MXep_PEmh8mDPVWj49x%2Fuploads%2FEPmHDxrXgxgrGdUUS2Fp%2F8.png?alt=media&amp;token=41724b79-520e-426a-befa-7b96747fad1b" alt=""><figcaption></figcaption></figure>

&#x20;**Step 9:** Click **Save** to submit the separation.

<figure><img src="https://4282324958-files.gitbook.io/~/files/v0/b/gitbook-x-prod.appspot.com/o/spaces%2F-MXep_PEmh8mDPVWj49x%2Fuploads%2F721bW4OjDUetGXolfHJ8%2F9.png?alt=media&amp;token=e7e0d6bc-d370-483e-aa8c-bb2e60d1c465" alt="" width="291"><figcaption></figcaption></figure>

\
**Step 10:** Click **Left Employees** to view the list of employees already separated.

<figure><img src="https://4282324958-files.gitbook.io/~/files/v0/b/gitbook-x-prod.appspot.com/o/spaces%2F-MXep_PEmh8mDPVWj49x%2Fuploads%2FT8KziWQ30R26i0DuC3Qm%2F10.png?alt=media&amp;token=1279085a-6267-420e-b06c-d08e44418a05" alt="" width="293"><figcaption></figcaption></figure>

**Path Link:** <https://cloud.pockethrms.com/Payroll/Transaction/separation>

**Important Note:** After HR initiates a separation from Cloud, the approval request reaches the Employee Separation Manager only if that manager has already been assigned to the employee.

&#x20;

### **How To assign an Employee Separation Manager to a Specific Employee?**

**Path:** Login into Cloud Portal > Employee > Employee List > Select Employee > Approval Matrix.

**Step 1:** Log in to the **Cloud Portal**, open **Employee**, go to **Employee List,** and select the **employee's profile**.

<figure><img src="https://4282324958-files.gitbook.io/~/files/v0/b/gitbook-x-prod.appspot.com/o/spaces%2F-MXep_PEmh8mDPVWj49x%2Fuploads%2FwNAxSqV2zTiWz8uFtfmO%2F1.png?alt=media&amp;token=629a79c3-7225-40d1-ba48-4c058cc08d93" alt="" width="342"><figcaption></figcaption></figure>

<figure><img src="https://4282324958-files.gitbook.io/~/files/v0/b/gitbook-x-prod.appspot.com/o/spaces%2F-MXep_PEmh8mDPVWj49x%2Fuploads%2F6SA4WIpJ7p6k5FYAyfUE%2F1.2.png?alt=media&amp;token=04c3007d-840d-44ed-a616-5d16a7a01d90" alt=""><figcaption></figcaption></figure>

**Step 2:** Go to **Approval Matrix** and click **Add Approval Matrix Manager.**

<figure><img src="https://4282324958-files.gitbook.io/~/files/v0/b/gitbook-x-prod.appspot.com/o/spaces%2F-MXep_PEmh8mDPVWj49x%2Fuploads%2FdHC3QeHNlBDdxdwVRzdo%2F2.png?alt=media&amp;token=1190466a-70e7-4497-a1c1-fb0022fb2aeb" alt=""><figcaption></figcaption></figure>

**Step 3:** Enter the **Manager's name** and set **Priority.**

<figure><img src="https://4282324958-files.gitbook.io/~/files/v0/b/gitbook-x-prod.appspot.com/o/spaces%2F-MXep_PEmh8mDPVWj49x%2Fuploads%2Fv3P6zwhnDIFs34txtP40%2F3.png?alt=media&amp;token=d262e8c9-8118-4164-a172-eedd2357d5bb" alt=""><figcaption></figcaption></figure>

**Step 4:** Check **Employee Separation Manager** from the module checklist, and Click **Save**.

<figure><img src="https://4282324958-files.gitbook.io/~/files/v0/b/gitbook-x-prod.appspot.com/o/spaces%2F-MXep_PEmh8mDPVWj49x%2Fuploads%2FxyX80iK9qEg2LqMVFSH7%2F4.png?alt=media&amp;token=59f0cb51-07df-4a09-9d9f-ed3045f4c520" alt=""><figcaption></figcaption></figure>

**Path Link:** [**https://cloud.pockethrms.com/Employee/Employee/EmployeeLis**t](https://cloud.pockethrms.com/Employee/Employee/EmployeeList)

### **How to Approve an HR-Initiated Employee Separation as a Manager?**

Path: ESS > Profile > Approval > Manager Approval

The **Manager Approval screen** is where a resigning employee's manager reviews and acts on separation requests routed to them.

**Step 1:** Log in to **ESS**, open **Profile**, go to **Approval**, and select **Manager Approval.**

<figure><img src="https://4282324958-files.gitbook.io/~/files/v0/b/gitbook-x-prod.appspot.com/o/spaces%2F-MXep_PEmh8mDPVWj49x%2Fuploads%2FJHEB9cypezSfRtz82sw8%2F1.png?alt=media&amp;token=d1e1620c-b321-46d5-a296-acaaa1dfb4b7" alt="" width="254"><figcaption></figcaption></figure>

<figure><img src="https://4282324958-files.gitbook.io/~/files/v0/b/gitbook-x-prod.appspot.com/o/spaces%2F-MXep_PEmh8mDPVWj49x%2Fuploads%2F7AYhPre0nx8wfOBqCI8H%2F1.2.png?alt=media&amp;token=2c5153ac-81be-4404-8dbe-f0d84c98e6f4" alt=""><figcaption></figcaption></figure>

**Step 2:** Under **Module**, select **Employee Separation.**

<figure><img src="https://4282324958-files.gitbook.io/~/files/v0/b/gitbook-x-prod.appspot.com/o/spaces%2F-MXep_PEmh8mDPVWj49x%2Fuploads%2F2ICyWRA9hZyJhhGJ3N4k%2F2.png?alt=media&amp;token=07a62603-6f74-4313-9df0-f35f621dd15b" alt=""><figcaption></figcaption></figure>

**Step 3:** Set **From Date** and **To Date**, then click **Search**.

<figure><img src="https://4282324958-files.gitbook.io/~/files/v0/b/gitbook-x-prod.appspot.com/o/spaces%2F-MXep_PEmh8mDPVWj49x%2Fuploads%2FIHDDfTH920wFKJOjJpJh%2F3.png?alt=media&amp;token=ef65f36c-5dab-42ce-8936-672a606b7321" alt=""><figcaption></figcaption></figure>

**Step 4:** Click **View Details** on a row to review the request.

<figure><img src="https://4282324958-files.gitbook.io/~/files/v0/b/gitbook-x-prod.appspot.com/o/spaces%2F-MXep_PEmh8mDPVWj49x%2Fuploads%2FL9d5uGhR8OPdfh2VrApk%2F4.png?alt=media&amp;token=3d609081-ccc9-4ac8-b15f-a148deef38ce" alt=""><figcaption></figcaption></figure>

<figure><img src="https://4282324958-files.gitbook.io/~/files/v0/b/gitbook-x-prod.appspot.com/o/spaces%2F-MXep_PEmh8mDPVWj49x%2Fuploads%2F0Q0hD6KEVmuh0Bf9Jl37%2F4.2.png?alt=media&amp;token=7bfc5514-2c5c-4c8e-8479-237a02802545" alt=""><figcaption></figcaption></figure>

**Step 5:** Tick **Approve** and **Save**,

<figure><img src="https://4282324958-files.gitbook.io/~/files/v0/b/gitbook-x-prod.appspot.com/o/spaces%2F-MXep_PEmh8mDPVWj49x%2Fuploads%2FzlgNuTyjF4gxccyuutvg%2F5.png?alt=media&amp;token=cf6eb146-470a-4ba2-a7cc-89ccd81ce430" alt=""><figcaption></figcaption></figure>

\
or **Reject**, If you select to reject the request, Enter a **remark** then click **Save**.

<figure><img src="https://4282324958-files.gitbook.io/~/files/v0/b/gitbook-x-prod.appspot.com/o/spaces%2F-MXep_PEmh8mDPVWj49x%2Fuploads%2FkjCi8sfat67QtGgWzKY7%2F5.2.png?alt=media&amp;token=94cc0d1c-fe66-43e1-9724-f315dad6f999" alt=""><figcaption></figcaption></figure>

&#x20;**Path Link:** [**https://ess.pockethrms.com/Employee/Profile/EmployeeApprovals?Menu=managerapprove**](https://ess.pockethrms.com/Employee/Profile/EmployeeApprovals?Menu=managerapprove)

### **ESS Transactions For Exit And FNF Settlement?**

### **How to Raise an Employee Self-Separation Request?**

**Path:** ESS Portal > Exit > Request > Employee Separation

The **Employee Separation** page is where as an Employee, you can raise a self separation or resignation request. You provide your separation/resignation details like, the reason for leaving, desired resignation and last working dates and any supporting documents, before submitting the request for managerial, departmental and HR approval.

**Step 1:** Log in to the **ESS Portal**, open the **Exit modul**e, go to **Request**, and select **Employee Separation**.

<figure><img src="https://4282324958-files.gitbook.io/~/files/v0/b/gitbook-x-prod.appspot.com/o/spaces%2F-MXep_PEmh8mDPVWj49x%2Fuploads%2FXJikR6P7zsH8mSzCjFl4%2F1.png?alt=media&amp;token=55e35bc5-3867-4e1d-873c-c3ac3fdc3ef3" alt=""><figcaption></figcaption></figure>

**Step 2:** Check your details in the **Employee Details** section. **Employee Name, Employee Code, Department, Designation, and Date of Joining** are filled in automatically from your record and cannot be edited.

<figure><img src="https://4282324958-files.gitbook.io/~/files/v0/b/gitbook-x-prod.appspot.com/o/spaces%2F-MXep_PEmh8mDPVWj49x%2Fuploads%2FARf2LEVXlfK5D350ZHZ1%2F2.png?alt=media&amp;token=3ade7d67-054e-4c91-9656-dad48737720f" alt=""><figcaption></figcaption></figure>

**Step 3:** Set your Resignation Date using the calendar. The **Last** **Working Date** updates automatically based on the **Resignation Date** and Notice Period Days.\
You will be able to edit the Resignation and Last Working dates only if the Amin/HR has enabled edit rights for the employees. Else, Resignation Date will be automatically taken as **‘TODAY**’ and Last Working Date as **‘Resignation Date + Notice Period Days’.**

<figure><img src="https://4282324958-files.gitbook.io/~/files/v0/b/gitbook-x-prod.appspot.com/o/spaces%2F-MXep_PEmh8mDPVWj49x%2Fuploads%2FJRVID5OlT8OhIVhoYpyh%2F3.png?alt=media&amp;token=5c406b8d-ad41-4af9-a69e-043b09952624" alt=""><figcaption></figcaption></figure>

**Step 4:** **Separation Status** will be by default selected as **Resignation**, since the other options are applicable for Involuntary Separation processed by HR from cloud.

<figure><img src="https://4282324958-files.gitbook.io/~/files/v0/b/gitbook-x-prod.appspot.com/o/spaces%2F-MXep_PEmh8mDPVWj49x%2Fuploads%2FFriauw4CR3NVrfaFcTyw%2F4.png?alt=media&amp;token=8cc3b262-a4b5-45ab-9bc0-0769b754a161" alt=""><figcaption></figcaption></figure>

**Step 5:** Select your **Separation Reason** from the dropdown.

<figure><img src="https://4282324958-files.gitbook.io/~/files/v0/b/gitbook-x-prod.appspot.com/o/spaces%2F-MXep_PEmh8mDPVWj49x%2Fuploads%2FVWcZ5gbMwCYpFSSXQVlI%2F5.png?alt=media&amp;token=7cea799e-a24b-4efc-99e1-2c6ef9655f8c" alt=""><figcaption></figcaption></figure>

**Step 6:** Enter your contact details — **Personal Email ID, Personal Mobile No, and Address** — so you can be reached after you leave.

<figure><img src="https://4282324958-files.gitbook.io/~/files/v0/b/gitbook-x-prod.appspot.com/o/spaces%2F-MXep_PEmh8mDPVWj49x%2Fuploads%2FGXoHMAcorJy4RrXYYFfv%2F6.png?alt=media&amp;token=812ee78f-f412-4bc0-9aa6-74196f7e9edd" alt=""><figcaption></figcaption></figure>

**Note:** These details will be auto-fetched if they were updated in your profile.

**Step 7:** **Upload your documents.** Use Choose File under **Resignation Letter** to attach your resignation letter, and Choose File under Other Attachments for any additional files.

<figure><img src="https://4282324958-files.gitbook.io/~/files/v0/b/gitbook-x-prod.appspot.com/o/spaces%2F-MXep_PEmh8mDPVWj49x%2Fuploads%2FAHK85C7ft2F03bvc4RbO%2F7.png?alt=media&amp;token=9ec39b0b-5c29-4568-8e0f-a96e8b87b165" alt=""><figcaption></figcaption></figure>

**Step 8:** Add any extra details in the **Comments box**, And Click **Submit** to raise your separation request.

<figure><img src="https://4282324958-files.gitbook.io/~/files/v0/b/gitbook-x-prod.appspot.com/o/spaces%2F-MXep_PEmh8mDPVWj49x%2Fuploads%2FLu63uI0ys87JwQSw1MjC%2F8.png?alt=media&amp;token=40de85e0-4edf-4e49-ae89-45f22c0951f3" alt=""><figcaption></figcaption></figure>

After you submit, the request goes to the responsible manager for approval.

**Step 9:** Under **Separation Status**, review your submitted request — Date of Joining, Last Working Date, Separation Reason, Remarks, Employee Comments, HR Attachments, Resign Letter, Other Attachments, and Status. Click **Cancel** to withdraw it.

<figure><img src="https://4282324958-files.gitbook.io/~/files/v0/b/gitbook-x-prod.appspot.com/o/spaces%2F-MXep_PEmh8mDPVWj49x%2Fuploads%2FcjknytIwFDmU1hugdziO%2F9.png?alt=media&amp;token=83410f08-4311-4c10-a8d4-4087a93257c2" alt=""><figcaption></figcaption></figure>

**Step 10:** Under **Approval Status**, check the current stage — it updates to Approved once the manager approves the request. Click Manager Status to see the assigned manager's code, name, and approval status.

<figure><img src="https://4282324958-files.gitbook.io/~/files/v0/b/gitbook-x-prod.appspot.com/o/spaces%2F-MXep_PEmh8mDPVWj49x%2Fuploads%2FwErymw54S3j3KJrNGr5W%2F10.png?alt=media&amp;token=4d61a23b-5f33-4838-ae7d-f51c2318276a" alt=""><figcaption></figcaption></figure>

<figure><img src="https://4282324958-files.gitbook.io/~/files/v0/b/gitbook-x-prod.appspot.com/o/spaces%2F-MXep_PEmh8mDPVWj49x%2Fuploads%2FwmMjKCPH2ydqOiZPotnt%2F10.2.png?alt=media&amp;token=d67cd5c6-8c0d-4712-9f7d-3a0329f66e98" alt=""><figcaption></figcaption></figure>

**Path Link:** [**https://ess.pockethrms.com/ExitManagement/Transaction/Request?Menu=EmployeeSeparation**](https://ess.pockethrms.com/ExitManagement/Transaction/Request?Menu=EmployeeSeparation)

### **How to Approve an Employee's Self - Separation Request as a Manager On ESS?**

**Path:** ESS Portal > Exit > Approval > Separation Approval Data

When an employee raises a separation request, it comes to the assigned manager on the Separation Approval Data page. Here the manager reviews the request, adjusts the Resignation and Last Working dates if needed and enabled for Manager, and either approves or rejects it.

**Step 1:** When a request is raised, Manager gets a notification under Exit Management on their dashboard, along with an email if configured in [**Exit Notification Settings**](#how-to-configure-exit-notification-settings) (Reminder).

<figure><img src="https://4282324958-files.gitbook.io/~/files/v0/b/gitbook-x-prod.appspot.com/o/spaces%2F-MXep_PEmh8mDPVWj49x%2Fuploads%2FDTCTnbmlXipOiv9u4SF8%2F1.png?alt=media&amp;token=4a696848-fab2-42e5-83a1-6514ddd04f0b" alt=""><figcaption></figcaption></figure>

Log in to the **ESS Portal**, open the **Exit module**, go to **Approval**, and select **Separation Approval Data**.

<figure><img src="https://4282324958-files.gitbook.io/~/files/v0/b/gitbook-x-prod.appspot.com/o/spaces%2F-MXep_PEmh8mDPVWj49x%2Fuploads%2FDXtPR8QeS2ev9ykO001l%2F1.2.png?alt=media&amp;token=2da08fbd-ffc4-49f5-a106-474b8c2640b1" alt=""><figcaption></figcaption></figure>

<br>

**Step 2:** The page opens on the **Separation Approval Data tab**, which lists the separation requests waiting for your approval. Each row shows the **employee code, name, module name, Entry date, last working date, separation type, separation category, separation reason, employee comments,** and **status.**

<figure><img src="https://4282324958-files.gitbook.io/~/files/v0/b/gitbook-x-prod.appspot.com/o/spaces%2F-MXep_PEmh8mDPVWj49x%2Fuploads%2F0FiUObXCWVLfT5BDCJ0J%2F2.png?alt=media&amp;token=d9a360da-53fc-4473-81d6-000491f90058" alt=""><figcaption></figcaption></figure>

**Step 3:** In the **Action column** of a request, click **Details** to open a read-only summary of the full separation request.

<figure><img src="https://4282324958-files.gitbook.io/~/files/v0/b/gitbook-x-prod.appspot.com/o/spaces%2F-MXep_PEmh8mDPVWj49x%2Fuploads%2FrUv6SrFSjtbVKjUdhYiK%2F3.png?alt=media&amp;token=a9f9ff08-03c7-4ab8-8123-b582ceb606d4" alt=""><figcaption></figcaption></figure>

<figure><img src="https://4282324958-files.gitbook.io/~/files/v0/b/gitbook-x-prod.appspot.com/o/spaces%2F-MXep_PEmh8mDPVWj49x%2Fuploads%2FD0dwd8afKL3SMS40S2MM%2F4.png?alt=media&amp;token=ee9ad516-5c58-4ceb-afd9-1f359d0721fa" alt=""><figcaption></figcaption></figure>

**Step 4:** Click **Manager Status** to check the approval status of all the Managers.

<figure><img src="https://4282324958-files.gitbook.io/~/files/v0/b/gitbook-x-prod.appspot.com/o/spaces%2F-MXep_PEmh8mDPVWj49x%2Fuploads%2FlxAeQUbM2M9gGZeBnIsa%2F5.png?alt=media&amp;token=70910adc-f3db-4516-a462-8c90bb271dd4" alt="" width="289"><figcaption></figcaption></figure>

<figure><img src="https://4282324958-files.gitbook.io/~/files/v0/b/gitbook-x-prod.appspot.com/o/spaces%2F-MXep_PEmh8mDPVWj49x%2Fuploads%2F0hDmgzXtpyc4NFw3aULI%2F5.2.png?alt=media&amp;token=2e2a6418-1726-4bd2-b192-9bd8e9552b88" alt=""><figcaption></figcaption></figure>

**Step 5:** Click **View** to open the approval screen for the request.

<figure><img src="https://4282324958-files.gitbook.io/~/files/v0/b/gitbook-x-prod.appspot.com/o/spaces%2F-MXep_PEmh8mDPVWj49x%2Fuploads%2FsrQEOCbzX3ZoKuEj7ovk%2F6.png?alt=media&amp;token=489489d4-09d3-40be-b9ea-8d920c6c2604" alt=""><figcaption></figcaption></figure>

**Step 6:** Review the request. You can adjust the **Resignation Date** and **Last Working Date** using the calendars if needed and only if the Admin/HR has enabled the edit rights for the Managers. The page also shows the last working date calculated from the notice period and modifications done by Managers prior to your level (if available).

<figure><img src="https://4282324958-files.gitbook.io/~/files/v0/b/gitbook-x-prod.appspot.com/o/spaces%2F-MXep_PEmh8mDPVWj49x%2Fuploads%2FQutI6nCtKuQamz7y8Heo%2F7.png?alt=media&amp;token=2c310eb6-2b10-4eee-aca3-a7c6df52e9c2" alt=""><figcaption></figcaption></figure>

**Step 7:** Enter your **mandatory comments** in the Manager Remarks box.

<figure><img src="https://4282324958-files.gitbook.io/~/files/v0/b/gitbook-x-prod.appspot.com/o/spaces%2F-MXep_PEmh8mDPVWj49x%2Fuploads%2FBjDP9m3vHyWGcn8dL1Gq%2F8.png?alt=media&amp;token=43fca690-9a23-4db2-ba4a-8c39bdc73f90" alt=""><figcaption></figcaption></figure>

**Step 8:** Click **Approve** to approve the request,

<figure><img src="https://4282324958-files.gitbook.io/~/files/v0/b/gitbook-x-prod.appspot.com/o/spaces%2F-MXep_PEmh8mDPVWj49x%2Fuploads%2FimIlon4q1xaAdQdY98fq%2F9.png?alt=media&amp;token=a5e7d48d-3053-4c8c-bc97-d91afb3f17f2" alt="" width="284"><figcaption></figcaption></figure>

or **Reject** to reject it.

<figure><img src="https://4282324958-files.gitbook.io/~/files/v0/b/gitbook-x-prod.appspot.com/o/spaces%2F-MXep_PEmh8mDPVWj49x%2Fuploads%2FjFVzmsbW3VisNUqUaNiS%2F10.png?alt=media&amp;token=a118ffd7-9d64-40f1-ad3b-57e887412572" alt="" width="284"><figcaption></figcaption></figure>

Once you approve, the request moves to the department head(s) if available, else it directly moves to HR.

**Path Link:** [**https://ess.pockethrms.com/ExitManagement/Transaction/Approval?Menu=SeparationApprovalData**](https://ess.pockethrms.com/ExitManagement/Transaction/Approval?Menu=SeparationApprovalData)

&#x20;

### **How to Approve Employee Separation as a Department Head On ESS?**

**Path:** ESS Portal > Exit > Approval > Department Head Separation Approval

The **Department Head Separation Approval** page is where the assigned department head reviews and acts on separation requests that have cleared manager approval.

**Step 1:** When a **Separation Request** has received Managers approval, the Department Heads gets a notification under Exit Management on their dashboard, along with an email if configured in [**Exit Notification Settings (Reminder).**](#how-to-configure-exit-notification-settings)

<figure><img src="https://4282324958-files.gitbook.io/~/files/v0/b/gitbook-x-prod.appspot.com/o/spaces%2F-MXep_PEmh8mDPVWj49x%2Fuploads%2FGrq4dhVx2NemNn2kR0oL%2F1.png?alt=media&amp;token=0c229dfe-0949-4a4b-9642-6fcab73a240a" alt=""><figcaption></figcaption></figure>

Log in to the **ESS Portal**, open the **Exit module**, go to **Approval**, and select **Department Head Separation Approval.**

<figure><img src="https://4282324958-files.gitbook.io/~/files/v0/b/gitbook-x-prod.appspot.com/o/spaces%2F-MXep_PEmh8mDPVWj49x%2Fuploads%2Fy7gwFLpQCclT5PWk9nZS%2F1.2.png?alt=media&amp;token=bd78a36f-1abb-453c-a074-5cb6311d41fe" alt=""><figcaption></figcaption></figure>

**Step 2:** The page lists separation requests awaiting department head approval. Each row shows the **employee code, name, module name, creation date, last working date, separation type, separation category, notice period days, separation reason,** and **entry status.**

<figure><img src="https://4282324958-files.gitbook.io/~/files/v0/b/gitbook-x-prod.appspot.com/o/spaces%2F-MXep_PEmh8mDPVWj49x%2Fuploads%2FKjsJLUpPU4Am4e63bWJY%2F2.png?alt=media&amp;token=4a446bad-85a9-4fe4-88f3-6f16639bb1fd" alt=""><figcaption></figcaption></figure>

**Step 3:** In the **Action column** of a request, click **Details** to open a read-only summary of the full separation request.

<figure><img src="https://4282324958-files.gitbook.io/~/files/v0/b/gitbook-x-prod.appspot.com/o/spaces%2F-MXep_PEmh8mDPVWj49x%2Fuploads%2FCTdzD3glDhwDV5vdRfnB%2F3.png?alt=media&amp;token=1839f0d0-c873-444b-8c0e-d51cc50bdbea" alt=""><figcaption></figcaption></figure>

<figure><img src="https://4282324958-files.gitbook.io/~/files/v0/b/gitbook-x-prod.appspot.com/o/spaces%2F-MXep_PEmh8mDPVWj49x%2Fuploads%2Fr2NQbZOf3qcSXcEf8Jsu%2F3.2.png?alt=media&amp;token=cfec35c9-9795-4eda-82c4-bed240eb6ee9" alt=""><figcaption></figcaption></figure>

**Step 4:** Click **Department Head Status** to see the assigned department head's code (including you), **name, approval status, approval date,** and **remark.**

<figure><img src="https://4282324958-files.gitbook.io/~/files/v0/b/gitbook-x-prod.appspot.com/o/spaces%2F-MXep_PEmh8mDPVWj49x%2Fuploads%2FG79GzoE5NAAixZlvMCIG%2F4.png?alt=media&amp;token=50990657-90d0-4431-942f-15d3e0b01e72" alt=""><figcaption></figcaption></figure>

**Step 5:** Click **View Details** to open the approval screen for the request.

<figure><img src="https://4282324958-files.gitbook.io/~/files/v0/b/gitbook-x-prod.appspot.com/o/spaces%2F-MXep_PEmh8mDPVWj49x%2Fuploads%2FgF2ehevPYE02dHLBHvH9%2F5.png?alt=media&amp;token=2ce0f159-8917-4fee-815d-7b1abe612e75" alt=""><figcaption></figcaption></figure>

**Step 6:** Review the request — **Employee code and name, Last Working Date, Separation Category, Separation Type, Asset Details, and Separation Reason.** The page also shows the Last Working Date calculated from the notice period and dates modified by the Managers.

<figure><img src="https://4282324958-files.gitbook.io/~/files/v0/b/gitbook-x-prod.appspot.com/o/spaces%2F-MXep_PEmh8mDPVWj49x%2Fuploads%2FrOjjxBxReNQWFQqFO3vV%2F6.png?alt=media&amp;token=a4eca7a9-609a-4a40-85fc-3a7e54c4b473" alt=""><figcaption></figcaption></figure>

**Step 7**: Check **Asset Details** for the list of assets allotted to the employee. Before approving, release any allocated assets&#x20;

go to [Asset Details- Employee Profile](https://cloud.pockethrms.com/Employee/employee/Profile?employeeID=17490\&module=profile\&empstatus=1)\
And Select the **Asset** and Click on **Release**, add a **note**, and **click Submit.**

<figure><img src="https://4282324958-files.gitbook.io/~/files/v0/b/gitbook-x-prod.appspot.com/o/spaces%2F-MXep_PEmh8mDPVWj49x%2Fuploads%2FvQIqotPSnppdynpcczj5%2F7.png?alt=media&amp;token=23b2edd3-defa-4bc5-947b-c0401260ef9a" alt=""><figcaption></figcaption></figure>

<figure><img src="https://4282324958-files.gitbook.io/~/files/v0/b/gitbook-x-prod.appspot.com/o/spaces%2F-MXep_PEmh8mDPVWj49x%2Fuploads%2FhldxCxwbQODuJ3ML5yhU%2F7.2.png?alt=media&amp;token=bf7add1f-5796-4c03-8139-dbca66706f4a" alt=""><figcaption></figcaption></figure>

<figure><img src="https://4282324958-files.gitbook.io/~/files/v0/b/gitbook-x-prod.appspot.com/o/spaces%2F-MXep_PEmh8mDPVWj49x%2Fuploads%2FzoFQqikhrdqyul885X7M%2F7.3.png?alt=media&amp;token=4951debc-e73b-4a28-89f3-2d1858d98140" alt="" width="280"><figcaption></figcaption></figure>

**Step 8:** Enter a **Reason.**

<figure><img src="https://4282324958-files.gitbook.io/~/files/v0/b/gitbook-x-prod.appspot.com/o/spaces%2F-MXep_PEmh8mDPVWj49x%2Fuploads%2FsrGUvpyepeV1oJPSeFZk%2F8.png?alt=media&amp;token=6466971f-91f1-4496-8797-576f5e4b6b65" alt=""><figcaption></figcaption></figure>

**Step 9:** Click **Approve** to approve the request,

<figure><img src="https://4282324958-files.gitbook.io/~/files/v0/b/gitbook-x-prod.appspot.com/o/spaces%2F-MXep_PEmh8mDPVWj49x%2Fuploads%2FE0lCJzSlyu09yiNfm48x%2F9.png?alt=media&amp;token=d9c10257-fe8e-4d99-9532-553a971af3be" alt="" width="284"><figcaption></figcaption></figure>

or **Reject** to reject it.

<figure><img src="https://4282324958-files.gitbook.io/~/files/v0/b/gitbook-x-prod.appspot.com/o/spaces%2F-MXep_PEmh8mDPVWj49x%2Fuploads%2Fo0GXXQOERNe0qMtCbvKa%2F9.2.png?alt=media&amp;token=dcd2943f-df4d-48c7-960b-cfb7bbcd22e0" alt="" width="284"><figcaption></figcaption></figure>

Once approved, the request moves to HR For their Approval.

**Path Link:** [**https://ess.pockethrms.com/ExitManagement/Transaction/Approval?Menu=DepartmentHeadSeparationApproval**](https://ess.pockethrms.com/ExitManagement/Transaction/Approval?Menu=DepartmentHeadSeparationApproval)

### **How to Approve Employee Separation as HR Through ESS?**

**Path:** ESS Portal > Exit > Approval > HR Separation Approval Data

The **HR Separation Approval Data** page is where HR reviews separation requests after manager and department head approval.

**Reviewing Requests**

**Step 1:** Log in to the **ESS Portal**, open the **Exit module**, go to **Approval**, and select **HR Separation Approval Data.**

<figure><img src="https://4282324958-files.gitbook.io/~/files/v0/b/gitbook-x-prod.appspot.com/o/spaces%2F-MXep_PEmh8mDPVWj49x%2Fuploads%2FW4gWc1rA4QSPiDQwkILc%2F1.png?alt=media&amp;token=a9bafd14-5855-45bd-9ca6-a76947c79d83" alt=""><figcaption></figcaption></figure>

**Step 2:** Optionally filter by **Employee** or **Department**, then **click Search.**

<figure><img src="https://4282324958-files.gitbook.io/~/files/v0/b/gitbook-x-prod.appspot.com/o/spaces%2F-MXep_PEmh8mDPVWj49x%2Fuploads%2F5HNJvZ1CDbV4nDuvbxM9%2F2.png?alt=media&amp;token=2a0507fd-7e5e-49af-bae9-950fcf291b3d" alt=""><figcaption></figcaption></figure>

**Step 3:** The page lists all separation requests, each showing the **code, name, entry date, resignation date, modified LWD, Manager status, Department status,** and **HR Action.**

<figure><img src="https://4282324958-files.gitbook.io/~/files/v0/b/gitbook-x-prod.appspot.com/o/spaces%2F-MXep_PEmh8mDPVWj49x%2Fuploads%2FpAmH2lDnRbCAK48bRxh0%2Fimage.png?alt=media&amp;token=c2e9cfc4-d245-4c4a-a8bb-aecd381eeaac" alt=""><figcaption></figcaption></figure>

**Step 4:** Click the **Manager status** badge to see the manager's approval level, name, approval date, and remark.

<figure><img src="https://4282324958-files.gitbook.io/~/files/v0/b/gitbook-x-prod.appspot.com/o/spaces%2F-MXep_PEmh8mDPVWj49x%2Fuploads%2Fm5o2zk7CEcfEUQyYjZEv%2F4.1.png?alt=media&amp;token=999de3a8-9897-40e8-bd57-25bafe6b8251" alt=""><figcaption></figcaption></figure>

<figure><img src="https://4282324958-files.gitbook.io/~/files/v0/b/gitbook-x-prod.appspot.com/o/spaces%2F-MXep_PEmh8mDPVWj49x%2Fuploads%2F6JOMThAj3QtINZpxEKZK%2F4.2.png?alt=media&amp;token=daf516b6-735e-401b-af48-faa171be478b" alt=""><figcaption></figcaption></figure>

**Step 5:** Click the **Department status** badge to see the department head's approval, approval date, and remark.

<figure><img src="https://4282324958-files.gitbook.io/~/files/v0/b/gitbook-x-prod.appspot.com/o/spaces%2F-MXep_PEmh8mDPVWj49x%2Fuploads%2FpgS50Dy2Zd2vJ0BHwYLI%2F5.png?alt=media&amp;token=80caf49d-faf7-4609-8d8f-d4d4a223f13c" alt=""><figcaption></figcaption></figure>

<figure><img src="https://4282324958-files.gitbook.io/~/files/v0/b/gitbook-x-prod.appspot.com/o/spaces%2F-MXep_PEmh8mDPVWj49x%2Fuploads%2Fs9peSFBiR9ffXS61TFLh%2F5.2.png?alt=media&amp;token=7e68a727-8900-455e-bcb6-2ce5c47cf379" alt=""><figcaption></figcaption></figure>

**Approving a Request**

**Step 1:** Set **Employee Rehire** to **Yes** or **No**.

<figure><img src="https://4282324958-files.gitbook.io/~/files/v0/b/gitbook-x-prod.appspot.com/o/spaces%2F-MXep_PEmh8mDPVWj49x%2Fuploads%2FSGwSLa0bUZnw7h5GLomq%2F6.png?alt=media&amp;token=ac6cd3d5-a529-4f94-9b78-7e7670c7e5c5" alt=""><figcaption></figcaption></figure>

A remarks popup appears with a default and editable message based on your choice&#x20;

<figure><img src="https://4282324958-files.gitbook.io/~/files/v0/b/gitbook-x-prod.appspot.com/o/spaces%2F-MXep_PEmh8mDPVWj49x%2Fuploads%2FjEsn9X3LvAF839FUqCeT%2F6.2.png?alt=media&amp;token=b70e4063-941f-4943-a128-37683b175830" alt=""><figcaption></figcaption></figure>

<figure><img src="https://4282324958-files.gitbook.io/~/files/v0/b/gitbook-x-prod.appspot.com/o/spaces%2F-MXep_PEmh8mDPVWj49x%2Fuploads%2FsOsRJUoKhVDS7gfCduhM%2F6.3.png?alt=media&amp;token=0c49c214-7471-4c08-8ee6-173b0187d625" alt=""><figcaption></figcaption></figure>

which you can edit before saving.

<figure><img src="https://4282324958-files.gitbook.io/~/files/v0/b/gitbook-x-prod.appspot.com/o/spaces%2F-MXep_PEmh8mDPVWj49x%2Fuploads%2Ffsu4t8MDwvfWJBvQqJCm%2F6.4.png?alt=media&amp;token=b9115b52-ba7b-49c8-a1bd-e29654a81938" alt=""><figcaption></figcaption></figure>

<figure><img src="https://4282324958-files.gitbook.io/~/files/v0/b/gitbook-x-prod.appspot.com/o/spaces%2F-MXep_PEmh8mDPVWj49x%2Fuploads%2FSbcq1kcb2CpUHb3PSUAW%2F6.5.png?alt=media&amp;token=e1e9b100-959c-443c-b0b1-ede56dc37411" alt=""><figcaption></figcaption></figure>

**Step 2:** The **Exit Interview Form** will open automatically if the Admin/HR has configured the same in **Exit Notification Settings** in cloud. However, it can be manually opened and closed from here.

<figure><img src="https://4282324958-files.gitbook.io/~/files/v0/b/gitbook-x-prod.appspot.com/o/spaces%2F-MXep_PEmh8mDPVWj49x%2Fuploads%2FIgTWgwib0ZMD5AeecErO%2F7.png?alt=media&amp;token=6202c40d-36dc-4faf-87e6-b2d9a72cc6e9" alt=""><figcaption></figcaption></figure>

**Step 3:** Click **Approve** in the HR Action column to open the review screen.

<figure><img src="https://4282324958-files.gitbook.io/~/files/v0/b/gitbook-x-prod.appspot.com/o/spaces%2F-MXep_PEmh8mDPVWj49x%2Fuploads%2FfXvtBLkVogJA4Cz7EA3N%2F8.png?alt=media&amp;token=c44e548a-9ecd-44d2-b2af-721ba50a8013" alt=""><figcaption></figcaption></figure>

**Step 4:** Review the **Separation Details** and **Asset Details** shown.

<figure><img src="https://4282324958-files.gitbook.io/~/files/v0/b/gitbook-x-prod.appspot.com/o/spaces%2F-MXep_PEmh8mDPVWj49x%2Fuploads%2F1fj6hrOq82PnTkWapjre%2F9.png?alt=media&amp;token=f81e095c-6533-4bd3-ba17-d055cc450680" alt=""><figcaption></figcaption></figure>

**Step 5:** Set **Separation Type** as **Voluntary** or **Involuntary** and Separation Category — for a self-service separation, set Separation Category to Resignation.

**Step 6:** Enter **DHR/HR Remark.** This is mandatory.

<figure><img src="https://4282324958-files.gitbook.io/~/files/v0/b/gitbook-x-prod.appspot.com/o/spaces%2F-MXep_PEmh8mDPVWj49x%2Fuploads%2F6XaOk2xUBmEwRPjTrTvc%2F10.png?alt=media&amp;token=90d56811-693b-4b8a-a3c9-6942e4f887ed" alt=""><figcaption></figcaption></figure>

**Step 7:** Attach a file under **Attachment**, if needed.

<figure><img src="https://4282324958-files.gitbook.io/~/files/v0/b/gitbook-x-prod.appspot.com/o/spaces%2F-MXep_PEmh8mDPVWj49x%2Fuploads%2FCihUFk1SdoT2kcibXNtD%2F11.png?alt=media&amp;token=4b8db062-8c51-4955-b18b-30d830c6b41c" alt=""><figcaption></figcaption></figure>

**Step 8:** Click **Approve** to open the Approve Employee Separation,

<figure><img src="https://4282324958-files.gitbook.io/~/files/v0/b/gitbook-x-prod.appspot.com/o/spaces%2F-MXep_PEmh8mDPVWj49x%2Fuploads%2FUI9MgnQ8C8spjEHLsxyc%2F1.png?alt=media&amp;token=47e7cb6d-07f4-4443-b01f-26136764c70e" alt=""><figcaption></figcaption></figure>

or click **Withdraw** to withdraw the request instead.

<figure><img src="https://4282324958-files.gitbook.io/~/files/v0/b/gitbook-x-prod.appspot.com/o/spaces%2F-MXep_PEmh8mDPVWj49x%2Fuploads%2FiaxRMecKgCqwsSy5gLwK%2F1.2.png?alt=media&amp;token=811cdb93-c5c9-474b-9334-d5365c7d4a03" alt=""><figcaption></figcaption></figure>

**Step 9:** After Clicking Approve, Optionally set **Disable ESS Login after Separation**, as Days or Disable Instantly upon Separation.

<figure><img src="https://4282324958-files.gitbook.io/~/files/v0/b/gitbook-x-prod.appspot.com/o/spaces%2F-MXep_PEmh8mDPVWj49x%2Fuploads%2FHV4lRj1lIJVZXtjZNCAi%2F2.png?alt=media&amp;token=cb5f52c0-6391-498b-9c9d-0afb39ed8c8d" alt=""><figcaption></figcaption></figure>

**Step 10:** Choose **Approve and Separate Later** to approve the resignation now while keeping the employee active until their Last Working Date — they auto-separate at end of day on that date unless HR separates it first.

<figure><img src="https://4282324958-files.gitbook.io/~/files/v0/b/gitbook-x-prod.appspot.com/o/spaces%2F-MXep_PEmh8mDPVWj49x%2Fuploads%2F7cduiq1vVamPQn2ttWS1%2F3.png?alt=media&amp;token=23705dfb-c65d-46e7-b2e7-9430f66f8145" alt=""><figcaption></figcaption></figure>

<figure><img src="https://4282324958-files.gitbook.io/~/files/v0/b/gitbook-x-prod.appspot.com/o/spaces%2F-MXep_PEmh8mDPVWj49x%2Fuploads%2F94TVLYnuYyPPZBi4KWfg%2F5.png?alt=media&amp;token=46ec63df-70f4-4236-9fd2-f157c9231021" alt="" width="298"><figcaption></figcaption></figure>

**Step 11:** Choose **Approve and Separate Now** to approve and separate the employee immediately, adjusting ‘LWD Updates to’  if needed.

After Approve and Separate Later, the Approve button in the HR Action column turns into an Edit button, so HR can update the LWD or separate the employee early at any point before the auto-separation date.

<figure><img src="https://4282324958-files.gitbook.io/~/files/v0/b/gitbook-x-prod.appspot.com/o/spaces%2F-MXep_PEmh8mDPVWj49x%2Fuploads%2FIfwLZDl8HH6cbiUhm6ji%2F4.png?alt=media&amp;token=9c5639c4-7c8c-4fb7-859c-df5697790714" alt=""><figcaption></figcaption></figure>

After Approve and Separate Now, the employee is separated immediately, and the row's PDF, Excel, and comment icons become active —\
• PDF downloads the exit report,\
• Excel downloads it as a spreadsheet,\
• and the comment icon adds a remark.

<figure><img src="https://4282324958-files.gitbook.io/~/files/v0/b/gitbook-x-prod.appspot.com/o/spaces%2F-MXep_PEmh8mDPVWj49x%2Fuploads%2FHDcxHEhZre94JzMbuTWC%2F6.png?alt=media&amp;token=80df8463-3101-4cca-a669-c944a8196b04" alt=""><figcaption></figcaption></figure>

**Related Records**

**Step 1:** Scroll down to **Previous Records** and **click Load Previous Records** to see already-approved requests. Each row shows Rehire Remarks, Download PDF and Download Excel for the interview report, Manager Status, Details, and Edit for the separation and Last Working Date.

<figure><img src="https://4282324958-files.gitbook.io/~/files/v0/b/gitbook-x-prod.appspot.com/o/spaces%2F-MXep_PEmh8mDPVWj49x%2Fuploads%2FwS8KSmqoR8uYPppoRWLi%2F7.png?alt=media&amp;token=418e4a2e-4f55-43ff-912c-fd0d1fc9073e" alt=""><figcaption></figcaption></figure>

**Step 2:** Scroll down further to **Cloud Separation Records** and **click Load Cloud Separation Data** to see separations initiated directly from Cloud. Manager, Dept, and HR Action show as Cloud Separation for these rows, since they bypass the ESS approval chain.

<figure><img src="https://4282324958-files.gitbook.io/~/files/v0/b/gitbook-x-prod.appspot.com/o/spaces%2F-MXep_PEmh8mDPVWj49x%2Fuploads%2Fq2CPKsRT0MxC5zAqkuTx%2F8.png?alt=media&amp;token=4e81467b-c987-42f1-bd89-47290f3deed2" alt=""><figcaption></figcaption></figure>

**Path Link:** [**https://ess.pockethrms.com/ExitManagement/Transaction/Approval?Menu=HRSeparationApprovalData**](https://ess.pockethrms.com/ExitManagement/Transaction/Approval?Menu=HRSeparationApprovalData)

### **How to Approve Employee Separation as a Dedicated HR Through ESS?**&#xD;

**Path:** ESS Portal > Exit > Approval > DHR Separation Approval Data

A **Dedicated HR (DHR)** is an employee who is given HR-level approval and review access, but only for a specific set of employees who are tagged to them, instead of the entire company. This is useful when you want to split HR workload — for example, by department or location — without giving every HR person full visibility into all employee records.\
HR and DHR approval run in parallel after manager and department head approval.

**Important Note:** The HR and DHR Separation Approval Data tabs are initiated at the same time — this is a parallel approval, not a sequential one. Whichever of HR or DHR approves first, that decision is taken as the outcome.

**To add a dedicated HR:**  : [**How to Assign a Dedicated HR?**](https://docs.pockethrms.com/hr-and-admin-portal/cloud-configuration/hr/dedicated-hr%23what-is-a-dedicated-hr-and-how-do-i-assign-one)

**Reviewing Requests**

**Step 1:** Log in to the **ESS Portal**, open the **Exit module**, go to **Approval**, and select **DHR Separation Approval Data.**

<figure><img src="https://4282324958-files.gitbook.io/~/files/v0/b/gitbook-x-prod.appspot.com/o/spaces%2F-MXep_PEmh8mDPVWj49x%2Fuploads%2FJCoTcnvEDuojIeFvVSvZ%2F1.png?alt=media&amp;token=eea20754-1890-42c6-853b-91afffa61ac6" alt=""><figcaption></figcaption></figure>

\
**Step 2:** Optionally filter by **Employee** or **Department**, then click **Search**.

<figure><img src="https://4282324958-files.gitbook.io/~/files/v0/b/gitbook-x-prod.appspot.com/o/spaces%2F-MXep_PEmh8mDPVWj49x%2Fuploads%2FKVMXkXmETL1VZdDBO8fd%2F2.png?alt=media&amp;token=6c1d3f18-de66-4990-9dd0-cbe5c172d154" alt=""><figcaption></figcaption></figure>

**Step 3:** The page lists all separation requests, each showing the code, **name, entry date, resignation date, modified LWD, Manager status, Department status,** and **DHR Action.**

<figure><img src="https://4282324958-files.gitbook.io/~/files/v0/b/gitbook-x-prod.appspot.com/o/spaces%2F-MXep_PEmh8mDPVWj49x%2Fuploads%2FUwAOBkOt13j4L70G1DXr%2F3.png?alt=media&amp;token=c5b04b1f-7157-488f-84fe-911697498a6d" alt=""><figcaption></figcaption></figure>

**Step 4:** Click the **Manager status** badge to see the manager's approval level, name, approval date, and remark.

<figure><img src="https://4282324958-files.gitbook.io/~/files/v0/b/gitbook-x-prod.appspot.com/o/spaces%2F-MXep_PEmh8mDPVWj49x%2Fuploads%2FNaRjqGSmfRubVQOBDNww%2F4.png?alt=media&amp;token=ee665dbd-69e9-4469-966a-244339704f30" alt=""><figcaption></figcaption></figure>

<figure><img src="https://4282324958-files.gitbook.io/~/files/v0/b/gitbook-x-prod.appspot.com/o/spaces%2F-MXep_PEmh8mDPVWj49x%2Fuploads%2FhzZW85wKB6TSs0vLZM8g%2F4.2.png?alt=media&amp;token=fd94dbb9-a34e-4bc4-a724-80ebcdefc360" alt=""><figcaption></figcaption></figure>

**Step 5:** Click the **Department status** badge to see the department head's approval, approval date, and remark.

<figure><img src="https://4282324958-files.gitbook.io/~/files/v0/b/gitbook-x-prod.appspot.com/o/spaces%2F-MXep_PEmh8mDPVWj49x%2Fuploads%2FBNQ8xVozc76bUWG66NwG%2F5.png?alt=media&amp;token=b124f8f2-fd1d-4665-9367-eef05d53a65e" alt=""><figcaption></figcaption></figure>

**Approving a Request**

**Step 1:** Set **Employee Rehire** to **Yes** or **No**.

<figure><img src="https://4282324958-files.gitbook.io/~/files/v0/b/gitbook-x-prod.appspot.com/o/spaces%2F-MXep_PEmh8mDPVWj49x%2Fuploads%2Fh5wY3ya1wjmdf2PzJMO8%2F1.png?alt=media&amp;token=a422aa38-6263-4180-8482-291c8cc9641d" alt=""><figcaption></figcaption></figure>

**Step 2:** Set **Exit Interview** to **Open** or **Close**.

<figure><img src="https://4282324958-files.gitbook.io/~/files/v0/b/gitbook-x-prod.appspot.com/o/spaces%2F-MXep_PEmh8mDPVWj49x%2Fuploads%2Fl8OVThwUtxCKDK97inBK%2F2.png?alt=media&amp;token=8c835412-5cc4-47f6-a1fb-077b914792ff" alt=""><figcaption></figcaption></figure>

**Step 3:** Click **Approve in the DHR Action** column to open the review screen.

<figure><img src="https://4282324958-files.gitbook.io/~/files/v0/b/gitbook-x-prod.appspot.com/o/spaces%2F-MXep_PEmh8mDPVWj49x%2Fuploads%2F67UXkYdVywf0iRrltwQi%2F3.png?alt=media&amp;token=5bf80fdd-9a0b-48e2-a9f1-92a1324aad9e" alt=""><figcaption></figcaption></figure>

**Step 4:** Review the **Separation Details** and **Asset Details** shown.

<figure><img src="https://4282324958-files.gitbook.io/~/files/v0/b/gitbook-x-prod.appspot.com/o/spaces%2F-MXep_PEmh8mDPVWj49x%2Fuploads%2FWjD5SrW11TFz6h1Mozn8%2F4.png?alt=media&amp;token=fdffe268-592c-4193-8000-27d05bd04318" alt=""><figcaption></figcaption></figure>

**Step 5:** Set **Separation Type** and **Separation Category** — for a self-service separation, set Separation Category to Resignation.

<figure><img src="https://4282324958-files.gitbook.io/~/files/v0/b/gitbook-x-prod.appspot.com/o/spaces%2F-MXep_PEmh8mDPVWj49x%2Fuploads%2F0MX5kkvHZAvQQFfsQ2VL%2F5.png?alt=media&amp;token=646d1fc2-c5e7-4a2e-81a7-c7f92b8ea2c3" alt=""><figcaption></figcaption></figure>

**Step 6:** Enter **DHR/HR Remark.** This is mandatory.

<figure><img src="https://4282324958-files.gitbook.io/~/files/v0/b/gitbook-x-prod.appspot.com/o/spaces%2F-MXep_PEmh8mDPVWj49x%2Fuploads%2FrSK3zFjXPRWCUp5NOYzN%2F6.png?alt=media&amp;token=0222842c-c11f-4b04-8616-c1e2d7b77c55" alt=""><figcaption></figcaption></figure>

**Step 7:** Attach a file under **Attachment**, if needed.

<figure><img src="https://4282324958-files.gitbook.io/~/files/v0/b/gitbook-x-prod.appspot.com/o/spaces%2F-MXep_PEmh8mDPVWj49x%2Fuploads%2FmBwfGZQbMyFR4UZhgPvt%2F7.png?alt=media&amp;token=abfdf498-b5be-402a-9adc-05b93e84b1c9" alt=""><figcaption></figcaption></figure>

**Step 8:** Click **Approve** to open the **Approve Employee Separation choice,**

<figure><img src="https://4282324958-files.gitbook.io/~/files/v0/b/gitbook-x-prod.appspot.com/o/spaces%2F-MXep_PEmh8mDPVWj49x%2Fuploads%2FWvarn99J8XAPAeSJWiVL%2F8.png?alt=media&amp;token=0644e3e9-6eb5-4223-a8c4-2e918c531861" alt=""><figcaption></figcaption></figure>

or click **Withdraw** to withdraw the request instead.

<figure><img src="https://4282324958-files.gitbook.io/~/files/v0/b/gitbook-x-prod.appspot.com/o/spaces%2F-MXep_PEmh8mDPVWj49x%2Fuploads%2FA0TKSccytmaiFsYOysla%2F9.png?alt=media&amp;token=fd49d182-9f1a-4e4b-a588-c4b6bc8aaba2" alt=""><figcaption></figcaption></figure>

**Step 10:** Choose **Approve and Separate Later** to approve the resignation now while keeping the employee active until their Last Working Date — they auto-separate at end of day on that date unless updated first. Optionally set Disable ESS Login after Separation, as Days or Disable Instantly upon Separation.

<figure><img src="https://4282324958-files.gitbook.io/~/files/v0/b/gitbook-x-prod.appspot.com/o/spaces%2F-MXep_PEmh8mDPVWj49x%2Fuploads%2FQ4Sa42cD4DarABtXHxFV%2F10.png?alt=media&amp;token=3af41886-c035-40fa-9595-f721ea116b48" alt=""><figcaption></figcaption></figure>

<figure><img src="https://4282324958-files.gitbook.io/~/files/v0/b/gitbook-x-prod.appspot.com/o/spaces%2F-MXep_PEmh8mDPVWj49x%2Fuploads%2FZa564cSdYkVsYEA8hHRb%2F11.png?alt=media&amp;token=0fbb9c8d-3d7f-4bd5-a0fb-63827f1f02dc" alt=""><figcaption></figcaption></figure>

**Step 11:** Choose **Approve and Separate Now** to approve and separate the employee immediately, adjusting LWD Updates to if needed.

<figure><img src="https://4282324958-files.gitbook.io/~/files/v0/b/gitbook-x-prod.appspot.com/o/spaces%2F-MXep_PEmh8mDPVWj49x%2Fuploads%2FuPt4M6urjdQx8NC600LP%2F12.png?alt=media&amp;token=8745c759-e9b2-4c1a-a7e5-87d2d82ace28" alt=""><figcaption></figcaption></figure>

**Related Records**

**Step 1:** Scroll down to **Previous Records** to see already-approved requests.

<figure><img src="https://4282324958-files.gitbook.io/~/files/v0/b/gitbook-x-prod.appspot.com/o/spaces%2F-MXep_PEmh8mDPVWj49x%2Fuploads%2Fw6BIuoIZujMldeyuCKHz%2F13.png?alt=media&amp;token=d9d4e369-5f3f-449d-a432-3f0731434442" alt=""><figcaption></figcaption></figure>

Once approved here, the separation process is complete.

**Path Link:** [**https://ess.pockethrms.com/ExitManagement/Transaction/Approval?Menu=DHRSeparationApprovalData**](https://ess.pockethrms.com/ExitManagement/Transaction/Approval?Menu=DHRSeparationApprovalData)

### **How To Configure FNF No Dues Form Settings?**

The **FnF No Dues** process is where each approving department confirms that a departing employee has no outstanding dues against them before the final settlement is released.

The process begins according to the trigger set under **Full And Final Settings**, and routes to each approver in sequence.

This helps in:

* Collecting departmental clearance against a single settlement record
* Preventing a settlement from closing while dues remain open
* Giving each approver a defined window to act before the exit date

**Important:** The FnF No Dues process runs only when **Full & Final Process Activate** is set to **Yes** under [**Full And Final Settings**](#how-to-configure-full-and-final-settings), and only for department heads mapped under [**FnF Department Head Manager**](#how-to-assign-fnf-department-head-manager).

**When the FnF No Dues Process is Triggered**

The trigger point is set under **Full And Final Activation Trigger** in **Full And Final Settings**.

| **Option**                 | **Trigger Point**                                                        | **Ideal When / Suitable For**                                                                     |
| -------------------------- | ------------------------------------------------------------------------ | ------------------------------------------------------------------------------------------------- |
| **On Employee Separation** | F\&F forms are triggered after the employee is separated from the system | Best for companies preferring to start FnF only after confirmed exit                              |
| **On HR Approval**         | F\&F forms are triggered after HR approves the separation request in ESS | Useful when companies want early initiation after validation                                      |
| **X Days before LWD**      | F\&F forms are triggered x days before the Last Working Date             | Ideal for proactive departments who want to prepare in advance based on the most recent exit plan |

**smHRt Recommendation:** **X Days before LWD** offers the most flexibility and helps organizations avoid last-minute dependencies by initiating FnF at a pre-planned time.

To change the trigger, refer to [**Full And Final Settings**](https://cloud.pockethrms.com/Settings/Employee/ESSIndex?module=FullFinal\&submodule=FullFinalSettings)**.**

### **Where the FnF No Dues Form is Submitted**

Each approver submits their FnF No Dues Form from their own approval screen:

* Department Head — **ESS → F & F → Approval → Full Final Department Approval**
* HR — **ESS → F & F → Approval → Full Final HR Approval**

**Full Final Department Approval** and **Full Final HR Approval** appear as tabs at the top of the screen. You can switch between them without navigating away.

### **Full And Final Department Head Approval**

**Path: ESS → F & F → Approval → Full Final Department Approval**

The **Full Final Department Approval** screen is where a department head reviews a departing employee's separation record and submits the department's F\&F No Dues Form.

**Step 1: Open the Approval Screen**

Log in to the ESS Portal, go to **F & F**, then select **Approval** and open **Full Final Department Approval**.

<figure><img src="https://4282324958-files.gitbook.io/~/files/v0/b/gitbook-x-prod.appspot.com/o/spaces%2F-MXep_PEmh8mDPVWj49x%2Fuploads%2FqqiGdRc7At4iUcqN5oBo%2Fimage.png?alt=media&amp;token=afc3a2b9-93a1-4241-9c3a-83121784bac8" alt="" width="352"><figcaption></figcaption></figure>

**Step 2: Locate the Employee's Request**

The screen lists the separation requests routed to you. Use **Search** to filter the list, and **Show entries** to change the number of rows displayed.

<figure><img src="https://4282324958-files.gitbook.io/~/files/v0/b/gitbook-x-prod.appspot.com/o/spaces%2F-MXep_PEmh8mDPVWj49x%2Fuploads%2FXmGTRHuAWEnb2NL9z3X3%2Fimage.png?alt=media&amp;token=6e3c6125-03a8-410b-ab3d-8d6af14a00a2" alt=""><figcaption></figcaption></figure>

The list displays the following columns.

| **Column**         | **Description**                                        |
| ------------------ | ------------------------------------------------------ |
| **CODE**           | The employee's code                                    |
| **NAME**           | The employee's name                                    |
| **COMPANY**        | The company the employee belongs to                    |
| **ENTRY DATE**     | The date the request was raised                        |
| **STATUS**         | The current status of the request, such as **Pending** |
| **MANAGER STATUS** | Opens the manager's action status on the request       |
| **ACTION**         | **Details** and **View** buttons                       |

Each column heading can be clicked to sort the list.

<figure><img src="https://4282324958-files.gitbook.io/~/files/v0/b/gitbook-x-prod.appspot.com/o/spaces%2F-MXep_PEmh8mDPVWj49x%2Fuploads%2F2XYqP6JhX4tMoJHqduw9%2Fimage.png?alt=media&amp;token=5df964f9-39f4-4c78-b289-e731f02a644d" alt=""><figcaption></figcaption></figure>

**Step 3: Review the Separation Details**

Click **Details** to open the **Separation Details** window. The window displays:

* **Code**
* **Employee Name**
* **Personal Email ID**
* **Department**
* **Designation**
* **Date of Joining**
* **Last Working Date**
* **Separation Status**
* **Resignation Letter**
* **Resignation Date**
* **Personal Mobile No**
* **Address**
* **Separation Reason**
* **Remarks**
* **Other Attachments**

<figure><img src="https://4282324958-files.gitbook.io/~/files/v0/b/gitbook-x-prod.appspot.com/o/spaces%2F-MXep_PEmh8mDPVWj49x%2Fuploads%2FsUBomDDcIIHOLjidqZRf%2Fimage.png?alt=media&amp;token=df64a845-8242-4aab-9c15-1acfb4696695" alt=""><figcaption></figcaption></figure>

<figure><img src="https://4282324958-files.gitbook.io/~/files/v0/b/gitbook-x-prod.appspot.com/o/spaces%2F-MXep_PEmh8mDPVWj49x%2Fuploads%2FnSGlTncpLFqoBYUdULyW%2Fimage.png?alt=media&amp;token=83a60963-532e-485d-863a-636965bb8a26" alt=""><figcaption></figcaption></figure>

**Step 4: Download the Resignation Letter**

Click **Download** against **Resignation Letter** to download the letter submitted by the employee.

<figure><img src="https://4282324958-files.gitbook.io/~/files/v0/b/gitbook-x-prod.appspot.com/o/spaces%2F-MXep_PEmh8mDPVWj49x%2Fuploads%2Fe6GZk3wcwayda0TM5BJv%2Fimage.png?alt=media&amp;token=284035f2-8cc0-4b00-a159-e0b041de723f" alt=""><figcaption></figcaption></figure>

**Step 5: Check the Manager Status**

Click **Manager Status** to open the **Manager Status** window. The window lists each approver against the request:

<figure><img src="https://4282324958-files.gitbook.io/~/files/v0/b/gitbook-x-prod.appspot.com/o/spaces%2F-MXep_PEmh8mDPVWj49x%2Fuploads%2FZoB5B47ibbWVpILBkLGf%2Fimage.png?alt=media&amp;token=0073278f-e572-4820-a0e3-6b0341ba5139" alt=""><figcaption></figcaption></figure>

* **MANAGER CODE** and **MANAGER NAME** — the approver's employee code and name
* **FORM** — the form assigned to that approver, such as **F\&F No Dues Form**
* **STATUS** — the approver's status against that form, such as **Pending**

<figure><img src="https://4282324958-files.gitbook.io/~/files/v0/b/gitbook-x-prod.appspot.com/o/spaces%2F-MXep_PEmh8mDPVWj49x%2Fuploads%2FJ2CSR5HJJfUI9QXqUY6K%2Fimage.png?alt=media&amp;token=2d34c752-32bf-47a2-b371-a18bc097f951" alt=""><figcaption></figcaption></figure>

The **STATUS** value against each approver updates as that approver submits their form.

Click **Close** to return to the list.

**Step 6: Open the F\&F No Dues Form**

Click **View** to open the **Full Final Approval Save New** screen.

<figure><img src="https://4282324958-files.gitbook.io/~/files/v0/b/gitbook-x-prod.appspot.com/o/spaces%2F-MXep_PEmh8mDPVWj49x%2Fuploads%2FNjDDczUsx9hOMFMrEj8b%2Fimage.png?alt=media&amp;token=ae7e827e-e525-4169-aedd-3fc513efc265" alt=""><figcaption></figcaption></figure>

The header displays **Employee Name & Code**, **Last Working Day**, **Tenure** and **Employee Status** for the employee.

<figure><img src="https://4282324958-files.gitbook.io/~/files/v0/b/gitbook-x-prod.appspot.com/o/spaces%2F-MXep_PEmh8mDPVWj49x%2Fuploads%2FKYZpsizcrXazAzrCzkIJ%2Fimage.png?alt=media&amp;token=64abd79b-3934-49cf-a453-00b2ba245fdc" alt=""><figcaption></figcaption></figure>

**Step 7: Upload the F\&F No Dues Form**

Under **1. F\&F No dues form**, drop the completed form into the upload area or click to browse for it.

The file must be a PDF, JPG or PNG, and must not exceed 5 MB. The upload is mandatory.

<figure><img src="https://4282324958-files.gitbook.io/~/files/v0/b/gitbook-x-prod.appspot.com/o/spaces%2F-MXep_PEmh8mDPVWj49x%2Fuploads%2FFbhCSavoSTfMfItuObrC%2Fimage.png?alt=media&amp;token=68b5cc53-8625-4872-84ae-d7aaded8392b" alt=""><figcaption></figcaption></figure>

**Step 8: Submit the Form**

Click **SUBMIT** to submit the department's clearance.

<figure><img src="https://4282324958-files.gitbook.io/~/files/v0/b/gitbook-x-prod.appspot.com/o/spaces%2F-MXep_PEmh8mDPVWj49x%2Fuploads%2FbY5Oa7eJP2an1SHAMog9%2Fimage.png?alt=media&amp;token=5c19fe52-d349-47b6-bd80-4f4f06cc9fd9" alt=""><figcaption></figcaption></figure>

The request then moves to the next approver, and the row is removed from the **Full Final Department Approval** list.

**Important:** The sections shown on this screen are built from the form assigned to the **FullnFinal** module under **Form Master**. Sections and fields differ by company.

### **Full And Final HR Approval**

**Path: ESS → F & F → Approval → Full Final HR Approval**

The **Full Final HR Approval** screen is where HR reviews each department's F\&F No Dues Form, submits HR's own form, and closes the clearance for the departing employee.

**Step 1: Open the Approval Screen**

Log in to the ESS Portal, go to **F & F**, then select **Approval** and open **Full Final HR Approval**.

<figure><img src="https://4282324958-files.gitbook.io/~/files/v0/b/gitbook-x-prod.appspot.com/o/spaces%2F-MXep_PEmh8mDPVWj49x%2Fuploads%2FYA5AVDHYzXWqMHn2cjJx%2Fimage.png?alt=media&amp;token=9dbe68d5-9c7c-4051-a5b9-87b181946a4b" alt="" width="326"><figcaption></figcaption></figure>

<figure><img src="https://4282324958-files.gitbook.io/~/files/v0/b/gitbook-x-prod.appspot.com/o/spaces%2F-MXep_PEmh8mDPVWj49x%2Fuploads%2FJanwLd2PdR0F6fj9TVmp%2Fimage.png?alt=media&amp;token=10f8b338-ac9f-47e4-ba40-260dcb8f408f" alt=""><figcaption></figcaption></figure>

**Step 2: Locate the Employee's Request**

The **Pending Records** section lists the clearances awaiting HR action. Use **Search** to filter the list, and **Show entries** to change the number of rows displayed.

<figure><img src="https://4282324958-files.gitbook.io/~/files/v0/b/gitbook-x-prod.appspot.com/o/spaces%2F-MXep_PEmh8mDPVWj49x%2Fuploads%2FpObHE4M7bAgZ7jEtYTmG%2Fimage.png?alt=media&amp;token=e25d4192-c497-438a-896f-87b81f1c4342" alt=""><figcaption></figcaption></figure>

**Step 3: Check the Manager Status**

Click **Manager Status** to open the **Manager Status** window. The window lists each approver against the request:

<figure><img src="https://4282324958-files.gitbook.io/~/files/v0/b/gitbook-x-prod.appspot.com/o/spaces%2F-MXep_PEmh8mDPVWj49x%2Fuploads%2FpakZoGdgutwUC1nYhBR5%2Fimage.png?alt=media&amp;token=ea268235-de1a-497e-a121-2881b6fa2fbe" alt=""><figcaption></figcaption></figure>

<figure><img src="https://4282324958-files.gitbook.io/~/files/v0/b/gitbook-x-prod.appspot.com/o/spaces%2F-MXep_PEmh8mDPVWj49x%2Fuploads%2FuniZX4kRSMZeta8et87Y%2Fimage.png?alt=media&amp;token=cdbe8235-f802-4592-ad0d-8ecc21654821" alt=""><figcaption></figcaption></figure>

**Step 4: Review the Separation Details**

Click **Details** to open the **Separation Details** window. The window displays:

* **Code**
* **Employee Name**
* **Personal Email ID**
* **Department**
* **Designation**
* **Date of Joining**
* **Last Working Date**
* **Separation Status**
* **Resignation Letter**
* **Resignation Date**
* **Personal Mobile No**
* **Address**
* **Separation Reason**
* **Remarks**
* **Other Attachments**

<figure><img src="https://4282324958-files.gitbook.io/~/files/v0/b/gitbook-x-prod.appspot.com/o/spaces%2F-MXep_PEmh8mDPVWj49x%2Fuploads%2FUSf3zGHgEDQj1xjTlerz%2Fimage.png?alt=media&amp;token=0f62e09d-72fe-4642-99c2-e4a2b7fe1e2f" alt=""><figcaption></figcaption></figure>

<figure><img src="https://4282324958-files.gitbook.io/~/files/v0/b/gitbook-x-prod.appspot.com/o/spaces%2F-MXep_PEmh8mDPVWj49x%2Fuploads%2FjODSmae0D1fnyBh9U8qH%2Fimage.png?alt=media&amp;token=a499e42a-2cd1-43a4-b464-f42bf3f12179" alt=""><figcaption></figcaption></figure>

**Step 5: Open the F\&F No Dues Form**

Click **View** to open the **Full Final Approval Save New** screen.

<figure><img src="https://4282324958-files.gitbook.io/~/files/v0/b/gitbook-x-prod.appspot.com/o/spaces%2F-MXep_PEmh8mDPVWj49x%2Fuploads%2F4zgwG655ryssaJk5Ehwy%2Fimage.png?alt=media&amp;token=268e8f96-67d3-4caa-ae87-fbe36290229e" alt=""><figcaption></figcaption></figure>

**Step 6: Review the Employee Summary**

The header displays the employee's **Employee Name & Code**, **Last Working Day** with the number of days elapsed, the **Department Head** responsible for the clearance, the **Tenure**, and the **Employee Status**.

<figure><img src="https://4282324958-files.gitbook.io/~/files/v0/b/gitbook-x-prod.appspot.com/o/spaces%2F-MXep_PEmh8mDPVWj49x%2Fuploads%2FGBOkjwsIhhWT5tebkREX%2Fimage.png?alt=media&amp;token=b1ab6f0a-1e7b-4b44-8cf4-4a9d613f2a30" alt=""><figcaption></figcaption></figure>

**Step 7: Select the Form to Work On**

The screen displays one tab per form assigned against the clearance:

* **Full and Final Form - F\&F No Dues Form** — the department's F\&F No Dues Form

<figure><img src="https://4282324958-files.gitbook.io/~/files/v0/b/gitbook-x-prod.appspot.com/o/spaces%2F-MXep_PEmh8mDPVWj49x%2Fuploads%2F5k5UDEDutQ1nY64QdJSh%2Fimage.png?alt=media&amp;token=e0e01a38-5d98-477e-b252-71f50eb3561d" alt=""><figcaption></figcaption></figure>

* **Full and Final Form - HR** — HR's own F\&F No Dues Form

<figure><img src="https://4282324958-files.gitbook.io/~/files/v0/b/gitbook-x-prod.appspot.com/o/spaces%2F-MXep_PEmh8mDPVWj49x%2Fuploads%2FQ2ifwOBDI2pg6T9iRFLV%2Fimage.png?alt=media&amp;token=443fe0ba-314d-45ed-9ecf-de16becffdae" alt=""><figcaption></figcaption></figure>

Each tab displays an attention banner naming the team responsible for that form, reminding you to verify that all asset and access clearances are documented before final submission.

**Step 8: Upload the Form**

Under **1. F\&F No dues form**, drop the completed form into the upload area or click to browse for it.

The file must be a PDF, JPG or PNG, and must not exceed 5 MB. The upload is mandatory.

<figure><img src="https://4282324958-files.gitbook.io/~/files/v0/b/gitbook-x-prod.appspot.com/o/spaces%2F-MXep_PEmh8mDPVWj49x%2Fuploads%2FzRTUiEXeW4yBiumLPqDe%2Fimage.png?alt=media&amp;token=78bd3027-6466-4184-9e74-5a968d28268a" alt=""><figcaption></figcaption></figure>

**Step 9: Save or Submit the Form**

The buttons available depend on the tab you are on:

* **SAVE AS DRAFT** — the filled form is saved but not submitted. Once saved, the Submit button is enabled to approve the FnF.

<figure><img src="https://4282324958-files.gitbook.io/~/files/v0/b/gitbook-x-prod.appspot.com/o/spaces%2F-MXep_PEmh8mDPVWj49x%2Fuploads%2FOEF72Tzoc3Qb7C8HKh8X%2Fimage.png?alt=media&amp;token=c1f8af9e-dc2c-46f3-8ad5-31711d9e7d24" alt=""><figcaption></figcaption></figure>

* **SAVE AND SUBMIT OR SUBMIT FINAL APPROVAL** — the form is saved and submitted at once. The FnF is approved and moved to the **Approved Records** section of this screen.

<figure><img src="https://4282324958-files.gitbook.io/~/files/v0/b/gitbook-x-prod.appspot.com/o/spaces%2F-MXep_PEmh8mDPVWj49x%2Fuploads%2Fj3o2REkpD5pmoA5q59wv%2Fimage.png?alt=media&amp;token=c36e3fcc-9287-4f6c-aefe-ad7cbdc0d642" alt=""><figcaption></figcaption></figure>

Click the **?** icon beside the buttons to view a summary of what **Save As Draft** and **Save and Submit** do.

A form saved as a **draft** can be reopened and edited later if corrections are needed, then submitted once it is final.

**Step 10: View the Approved Records**

Scroll to the **Approved Records** section at the bottom of the screen. It lists the clearances that have already been approved, and carries its own **Search**, **Show entries** and pagination controls.

<figure><img src="https://4282324958-files.gitbook.io/~/files/v0/b/gitbook-x-prod.appspot.com/o/spaces%2F-MXep_PEmh8mDPVWj49x%2Fuploads%2Fh3sJjh8MD29WFjvmncKg%2Fimage.png?alt=media&amp;token=92bf6c70-06f3-4944-9c83-a12d65079ae0" alt=""><figcaption></figcaption></figure>

* **F & F NO DUES REPORT** — click **Download PDF** or **Download Excel** to download the approved No Dues report in that format.

<figure><img src="https://4282324958-files.gitbook.io/~/files/v0/b/gitbook-x-prod.appspot.com/o/spaces%2F-MXep_PEmh8mDPVWj49x%2Fuploads%2FnuH0T2JOv6ebKWqI76x8%2Fimage.png?alt=media&amp;token=979fcd27-1f3b-4dc1-9563-8c143b859540" alt=""><figcaption></figcaption></figure>

* **MANAGER STATUS** — opens the same **Manager Status** window, with each approver's status shown as **Approved**.

<figure><img src="https://4282324958-files.gitbook.io/~/files/v0/b/gitbook-x-prod.appspot.com/o/spaces%2F-MXep_PEmh8mDPVWj49x%2Fuploads%2F62COc1eNcBOVsXt2T934%2Fimage.png?alt=media&amp;token=58062768-7ab2-44f1-91b9-a7836f6c75ea" alt=""><figcaption></figcaption></figure>

* **ACTION** — click **Details** to open the **Separation Details** window, or **Edit** to reopen the **Full and Final Form - HR** screen.

<figure><img src="https://4282324958-files.gitbook.io/~/files/v0/b/gitbook-x-prod.appspot.com/o/spaces%2F-MXep_PEmh8mDPVWj49x%2Fuploads%2FNBPQnxMwZ7Blw8mpQZ8P%2Fimage.png?alt=media&amp;token=ec83ecae-4937-4001-bdd4-a3a1cef30eeb" alt=""><figcaption></figcaption></figure>

**Approval Sequence**

The department heads submit their F\&F No Dues Forms first. Once a department head submits, the request moves to the next approver and the row is removed from the **Full Final Department Approval** list.

HR is the final approver. No further approval is required once HR submits, and the record moves to the **Approved Records** section of the **Full Final HR Approval** screen.

**Related Configuration**

The FnF No Dues process depends on two configuration screens in Cloud. Configure both before the process is used.

| **Screen**                                                                                                                           | **Path**                                                          | **What it controls**                                                                         |
| ------------------------------------------------------------------------------------------------------------------------------------ | ----------------------------------------------------------------- | -------------------------------------------------------------------------------------------- |
| [**Full And Final Settings**](https://cloud.pockethrms.com/Settings/Employee/ESSIndex?module=FullFinal\&submodule=FullFinalSettings) | Cloud → ESS Settings → Full & Final → Full And Final Settings     | Whether the process is active, the activation trigger, the clearance period, and the HR form |
| [**FnF Department Head Manager.**](https://cloud.pockethrms.com/Settings/Employee/Index?module=hr\&submodule=AssignFormManager)      | Cloud → ESS Settings → Full & Final → FnF Department Head Manager | Which department heads receive the FnF No Dues request for each department                   |

**Why is this step required?**

If **Full & Final Process Activate** is not set to **Yes**, the FnF No Dues forms are never triggered and no approval screen receives a request.

If no department head is mapped under **FnF Department Head Manager**, the request has no recipient and the clearance chain cannot start.

To create or edit the form used here, refer to [Form Master.](#how-to-configure-form-master)

### **How to Configure Full and Final Settlement of an Employee?**

The **Full and Final Settlement (F\&F)** process calculates and settles all dues payable to an employee when they leave the organization, including earnings, deductions, leave encashment, notice period adjustments, and any recoveries.

For detailed information on the Full and Final Settlement process, refer to the following topics:

#### How to run or generate a Full and Final Settlement?

Follow the steps outlined in the dedicated guide to generate and process the Full and Final Settlement for an employee.

[**How to run or generate a Full and Final Settlement?**](https://docs.pockethrms.com/hr-and-admin-portal/cloud-configuration/employee-management/employee-separation-and-release#id-1.-how-to-run-or-generate-a-full-and-final-settlement)

#### How to download Full and Final processed payslip (FNF Settlement Slip)?

Once the Full and Final Settlement has been processed, follow the dedicated guide to download the employee’s FNF Settlement Slip.

[**How to download Full and Final processed payslip (FNF Settlement Slip)?**](https://docs.pockethrms.com/hr-and-admin-portal/cloud-configuration/employee-management/employee-separation-and-release#id-9.-how-to-download-full-and-final-processed-payslip-fnf-settlement-slip)

**For any queries, contact** [**support@pockethrms.com**](mailto:support@pockethrms.com)


# Expense Module

Step-by-step Guide to setup the Expense Module

### **Expense Module**

The **Expense Module** in Pocket HRMS helps organisations manage employee expense claims and reimbursements in one place.

Employees can submit expenses such as travel, food, conveyance, or other business-related expenses, upload bills or supporting documents, and track the status of their claims.

This helps in:

* Centralising expense submission, documentation, and status tracking for employees
* Applying organisation-defined rules for expense types, eligibility, and restrictions
* Structuring expense approvals through a configurable **Approval Matrix**

#### **Prerequisites**

Before configuring the Expense Module, ensure the following:

* **Self-Service Role**: Assign the required ESS role to Employees, Managers, HR/Admin, and Finance users. Refer to [Self Service Role](https://docs.pockethrms.com/hr-and-admin-portal/cloud-configuration/employee-management/setup-and-activation).
* **Expense Rights**: Enable the required Expense options through [Role Allocation](https://docs.pockethrms.com/hr-and-admin-portal/ess-configurations/profile-info/role-allocation).
* **Expense Manager**: Assign the employee's Expense Manager through the [Approval Matrix](https://docs.pockethrms.com/hr-and-admin-portal/cloud-configuration/employee-management/approval-matrix).
* **Employee Details**: Ensure basic employee details such as **Employee Code** and **Business Unit** are updated.

Once these are in place, you can proceed with the Cloud Configuration.

### **Cloud Configuration**

**Path: Cloud → ESS Settings → Expense**

The **Expense** tab groups the settings that control how expense claims work for your organisation:

### **How to set ‘Expense Type’?**

**Path: Cloud → ESS Settings → Expense → Expense Type**

**Expense Types** – the categories of expense employees can claim, such as travel or food

**Step 1:** Log in to the cloud portal and select **‘ESS Settings’.**&#x20;

Click on the **‘Expense’** tab and select the **‘Expense type’** subtab,

&#x20;now simply click on the **‘+’** icon to create a new Expense Type.

<figure><img src="https://4282324958-files.gitbook.io/~/files/v0/b/gitbook-x-prod.appspot.com/o/spaces%2F-MXep_PEmh8mDPVWj49x%2Fuploads%2F6WKrtusLeZZWijTtnjFI%2FHow%20to%20set%20Expense%20Type%201.png?alt=media&amp;token=93bd8dd6-6ce3-4e77-bb7f-9326b8eb68cf" alt=""><figcaption></figcaption></figure>

**Step 2: Select the Business Unit**

Under **Business Unit**, select the company this expense type applies to.

**Step 3: Enter the Expense Type Name**

Enter a name for the expense category in the **Expense Type** field. This field is mandatory.

**Step 4: Set Approval Rights**

Set **Approval Rights** to **Yes** if claims under this expense type require approval, or **No** if they do not.

<figure><img src="https://4282324958-files.gitbook.io/~/files/v0/b/gitbook-x-prod.appspot.com/o/spaces%2F-MXep_PEmh8mDPVWj49x%2Fuploads%2FUIbslgTxPsdGJnB0bJF8%2FFrame%201%20-%202026-08-25T100254.313.png?alt=media&amp;token=86c7063c-4cbb-48a0-887d-aadf13e9d91d" alt=""><figcaption></figcaption></figure>

**Step 5: Enable Location Tracking**

Check the **Location** box to add **From** and **To** location fields to the expense claim entry, for tracking travel-based expenses. Leave it unchecked if location tracking does not apply to this expense type.

**Step 6: Set Location as Mandatory**

When **Location** is checked, the **Location Required Mandatory** toggle appears. Enable it to make entering location details compulsory for the employee, or leave it off to keep location details optional.

**Step 7: Set Expense Mode as Mandatory**

Enable **Mode required Mandatory** to make selecting an **Expense Mode** compulsory when an employee submits a claim under this expense type.

<figure><img src="https://4282324958-files.gitbook.io/~/files/v0/b/gitbook-x-prod.appspot.com/o/spaces%2F-MXep_PEmh8mDPVWj49x%2Fuploads%2FWxA0UeL6EF1rlyVRVl87%2FFrame%201%20-%202026-08-25T100734.420.png?alt=media&amp;token=268caa11-9b5e-4be7-add1-8bef29b29163" alt=""><figcaption></figcaption></figure>

**Step 8: Set the Expense Type as Active**

Keep **Active** checked to make the expense type available for selection during claim entry. Uncheck it to disable the expense type without deleting it.

**Step 9: Save the Expense Type**

Click **Save** to add the expense type, or **Close** to discard the entry without saving.

<figure><img src="https://4282324958-files.gitbook.io/~/files/v0/b/gitbook-x-prod.appspot.com/o/spaces%2F-MXep_PEmh8mDPVWj49x%2Fuploads%2FhW8fIa6j7RFa9RAkO6Ti%2FFrame%201%20-%202026-08-25T100856.340.png?alt=media&amp;token=f9b729ac-4fe8-4be2-bc61-fde77d3e7579" alt=""><figcaption></figcaption></figure>

#### **Managing Existing Expense Types**

Each configured expense type is listed as a card, showing:

* **Business Unit**
* **Expense Type**
* **Approval Rights**
* **Active Location** — with its mandatory / non-mandatory status
* **Is Finance Approval Required**
* **Mode required Mandatory**
* **Active**

**Step 1: Edit an Expense Type**

Click the **pencil icon** on an expense type card to edit its details.

<figure><img src="https://4282324958-files.gitbook.io/~/files/v0/b/gitbook-x-prod.appspot.com/o/spaces%2F-MXep_PEmh8mDPVWj49x%2Fuploads%2F1W7OhcAVj4iX50zpIfLF%2FFrame%201%20-%202026-08-25T101032.831.png?alt=media&amp;token=90cf83aa-73bf-4814-b00f-48dee35c8c10" alt=""><figcaption></figcaption></figure>

**Step 2: Delete an Expense Type**

Click the **trash icon** on an expense type card to delete it.

<figure><img src="https://4282324958-files.gitbook.io/~/files/v0/b/gitbook-x-prod.appspot.com/o/spaces%2F-MXep_PEmh8mDPVWj49x%2Fuploads%2FBb6apG5H0mGnBopR69vb%2FFrame%201%20-%202026-08-25T101052.666.png?alt=media&amp;token=95e1c785-ca02-4387-b467-d08f27703383" alt=""><figcaption></figcaption></figure>

**Step 3: Bulk Import Expense Types**

Click **Bulk Import** to upload multiple expense types at once.

<figure><img src="https://4282324958-files.gitbook.io/~/files/v0/b/gitbook-x-prod.appspot.com/o/spaces%2F-MXep_PEmh8mDPVWj49x%2Fuploads%2Flqtye3tWREg4ugWU8GlD%2FFrame%201%20-%202026-08-25T101121.800.png?alt=media&amp;token=ed2a8ce4-f811-43fb-831e-032af7223de8" alt=""><figcaption></figcaption></figure>

**Path Link:** [**https://cloud.pockethrms.com/Settings/Employee/ESSIndex?module=Expense\&submodule=ExpenseType**](https://cloud.pockethrms.com/Settings/Employee/ESSIndex?module=Expense\&submodule=ExpenseType)

### **How to Set ‘Expense Eligibility’ for expense types?**

**Path: Cloud → ESS Settings → Expense → Employee Eligibility**

**Expense Eligibility** – which employees or business units can claim which expense types, and the applicable limits

Go to **‘ESS Settings’** from the cloud portal and under the ‘**Expense**’ tab select ‘**Employee Eligibility**’ subtab then click on the ‘**+**’ icon to open an ‘**Expense Eligibility**’ pop-up window.

<figure><img src="https://4282324958-files.gitbook.io/~/files/v0/b/gitbook-x-prod.appspot.com/o/spaces%2F-MXep_PEmh8mDPVWj49x%2Fuploads%2FgpgvtcQdkQdZHRhiTlHJ%2FFrame%201%20-%202026-08-25T102622.699.png?alt=media&amp;token=3b6b44be-3f9e-44f5-b747-19fa57df3180" alt=""><figcaption></figcaption></figure>

* Fill in the necessary fields to set ‘Expense Eligibility’ to improve productivity management.
* Start with selecting the ‘Business Unit’ you want it to be applicable to. This way system allows you the flexibility to customize expense eligibility for various business units.
* From the ‘Expense Type’ drop down you can choose from various expenses that you have created in the system conveniently.
* You can also select an ‘Employee Code’ making it super easy to select individual employees and save a lot of time in the process.
* You also need to set an ‘Amount’ which will be the upper limit for this eligibility criteria. So, the expense claim that will be approved for the eligibility criteria can not exceed this amount.
* The ‘Approval Type’ drop-down gives you quick access to set it as ‘Claim Wise’ or ‘Month Wise’

**'Claim Wise'** means approvals are done individually for each claim, offering flexibility. 'Month Wise' means a consolidated amount will be considered for approval within a month.

* In addition to that you get an option to ensure that there is ‘No Approval up to Amount’. That way mundane expenses can pass swiftly without hindering day-to-day operations. That also means less administrative work for those who are in charge of approving the expense and focus better on their high-stake responsibilities.
* Option to set ‘Prior Days Claim Request Limit’ allows you to limit the prior claim request up to a certain number of days.

**For example:** if you set 7 days in this setting then the system will not allow employees to submit claim requests more than 7 days old.

* If you tick the check box for ‘Limit to attendees’ the system will check the eligibility according to the employee’s attendance or completed shift hours. This means only the employees who have completed a certain number of shift hours or attendance.
* If you tick the check box for **'Eligibility Override'**, the employee will be allowed to raise a claim that goes beyond the set eligibility amount. When this happens, the system will show a confirmation prompt asking the user to confirm before the claim is submitted.

**Path Link:** [**https://cloud.pockethrms.com/Settings/Employee/ESSIndex?module=Expense\&submodule=ExpenseEligibility**](https://cloud.pockethrms.com/Settings/Employee/ESSIndex?module=Expense\&submodule=ExpenseEligibility)

### **How to do ‘Auto Document Number Setting’?**

**Path: Cloud → ESS Settings → Expense →** **Auto Document Number Setting**

**Auto Document Number Setting’** generates a unique '**Transaction Code'** automatically when an employee submits a claim. This feature streamlines record-keeping by ensuring each transaction has a distinct identification, reducing errors and enhancing organization. It simplifies tracking and makes it easier to find it resulting in efficient management of employee claims within the system.

Log into the cloud portal and go to the **‘ESS Settings’** menu. Under the **‘Expense’** tab click on the **‘Auto Document Settings’** subtab.

<figure><img src="https://4282324958-files.gitbook.io/~/files/v0/b/gitbook-x-prod.appspot.com/o/spaces%2F-MXep_PEmh8mDPVWj49x%2Fuploads%2FsINUbUOyamZxqQVgDImZ%2FHow%20to%20do%20Auto%20Document%20Number%20Setting1.png?alt=media&amp;token=854e6b41-4993-44d1-a6ee-c2bff5b42449" alt=""><figcaption></figcaption></figure>

The system allows you to customize series settings by selecting the initial '**Characters**,' specifying the '**Trailing Zero**,' and the 'Starting Number.' This feature allows you to see the preview for defining unique identifiers for various elements within the system resulting in better data management.

**Path Link:** [**https://cloud.pockethrms.com/Settings/Employee/ESSIndex?module=Expense\&submodule=DocumentNumberSetting**](https://cloud.pockethrms.com/Settings/Employee/ESSIndex?module=Expense\&submodule=DocumentNumberSetting)

### **How to create ‘Expense Mode’?**

**Path: Cloud → ESS Settings → Expense → Expense Mode**

**Expense Modes** – the modes of expense (for example, per kilometre) and their rates

The system allows you to easily create ‘**Expense Mode’**. Go to the **‘ESS Settings**’ menu and under the **‘Expense’** tab click on the ‘**Expense Mode**’ subtab and simply click on the ‘**+**’ Icon. Here, you can enter essential information such as the **‘Expense Type**’, ‘**Mode**’, the ‘**Rate**’ that allows for this expense type and the ‘**Unit**’ of expense.

The system allows you to simply click on the checkbox for the **‘Kilometer Required?’**. If you check the box the ‘**Unit**’ will always be in the terms of Kilometer.

<figure><img src="https://4282324958-files.gitbook.io/~/files/v0/b/gitbook-x-prod.appspot.com/o/spaces%2F-MXep_PEmh8mDPVWj49x%2Fuploads%2FY2SPcPVXBGHLwklwrufl%2FHow%20to%20create%20Expense%20Mode1.png?alt=media&amp;token=0736bc3e-5403-48a9-b156-45c0e978da96" alt=""><figcaption></figcaption></figure>

**Path Link:** [**https://cloud.pockethrms.com/Settings/Employee/ESSIndex?module=Expense\&submodule=ExpenseMode**](https://cloud.pockethrms.com/Settings/Employee/ESSIndex?module=Expense\&submodule=ExpenseMode)

### **How to create ‘Expense Purpose’?**

**Path: Cloud → ESS Settings → Expense → Expense Purpose**

**Expense Purposes** – the list of purposes employees can select for a claim

Go to **‘ESS Settings’** and under the ‘Expense’ tab click on the **‘Expense Purpose’** subtab and click on the ‘**+**’ icon. A **‘Purpose’** pop-up window will open, simply enter the purpose and click on the ‘**Save**’ button. The system will immediately add this purpose.

<figure><img src="https://4282324958-files.gitbook.io/~/files/v0/b/gitbook-x-prod.appspot.com/o/spaces%2F-MXep_PEmh8mDPVWj49x%2Fuploads%2FIe6dCJVFiFfIkJwj1Uy7%2FHow%20to%20create%20Expense%20Purpose1.png?alt=media&amp;token=5697dd2e-b8fb-44cd-a3cc-3280319801fe" alt=""><figcaption></figcaption></figure>

You can also create multiple expense purposes in the system.

**Path Link:** [**https://cloud.pockethrms.com/Settings/Employee/ESSIndex?module=Expense\&submodule=ExpensePurpose**](https://cloud.pockethrms.com/Settings/Employee/ESSIndex?module=Expense\&submodule=ExpensePurpose)

### **How to set due dates and expense cycles?**

**Path: Cloud → ESS Settings → Expense → Restrictions**

**Expense Cycles and Due Dates** – the periods expenses are grouped into and their submission deadlines

**Step 1**: Log into the cloud portal. Go to the **‘ESS Settings’** menu. Under the **‘Expense’** tab click on the **‘Restrictions’** subtab. Select the checkbox for the **‘Due Date Required’** option. That will allow you to add multiple expense cycles.

![](https://4282324958-files.gitbook.io/~/files/v0/b/gitbook-x-prod.appspot.com/o/spaces%2F-MXep_PEmh8mDPVWj49x%2Fuploads%2FEYjBWuI54uzoWNSgff7J%2F0.png?alt=media)

**Step 2**: Fill in the details in the following fields accordingly

* **Count** – Number of expense cycles you want create for a month.
* **Date Range** – Fill in the start date and the end date for the expense cycle in the first and second boxes respectively

The expenses that are occurred during this date range will be considered as part of the respective expense cycle.

* **Due Date** – The last date to submit expense claims for respective expense cycle

**Note**: If your company policy requires employees to submit hard copies of the bills/invoices to HR/Finance person, the ‘Due Date’ will also be applicable for these submissions. The HR will update the status for the bills they received.

* **Month** - Select the option for the due date:

1. Current - If the due date is in the same month as the expense cycle.
2. Next - If the due date is in the following month of the expense cycle.

Once you entered all the details click on the ‘Save’ button and the employee will see the defined expense cycles while requesting the expense claim.

**For example,**

We keep the ‘**Count**’ for the expense cycles ‘2’

1\. Date Range: 1 to 15, Due Date: 25 of the ‘Current’ month.

2\. Date Range: 16 to 31, Due Date: 10 of the ‘Next’ month.

![](https://4282324958-files.gitbook.io/~/files/v0/b/gitbook-x-prod.appspot.com/o/spaces%2F-MXep_PEmh8mDPVWj49x%2Fuploads%2FZ0jOb8fnnNbKbh2DWj45%2F1.png?alt=media)

**Path Link:** [**https://cloud.pockethrms.com/Settings/Employee/ESSIndex?module=Expense\&submodule=Restrictions**](https://cloud.pockethrms.com/Settings/Employee/ESSIndex?module=Expense\&submodule=Restrictions)

### **How to Restrict/Block certain Expense Types against another expense type claim request?**

**Path: Cloud → ESS Settings → Expense → Restrictions**

**Expense Restrictions** – rules that block or restrict certain expense types against others

**Step 1**: Log into the cloud portal. Go to the **‘ESS Settings**’ menu. Under the ‘**Expense’** tab click on the **‘Restrictions’** subtab.

In the **‘Restrictions Against Expenses’** section you will find fields that help you put restrictions against expenses.

![](https://4282324958-files.gitbook.io/~/files/v0/b/gitbook-x-prod.appspot.com/o/spaces%2F-MXep_PEmh8mDPVWj49x%2Fuploads%2FpDAcxtxcIMc6AruamDf6%2F2.png?alt=media)

**Step 2:** From the **‘Expense Type’** drop-down, select the type of expense you want to put restrictions against.

For example, if you want to restrict or block certain expense requests against the **‘Travel’** expense, you need to select the ‘Travel’ option from the **‘Expense Type’** drop-down.

![](https://4282324958-files.gitbook.io/~/files/v0/b/gitbook-x-prod.appspot.com/o/spaces%2F-MXep_PEmh8mDPVWj49x%2Fuploads%2FCDDUTiNbszhEm9l49OTA%2F3.png?alt=media)

**Step 3**: Select the checkbox for the **‘Exclusive Expense’** if you want to restrict other expenses against it.

The **‘Block Expenses’** field will become visible under the ‘Exclusive Expense?’ field.

![](https://4282324958-files.gitbook.io/~/files/v0/b/gitbook-x-prod.appspot.com/o/spaces%2F-MXep_PEmh8mDPVWj49x%2Fuploads%2F26N5o0CwTm4UCEVW9LNJ%2F4.png?alt=media)

**Step 4**: From the **‘Block Expenses’** drop-down you can choose single or multiple expenses that you want to restrict against the exclusive expense.

That means if the employee has added the exclusive expense in their claim entry, the system won’t let them add the restricted/blocked expense.

![](https://4282324958-files.gitbook.io/~/files/v0/b/gitbook-x-prod.appspot.com/o/spaces%2F-MXep_PEmh8mDPVWj49x%2Fuploads%2F98NHm11HVmkdxaE5LNIy%2F5.png?alt=media)

**Step 5**: Select the checkbox for ‘Remarks Mandatory’ to ensure that the employee provides a remark for their expense claim entry and click on the ‘Save’ button and the restrictions will be applied to the employee’s expense claim entries.

**Path Link:** [**https://cloud.pockethrms.com/Settings/Employee/ESSIndex?module=Expense\&submodule=Restrictions**](https://cloud.pockethrms.com/Settings/Employee/ESSIndex?module=Expense\&submodule=Restrictions)

### **How to set a ‘Lock Date’ for expense claims?**

**Path: Cloud → ESS Settings → Expense → Expense Lock**

**Expense Lock Dates** – the date before which expense entries cannot be submitted

Go to **ESS Settings** and under the Expense tab go to the **‘Expense Lock’** subtab. This feature allows you to set a lock date for the expense type. For this enter the date against the Expense type, this is the lock date for an entry date.

<figure><img src="https://4282324958-files.gitbook.io/~/files/v0/b/gitbook-x-prod.appspot.com/o/spaces%2F-MXep_PEmh8mDPVWj49x%2Fuploads%2Fo0NZNVHM70jFvan81mT6%2FFrame%201%20-%202026-08-25T103108.873.png?alt=media&amp;token=b94f0a1a-e33b-44a1-92bb-e24a989b8354" alt=""><figcaption></figcaption></figure>

For example, if you set a lock date for a particular date type the system will not allow employees to submit entries before that date. This feature helps you bring a more structured approach to expense management and improve efficiency.

**Path Link:** [**https://cloud.pockethrms.com/Settings/Employee/ESSIndex?module=Expense\&submodule=ExpenseLock**](https://cloud.pockethrms.com/Settings/Employee/ESSIndex?module=Expense\&submodule=ExpenseLock)

### **How to do trip configuration?**

**Path: Cloud → ESS Settings → Expense → Trips**

**Trip Settings** – whether trip-based claims are enabled, and how proof documents are captured

Under the Expense tab, click on the **Trip Configuration** subtab. Use the **Enable Trip Functionality** toggle key to turn trip capture on or off for the ESS portal and mobile app.

<figure><img src="https://4282324958-files.gitbook.io/~/files/v0/b/gitbook-x-prod.appspot.com/o/spaces%2F-MXep_PEmh8mDPVWj49x%2Fuploads%2FL3IDOTYFeZ1vZpJHwXbY%2FFrame%201%20-%202026-08-25T104012.421.png?alt=media&amp;token=9959a8d2-f927-4c7c-b0a6-816cadf60483" alt=""><figcaption></figcaption></figure>

Once trips are enabled, you can choose the **Trip Type** — **Manual Trip**, where the employee enters the Start and End KM and location manually, and attaches an odometer reading as proof; or **Location-Based Trip**, where the employee searches and selects locations via map, and the KM is auto-calculated from the selected From/To locations.

You can choose to configure proof uploads through **Camera Only** or **Camera and Gallery**. The camera-only feature will work only on mobile devices.

You will also get an option to make this attachment mandatory using the **Make this mandatory** toggle. When enabled, the attachment will be required at the time of submission.

The **KM Modification Rights** toggle lets you decide who is allowed to edit the KM entered for a trip — **Manager**, **Finance**, or **Both**. By default, both Managers and Finance have rights to edit the amount.

Next, you need to configure the expense type and mode in the expense module.

For that go to ‘ESS Settings’ in the admin portal, select the ‘Expense’ tab and then ‘**Expense Type’.**

<figure><img src="https://4282324958-files.gitbook.io/~/files/v0/b/gitbook-x-prod.appspot.com/o/spaces%2F-MXep_PEmh8mDPVWj49x%2Fuploads%2FzYuhvB6k2o5XpjFnC1NP%2FHow%20to%20do%20trip%20configuration2.png?alt=media&amp;token=6513afbc-565b-40b1-8f07-7bc668bdc9d6" alt=""><figcaption></figcaption></figure>

Now you can select the ‘**Expense Mode**’ subtab under the expense tab and click on the ‘**+**’ icon. A pop-up window will open where you can define ‘Rate’ and ‘unit while setting up mode and on the basis of this configuration trips functionality will work. You must check the box for **‘Kilometers Required’** for the trip function.

<figure><img src="https://4282324958-files.gitbook.io/~/files/v0/b/gitbook-x-prod.appspot.com/o/spaces%2F-MXep_PEmh8mDPVWj49x%2Fuploads%2FHV883gT6D6q6DvlM1767%2FHow%20to%20do%20trip%20configuration3.png?alt=media&amp;token=a770a507-33f3-4ff0-ad40-a45e11eb2d9d" alt=""><figcaption></figcaption></figure>

**Path Link:** [**https://cloud.pockethrms.com/Settings/Employee/ESSIndex?module=Expense\&submodule=TripConfiguration**](https://cloud.pockethrms.com/Settings/Employee/ESSIndex?module=Expense\&submodule=TripConfiguration)

### **How To Configure Expense Field Creation?**

The **Expense Field Creation** page lets you add custom fields to Expense forms, such as **Expense Claim**, without any additional development.

It appears inside **Field Creation** when the **Expense** module is selected, and lists every custom field configured for the chosen Expense form.

This helps in:

* Capturing additional expense details specific to your organisation
* Controlling which custom fields are mandatory before submission
* Extending Expense forms without changing the core application

**Path: Login into Cloud Portal → Settings → HR → Expense Field Creation.**

**Step 1:** Log in to the **Cloud Portal** with your credentials. From the left-hand navigation menu, click **Settings**, then select **HR**.

<figure><img src="https://4282324958-files.gitbook.io/~/files/v0/b/gitbook-x-prod.appspot.com/o/spaces%2F-MXep_PEmh8mDPVWj49x%2Fuploads%2FcCTBbQIbKsNqiGiOTKaN%2FPicture1.png?alt=media&amp;token=a6f8efcc-fe11-4dec-93a6-836ab2ec5617" alt=""><figcaption></figcaption></figure>

**Step 2: Open Expense Field Creation**

From the list of modules in **Field Creation**, select **Expense** to open the **Expense Field Creation** screen.

<figure><img src="https://4282324958-files.gitbook.io/~/files/v0/b/gitbook-x-prod.appspot.com/o/spaces%2F-MXep_PEmh8mDPVWj49x%2Fuploads%2FmqtinS1Gn0w442u4uxDF%2FPicture2.png?alt=media&amp;token=6f0e4132-4915-431d-a393-066dc22ccb8f" alt=""><figcaption></figcaption></figure>

**Step 3: Select the Expense Form**

The section header displays **Custom Fields,** based on the form selected in the dropdown beside it — for example, **Expense Claim**. Select a different form from the dropdown to view or add custom fields for that form instead.

<figure><img src="https://4282324958-files.gitbook.io/~/files/v0/b/gitbook-x-prod.appspot.com/o/spaces%2F-MXep_PEmh8mDPVWj49x%2Fuploads%2FJIIXRJSaYBKL12gAzmEW%2FPicture3.png?alt=media&amp;token=d90542f1-a30f-4d6b-937a-36865f7e763e" alt=""><figcaption></figcaption></figure>

**Step 4: Add a Custom Field**

Click **+ Add Field** to open the **Add Custom Field** panel.

<figure><img src="https://4282324958-files.gitbook.io/~/files/v0/b/gitbook-x-prod.appspot.com/o/spaces%2F-MXep_PEmh8mDPVWj49x%2Fuploads%2FhsfsFJjd4PLDqYbpnsbk%2FPicture4.png?alt=media&amp;token=a8424b86-778a-4058-9100-edfd448304d4" alt=""><figcaption></figcaption></figure>

**Step 5: Enter the Field Label**

Under **Field Configuration**, enter a name for the field in **Field Label** — for example, **City**.

<figure><img src="https://4282324958-files.gitbook.io/~/files/v0/b/gitbook-x-prod.appspot.com/o/spaces%2F-MXep_PEmh8mDPVWj49x%2Fuploads%2Fz2mWKCtf14tyMMddSIgS%2FPicture5.png?alt=media&amp;token=232271b2-ed0d-419b-82da-4c73bf985752" alt=""><figcaption></figcaption></figure>

The system auto-generates a **System ID** by prefixing the label with **cf\_** and lowercasing it — for example, city becomes cf\_city.\
Click the **edit** icon next to it to set a custom ID instead.

<figure><img src="https://4282324958-files.gitbook.io/~/files/v0/b/gitbook-x-prod.appspot.com/o/spaces%2F-MXep_PEmh8mDPVWj49x%2Fuploads%2FE9KRP5chIQacCt9Qp9BZ%2FPicture6.png?alt=media&amp;token=c262f812-0645-4cc6-9a0b-1b38b8c5f6b7" alt=""><figcaption></figcaption></figure>

**Step 6: Select the Field Type**

Select the field's data type from the **Field Type** dropdown. Available types include:

* Text
* Number
* Dropdown
* Multi-select
* Date
* File Upload
* Email
* Phone
* Radio Button

**Step 7: Set Field Behaviour**

<figure><img src="https://4282324958-files.gitbook.io/~/files/v0/b/gitbook-x-prod.appspot.com/o/spaces%2F-MXep_PEmh8mDPVWj49x%2Fuploads%2FFsJEHWKqeis1rON3GZSe%2FPicture7.png?alt=media&amp;token=961f7757-eb83-49af-882f-f831eea17cf9" alt=""><figcaption></figcaption></figure>

Enable **Mandatory** to require the field before the form can be submitted.

<figure><img src="https://4282324958-files.gitbook.io/~/files/v0/b/gitbook-x-prod.appspot.com/o/spaces%2F-MXep_PEmh8mDPVWj49x%2Fuploads%2F9ZnUqG0YRroCw69CY9WY%2FPicture8.png?alt=media&amp;token=239a46b6-07b5-4f53-869f-def7c4ef1733" alt=""><figcaption></figcaption></figure>

Enable **Help Text** to reveal a text input where you can enter guidance text shown to the user — for example, "**Select your current residing city.**"

<figure><img src="https://4282324958-files.gitbook.io/~/files/v0/b/gitbook-x-prod.appspot.com/o/spaces%2F-MXep_PEmh8mDPVWj49x%2Fuploads%2FFmz12wuJUvCqegHwqF4u%2FPicture9.png?alt=media&amp;token=5c4f93c2-0e14-457f-a03c-703968a55f2d" alt=""><figcaption></figcaption></figure>

**Step 8: Add Options**

Under **Options**, type a value in **Type option, press Enter to add** and press **Enter** or, to add it. Each added value appears as a removable tag next to the input — for example, MUMBAI, NAVI MUMBAI, PUNE, NOIDA.

<figure><img src="https://4282324958-files.gitbook.io/~/files/v0/b/gitbook-x-prod.appspot.com/o/spaces%2F-MXep_PEmh8mDPVWj49x%2Fuploads%2FNt5QakDSkqxR0IYTyu8Z%2FPicture10.png?alt=media&amp;token=a55144a4-8db8-4f17-ad2f-e92a99cb5376" alt=""><figcaption></figcaption></figure>

**Step 9: Set Up a Conditional Field**

Enable **Make this a conditional field** to control the field's visibility based on another field. The info icon next to this option shows the tooltip: "Enable cascading level fields." This setting corresponds to the **Conditional** column in the custom fields table.

<figure><img src="https://4282324958-files.gitbook.io/~/files/v0/b/gitbook-x-prod.appspot.com/o/spaces%2F-MXep_PEmh8mDPVWj49x%2Fuploads%2FgLjefQSnFAR2xZSy25ss%2FPicture11.png?alt=media&amp;token=7615390b-1ae0-4ca7-bc7b-4c4e8db31058" alt=""><figcaption></figcaption></figure>

Enabling it adds a **Level 1** block for configuring the cascading child field.

**Step 10: Configure the Level 1 Child Field**

Under **Level 1**, select the child field's data type from **Input Type**, and enable **Make Mandatory** if the child field should be required.

<figure><img src="https://4282324958-files.gitbook.io/~/files/v0/b/gitbook-x-prod.appspot.com/o/spaces%2F-MXep_PEmh8mDPVWj49x%2Fuploads%2Fi2Os1gzEFy1qgeWhTMT1%2FPicture12.png?alt=media&amp;token=2a7ac690-1cbe-4cce-984b-3d53ed513e07" alt=""><figcaption></figcaption></figure>

**Step 11: Name the Child Field**

Enter a name for the child field in **Child Field Label** — for example, Area.

<figure><img src="https://4282324958-files.gitbook.io/~/files/v0/b/gitbook-x-prod.appspot.com/o/spaces%2F-MXep_PEmh8mDPVWj49x%2Fuploads%2FqhVwX73yJ7XLoKZulrTW%2FPicture13.png?alt=media&amp;token=f6955573-5db4-493a-b23f-eb99e157a219" alt=""><figcaption></figcaption></figure>

**Step 12: Set Values by Parent Option**

Under **Values by Parent Option**, a When show: row appears for every value already added to the parent field's **Options** list — for example, MUMBAI, NAVI MUMBAI, PUNE, NOIDA. For each row, type the child field values that should appear when that parent option is selected, and press **Enter** or,to add each one.

<figure><img src="https://4282324958-files.gitbook.io/~/files/v0/b/gitbook-x-prod.appspot.com/o/spaces%2F-MXep_PEmh8mDPVWj49x%2Fuploads%2FQPgzgOnX6NvfGlIxJPdL%2FPicture14.png?alt=media&amp;token=a4b4daca-c1e2-4fa7-a4fb-ddf0d96b74db" alt=""><figcaption></figcaption></figure>

**Step 13: Add Further Levels**

Click **+ Add Level** below the current level to add another cascading level (**Level 2**) underneath Level 1.

<figure><img src="https://4282324958-files.gitbook.io/~/files/v0/b/gitbook-x-prod.appspot.com/o/spaces%2F-MXep_PEmh8mDPVWj49x%2Fuploads%2Fy2nfenEUVChQ4qn5hfTv%2FPicture15.png?alt=media&amp;token=173d1efb-85fa-42f5-8a4e-5f6087b8aa78" alt=""><figcaption></figcaption></figure>

The **Live Preview** panel on the right shows how the field will look based on the selected **Field Type**.

#### **Understanding the Live Preview**

The **Live Preview** panel updates as you configure the field, showing how it will actually appear on the Expense form once saved:

1. The **Field Label** you enter appears as the preview heading, exactly as typed (case included).

<figure><img src="https://4282324958-files.gitbook.io/~/files/v0/b/gitbook-x-prod.appspot.com/o/spaces%2F-MXep_PEmh8mDPVWj49x%2Fuploads%2FwkCcxQWodHaH2RNFI7bb%2FPicture16.png?alt=media&amp;token=18a17aec-b838-427a-b6c2-b50f4a6fa21e" alt="" width="218"><figcaption></figcaption></figure>

2. A red asterisk **(\*)** is added next to the label automatically when **Mandatory** is enabled.

<figure><img src="https://4282324958-files.gitbook.io/~/files/v0/b/gitbook-x-prod.appspot.com/o/spaces%2F-MXep_PEmh8mDPVWj49x%2Fuploads%2FiPeUTC0gDW5cRq3KgLMh%2FPicture17.png?alt=media&amp;token=2ebae3d6-be2e-4f2f-a3bb-43baf61e2e6f" alt="" width="213"><figcaption></figcaption></figure>

3. The input control shown matches the selected **Field Type** — for example, **Dropdown** previews as a **"Select City”**" dropdown, and if there’s a conditional field applied to it, It will show another dropdown preview as a **“Select Area”.**

<figure><img src="https://4282324958-files.gitbook.io/~/files/v0/b/gitbook-x-prod.appspot.com/o/spaces%2F-MXep_PEmh8mDPVWj49x%2Fuploads%2FxRXanmKjlQtMgq2jOrEO%2FPicture18.png?alt=media&amp;token=b0d6e7b7-c5ca-4b82-87c2-bc4d075492e9" alt="" width="215"><figcaption></figcaption></figure>

**Step 14: Save the Field**

Click **Save Field** to add the custom field to the selected form, or **Cancel** to discard it.

<figure><img src="https://4282324958-files.gitbook.io/~/files/v0/b/gitbook-x-prod.appspot.com/o/spaces%2F-MXep_PEmh8mDPVWj49x%2Fuploads%2FPPiNgnQxVZj3Q7R7inGG%2FPicture19.png?alt=media&amp;token=32e6cbff-7653-452a-a51d-263bbc010a63" alt=""><figcaption></figcaption></figure>

**Step 15: Edit a Custom Field**

To modify an existing custom field, click **Edit** against the required field, make the necessary changes, and then click **Update Details** to save the updated configuration.

<figure><img src="https://4282324958-files.gitbook.io/~/files/v0/b/gitbook-x-prod.appspot.com/o/spaces%2F-MXep_PEmh8mDPVWj49x%2Fuploads%2Fuc3wuM1XFPNrPLPZIV0c%2FPicture20.png?alt=media&amp;token=52fb1ea1-4f72-4a9c-ac8c-4eab565b387c" alt=""><figcaption></figcaption></figure>

<figure><img src="https://4282324958-files.gitbook.io/~/files/v0/b/gitbook-x-prod.appspot.com/o/spaces%2F-MXep_PEmh8mDPVWj49x%2Fuploads%2FYeh3Cyqimk6lUWYClZ2z%2FPicture21.png?alt=media&amp;token=787f2cb3-b8fe-436c-96ab-25c8adce5ec8" alt=""><figcaption></figcaption></figure>

**Step 16: Delete a Custom Field**

To remove an existing custom field, click **Delete** against the required field. A confirmation pop-up will appear; click **OK** to confirm and delete the field.

<figure><img src="https://4282324958-files.gitbook.io/~/files/v0/b/gitbook-x-prod.appspot.com/o/spaces%2F-MXep_PEmh8mDPVWj49x%2Fuploads%2FAq2peX1V7tdG6vRc0Bkf%2FPicture22.png?alt=media&amp;token=6c03a14d-79f9-4474-9921-babe991a5cdc" alt=""><figcaption></figcaption></figure>

<figure><img src="https://4282324958-files.gitbook.io/~/files/v0/b/gitbook-x-prod.appspot.com/o/spaces%2F-MXep_PEmh8mDPVWj49x%2Fuploads%2F8VejCKbFOncu2wMsgC6G%2FPicture23.png?alt=media&amp;token=d535731d-d1c4-4d0d-857c-107759306f1a" alt="" width="375"><figcaption></figcaption></figure>

**Note:** Once deleted, the field cannot be restored.

#### **Understanding the Custom Fields Table**

Once created, each custom field appears in a table with the following details:

| **Column**      | **Description**                                                      |
| --------------- | -------------------------------------------------------------------- |
| **Label**       | Display name of the custom field                                     |
| **System Key**  | Unique identifier used to reference the field in the system          |
| **Type**        | Data type of the field                                               |
| **Mandatory**   | Whether the field must be filled before the form can be submitted    |
| **Conditional** | Whether the field's visibility depends on another field or condition |
| **Status**      | Whether the field is active or inactive                              |

If no custom fields have been created yet for the selected form, the table shows: *"No custom fields yet. Click '* ***Add Field'*** *to create one."*

### **How Custom Fields Appear on the Actual Expense Claim Form?**

**Path: (ESS Portal):** [Login to ESS portal → Expense → Request → Claim Entry → click the + icon](https://ess.pockethrms.com/Expense/Transaction/ExpenseRequests)**.**

**Step 1:** Log in to the **ESS Portal** and navigate to **Expense,** then click on **Request.**

<figure><img src="https://4282324958-files.gitbook.io/~/files/v0/b/gitbook-x-prod.appspot.com/o/spaces%2F-MXep_PEmh8mDPVWj49x%2Fuploads%2FWuQctEuKSfDo7rG3W5W4%2FPicture24.png?alt=media&amp;token=fa55780d-434b-4e94-ae61-6dfae40e5a8e" alt="" width="265"><figcaption></figcaption></figure>

**Step 2:** In the **Claim Entry tab**, Click the **+ (Add)** icon.

<figure><img src="https://4282324958-files.gitbook.io/~/files/v0/b/gitbook-x-prod.appspot.com/o/spaces%2F-MXep_PEmh8mDPVWj49x%2Fuploads%2FfkqbPmYmEoMOQvYsjmGb%2FPicture25.png?alt=media&amp;token=4509242e-d8ac-4061-a8b4-c04ddafef680" alt=""><figcaption></figcaption></figure>

This opens the **Expense** window where an employee's filed-in expense line is shown, along with every custom field configured for **Expense Claim**. Confirmed from a live example with four custom fields — **City**, **Expense Amount**, **Bill/Receipt**, and **Expense Category**.

* **Dropdown** fields (e.g. City) render as a **--Select--** dropdown, with a red asterisk if Mandatory is enabled.

<figure><img src="https://4282324958-files.gitbook.io/~/files/v0/b/gitbook-x-prod.appspot.com/o/spaces%2F-MXep_PEmh8mDPVWj49x%2Fuploads%2FSpA6kbmLVuSzyacBS5lc%2FPicture26.png?alt=media&amp;token=aecd3a13-16f9-44db-99ce-72ff8806384a" alt="" width="372"><figcaption></figcaption></figure>

* **Number** fields (e.g. Expense Amount) render as a plain number input.

<figure><img src="https://4282324958-files.gitbook.io/~/files/v0/b/gitbook-x-prod.appspot.com/o/spaces%2F-MXep_PEmh8mDPVWj49x%2Fuploads%2FwvdpQg3Q2MZJIov9y6e0%2FPicture27.png?alt=media&amp;token=53ce7dda-64b3-4463-8cb7-3592e052c61e" alt="" width="371"><figcaption></figcaption></figure>

* **File Upload** fields (e.g. Bill/Receipt) render as a **Choose file** control showing "No file chosen."

<figure><img src="https://4282324958-files.gitbook.io/~/files/v0/b/gitbook-x-prod.appspot.com/o/spaces%2F-MXep_PEmh8mDPVWj49x%2Fuploads%2FqqiVe6nOVs16JeeexPq6%2FPicture28.png?alt=media&amp;token=b418f69c-b8d5-4a35-8d79-cc83053640d8" alt="" width="331"><figcaption></figcaption></figure>

* **Multi-select** fields (e.g. Expense Category) render as a list box where multiple values can be selected — for example, travel, food, accomodation.

<figure><img src="https://4282324958-files.gitbook.io/~/files/v0/b/gitbook-x-prod.appspot.com/o/spaces%2F-MXep_PEmh8mDPVWj49x%2Fuploads%2FIZ6Fu0P3kv8gWqigYJSF%2FPicture29.png?alt=media&amp;token=af7fbb0e-b1e5-4d95-9451-0c08fd0daaeb" alt="" width="346"><figcaption></figcaption></figure>

* When **Help Text** is enabled, it appears as a small line of guidance text directly below the field — for example, "select appropriate expense amount" below **Expense Amount**, and "upload our file here" below **Bill/Receipt**.

<figure><img src="https://4282324958-files.gitbook.io/~/files/v0/b/gitbook-x-prod.appspot.com/o/spaces%2F-MXep_PEmh8mDPVWj49x%2Fuploads%2FuiUyhBBiKc2fmvviTfhx%2FPicture30.png?alt=media&amp;token=54a29bd0-7253-4d0f-b0bb-b73f928302bf" alt="" width="346"><figcaption></figcaption></figure>

**Path Link:** [**https://ess.pockethrms.com/Expense/Transaction/ExpenseRequests**](https://ess.pockethrms.com/Expense/Transaction/ExpenseRequests)

### **ESS Portal**

Once submitted, an expense claim moves through the ESS Portal based on each user's role:

**Employee submits Expense → Manager reviews → HR reviews (if applicable) → Finance approves**

**Important:** The approval flow may vary depending on the organisation's configuration.

### **How to submit expense claim entries?**

Follow the steps below to submit the expense claim entries.

**Path: ESS Portal → Expense → Request → Claim Entry**

**Step 1**: Log into the **ESS portal**. Go to the **‘Expense’** menu and select the ‘**Request**’ submenu.

<figure><img src="https://4282324958-files.gitbook.io/~/files/v0/b/gitbook-x-prod.appspot.com/o/spaces%2F-MXep_PEmh8mDPVWj49x%2Fuploads%2FElArvuBua9gcHxoRZdZG%2FFrame%201%20-%202026-08-25T105426.300.png?alt=media&amp;token=686f0029-cd5b-4403-8855-b292c0fd95f8" alt="" width="188"><figcaption></figcaption></figure>

**Step 2**: Click on the **‘Claim Entry’** tab at the top of the page and your previously submitted expense claim entries will be visible. Information such as applied date, expense cycle, expense date, expense amount and transaction number will be visible for respective expense claim entries.

In the **‘Claim Entry’** tab you will also see the status for your expense claim entries under the ‘Status’ column.

![](https://4282324958-files.gitbook.io/~/files/v0/b/gitbook-x-prod.appspot.com/o/spaces%2F-MXep_PEmh8mDPVWj49x%2Fuploads%2FGB03UhIHoTInvIJIyKNR%2F1.png?alt=media)

**Step 3:** Click on the **‘+ Add’** button towards the upper right-hand corner of the screen to add a new expense claim entry. A new window will open

![](https://4282324958-files.gitbook.io/~/files/v0/b/gitbook-x-prod.appspot.com/o/spaces%2F-MXep_PEmh8mDPVWj49x%2Fuploads%2FkvflIRsutthRkuNRiwz3%2F2.png?alt=media)

The system will fetch the present date in the ‘**Applied Date**’ field. You need to select the date on which the expense occurred in the ‘Expense Date’ field.

![](https://4282324958-files.gitbook.io/~/files/v0/b/gitbook-x-prod.appspot.com/o/spaces%2F-MXep_PEmh8mDPVWj49x%2Fuploads%2Fw6aIGqPRSqZNaWUg7Mwn%2F3.png?alt=media)

#### Special Case:Expense Cycle <a href="#hlk169109359" id="hlk169109359"></a>

If your company policies define expense cycles, then some additional fields will be visible to you as listed below. Fill in the details accordingly in the respective fields.

* **Expense Month** – The ‘**Month**’ during which concerned expense occurred
* **Expense Year** - The ‘**Year**’ during which concerned expense occurred
* **Expense Cycle** - The ‘**Expense Cycle**’ during which concerned expense occurred.

The predefined expense cycle date ranges will appear in the ‘Expense Cycle’ drop-down. You need to select the cycle during which the concerned expense occurred.

![](https://4282324958-files.gitbook.io/~/files/v0/b/gitbook-x-prod.appspot.com/o/spaces%2F-MXep_PEmh8mDPVWj49x%2Fuploads%2FxpP0CpmCdYQxso0hsa15%2F4.png?alt=media)

**Step 4**: Once you added the above details click on the ‘**+**’ icon towards the right-hand of the screen to add your expenses.

![](https://4282324958-files.gitbook.io/~/files/v0/b/gitbook-x-prod.appspot.com/o/spaces%2F-MXep_PEmh8mDPVWj49x%2Fuploads%2FehDCFWU3dc7vTAu4P2ir%2F5.png?alt=media)

**Step 5:** You need to add details such as expense type, mode, from date, to date, remark, and the purpose in the respective fields. Click on the **‘Choose File’** button if you want to upload any file and click on the ‘Add’ button and the expense will be added to your expense claim entry.

![](https://4282324958-files.gitbook.io/~/files/v0/b/gitbook-x-prod.appspot.com/o/spaces%2F-MXep_PEmh8mDPVWj49x%2Fuploads%2Fdel0TagaqxadWqD4IKIE%2F6.png?alt=media)

#### Special Cases

#### Additional Fields <a href="#hlk169109263" id="hlk169109263"></a>

Depending on your company you may find some additional fields below the ‘Purpose field. You can scroll down and provide the necessary details and then click on the ‘**Add**’ button.

#### Kilometres (KMs) Details <a href="#hlk169109277" id="hlk169109277"></a>

If your company policies require you to provide ‘Kilometers (KMs)’ details for an expense claim entry there will be a few additional fields.

**For example**,

The company policies make it necessary to provide **‘Kilometers KMs’** details for specific expenses such as ‘**Travel**’, the you need to fill in the details in the additional fields as listed below.

* **Start Location KMs** - Reading of your vehicle’s odometer at the time you started the travel/journey
* **End Location KMs**- Reading of your vehicle’s odometer at the time you finished the travel/journey (Reached the Destination)
* **Total Kms**- Then the system will calculate the total distance you travelled in the field based on the values you provided for the **‘Start Location KMs’** and **‘End Location KMs’** fields.

![](https://4282324958-files.gitbook.io/~/files/v0/b/gitbook-x-prod.appspot.com/o/spaces%2F-MXep_PEmh8mDPVWj49x%2Fuploads%2FRq7OP4uTPx7wcZ9MBc5F%2F7.png?alt=media)

Scroll down, and add more details such as the **‘Invoice No./Bill No.’** and the ‘**Purpose**’ in the respective fields. Click on the **‘Choose Files’** button to upload files such as photos of your Odometer or the invoice for the respective expenses.

Add the ‘**Remark**’ and once you fill in all the necessary details click on the ‘Add’ button.

![](https://4282324958-files.gitbook.io/~/files/v0/b/gitbook-x-prod.appspot.com/o/spaces%2F-MXep_PEmh8mDPVWj49x%2Fuploads%2FTKfOsGeCOS4T6JDaO6fr%2F8.png?alt=media)

#### Restrictions for Claim Amount <a href="#hlk169109299" id="hlk169109299"></a>

If the company policies set a limit for the amount you can claim in a month or for a particular type of expense, you can click on the ‘Remaining Amount’ button.

* The **‘Remaining Amount’** pop-up will open, specifying the remaining amount for which you can submit a claim request.
* If company policies don’t set any limit on the amount to be claimed in the expense request the **‘Remaining Amount’** pop-up will inform you that there is no such limit.

![](https://4282324958-files.gitbook.io/~/files/v0/b/gitbook-x-prod.appspot.com/o/spaces%2F-MXep_PEmh8mDPVWj49x%2Fuploads%2Fz9Oaa5HXoN2r3bZ56qpq%2F9.png?alt=media)

**Step 6**: Once you fill in all the necessary details according to your company policies click on the ‘Add’ button the expense will be added to your expense claim entry.

![](https://4282324958-files.gitbook.io/~/files/v0/b/gitbook-x-prod.appspot.com/o/spaces%2F-MXep_PEmh8mDPVWj49x%2Fuploads%2F3pT9WlcVm8MGyE62QKsz%2F10.png?alt=media)

You can click on the ‘**+**’ icon, towards the right-hand side of the screen, again to add multiple expenses following the steps above.

**For example**,

We will add 2 more expenses i.e. **'Calling Expenses'** and **'Client Visit'** in the expense claim entry.

![](https://4282324958-files.gitbook.io/~/files/v0/b/gitbook-x-prod.appspot.com/o/spaces%2F-MXep_PEmh8mDPVWj49x%2Fuploads%2FtA25f0RuYxpoAcRrM1up%2F11.png?alt=media)

#### Restricted Expenses <a href="#hlk169109321" id="hlk169109321"></a>

If a certain expense is restricted against the expense you have already added, the system will not allow you to add a new request for that restricted/blocked expense on the same day.

**For example**,

If you added the expense for the expense type **‘Travel’** and the expense type ‘Stationary’ is restricted against it. If you select the **‘Stationary’** as the **‘Expense Type’** the system won’t accept that input.

![](https://4282324958-files.gitbook.io/~/files/v0/b/gitbook-x-prod.appspot.com/o/spaces%2F-MXep_PEmh8mDPVWj49x%2Fuploads%2FsJVnrAoMC6PSDKE83ZV6%2F12.png?alt=media)

You will also get a notification informing you that the expense type you are trying to select is blocked.

![](https://4282324958-files.gitbook.io/~/files/v0/b/gitbook-x-prod.appspot.com/o/spaces%2F-MXep_PEmh8mDPVWj49x%2Fuploads%2FUHj6hmmLW5HjO6vFaKx9%2F13.png?alt=media)

**Step 7:** You can click on the **‘Edit Icon’** at the end of the row for the respective expense to make any changes.

![](https://4282324958-files.gitbook.io/~/files/v0/b/gitbook-x-prod.appspot.com/o/spaces%2F-MXep_PEmh8mDPVWj49x%2Fuploads%2FbYkLTFjG9Eavxoi8flfN%2F14.png?alt=media)

**Step 8**: You can click on the **‘Delete Icon’** at the end of the row for the respective expense to delete the expense.

![](https://4282324958-files.gitbook.io/~/files/v0/b/gitbook-x-prod.appspot.com/o/spaces%2F-MXep_PEmh8mDPVWj49x%2Fuploads%2FwMpBJun2xcf4ujL9jgq5%2F15.png?alt=media)

**Step 9:** Once you have added all the expenses you need to add the **‘Remark’** and then you can click on the **‘Save As Draft’** button. The entry will be moved to the **‘Pending Claim’** tab.

You can also click on the **‘Submit’** button and the expense claim entry will be sent to the respective manager for approval.

**Note:**

The approval flow of the expense claim entries depends on your company policies.

1. Employee submits expense claim entry it goes to the Manager, once approved it goes to Finance Manager (Finance Department) for final approval.
2. Employee submits expense claim entry it goes to the Manager, once approved it goes to the Human Resources (HR), and once approved it goes to the Finance Manager (Finance Department) for final approval

![](https://4282324958-files.gitbook.io/~/files/v0/b/gitbook-x-prod.appspot.com/o/spaces%2F-MXep_PEmh8mDPVWj49x%2Fuploads%2FfaF81l4CL9gXq3XXhrpH%2F16.png?alt=media)

**Step 10**: Click on the **‘Pending Claim’** tab to view the expense claim requests that you have saved as draft or not yet submitted. You can click on the ‘**Details**’ button for the respective entry to see more information.

![](https://4282324958-files.gitbook.io/~/files/v0/b/gitbook-x-prod.appspot.com/o/spaces%2F-MXep_PEmh8mDPVWj49x%2Fuploads%2FaeX2OEnUxVHzuBPNwqJq%2F17.png?alt=media)

The expense details pop-up will open where you will find details such as, expense type, from-to date, mode, purpose, applied amount, the bill if uploaded and the remark.

**Step 11**: You can click on the ‘**View**’ button to see additional information specific to the expense and another **‘Expense Details’** pop-up will open.

![](https://4282324958-files.gitbook.io/~/files/v0/b/gitbook-x-prod.appspot.com/o/spaces%2F-MXep_PEmh8mDPVWj49x%2Fuploads%2FuWlCbhAUp0g4aDX6t25b%2F18.png?alt=media)

In this **‘Expense Details’** pop-up, along with the **‘Expense Type’** you will find information that is specific to that particular expense type and in accordance with the company policies.

**For example**,

When it comes to the expense type ‘**Travel**’ the additional details you filled in for the request such as, start location kms, end location kms, total kms, total amount and the invoice number will be visible here.

![](https://4282324958-files.gitbook.io/~/files/v0/b/gitbook-x-prod.appspot.com/o/spaces%2F-MXep_PEmh8mDPVWj49x%2Fuploads%2FOhnizVDfLfAxm4zSAMDf%2F19.png?alt=media)

**Step 12**: Under the **‘Pending Claim’** tab you can also click on the ‘**Edit**’ button for the respective entry to make any changes.

![](https://4282324958-files.gitbook.io/~/files/v0/b/gitbook-x-prod.appspot.com/o/spaces%2F-MXep_PEmh8mDPVWj49x%2Fuploads%2F1bD4P40O6NJMLv3N07nm%2F20.png?alt=media)

**Step 13**: In the page that opens next, you can fill in details such as, the **‘Vendor Name’** and the **‘Invoice Number’** that you may have missed earlier and click on the **‘Save as Draft’** button.

<figure><img src="https://4282324958-files.gitbook.io/~/files/v0/b/gitbook-x-prod.appspot.com/o/spaces%2F-MXep_PEmh8mDPVWj49x%2Fuploads%2FdLHWR2YJnJLhf5O1LewG%2F13.png?alt=media&amp;token=82321871-c48e-4d8d-b169-1d4845f4f6a0" alt=""><figcaption></figcaption></figure>

**Step 14**: It will take you to the **‘Pending Claims’** tab where you can click on the **‘Details’** buttons for the respective entry to view the changes you made in the expense entry.

<figure><img src="https://4282324958-files.gitbook.io/~/files/v0/b/gitbook-x-prod.appspot.com/o/spaces%2F-MXep_PEmh8mDPVWj49x%2Fuploads%2FxxHlJQjkpQIclG3TMJ4N%2F14.png?alt=media&amp;token=1c63c812-cc71-48bb-a3e1-5329d7d15691" alt=""><figcaption></figcaption></figure>

**Step 15**: Once you verified all the details and made any necessary edits you can click on the ‘**Submit**’ button. The expense claim request will be sent to the respective manager for approval.

<figure><img src="https://4282324958-files.gitbook.io/~/files/v0/b/gitbook-x-prod.appspot.com/o/spaces%2F-MXep_PEmh8mDPVWj49x%2Fuploads%2FEwcFQZXEmHSWLclsXOiB%2F15.png?alt=media&amp;token=ad488275-8e74-4a47-8318-7065d2a584bc" alt=""><figcaption></figcaption></figure>

**Step 16**: Click on the **‘Claim Entry’** tab to view the expense claim entries you have submitted for approval. Under the ‘**Status**’, column you can check the approval status for your expense claim entry.

<figure><img src="https://4282324958-files.gitbook.io/~/files/v0/b/gitbook-x-prod.appspot.com/o/spaces%2F-MXep_PEmh8mDPVWj49x%2Fuploads%2FNBnrt56M41TCXwQrwJdy%2F16.png?alt=media&amp;token=a8447664-3610-4e57-a537-c2754cd55bf1" alt=""><figcaption></figcaption></figure>

### **How to save a 'Trip'?**

**Path: ESS Portal → Expense → My Trip → My Trips**

**Step 1:** Log into your ESS portal, from the **'Expense'** menu on the left-hand side of the screen click on the **'My Trip'** sub-menu.

<figure><img src="https://4282324958-files.gitbook.io/~/files/v0/b/gitbook-x-prod.appspot.com/o/spaces%2F-MXep_PEmh8mDPVWj49x%2Fuploads%2FQ63nro12RGP8MRQJI6Rr%2FFrame%201%20-%202026-08-24T170252.471.png?alt=media&amp;token=30c13510-346f-489d-8d89-6df6c4fd3c19" alt="" width="348"><figcaption></figcaption></figure>

**Step 2:** Under the **'My Trips'** tab, check that the **'Expense Type'** field shows **'Trip'**, then select the **'Mode'** and **'Purpose'**.

<figure><img src="https://4282324958-files.gitbook.io/~/files/v0/b/gitbook-x-prod.appspot.com/o/spaces%2F-MXep_PEmh8mDPVWj49x%2Fuploads%2FGt6jXk9kAbsVQ62lKyLC%2FFrame%202%20-%202026-08-24T170925.680.png?alt=media&amp;token=7ddcc70a-c119-40a5-82c3-d262eaed2ddc" alt=""><figcaption></figcaption></figure>

**Step 3:** Enter your **'Start KMs' and 'End KMs'**, upload a supporting document and add a **'Remark'**.

<figure><img src="https://4282324958-files.gitbook.io/~/files/v0/b/gitbook-x-prod.appspot.com/o/spaces%2F-MXep_PEmh8mDPVWj49x%2Fuploads%2FivNEDSAG30AfEnG1A2Kf%2FFrame%202%20-%202026-08-24T171231.919.png?alt=media&amp;token=25a70aa3-7a19-45a2-a4a6-bfb043140835" alt=""><figcaption></figcaption></figure>

**Step 4:** Click on the **'Submit'** button.

<figure><img src="https://4282324958-files.gitbook.io/~/files/v0/b/gitbook-x-prod.appspot.com/o/spaces%2F-MXep_PEmh8mDPVWj49x%2Fuploads%2FAUS7eY3z7aqfXBvOVGom%2FFrame%202%20-%202026-08-24T171943.010.png?alt=media&amp;token=cce93b70-cd21-4053-b356-b0d83d9de003" alt=""><figcaption></figcaption></figure>

**Step 5:** Once you complete your trip, go to **'My Trips'** and click on **'End Trip'**. Your **'Expense Type'**, **'Mode'** and **'Purpose'** carry over from when you started the trip. Enter your **'End KMs'** — the **'Total KMs'** and **'Total Amount'** fields are shown on the screen.

**Step 6:** Upload a supporting document, add a **'Remark'** and click on the **'End Trip'** button. No pop-up appears after this — the trip is saved directly and moves to the **'Saved Trips'** tab.

**Step 7:** Go to the **'Saved Trips'** tab, click on **'View Details'** to check the trip, or click on **'Submit'** to submit it for your expense claim.

<figure><img src="https://4282324958-files.gitbook.io/~/files/v0/b/gitbook-x-prod.appspot.com/o/spaces%2F-MXep_PEmh8mDPVWj49x%2Fuploads%2F4v9VpbxcmduBjipPqzcf%2FFrame%202%20-%202026-08-24T172909.937.png?alt=media&amp;token=14e0ebc6-adc6-42c0-91e4-930916772715" alt=""><figcaption></figcaption></figure>

**Path Link:** [**https://ess.pockethrms.com/Expense/Transaction/ExpenseTrips?Menu=MyTrips**](https://ess.pockethrms.com/Expense/Transaction/ExpenseTrips?Menu=MyTrips)

### **Manager: Reviewing Expense Claims**

Managers are notified by email and through the ESS Portal notification bell when an employee submits a claim.

* Review the claim, then **Approve** or **Reject** it; multiple claims can be actioned together
* If the **Approval Matrix** is configured for multi-level approval, the claim moves to the next manager only after the first approves

The employee is notified of the outcome by email and through the ESS Portal.

### **Responding to Expense Entries as a Manager**

**Step 1**: Log into the **ESS portal**, go to the ‘**Expense**’ menu and click on the **‘Approval’** submenu.

![](https://4282324958-files.gitbook.io/~/files/v0/b/gitbook-x-prod.appspot.com/o/spaces%2F-MXep_PEmh8mDPVWj49x%2Fuploads%2F3Bmpli0Q6wJx01iuklfK%2F0.png?alt=media)

**Step 2**: Click on the **‘Manager Approval’** tab. Select the ‘**Month**’ and the ‘Year’ in the respective fields and click on the ‘**Search**’ button. The entries for the selected timeframe will appear below.

![](https://4282324958-files.gitbook.io/~/files/v0/b/gitbook-x-prod.appspot.com/o/spaces%2F-MXep_PEmh8mDPVWj49x%2Fuploads%2FAZWaV26oLOxacgTL1WxP%2F1.png?alt=media)

**Step 3:** To view expense entries for an individual employee select an employee name or code from the **‘Employee’** field, followed by selecting the ‘**Month**’ and the ‘**Year**’ and click on the **‘Search’** button. The expense entries from the employee in the selected timeframe will appear.

![](https://4282324958-files.gitbook.io/~/files/v0/b/gitbook-x-prod.appspot.com/o/spaces%2F-MXep_PEmh8mDPVWj49x%2Fuploads%2FyhITh9lWiDDzLJgkE9YA%2F2.png?alt=media)

**Step 4**: Click on the ‘**Details**’ button for the respective expense entry to view the Details.

![](https://4282324958-files.gitbook.io/~/files/v0/b/gitbook-x-prod.appspot.com/o/spaces%2F-MXep_PEmh8mDPVWj49x%2Fuploads%2F6Ww39kIQoCBiohJd07rv%2F3.png?alt=media)

**Step 5**: The **‘Expense Details’** pop-up will open where you can find details of all the expenses in the expense entry. To get more information about the expense click on the ‘**View**’ button in the ‘**Details**’ column.&#x20;

<figure><img src="https://4282324958-files.gitbook.io/~/files/v0/b/gitbook-x-prod.appspot.com/o/spaces%2F-MXep_PEmh8mDPVWj49x%2Fuploads%2FMuXurnc2vL8NeahLhIjS%2F4.png?alt=media" alt=""><figcaption></figcaption></figure>

**Step 6**: A pop-up will open where you can view additional information which is specific to the certain expense type. Click on the ‘**Close**’ button to close the ‘**pop-up**’.

<figure><img src="https://4282324958-files.gitbook.io/~/files/v0/b/gitbook-x-prod.appspot.com/o/spaces%2F-MXep_PEmh8mDPVWj49x%2Fuploads%2Fna6TZkklN677Gj5Mrb7b%2FFrame%201%20-%202026-08-25T111006.844.png?alt=media&amp;token=ad3f5e25-27bc-4fda-b036-89642fc5eeb0" alt="" width="375"><figcaption></figcaption></figure>

**Step 7:** In will take you back to the ‘**Expense Details**’ pop-up. The column ‘**Applied Amount**’ shows the amount the employee asked for, and in the **‘Approved Amount**’ column you can enter the amount you want to approve for the respective expense.

![](https://4282324958-files.gitbook.io/~/files/v0/b/gitbook-x-prod.appspot.com/o/spaces%2F-MXep_PEmh8mDPVWj49x%2Fuploads%2FlP63LNBmeNWrb5bxJOJ2%2F6.png?alt=media)

**Step 8:** Select the radio button in the ‘**Accept**’ and the ‘**Reject**’ column to take respective actions for the expenses. You can also click on the ‘**check box**’ in front of the ‘**Accept**’ and the '**Reject**’ option/column name, to select all the expenses in the expense entry.

![](https://4282324958-files.gitbook.io/~/files/v0/b/gitbook-x-prod.appspot.com/o/spaces%2F-MXep_PEmh8mDPVWj49x%2Fuploads%2FkMfbDMAswkmK5nfPNO16%2F7.png?alt=media)

**Step 9:** It is mandatory to enter your comment in the ‘**Manager Note/Reject Reason’** and the ‘**Manager Remark**’ in the respective fields. Click on the save button to submit your response.

![](https://4282324958-files.gitbook.io/~/files/v0/b/gitbook-x-prod.appspot.com/o/spaces%2F-MXep_PEmh8mDPVWj49x%2Fuploads%2FTFC60V7b7eXA3PNcBxjx%2F8.png?alt=media)

**Step 10**: You will get a notification asking if you are sure about saving your response as you can’t edit/change your action later.

* Click on the ‘**Cancel’** button if you want to reconsider your response or edit it.
* You can click on the ‘**Ok**’ button to confirm your response and the expense entry

Once you click on the ‘**Ok**’ in the notification your response will be submitted.

![](https://4282324958-files.gitbook.io/~/files/v0/b/gitbook-x-prod.appspot.com/o/spaces%2F-MXep_PEmh8mDPVWj49x%2Fuploads%2FqWzxKHesW7PtR0JZPLdi%2F9.png?alt=media)

Your response (Accepted/Rejected) to the expense entries will be submitted to finance manager/HR for further approval.

**Step 11**: On the **‘Manager Approval’** page, you can select,

1. Specific entries
2. All the entries present on the current page
3. All the entries present in the system

#### Specific expense entries

If you want to select specific expense entries from the **‘Manager Approval’** page, select the radio buttons in the ‘**Accept**’ or ‘**Reject**’ column for respective action. Add a remark in the respective field and click on the ‘**Save**’ button to submit your response.

![](https://4282324958-files.gitbook.io/~/files/v0/b/gitbook-x-prod.appspot.com/o/spaces%2F-MXep_PEmh8mDPVWj49x%2Fuploads%2F4aVBEbmEmMThlcJkojGT%2F10.png?alt=media)

As this action is irreversible you will get a notification asking if you are sure about the action. The notification will also specify the number of entries selected for the response.

* Click on the ‘**Ok**’ button in the notification to confirm your action.
* Click on the ‘**Cancel**’ button in the notification if you are not sure about your action.

Once you click on the ‘**Ok**’ in the notification your response will be submitted for the selected entries.

![](https://4282324958-files.gitbook.io/~/files/v0/b/gitbook-x-prod.appspot.com/o/spaces%2F-MXep_PEmh8mDPVWj49x%2Fuploads%2F61N4LbSTalSj0WMwaRd3%2F11.png?alt=media)

#### All the expense entries present on the current page

You can select the respective checkbox for the ‘**Accept**’ and the ‘**Reject**’ to select all the expense entries on the current page. Click on the ‘**Save**’ button to submit your response.

The ‘Remarks’ as accepted/rejected will also be auto-filled for the entries on the current page.

![](https://4282324958-files.gitbook.io/~/files/v0/b/gitbook-x-prod.appspot.com/o/spaces%2F-MXep_PEmh8mDPVWj49x%2Fuploads%2FAih8as90TdVPj9jU5nnn%2F12.png?alt=media)

As this action is irreversible you will get a notification asking if you are sure about the action. The notification will also specify the number of entries selected for the response.

* Click on the ‘**Ok**’ button in the notification to confirm your action.
* Click on the ‘**Cancel**’ button in the notification if you are not sure about your action.

Once you click on the ‘**Ok**’ in the notification your response will be submitted for expense entries on the current page.

![](https://4282324958-files.gitbook.io/~/files/v0/b/gitbook-x-prod.appspot.com/o/spaces%2F-MXep_PEmh8mDPVWj49x%2Fuploads%2FC4OshYHg0Tro7Hlo82y3%2F13.png?alt=media)

#### All the expense entries present in the system

You can use the **‘Approve All’** and the **‘Reject All’** buttons to select all the expense entries in the system and the ‘**Remarks**’ as accepted/rejected will be auto-filled for all the expense entries in the system. That also includes the entries that are not visible on the current page.

![](https://4282324958-files.gitbook.io/~/files/v0/b/gitbook-x-prod.appspot.com/o/spaces%2F-MXep_PEmh8mDPVWj49x%2Fuploads%2FxspcSHof2KMc4mk9NSW9%2F14.png?alt=media)

As this action is irreversible you will get a notification. This notification intends to make sure that you want to submit your response for all the entries and it also shows you the exact number of entries selected.

* Click on the ‘**Ok**’ button in the notification to confirm your action.
* Click on the ‘**Cancel**’ button in the notification if you are not sure about your action.

Once you click on the ‘**Ok**’ in the notification your response will be submitted for all expense entries present in the system.

![](https://4282324958-files.gitbook.io/~/files/v0/b/gitbook-x-prod.appspot.com/o/spaces%2F-MXep_PEmh8mDPVWj49x%2Fuploads%2FR4roVgndqhXJn9tnjUWM%2F15.png?alt=media)

Your response (Accepted/Rejected) to the expense entries will be submitted to finance manager/HR for further approval.

#### **Expense Tracker**

Clicking the **Tracker** button under the **Action** column opens the **Expense Request Tracking** window, which shows the current approval status of the expense request. Under **Expense request**, each approval level is listed with the approver's name and status — for example, **Level 1** and **Level 2**, each shown as **Pending** until that approver acts. Once the request clears all approval levels, it moves to the **Finance** stage, shown as **Waiting** until finance processes it, along with the date.

<figure><img src="https://4282324958-files.gitbook.io/~/files/v0/b/gitbook-x-prod.appspot.com/o/spaces%2F-MXep_PEmh8mDPVWj49x%2Fuploads%2FHtIw2Hzecb6Ac0KWSga6%2FFrame%201%20-%202026-08-25T110536.698.png?alt=media&amp;token=197fba80-01c3-4649-a585-97d184f4790b" alt=""><figcaption></figcaption></figure>

<figure><img src="https://4282324958-files.gitbook.io/~/files/v0/b/gitbook-x-prod.appspot.com/o/spaces%2F-MXep_PEmh8mDPVWj49x%2Fuploads%2FgxvdpwQIVklf7VkmSkP5%2FFrame%201%20-%202026-08-25T110708.219.png?alt=media&amp;token=5fa4f2aa-9cf4-43cb-8832-b25eb9ed0e96" alt="" width="375"><figcaption></figcaption></figure>

### **How to download expense reports as a Manager?**

If managers want to download the expense reports they can go to the ‘**Expense**’ menu and then click on the **‘My Team Report’** submenu.

<figure><img src="https://4282324958-files.gitbook.io/~/files/v0/b/gitbook-x-prod.appspot.com/o/spaces%2F-MXep_PEmh8mDPVWj49x%2Fuploads%2FFTV6VwhCXTWxUKdeSyxr%2FFrame%201%20-%202026-08-25T111348.932.png?alt=media&amp;token=544a9690-6edb-47d0-a357-527e58e664eb" alt="" width="188"><figcaption></figcaption></figure>

Under the **‘Manager Report’** tab select the ‘**Status**’, and **‘Date Range’** and click on the search button. You can easily download it by clicking on the **‘Download Excel’** button.

<figure><img src="https://4282324958-files.gitbook.io/~/files/v0/b/gitbook-x-prod.appspot.com/o/spaces%2F-MXep_PEmh8mDPVWj49x%2Fuploads%2FFbXOsOcc4dtDJM8Q6I2j%2FManager%20Report.png?alt=media&amp;token=d77e70b3-936e-46fb-b72f-5c5a09108f63" alt=""><figcaption></figcaption></figure>

Managers can download reports for an individual **‘Employee’** by entering their employee code.&#x20;

[**Path Link:** ](https://ess.pockethrms.com/Expense/Reports/MyTeamExpenseReport?Menu=expensemanagerreport)[**https://ess.pockethrms.com/Expense/Reports/MyTeamExpenseReport?Menu=expensemanagerreport**](https://ess.pockethrms.com/Expense/Reports/MyTeamExpenseReport?Menu=expensemanagerreport)

#### **Admin/HR: Tracking and Reporting on Expense Claims**

**Path: ESS Portal → Expense → HR Reports**

* Filter claims by status (**Approved**, **Pending**, **Rejected**, or **All**) and by date range
* Download the **HR Report**, or download bills submitted against individual claims

**Important:** If your company policy requires employees to submit hard copies of bills, HR must update the receipt status separately once received.

**Path Link:** [**https://ess.pockethrms.com/Expense/Reports/HRReport**](https://ess.pockethrms.com/Expense/Reports/HRReport)

### **Finance: Approving Expense Claims for Reimbursement**

### **How approve expense claims as a finance person?**

As a Finance person, you need to log into the **ESS portal** and click on the **‘Finance Approval’** under the ‘**Expense**’ menu.

<figure><img src="https://4282324958-files.gitbook.io/~/files/v0/b/gitbook-x-prod.appspot.com/o/spaces%2F-MXep_PEmh8mDPVWj49x%2Fuploads%2FqT2uDFIv1yqF1eHJfvWM%2FFrame%201%20-%202026-08-25T111632.243.png?alt=media&amp;token=c916d1cb-d845-4270-8a31-b1da969bc1aa" alt="" width="188"><figcaption></figcaption></figure>

Under the ‘**Finance Approval**’ tab select the ‘**Month**’ and click on the ‘Search’ button. The expense requests will appear, click on the ‘**Details**’ button for more information.

<figure><img src="https://4282324958-files.gitbook.io/~/files/v0/b/gitbook-x-prod.appspot.com/o/spaces%2F-MXep_PEmh8mDPVWj49x%2Fuploads%2FXIcu7v51QGr8Xxi6M00k%2FFinance%20requests.png?alt=media&amp;token=7dcb0c46-9dcd-47b2-8754-2f5a096672cb" alt=""><figcaption></figcaption></figure>

The ‘**Expense Details’** pop-up will open, you can edit the ‘Finance Amount’ and scroll left to ‘**Approve**’ or ‘**Reject**’ the request. Enter the ‘Finance Remark’ and click on the ‘**Save**’ button.

<figure><img src="https://4282324958-files.gitbook.io/~/files/v0/b/gitbook-x-prod.appspot.com/o/spaces%2F-MXep_PEmh8mDPVWj49x%2Fuploads%2F1PbUVad4Sk25A7olku3D%2Fimage.png?alt=media&amp;token=3a0f6b03-fcf8-47e3-8267-18a9a0c54b6b" alt=""><figcaption></figcaption></figure>

Once approved by Finance, the claim is processed for reimbursement.

**Path Link:** [**https://ess.pockethrms.com/Expense/Transaction/FinanceApproval?Menu=financeapproval**](https://ess.pockethrms.com/Expense/Transaction/FinanceApproval?Menu=financeapproval)

### **Expense Management in the Pocket HRMS 2.0 Mobile App**

The **Expense Module** in the Pocket HRMS 2.0 Mobile App allows employees to submit expense claims, upload bills or supporting documents, and track their expense requests directly from the mobile application. Managers and Finance users can also review and process expense requests based on the rights assigned to them.

For detailed steps on using the Expense Module in the Pocket HRMS 2.0 Mobile App, refer to the documentation below:

[**Expense - Pocket HRMS 2.0 Mobile App Docs**](/pocket-hrms-2.0-mobile-app/expense)

**For any queries, contact** [**support@pockethrms.com**](mailto:support@pockethrms.com)


# Learning Module

### **Learning Module**

The **Learning** Module in Pocket HRMS lets you set up, run, and track training programs for your employees. It covers the full process — from defining the basic building blocks like training types, trainers, and locations, to creating a learning program, scheduling and assigning it to employees, and tracking progress through reports.

This guide walks you through the module phase by phase, in the order you would typically set things up.

### **Configuring the Learning Module**

1. **How to Create a Learning Type?**

**Path:** Cloud > Settings > Learning > Learning Type

**Learning types** let you categorize and organize different kinds of training content, so you can group related trainings under one label (for example, Digital Marketing or Autocad) and associate multiple individual learnings with each type.

**Step 1:** Log in to **Cloud**, go to **Settings**, open **Learning**, and select **Learning Type**.

<figure><img src="https://content.gitbook.com/content/-MXep_PEmh8mDPVWj49x/blobs/lJLG44l7KrvEf2dW6Mra/Unknown%20image" alt="" width="563"><figcaption></figcaption></figure>

**Step 2:** The Learning Type List shows all existing types and a total entry count. Use the **search bar** to find a type by name.

<img src="https://content.gitbook.com/content/-MXep_PEmh8mDPVWj49x/blobs/xJAmrWPRfc00gZFV6163/Unknown%20image" alt="" width="563">

**Step 3:** Click **+ Add New** Type. Enter a name in the **Learning Type** Name field, then click Add Learning Type to save.

<figure><img src="https://content.gitbook.com/content/-MXep_PEmh8mDPVWj49x/blobs/k3cdTH2fOXNQY6po7r63/Unknown%20image" alt="" width="563"><figcaption></figcaption></figure>

<img src="https://content.gitbook.com/content/-MXep_PEmh8mDPVWj49x/blobs/9gwSKVsMF0xWpxLbhOGc/Unknown%20image" alt="" width="375">

**Step 4:** Click the **eye icon** in the View column to see the learnings under a type. This opens the Learning Name List, with a count badge (for example, ESS Training shows 5 learnings).

<figure><img src="https://content.gitbook.com/content/-MXep_PEmh8mDPVWj49x/blobs/AHV7YcIys1V1C3IEeKec/Unknown%20image" alt="" width="563"><figcaption></figcaption></figure>

<figure><img src="https://content.gitbook.com/content/-MXep_PEmh8mDPVWj49x/blobs/sQcXlAukjn0EMawIH4VL/Unknown%20image" alt="" width="375"><figcaption></figcaption></figure>

**Step 5:** Click the **pencil icon** to edit a type. The Edit window shows the name field (pre-filled) and a Current Status box with the number of associated learnings. **Update** the name and click Save Changes.

<figure><img src="https://content.gitbook.com/content/-MXep_PEmh8mDPVWj49x/blobs/8dzc5qV1HihX3dvW2MqV/Unknown%20image" alt="" width="563"><figcaption></figcaption></figure>

<img src="https://content.gitbook.com/content/-MXep_PEmh8mDPVWj49x/blobs/Mq6mRSzqs9J2wNGaw41r/Unknown%20image" alt="" width="375">

**Step 6:** To **delete** a Learning Type, click the **trash icon** in the Action column.

<figure><img src="https://4282324958-files.gitbook.io/~/files/v0/b/gitbook-x-prod.appspot.com/o/spaces%2F-MXep_PEmh8mDPVWj49x%2Fuploads%2FoFqAtq77hty9chDasdYb%2FFrame%201%20(14).png?alt=media&amp;token=f8013b21-71cf-4da7-a148-c30f7f6b5c3a" alt=""><figcaption></figcaption></figure>

2. **How to Add or Create a New Trainer?**

**Path:** Cloud > Settings > Learning > Trainer Details

**Trainer Details** lets you maintain a list of the people who deliver training — both employees from within your organization (Internal Trainer) and trainers from outside your organization (External Trainer).

**Step 1:** Log in to **Cloud**, go **to Settings**, open **Learning**, and select **Trainer Details**.

![](https://content.gitbook.com/content/-MXep_PEmh8mDPVWj49x/blobs/F6IuaWzXHYKsjQRnbzsM/Unknown%20image)

**Step 2:** Use the **Internal Trainer** and **External Trainer** tabs to switch between the two lists. Each trainer appears as a card showing their **name**, **department**, **skills**, and **certification**.

<figure><img src="https://content.gitbook.com/content/-MXep_PEmh8mDPVWj49x/blobs/fSCRmecmIda9xPUNEPhC/Unknown%20image" alt=""><figcaption></figcaption></figure>

**Step 3:** Use the **search bar** to find a specific trainer.

<figure><img src="https://content.gitbook.com/content/-MXep_PEmh8mDPVWj49x/blobs/EwSsBsznWrShZhQWXEgU/Unknown%20image" alt=""><figcaption></figcaption></figure>

**Step 4:** Click the **+ icon** to add a new trainer. Choose **Internal Trainer** or **External Trainer**at the top of the window.

<figure><img src="https://content.gitbook.com/content/-MXep_PEmh8mDPVWj49x/blobs/KkDZfSZeHuP2D2Pk1z85/Unknown%20image" alt=""><figcaption></figcaption></figure>

<img src="https://content.gitbook.com/content/-MXep_PEmh8mDPVWj49x/blobs/Tyz8lGy9H3Im5VtgWTNR/Unknown%20image" alt="" width="375">

**Step 5:** For an **Internal Trainer**, select the **Employee Code** from the dropdown (mandatory). Department is filled in automatically based on the employee record. Enter **Skills** and **Certified In** (both mandatory), then click **Save**. Click Clear to reset the form.

<figure><img src="https://content.gitbook.com/content/-MXep_PEmh8mDPVWj49x/blobs/wziDh2lqxrDTCk6YmDRe/Unknown%20image" alt="" width="375"><figcaption></figcaption></figure>

**Step 6:** For an **External Trainer**, enter **Trainer Name**, **Email**, **Phone**, **Skills**, and **Certified In** — all mandatory — then click **Save**. Click Clear to reset the form.

<figure><img src="https://content.gitbook.com/content/-MXep_PEmh8mDPVWj49x/blobs/Z1H6ymVPb8ZkwZ4lAYWK/Unknown%20image" alt="" width="375"><figcaption></figcaption></figure>

**Step 7:** Click the **pencil icon** on a trainer's card to edit their details. The Edit window shows Employee Code and Department as read-only (pre-filled), with Skills and Certified In editable. Update the fields and click **Update** to save.

![](https://content.gitbook.com/content/-MXep_PEmh8mDPVWj49x/blobs/2FKyJcmMP5v7KWCIYYf4/Unknown%20image)

<img src="https://content.gitbook.com/content/-MXep_PEmh8mDPVWj49x/blobs/XS0p1qWfJ3isgwVlYAfu/Unknown%20image" alt="" width="375">

**Step 8:** Click the **trash icon** on a trainer's card to **delete** the trainer.

<figure><img src="https://content.gitbook.com/content/-MXep_PEmh8mDPVWj49x/blobs/cwzTq1CbNAJfTIX7t7p5/Unknown%20image" alt=""><figcaption></figcaption></figure>

3. **How to Add a Training Location?**

**Path:** Cloud > Settings > Learning > Training Location

**Training Location** lets you maintain a list of physical venues where training sessions take place, such as office meeting rooms or city-based venues.

**Step 1:** Log in to **Cloud**, go to **Settings**, open **Learning**, and select **Training Location**.

<figure><img src="https://content.gitbook.com/content/-MXep_PEmh8mDPVWj49x/blobs/SQqz8552uHRPw9KUv1yR/Unknown%20image" alt=""><figcaption></figcaption></figure>

**Step 2:** Each **location appears** as a card showing its **name** and **address**.

<figure><img src="https://content.gitbook.com/content/-MXep_PEmh8mDPVWj49x/blobs/INgPBNpTsuQXkytZv44l/Unknown%20image" alt="" width="563"><figcaption></figcaption></figure>

**Step 3:** Click the **+ icon** to add a new location. In the Training Location window, enter the **Location name** and **Address** (both mandatory), then click **Save**. Click Close to exit without saving.

<img src="https://content.gitbook.com/content/-MXep_PEmh8mDPVWj49x/blobs/zkJRDQqsH4dUEXYRtEl2/Unknown%20image" alt="" width="375">

**Step 4:** Click the **pencil icon** on a location's card to **edit** it. The Training Location window opens pre-filled with the existing Location and Address. Update the fields and click **Update** to save.

<figure><img src="https://content.gitbook.com/content/-MXep_PEmh8mDPVWj49x/blobs/jGMyZ4Iieg698k64tVxs/Unknown%20image" alt="" width="375"><figcaption></figcaption></figure>

<img src="https://content.gitbook.com/content/-MXep_PEmh8mDPVWj49x/blobs/xlsJbJnXbSbZ3fQWMwP3/Unknown%20image" alt="" width="375">

**Step 5:** Click the **trash icon** on a location's card to **delete** it.

<figure><img src="https://content.gitbook.com/content/-MXep_PEmh8mDPVWj49x/blobs/hG9V7snNrMhhlVsVrvnw/Unknown%20image" alt="" width="563"><figcaption></figcaption></figure>

### **Creating the Learning Program**

1. **How to Create a Learning Program?**

**Path:** Cloud > Settings > Learning > Learning Program Details

The Learning page lists all **learning programs** created in the system. Each program appears as a card showing its name, mode (Online/Offline), duration, and date range.

**Step 1:** Log in to **Cloud** Portal, go to **Settings**, open **Learning**, and select **Learning** **Program** **Details**.

<figure><img src="https://content.gitbook.com/content/-MXep_PEmh8mDPVWj49x/blobs/hT6NQWYDCVTDwnHZyNxf/Unknown%20image" alt=""><figcaption></figcaption></figure>

**Step 2:** Click the **+ icon** at the top right of the Learning page to create a new program. This opens the Create Learning Program window, with four tabs: **Learning** **Details**, **Configuration**, **Reference** **Material**, and **Assignment**.

![](https://content.gitbook.com/content/-MXep_PEmh8mDPVWj49x/blobs/IVdda8YIIvZoDue3oGlt/Unknown%20image)

**Step 3:** In the **Learning Details** tab,

1. Enter the **Learning Name, Learning Type**, **Training Mode** (Online or Offline)

![](https://content.gitbook.com/content/-MXep_PEmh8mDPVWj49x/blobs/XPJvLkmKXPKcu7OjkZ3B/Unknown%20image)

2. **Learning Platform**, **Duration**(In Hours or Days) along with their values,

**Eg**: 5 Hours or 3 Days.

![](https://content.gitbook.com/content/-MXep_PEmh8mDPVWj49x/blobs/7XnpGjaf0I2Qh1rubANq/Unknown%20image)

3. **Start Date** and **End Date, Location**, and **Learning Head** — all mandatory.

<figure><img src="https://content.gitbook.com/content/-MXep_PEmh8mDPVWj49x/blobs/CxHqNrBORhVheE0Ieu23/Unknown%20image" alt=""><figcaption></figcaption></figure>

4. If you want to enable **certificate** options, **Check the box**, and Click **Save**.

![](https://content.gitbook.com/content/-MXep_PEmh8mDPVWj49x/blobs/r1L5VDR1gGX76lW6D3IC/Unknown%20image)

**Step 4:** In the **Configuration tab**, under **Notification**, enable **Learning Email & Feedback**, set **reminder timing**, and select a **feedback form**. Click **Save**.

<figure><img src="https://content.gitbook.com/content/-MXep_PEmh8mDPVWj49x/blobs/nTOMFUne9HykqE5sRzTv/Unknown%20image" alt=""><figcaption></figcaption></figure>

**Step 5:** In the **Reference Material** tab, choose a **Content Type** from the Dropdown, then click **Create**.

<figure><img src="https://content.gitbook.com/content/-MXep_PEmh8mDPVWj49x/blobs/ymzTTfDNZpGuiyJSvsQO/Unknown%20image" alt=""><figcaption></figcaption></figure>

<figure><img src="https://content.gitbook.com/content/-MXep_PEmh8mDPVWj49x/blobs/bIVbvaIaC1Bt4j9RAjwP/Unknown%20image" alt=""><figcaption></figcaption></figure>

**Step 6:** In the **Assignment tab**, click **+ Add Assignment**, Fill in the details, then **Save** **Assignment**.

<figure><img src="https://content.gitbook.com/content/-MXep_PEmh8mDPVWj49x/blobs/x2CWpsUkhNygOUv02XW7/Unknown%20image" alt=""><figcaption></figcaption></figure>

<figure><img src="https://content.gitbook.com/content/-MXep_PEmh8mDPVWj49x/blobs/5zDupUQV4sF1cW51KYZB/Unknown%20image" alt=""><figcaption></figcaption></figure>

**Step 7:** Check the **Certificate checkbox** in Learning Details to enable the **Certification Details tab**. There, select a **Template** and enter a **Title**, then click **Save**.

<figure><img src="https://content.gitbook.com/content/-MXep_PEmh8mDPVWj49x/blobs/QezMgDKb4wlB7U3lw3Wh/Unknown%20image" alt=""><figcaption></figcaption></figure>

**Step 8:** Click the **copy icon** on a program's card to duplicate it. Enter a **Learning Name, Start Date, and End Date**, then click **Copy**.

<figure><img src="https://content.gitbook.com/content/-MXep_PEmh8mDPVWj49x/blobs/4urYDdRB8q3KQiQGJhnM/Unknown%20image" alt="" width="375"><figcaption></figcaption></figure>

![](https://content.gitbook.com/content/-MXep_PEmh8mDPVWj49x/blobs/XzUolZbc0YAWCprrBmhg/Unknown%20image)

**Step 9:** Click the **pencil icon** on a program's card to edit it. This opens the Update Learning Program window with the same tabs described above. Make Changes as per your requirement, and click on **Save**.

<figure><img src="https://content.gitbook.com/content/-MXep_PEmh8mDPVWj49x/blobs/yZfjtZvYxLBbaUmCo2lF/Unknown%20image" alt="" width="375"><figcaption></figcaption></figure>

<figure><img src="https://content.gitbook.com/content/-MXep_PEmh8mDPVWj49x/blobs/4RsE0Y3KknUGE8wUlQtV/Unknown%20image" alt=""><figcaption></figcaption></figure>

**Step 10:** Click the **archive icon** on a program's card to **archive** that learning program.

<figure><img src="https://content.gitbook.com/content/-MXep_PEmh8mDPVWj49x/blobs/vnlrYF7QSvj5jx5nErjx/Unknown%20image" alt="" width="375"><figcaption></figcaption></figure>

**Step 11:** Click the **trash icon** on a program's card to **delete** it.

<figure><img src="https://content.gitbook.com/content/-MXep_PEmh8mDPVWj49x/blobs/jQydvwwb4lO8R2sukiLE/Unknown%20image" alt="" width="375"><figcaption></figcaption></figure>

2. **How to Create a Training Batch?**

**Path:** Cloud > Settings > Learning > Training Batches

**Training Batches** lets you group specific employees under a learning program, so you can track that group's training together.

**Step 1:** Log in to **Cloud** Portal, go to **Settings**, open **Learning**, and select **Training** **Batches**.

![](https://content.gitbook.com/content/-MXep_PEmh8mDPVWj49x/blobs/F8PbmVFmLtjUK5Dik7UB/Unknown%20image)

**Step 2:** Enter a **Batch Name**, select one or more **Employee Codes**to be added to the batch, and select one or more **Learnings** from the **Select Learnings field** (all mandatory). Select Learnings refers to the learning program names created earlier under Learning Program Details.

<figure><img src="https://content.gitbook.com/content/-MXep_PEmh8mDPVWj49x/blobs/IXwAtv4WVtzsLGeQzC4H/Unknown%20image" alt=""><figcaption></figcaption></figure>

**Step 3:** Optionally, set a **Practical Date** and **Select Sessions**. Click **Create** Batch to save.

<figure><img src="https://content.gitbook.com/content/-MXep_PEmh8mDPVWj49x/blobs/m4E9exvcObaSFYvSPRUX/Unknown%20image" alt=""><figcaption></figcaption></figure>

**Step 4:** The **Created Batches table** below lists all batches created so far, showing **Batch Name, Employees, Learnings, Practical Date, and Learning Session**.

<figure><img src="https://content.gitbook.com/content/-MXep_PEmh8mDPVWj49x/blobs/qZ7KWpMygr5oSvX6AnaG/Unknown%20image" alt=""><figcaption></figcaption></figure>

**Step 5:** In the Created Batches table, click **Edit** in the Actions column to modify a batch. The Edit Training Batch window opens pre-filled with the Batch Name, Practical Date, Employees, Learnings, and Sessions. **Update** the fields and click **Save**.

![](https://content.gitbook.com/content/-MXep_PEmh8mDPVWj49x/blobs/44BfND9LMlqLPuvNCdQl/Unknown%20image)

<img src="https://content.gitbook.com/content/-MXep_PEmh8mDPVWj49x/blobs/U9NzqS16UaOhnImJLCgl/Unknown%20image" alt="" width="563">

**Step 6:** Click **Delete** in the Actions column to delete a batch.

<figure><img src="https://content.gitbook.com/content/-MXep_PEmh8mDPVWj49x/blobs/GVZf73hYesx8rpsEqGmW/Unknown%20image" alt=""><figcaption></figcaption></figure>

### **Assigning Training**

**How to Assign a Learning Program to Employees?**

**Path:** Cloud > Settings > Learning > Assign Learning Program

**Assign Learning** lets you assign a specific learning program to one or more employees, using filters to narrow down who it applies to.

**Step 1:** Log in to **Cloud** Portal, go to **Settings**, open **Learning**, and select **Assign** **Learning** **Program**.

<figure><img src="https://content.gitbook.com/content/-MXep_PEmh8mDPVWj49x/blobs/jUWx7ZCsOp4bp8U0lWdM/Unknown%20image" alt=""><figcaption></figcaption></figure>

**Step 2:** Select a **Learning Type** and a **Learning Name**from their respective dropdowns. Click the **assign Button** to choose which employees to assign the program to.

<figure><img src="https://content.gitbook.com/content/-MXep_PEmh8mDPVWj49x/blobs/eXJqEhD8tSosWRxjKgqm/Unknown%20image" alt=""><figcaption></figcaption></figure>

**Step 3:** Choose an **Employee** **Status**: **All**, **Active**, or **Inactive**. Select specific employees using **Select Employee**, or narrow the list further using the Filters section (Branch, Department, Designation, Location, and others). Click **Apply**.

<figure><img src="https://content.gitbook.com/content/-MXep_PEmh8mDPVWj49x/blobs/E3Kur6ljSWAHLg1xw3ti/Unknown%20image" alt="" width="375"><figcaption></figcaption></figure>

<img src="https://content.gitbook.com/content/-MXep_PEmh8mDPVWj49x/blobs/YGoQOeY1bOTGnYKVRULH/Unknown%20image" alt="" width="375">

**Step 4:** Click **"Click here to view assigned employee records"** to see everyone already assigned to a program. Set a **Start Date** and **End Date** to filter the list by assignment period.

<figure><img src="https://content.gitbook.com/content/-MXep_PEmh8mDPVWj49x/blobs/WZaAiCOADCkjqeAMP47B/Unknown%20image" alt=""><figcaption></figcaption></figure>

**Step 5:** Click **Edit** next to a record to modify it, Scroll the page upwards to change and **update** the details.

<figure><img src="https://content.gitbook.com/content/-MXep_PEmh8mDPVWj49x/blobs/utFsTCCnbDSJq6ceRG4M/Unknown%20image" alt=""><figcaption></figcaption></figure>

### **Tracking and Reporting**

1. **How to Generate a Training Management Detailed Report?**

**Path:** Cloud > Settings > Learning > Training Management Detailed

**Report Training Management Detailed** lets you pull a training status report, either grouped by employee category or filtered down to a specific employee.

**Step 1:** Log in to **Cloud** Portal, go to **Settings**, open **Learning**, and select **Training** **Management** **Detailed**.

![](https://content.gitbook.com/content/-MXep_PEmh8mDPVWj49x/blobs/OsLzdBteyuEStES2BM5R/Unknown%20image)

**Step 2:** Use **Group By** to group the report, and **check** **Summary** if you want a summarized view. Optionally filter by **Training Name** and **Training Status**.

![](https://content.gitbook.com/content/-MXep_PEmh8mDPVWj49x/blobs/0nKciBlVs2Kui2g5RI0v/Unknown%20image)

**Step 3:** To pull the report for a specific employee, select them under **Employee**. Set a **From Date** and **To Date** to define the reporting period.

![](https://content.gitbook.com/content/-MXep_PEmh8mDPVWj49x/blobs/pRRtkWvr8j7jroM2kwRN/Unknown%20image)

**Step 4:** To pull it by **category** instead, use the **Category panel** on the right to check one or more categories (for example, Supervisor Trainee, Staff, Team Lead).

<figure><img src="https://content.gitbook.com/content/-MXep_PEmh8mDPVWj49x/blobs/80i0lySxw7QMNKNpSo88/Unknown%20image" alt="" width="375"><figcaption></figcaption></figure>

**Step 5:** Click **Download Excel** or **Download PDF** to get the report in your preferred format.

<figure><img src="https://content.gitbook.com/content/-MXep_PEmh8mDPVWj49x/blobs/GO9L81VHXHZ9Ibm3ls5X/Unknown%20image" alt="" width="375"><figcaption></figcaption></figure>

2. **How to Generate a Training Report?**

**Path:** Cloud > Settings > Learning > Training Reports

**Training Reports** lets you generate one of several report types from a single page, using the Report Type dropdown to switch between them.

**Step 1:** Log in to **Cloud Portal**, go to **Settings**, open **Learning**, and select **Training** **Reports**.

<figure><img src="https://content.gitbook.com/content/-MXep_PEmh8mDPVWj49x/blobs/vl9FRxqNwD2w5JOQzVqm/Unknown%20image" alt=""><figcaption></figcaption></figure>

**Step 2:** Use the **Report Type dropdown** to choose which report to generate: **Training Master Report**, **Employee Training Card Report**, or **Training Progress Report.**

<figure><img src="https://content.gitbook.com/content/-MXep_PEmh8mDPVWj49x/blobs/a587kPXaAp0A6WIUs3wk/Unknown%20image" alt=""><figcaption></figcaption></figure>

**To generate a Training Master Report:**

**Step 1:** Select **Training Master Report** from the Report Type dropdown.

<figure><img src="https://content.gitbook.com/content/-MXep_PEmh8mDPVWj49x/blobs/okY57IbJvFTak6t8p4rW/Unknown%20image" alt=""><figcaption></figcaption></figure>

**Step 2:** Filter by **Employee Code, Learning Type, Training Name, Start Date, End Date, Batch Name,and Type** as needed.

<figure><img src="https://content.gitbook.com/content/-MXep_PEmh8mDPVWj49x/blobs/YLe2mAG8V5MN8xXLAq0I/Unknown%20image" alt=""><figcaption></figcaption></figure>

**Step 3:** Click **View**.

<figure><img src="https://content.gitbook.com/content/-MXep_PEmh8mDPVWj49x/blobs/1UCS7lBeg2ounPW3ik6D/Unknown%20image" alt=""><figcaption></figcaption></figure>

**To generate an Employee Training Card Report:**

**Step 1:** Select **Employee Training Card Report** from the Report Type dropdown.

<figure><img src="https://content.gitbook.com/content/-MXep_PEmh8mDPVWj49x/blobs/n8zotBFjy7XO5QKOrQ53/Unknown%20image" alt=""><figcaption></figcaption></figure>

**Step 2:** Select an **Employee Code.** Click **View.**

<figure><img src="https://content.gitbook.com/content/-MXep_PEmh8mDPVWj49x/blobs/2h1Kf4kzPu57qZsALteP/Unknown%20image" alt=""><figcaption></figcaption></figure>

**To generate a Training Progress Report:**

**Step 1:** Select **Training Progress Report** from the Report Type dropdown.

<figure><img src="https://content.gitbook.com/content/-MXep_PEmh8mDPVWj49x/blobs/Yu1LV9CDIhw6mrrHzszd/Unknown%20image" alt=""><figcaption></figcaption></figure>

**Step 2:** Filter by **Employee Code, Learning Type, Training Name, Start Date, End Date, Batch Name, and Type** as needed. Click **View**.

<figure><img src="https://content.gitbook.com/content/-MXep_PEmh8mDPVWj49x/blobs/zvkpTDoda4HduxR86bqh/Unknown%20image" alt=""><figcaption></figcaption></figure>

**Path Link:** [**https://cloud.pockethrms.com/Settings/Employee/Index?module=Training\&submodule=TrainingReports**](https://cloud.pockethrms.com/Settings/Employee/Index?module=Training\&submodule=TrainingReports)

### **Learning on the ESS Portal**

This section covers the employee-facing side of the Learning Module, accessed through the **ESS Portal**.

**Path:** Log in to the ESS Portal > Learning > Learning

**Step 1:** Log in to the **ESS Portal**, Click **Learning** in the top navigation, From the sub-menu, select **Learning**.

<figure><img src="https://content.gitbook.com/content/-MXep_PEmh8mDPVWj49x/blobs/AD9pgXhHzX6hhoWouadI/Unknown%20image" alt="" width="375"><figcaption></figcaption></figure>

**Step 2:** This opens a screen with six tabs:

**Dashboard, Learning List, Employee Session, Certificate Detail, Feedback, and Learning Catalog.**

<figure><img src="https://content.gitbook.com/content/-MXep_PEmh8mDPVWj49x/blobs/7zUb15VeHaFzBT9s6In8/Unknown%20image" alt=""><figcaption></figcaption></figure>

1. **Dashboard**

**Step 1:** Open the **Dashboard** tab. The **Training Status** panel on the left shows a count of trainings for the employee. The **calendar** on the right shows scheduled trainings by date. Use the arrows to move between months, click today to jump to the current date, and use month, week, or day to change the calendar view.

<figure><img src="https://content.gitbook.com/content/-MXep_PEmh8mDPVWj49x/blobs/mCpPBtpWEUecZZlD0oF2/Unknown%20image" alt=""><figcaption></figcaption></figure>

**Step 2:** Scroll down to see the **Certification** Received panel, listing certificates the employee has earned (for example, IVIS Learning Certificate, Online Sales Training Certificate).

![](https://content.gitbook.com/content/-MXep_PEmh8mDPVWj49x/blobs/W6OLu1sNyvdn5oaUX5fL/Unknown%20image)

**Step 3:** Below that, the **Training List panel** shows trainings assigned to the employee, each with a completion date, and The **Training Programs** Completed In Month panel shows trainings completed within the current month.

<figure><img src="https://content.gitbook.com/content/-MXep_PEmh8mDPVWj49x/blobs/ApJ9ADErK1HA5qZ6Qj4E/Unknown%20image" alt=""><figcaption></figcaption></figure>

2. **Learning List**

**Step 1:** Open the **Learning List** tab and:

1. Set a **date range** using the two date fields to filter which learning programs are shown.
2. A **count badge** next to the date fields shows the total number of programs.
3. Use the **Status dropdown** to filter by status (default is All).
4. then click **View** to apply it.
5. Click **Download** to export the list.
6. Use the **search bar** to find a specific learning program by name.

<figure><img src="https://content.gitbook.com/content/-MXep_PEmh8mDPVWj49x/blobs/BjhJZpXkWepT3stkE75K/Unknown%20image" alt=""><figcaption></figcaption></figure>

**Step 2:** Each **learning program** appears as a **card** showing its **name, date range, and status (for example, Expired or Completed).** Cards for programs assigned by a manager are marked **"Assigned by Manager".**

<figure><img src="https://content.gitbook.com/content/-MXep_PEmh8mDPVWj49x/blobs/6gmtQwt92TlhATAmDFEg/Unknown%20image" alt=""><figcaption></figcaption></figure>

**Step 3:** Click a **card** to open its details. This opens a screen with the tabs **Learning Details, Reference Material, Assignments, Session, and Certificate Details.**

<figure><img src="https://content.gitbook.com/content/-MXep_PEmh8mDPVWj49x/blobs/v7CKJotnmmD9RnNRqQaN/Unknown%20image" alt=""><figcaption></figcaption></figure>

**Step 4:** In the **Learning Details tab**, view the **Learning Name**, **date range**, **Description**, and a **Progress bar showing percentage** completed.

<figure><img src="https://content.gitbook.com/content/-MXep_PEmh8mDPVWj49x/blobs/y7hHFPSRpyoIOoOa6fRW/Unknown%20image" alt=""><figcaption></figcaption></figure>

**Step 5:** In the **Reference Material tab**, select a document from the list (for example, a video or linked document) to view its content or link in the panel on the right. Click **Next** to move to the next document.

<figure><img src="https://content.gitbook.com/content/-MXep_PEmh8mDPVWj49x/blobs/RyMx6ogk3MhW54X1p4r1/Unknown%20image" alt=""><figcaption></figcaption></figure>

**Step 6:** The **Assignments tab** lists assignments for that learning program, showing Assignment Name, Assignment Description, Choose File, Trainer Rating, Trainer Feedback, and Status.

<figure><img src="https://content.gitbook.com/content/-MXep_PEmh8mDPVWj49x/blobs/WBEArDaeNcGlHJACFlr3/Unknown%20image" alt=""><figcaption></figcaption></figure>

**Step 7:** The **Session tab** shows Employee Sessions and Previous Session History for that learning program.

**Step 8:** The **Certificate Details** tab lists certificates for that learning program, showing Learning Name, Trainer Name, Learning Date, Status, and Action.

<figure><img src="https://content.gitbook.com/content/-MXep_PEmh8mDPVWj49x/blobs/TmnJN2s9dvRirDBoVPC7/Unknown%20image" alt=""><figcaption></figcaption></figure>

3. **Employee Session**

**Step 1:** Open the **Employee Session** tab. The **Employee Sessions** panel at the top shows any currently scheduled sessions for the employee.

<figure><img src="https://content.gitbook.com/content/-MXep_PEmh8mDPVWj49x/blobs/SamOtrk45EPfOsvUooU2/Unknown%20image" alt=""><figcaption></figcaption></figure>

**Step 2:** The **Previous Session** History table below lists past sessions, showing details like Trainer Name, Employee Name, Learning Name, Session Name, Date, and Time.

<figure><img src="https://content.gitbook.com/content/-MXep_PEmh8mDPVWj49x/blobs/XKuBwwgaKIODyK4RDyWy/Unknown%20image" alt=""><figcaption></figcaption></figure>

**Step 3:** Use the **search bar** to find a specific session, and use Previous, Next, and the page numbers to move through the list.

![](https://content.gitbook.com/content/-MXep_PEmh8mDPVWj49x/blobs/O7hc9IiDDP2yVylxluBI/Unknown%20image)

4. **Certificate Detail**

**Step 1:** Open the **Certificate Detail** tab.

The table lists all certificates earned, showing **Learning Name, Trainer Name, Learning Date, and Status**. Click the **download icon** in the Action column to download a certificate.

![](https://content.gitbook.com/content/-MXep_PEmh8mDPVWj49x/blobs/GPwcf3bgHw0ZiI5hpvff/Unknown%20image)

**Step 2:** Use the **search bar** to find a specific certificate, and use Previous, Next, and the page numbers to move through the list.

<figure><img src="https://content.gitbook.com/content/-MXep_PEmh8mDPVWj49x/blobs/xXyhmsI8vAGbjSJsXmH5/Unknown%20image" alt=""><figcaption></figcaption></figure>

5. **Feedback**

**Step 1:** Open the **Feedback tab**. The table lists trainings assigned to the **employee, showing Trainer Head, Training Name, Training Status, Employee Feedback, and Employee Rating.**

![](https://content.gitbook.com/content/-MXep_PEmh8mDPVWj49x/blobs/vO54AmczbuV2uOtKA8u9/Unknown%20image)

**Step 2:** Click the **Employee Rating dropdown** and select a rating from **1 to 5**, then submit it.

<figure><img src="https://content.gitbook.com/content/-MXep_PEmh8mDPVWj49x/blobs/miCeWuaynZPLKAjKdR21/Unknown%20image" alt=""><figcaption></figcaption></figure>

![](https://content.gitbook.com/content/-MXep_PEmh8mDPVWj49x/blobs/w2nhnVeZ8ucVtTVsAQGK/Unknown%20image)

**Path Link:** [**https://ess.pockethrms.com/Training/Transaction/MyTraining?Menu=Dashboard**](https://ess.pockethrms.com/Training/Transaction/MyTraining?Menu=Dashboard)

### **Trainer on the ESS Portal**

This section covers the Trainer sub-menu on the ESS Portal, used by employees who deliver training.

**Path:** Log in to the ESS Portal > Learning > Trainer > Trainer Dashboard

**Step 1:** Log in to the **ESS Portal**. Click **Learning** in the top navigation, and from the sub-menu, select **Trainer.**

<figure><img src="https://content.gitbook.com/content/-MXep_PEmh8mDPVWj49x/blobs/iNHWEoNFtONLHGptjnic/Unknown%20image" alt=""><figcaption></figcaption></figure>

**Step 2:** This opens a screen with four tabs: **Trainer Dashboard, Assign Training, New Employee Session, and Employee Session.**

<figure><img src="https://content.gitbook.com/content/-MXep_PEmh8mDPVWj49x/blobs/RIL37KcWpLNsXyLrh6Gl/Unknown%20image" alt=""><figcaption></figcaption></figure>

1. **Trainer Dashboard**

**Step 1:** Open the **Trainer Dashboard**tab.

**Step 2:** Check **Total Trainings** Conducted to see how many trainings you've delivered so far.

**Step 3:** Check **Pending Feedbacks** to Submit to see if any trainee feedback is still due from you.

**Step 4:** Look at **Trainee Performance Summary** for an overall average score across your trainees.

**Step 5:** Look at **Training Completion Status** to see how many trainings are Completed, In Progress, or Not Started.

**Step 6:** Scroll down to Top Performing Employees and Low Performing Employees to see which trainees are doing best and which need more support.

![](https://content.gitbook.com/content/-MXep_PEmh8mDPVWj49x/blobs/RIL37KcWpLNsXyLrh6Gl/Unknown%20image)

2. **Assign Training**

**Step 1:** Open the **Assign Training** tab. Select a **Learning Type** and **Learning Name**. Choose an **Employee Code**, then click **Submit** to assign the training to that employee.

![](https://content.gitbook.com/content/-MXep_PEmh8mDPVWj49x/blobs/zolI7RXBcge5QVq9whRA/Unknown%20image)

**Step 2:** To assign the same training **to several employees** at once, click **Multiple** **Employee** instead. In the Assign Training Multiple window, search for employees by Code or Name, check the ones you want, then click **Save**.

<figure><img src="https://content.gitbook.com/content/-MXep_PEmh8mDPVWj49x/blobs/SUkWCTfmlUqZufWGS5gz/Unknown%20image" alt=""><figcaption></figcaption></figure>

<figure><img src="https://content.gitbook.com/content/-MXep_PEmh8mDPVWj49x/blobs/QPO5yThCEvkQ70ujI3Pg/Unknown%20image" alt=""><figcaption></figcaption></figure>

**Step 3:** The table below lists all **training assignments**, showing **Employee Code, Employee Name, Learning Name, and Assigned Date**.

Use the **search bar** to find a specific assignment.

<figure><img src="https://content.gitbook.com/content/-MXep_PEmh8mDPVWj49x/blobs/xpdwGrXmQXGdW6C2nEoe/Unknown%20image" alt=""><figcaption></figcaption></figure>

**Step 4:** Select one or more rows using the checkboxes, then click **Delete** to remove those assignments.

![](https://content.gitbook.com/content/-MXep_PEmh8mDPVWj49x/blobs/3FsMpsaIot8bzQ58IMZS/Unknown%20image)

3. **Employee Session New**

**Step 1:** Open the **Employee Session New** tab.Select a **Learning Name (mandatory).** Optionally filter further by Batch Name, Session Name, and Session Date.

<figure><img src="https://content.gitbook.com/content/-MXep_PEmh8mDPVWj49x/blobs/aTBmBn8O7tME5nndWbr5/Unknown%20image" alt=""><figcaption></figcaption></figure>

**Step 2:** Click **Search** to view matching sessions. Results appear in a table below, showing Training Name, Session Name, Session Deviation Name, Session Deviation Description, Session Date, Total, Present, and Absent. Click **Export** to download the results as an Excel file.

<figure><img src="https://content.gitbook.com/content/-MXep_PEmh8mDPVWj49x/blobs/KXuyS0xBZzPsOg7UVvO2/Unknown%20image" alt=""><figcaption></figcaption></figure>

4. **Employee Session**

**Step 1:** Open the **Employee Session** tab. The **Employee Sessions** panel at the top shows any currently scheduled sessions.

![](https://content.gitbook.com/content/-MXep_PEmh8mDPVWj49x/blobs/ghCfmkCXJvmYBiAScenv/Unknown%20image)

**Step 2:** The **Previous Session History** table below lists past sessions, showing details like Trainer Name, Employee Name, Learning Name, Session Name, Date, and Time. Use the search bar to find a specific session.

<figure><img src="https://content.gitbook.com/content/-MXep_PEmh8mDPVWj49x/blobs/I1ppfaV0TihWFu2QaDAI/Unknown%20image" alt=""><figcaption></figcaption></figure>

**Path Link:** [**https://ess.pockethrms.com/Training/Transaction/MyTraining?Menu=Dashboard**](https://ess.pockethrms.com/Training/Transaction/MyTraining?Menu=Dashboard)

**For any queries, contact** <support@pockethrms.com>


# Performance Management System (PMS) Module

### **Overview**

The **Performance Management System (PMS)** module allows you to carry out a performance review of your Employees. Performance reviews can be run on a monthly, quarterly, half-yearly or annual basis.

The appraisal can be set to **90**, **180** or **360**, which decides whether the Employee is rated by the Manager alone, by the Employee and the Manager, or by the Employee, the Manager and Peers.

The appraisal itself can run in one of two ways, selected as the **Appraisal Type**:

* **Predefined KPI Flow** — the parameters and KPIs are defined by the Admin in advance, and Employees and Managers provide ratings against them
* **Employee Driven KPI Flow** — Employees set their own KPIs, and once the Manager approves them the evaluation flow begins

Ratings can be captured on a **Scale** or by **Weightage**. Against each score, a status is reflected, which is defined from the **Grading Matrix**. Ratings can also be distributed across a bell curve, where required.

HR configures the module from the **AppraisalV2** section of the Cloud Portal. Employees, Managers and HR then use it from the **PMS** menu of the ESS Portal.

This helps in:

* Assessing all Employees against the same criteria in the same period
* Recording the Employee's own assessment alongside the Manager's
* Tracking who has submitted their ratings and who has not
* Storing ratings, comments and supporting documents in one place
* Converting appraisal scores into a consistent grade across the organisation
* Using appraisal scores to calculate increments, where configured

**Who is Involved in the Appraisal?**

<table data-header-hidden data-search="true"><thead><tr><th></th><th></th></tr></thead><tbody><tr><td><strong>Role</strong></td><td><strong>What they do</strong></td></tr><tr><td><strong>HR / Admin</strong></td><td>Sets up the appraisal period, criteria, eligibility and grading. Tracks status and downloads reports.</td></tr><tr><td><strong>Employee</strong></td><td>Rates themselves against the assigned parameters and KPIs, and adds comments and documents.</td></tr><tr><td><strong>Manager</strong></td><td>Reviews the Employee's submission and provides ratings, comments and a remark.</td></tr><tr><td><strong>Peer</strong></td><td>Rates a colleague, in a 360 degree appraisal.</td></tr><tr><td><strong>Department Head (Last Manager)</strong></td><td>Confirms increment entries, where the increment flow is used.</td></tr></tbody></table>

### **How an Appraisal Runs?**

Before the cycle begins, HR sets up the appraisal period, decides who is eligible, and defines what employees will be measured on. The appraisal opens to employees once the stage is made active.

Employees then rate themselves against the parameters and questions assigned to them, and add their comments. The reporting Manager reviews each submission and provides their own ratings and remarks. Where the appraisal is set to 360, Peers also submit their ratings.

Once the required ratings are in, the system arrives at a final rating using the method HR has selected. That score is converted into a status using the Grading Matrix, and can be adjusted against the expected spread before the cycle is closed.

The settings that control each of these points are covered below.

### **Appraisal V2 Configurations / Settings**

**Path: Cloud → Settings → AppraisalV2**

All PMS setup is done by HR from the Cloud Portal. This is where the appraisal period, the rules for the cycle and the grading are configured before an appraisal begins.

<figure><img src="https://4282324958-files.gitbook.io/~/files/v0/b/gitbook-x-prod.appspot.com/o/spaces%2F-MXep_PEmh8mDPVWj49x%2Fuploads%2FbWeOzcUznbyKWRiB2myU%2Fimage.png?alt=media&amp;token=a1d3b421-c7df-4d4d-ae26-f4122347478b" alt=""><figcaption></figcaption></figure>

### **Configuration of the Appraisal Module in Pocket HRMS**

**Path: Cloud → Settings → AppraisalV2 → Appraisal Configuration**

This is the main setup screen. It defines one appraisal period and the rules that apply to it.

Existing periods are displayed as cards showing the period dates, the rating method and whether the period is the default financial year. Opening a card displays the full set of settings under **Configuration Fields**.

<figure><img src="https://4282324958-files.gitbook.io/~/files/v0/b/gitbook-x-prod.appspot.com/o/spaces%2F-MXep_PEmh8mDPVWj49x%2Fuploads%2FJaLfP5FnVY1WxG3I3H5d%2F2.1.png?alt=media&amp;token=e2d95817-b5bf-447a-9f35-bcac0714a965" alt="" width="161"><figcaption></figcaption></figure>

<figure><img src="https://4282324958-files.gitbook.io/~/files/v0/b/gitbook-x-prod.appspot.com/o/spaces%2F-MXep_PEmh8mDPVWj49x%2Fuploads%2F7jTObPPA5Srq3ahAMuVA%2F2.2.png?alt=media&amp;token=5e1c88f2-9a10-42cb-bfc0-201c25ab5aba" alt=""><figcaption></figcaption></figure>

The settings on this screen cover:

<table data-header-hidden data-search="true"><thead><tr><th></th><th></th></tr></thead><tbody><tr><td><strong>Setting group</strong></td><td><strong>What it decides</strong></td></tr><tr><td><strong>Appraisal Type</strong></td><td>Whether the Admin defines the KPIs in advance (<strong>Predefined KPI Flow</strong>) or Employees set their own KPIs for Manager approval (<strong>Employee Driven KPI Flow</strong>)</td></tr><tr><td><strong>Business Unit</strong></td><td>The group the appraisal applies to, such as <strong>Category</strong>, <strong>Department</strong>, <strong>Designation</strong>, <strong>Branch</strong> or the whole company</td></tr><tr><td><strong>Appraisal period</strong></td><td>The <strong>Start Date</strong> and <strong>End Date</strong>, and whether this is the default financial year</td></tr><tr><td><strong>Eligibility</strong></td><td>The <strong>Completed Month</strong> an Employee must have served to be eligible, and the date this is calculated from under <strong>Eligibility Based On</strong></td></tr><tr><td><strong>Rating method</strong></td><td>Whether <strong>Rating</strong> is by <strong>Scale</strong> or <strong>Weightage</strong>, and whether Managers and Peers rate against a different set of parameters and questions from the Employee</td></tr><tr><td><strong>Final Rating option</strong></td><td>How the final rating is arrived at — the average of Manager and Employee, the average of all Managers, the Employee's own rating, or the last Manager's rating</td></tr><tr><td><strong>Bell curve</strong></td><td>Whether ratings are distributed across a bell curve, and on what basis, depending on the scale type selected</td></tr><tr><td><strong>Peer and review controls</strong></td><td>The number of days a Peer has to respond under <strong>Peer Expiry Days</strong></td></tr><tr><td><strong>Feedback Activation</strong></td><td>Whether the feedback flow is required</td></tr><tr><td><strong>Stage Activation Update</strong></td><td>Notifies employees which stage is activated</td></tr><tr><td><strong>PMS Info Banner</strong></td><td>Whether to show PMS information banner is at employee and manager appraisal</td></tr><tr><td><strong>New Joiner Notification Alert</strong></td><td>When new joiners, notification to HR is triggered</td></tr></tbody></table>

<figure><img src="https://4282324958-files.gitbook.io/~/files/v0/b/gitbook-x-prod.appspot.com/o/spaces%2F-MXep_PEmh8mDPVWj49x%2Fuploads%2F7Wo75cUtMLoGaWLbm71c%2F2.3.png?alt=media&amp;token=f6cd5aab-9d12-401a-8f2f-9e2989ddcc4f" alt=""><figcaption></figcaption></figure>

<figure><img src="https://4282324958-files.gitbook.io/~/files/v0/b/gitbook-x-prod.appspot.com/o/spaces%2F-MXep_PEmh8mDPVWj49x%2Fuploads%2FimzYDsAqmihi9D6VXIDw%2F2.4.png?alt=media&amp;token=5ce60ceb-1978-4dc4-903a-ab4d8ae8b021" alt=""><figcaption></figcaption></figure>

**Important:**&#x20;

* Selecting **Employee Driven KPI Flow** locks **Business Unit** to **EMPLOYEE WISE**.
* An appraisal period is active for Employees only when **Set Default Financial Year** is set to **Yes**. Setting it to **No** makes the cycle inactive.

Because this screen decides eligibility, the rating method and the final rating, it is set up before any other PMS screen.

**Path Link:** [**https://cloud.pockethrms.com/Settings/Employee/Index?module=AppraisalV2\&submodule=AppraisalConfigurationV2**](https://cloud.pockethrms.com/Settings/Employee/Index?module=AppraisalV2\&submodule=AppraisalConfigurationV2)

### **Process of the Appraisal V2 Module**

**Path: Cloud → Settings → AppraisalV2 → Appraisal Process**

This screen is where the review type is selected. It has a single setting with three options:

| **Option** | **Who rates the Employee**                                                                      |
| ---------- | ----------------------------------------------------------------------------------------------- |
| **90**     | The Manager rates the Employee                                                                  |
| **180**    | The Employee rates themselves and the Manager rates the Employee                                |
| **360**    | The Employee rates themselves, the Manager rates the Employee, and Peers also rate the Employee |

<figure><img src="https://4282324958-files.gitbook.io/~/files/v0/b/gitbook-x-prod.appspot.com/o/spaces%2F-MXep_PEmh8mDPVWj49x%2Fuploads%2FSDqwCa9IzyOU3DbWlTgJ%2F3.1.png?alt=media&amp;token=8d785759-c786-4eaf-b64e-e1ccf8455d83" alt="" width="142"><figcaption></figcaption></figure>

<figure><img src="https://4282324958-files.gitbook.io/~/files/v0/b/gitbook-x-prod.appspot.com/o/spaces%2F-MXep_PEmh8mDPVWj49x%2Fuploads%2FZ9lyOmzlLYTMHRQ84u9x%2F3.2.png?alt=media&amp;token=85212ac7-4f86-44c0-8399-d08595a577bb" alt=""><figcaption></figcaption></figure>

If **90** is selected, Employees will not see a self-assessment in their ESS Portal.

**Path Link:** [**https://cloud.pockethrms.com/Settings/Employee/Index?module=AppraisalV2\&submodule=AppraisalProcessV2**](https://cloud.pockethrms.com/Settings/Employee/Index?module=AppraisalV2\&submodule=AppraisalProcessV2)

### **Grading Matrix Setting in the Appraisal V2 Module**

**Path: Cloud → Settings → AppraisalV2 → Grading Matrix**

An appraisal produces a score. The **Grading Matrix** turns that score into a status, so that performance is described in the same words across the organisation.

Each score covers a range, and carries a **Status** and **Details**. A typical matrix looks like this:

| **Score range** | **Status**        |
| --------------- | ----------------- |
| 1 to 20         | Poor              |
| 21 to 40        | Needs Improvement |
| 41 to 60        | Satisfactory      |
| 61 to 80        | Good              |
| 81 to 100       | Excellent         |

<figure><img src="https://4282324958-files.gitbook.io/~/files/v0/b/gitbook-x-prod.appspot.com/o/spaces%2F-MXep_PEmh8mDPVWj49x%2Fuploads%2FDfncImw1p3lsESCLzqi3%2F4.1.png?alt=media&amp;token=3b739b62-a6df-49e2-aa7a-fb968c4ce380" alt="" width="158"><figcaption></figcaption></figure>

<figure><img src="https://4282324958-files.gitbook.io/~/files/v0/b/gitbook-x-prod.appspot.com/o/spaces%2F-MXep_PEmh8mDPVWj49x%2Fuploads%2FbcJMwet2gTVrdG1fiy25%2F4.2.png?alt=media&amp;token=19c48928-788a-4585-857c-f52a0c9bf816" alt=""><figcaption></figcaption></figure>

<figure><img src="https://4282324958-files.gitbook.io/~/files/v0/b/gitbook-x-prod.appspot.com/o/spaces%2F-MXep_PEmh8mDPVWj49x%2Fuploads%2F3jQr4WQS89yiwnAJhZ3G%2F4.3.png?alt=media&amp;token=f1ec9cb4-c9ba-4f64-8ff4-a8ac0de6820b" alt=""><figcaption></figcaption></figure>

Grading ranges are set per **Business Unit**, so different departments or grades can use different bands if required. Ranges can be added, edited or removed as the organisation's grading changes.

**Best Practice**

✔ Cover the full score range, so that every appraisal score falls into a status

✔ Avoid overlapping ranges, so that a score maps to only one status

✔ Keep the **Status** wording consistent across business units, so that reports can be compared

**Path Link:** [**https://cloud.pockethrms.com/Settings/Employee/Index?module=AppraisalV2\&submodule=GradingMatrixV2**](https://cloud.pockethrms.com/Settings/Employee/Index?module=AppraisalV2\&submodule=GradingMatrixV2)

### **Settings by Admin or HR in Appraisal V2 Module**

Once the appraisal period and grading are in place, HR defines the appraisal cycles themselves and decides what each role sees on screen.

### **Appraisal Stages**

**Path: Cloud → Settings → AppraisalV2 → Appraisal Stages**

An appraisal stage is one appraisal cycle, such as **Annual Appraisal**. Stages are created per business unit, and each stage carries a name, its own start and end dates, an order number that sets the sequence when more than one stage runs, and an **Is Active** setting.

A stage can be activated or deactivated across all business units at once, and an existing stage can be copied to all values of the selected business unit rather than being created again for each one.

<figure><img src="https://4282324958-files.gitbook.io/~/files/v0/b/gitbook-x-prod.appspot.com/o/spaces%2F-MXep_PEmh8mDPVWj49x%2Fuploads%2FSzm0s6lZ8LzzqbqH0oBP%2F1.1.1.png?alt=media&amp;token=623ada2b-129a-4951-be7d-d8012097dade" alt=""><figcaption></figcaption></figure>

<figure><img src="https://4282324958-files.gitbook.io/~/files/v0/b/gitbook-x-prod.appspot.com/o/spaces%2F-MXep_PEmh8mDPVWj49x%2Fuploads%2FiYxFDn0CK21MpPA5YRVi%2F1.1.2.png?alt=media&amp;token=bd9c882c-f393-40be-b55c-bb8ed16cd0b5" alt="" width="375"><figcaption></figcaption></figure>

**Important:** A review will be submitted only when **Is Active** is set to **Yes** for the stage.

**Path Link:** [**https://cloud.pockethrms.com/Settings/Employee/Index?module=AppraisalV2\&submodule=AppraisalStagesV2**](https://cloud.pockethrms.com/Settings/Employee/Index?module=AppraisalV2\&submodule=AppraisalStagesV2)

### **Appraisal Stage Settings**

**Path: Cloud → Settings → AppraisalV2 → Appraisal Stage Settings**

This screen builds the appraisal form for a selected stage. Fields are defined separately for each role — **Employee**, **Manager**, **Peer**, **KPI** and **Admin** — so that each role fills in what applies to them.

<figure><img src="https://4282324958-files.gitbook.io/~/files/v0/b/gitbook-x-prod.appspot.com/o/spaces%2F-MXep_PEmh8mDPVWj49x%2Fuploads%2FYMss2xqcXdo0zHHwRs8q%2F1.2.1.png?alt=media&amp;token=d3aef7e8-8950-456d-b782-b815879bf0db" alt=""><figcaption></figcaption></figure>

Each field carries:

* A **Field Name**, **Field Type** and **Field Size**, and the **Label Name** the user sees
* Whether the field is **Mandatory**, and the **Order** it appears in
* The **Level** the field is reflected at — **Stage Level**, where the field appears against the entire form, or **Question Level**, where the field appears against each KPI or question
* Whether the field is displayed on the Manager, Employee and Peer screens
* Whether the field's content appears in the comments section of the PDF report

<figure><img src="https://4282324958-files.gitbook.io/~/files/v0/b/gitbook-x-prod.appspot.com/o/spaces%2F-MXep_PEmh8mDPVWj49x%2Fuploads%2FrpQBxeIFAfpejyE0iG7R%2F1.2.2.png?alt=media&amp;token=9f0176c1-ed88-4af9-9afd-93aab38959d8" alt="" width="375"><figcaption></figcaption></figure>

A field can also be deactivated for selected Employees, so that it appears for most Employees but not for those chosen. The screen also controls what each role can see of the others' input - for example, whether the Manager's rating is visible on the Employee screen, whether Peer ratings are visible to the Manager, and whether the total weightage and score are shown to everyone.

<figure><img src="https://4282324958-files.gitbook.io/~/files/v0/b/gitbook-x-prod.appspot.com/o/spaces%2F-MXep_PEmh8mDPVWj49x%2Fuploads%2F9XB0etjruhcaFCIQLigo%2F1.2.3.png?alt=media&amp;token=a75e3a3c-84fb-4e5d-ac03-34f4f7de28f7" alt="" width="375"><figcaption></figcaption></figure>

Fields can be copied to all business units in one action, with the option to overwrite what is already there.

**Path Link:** [**https://cloud.pockethrms.com/Settings/Employee/Index?module=AppraisalV2\&submodule=AppraisalStageSettingsV2**](https://cloud.pockethrms.com/Settings/Employee/Index?module=AppraisalV2\&submodule=AppraisalStageSettingsV2)

### **Appraisal Popup Data Configuration in Appraisal V2 Module**

**Path: Cloud → Settings → AppraisalV2 → Appraisal Popup Data**

Some appraisal questions are answered by picking from a list rather than typing a response. This screen holds the options that appear in those lists.

An option is added against an appraisal stage and a selected component, along with the order it should appear in. Adding several options against the same component builds up the list the employee sees while answering. The same set can be copied to all stages so it does not have to be entered again.

<figure><img src="https://4282324958-files.gitbook.io/~/files/v0/b/gitbook-x-prod.appspot.com/o/spaces%2F-MXep_PEmh8mDPVWj49x%2Fuploads%2FaBdYdZrvmvwMKAb1zlkN%2F2.1.png?alt=media&amp;token=9e235855-6112-42da-9f27-2c083e656328" alt=""><figcaption></figcaption></figure>

**Path Link:** [**https://cloud.pockethrms.com/Settings/Employee/Index?module=AppraisalV2\&submodule=AppraisalPopUpDataV2**](https://cloud.pockethrms.com/Settings/Employee/Index?module=AppraisalV2\&submodule=AppraisalPopUpDataV2)

### **Appraisal Parameter Settings in Appraisal V2 Module**

**Path: Cloud → Settings → AppraisalV2 → Appraisal Parameter**

Parameters are the areas an Employee is assessed on, such as **Performance**. Each parameter is set for a stage and carries a sub-parameter, the marks allotted to it and an order number.

The screen displays a **Parameter List** with the marks against each parameter and a running total, so that the allotted marks can be checked before the cycle begins. Parameters can be copied to all business units, or to all stages, rather than being entered again for each one.

<figure><img src="https://4282324958-files.gitbook.io/~/files/v0/b/gitbook-x-prod.appspot.com/o/spaces%2F-MXep_PEmh8mDPVWj49x%2Fuploads%2FsRLRpylKMLEB7NeJgbjj%2F3.1.png?alt=media&amp;token=0c04a99e-0f89-4a69-99cc-c7664c3fdefa" alt=""><figcaption></figcaption></figure>

<figure><img src="https://4282324958-files.gitbook.io/~/files/v0/b/gitbook-x-prod.appspot.com/o/spaces%2F-MXep_PEmh8mDPVWj49x%2Fuploads%2FrfYSdmwdP38DWgz57cLb%2F3.2.png?alt=media&amp;token=d8ba1fa1-832c-48cc-b78d-503a21b846c6" alt=""><figcaption></figcaption></figure>

An **Employee-wise Progress** panel on the same screen shows how many Employees have their parameters not yet started, partially completed or fully completed, and lists the Employees still pending, so that HR can follow up before the appraisal opens. This panel is applicable only for the **EMPLOYEE WISE** business unit setting.

**Path Link:** [**https://cloud.pockethrms.com/Settings/Employee/Index?module=AppraisalV2\&submodule=AppriasalParameterV2**](https://cloud.pockethrms.com/Settings/Employee/Index?module=AppraisalV2\&submodule=AppriasalParameterV2)

### **Appraisal Questions Settings in Appraisal V2 Module**

**Path: Cloud → Settings → AppraisalV2 → Appraisal Questions**

Questions are what the Employee actually answers during the appraisal. Each question is set against a stage, a parameter and a sub-parameter, and carries its own weightage, order number and answer type.

A question can also record the Employee's goals, and can be linked to a formula where the answer is calculated rather than entered.

<figure><img src="https://4282324958-files.gitbook.io/~/files/v0/b/gitbook-x-prod.appspot.com/o/spaces%2F-MXep_PEmh8mDPVWj49x%2Fuploads%2FCB9ifcHtu4RKQaHGK0ko%2F4.1.png?alt=media&amp;token=4050af77-90b6-4979-b9b9-7cff811cb3f4" alt=""><figcaption></figcaption></figure>

As with parameters, questions can be copied to all stages in one action, and an **Employee-wise Progress** panel shows which employees still have questions. This is applicable only to **Employee-wise**.

**Path Link:** [**https://cloud.pockethrms.com/Settings/Employee/Index?module=AppraisalV2\&submodule=AppraisalKpiV2**](https://cloud.pockethrms.com/Settings/Employee/Index?module=AppraisalV2\&submodule=AppraisalKpiV2)

### **Peer Configurations**

In a **360 Degree** Appraisal, an Employee is also rated by Peers. The three screens below are where HR creates those Peers and sets what they will rate the Employee on.

### **How to Create an Appraisal Peer?**

**Path: Cloud → Settings → AppraisalV2 → Appraisal Peer**

A **Peer** is someone who works alongside an Employee and can comment on how they perform day to day. In a 360 Degree appraisal, Peers rate the Employee alongside the Employee's own self-assessment and the Manager's review, so the final picture is not based on one point of view alone.

A Peer does not need to be a user of the main system. HR creates the Peer here, and the system generates a login that lets them sign in and complete only the appraisal they have been given.

This screen is where Peer records are created and maintained. Each record holds a peer code, name, designation, email address and contact number. From here, HR can email a Peer their login details or download a **Peer Credential Report** listing the Peers with those details.

Creating a Peer does not attach them to anyone. That is done on the **Assign Manager** screen, where either a Manager or a Peer created here can be selected. A Peer stays in place for the whole appraisal period, an Employee can have more than one, and Peers are simply assigned — they do not accept or decline.

<figure><img src="https://4282324958-files.gitbook.io/~/files/v0/b/gitbook-x-prod.appspot.com/o/spaces%2F-MXep_PEmh8mDPVWj49x%2Fuploads%2F3xJnw6jsEuW7ebWy0dlB%2F3.1.png?alt=media&amp;token=7c2fa155-30ca-4cca-833d-dd249c26bd2f" alt=""><figcaption></figcaption></figure>

<figure><img src="https://4282324958-files.gitbook.io/~/files/v0/b/gitbook-x-prod.appspot.com/o/spaces%2F-MXep_PEmh8mDPVWj49x%2Fuploads%2Ftccm55DtZvILYFNIVEHW%2F3.2.png?alt=media&amp;token=f9bb611e-48d2-443f-a873-3df76bf371b2" alt="" width="374"><figcaption></figcaption></figure>

<figure><img src="https://4282324958-files.gitbook.io/~/files/v0/b/gitbook-x-prod.appspot.com/o/spaces%2F-MXep_PEmh8mDPVWj49x%2Fuploads%2F9aqSt66gGw188WPjGTcO%2F3.3.png?alt=media&amp;token=1fe9b27b-ad07-4699-9656-0b6d4f38b1c0" alt=""><figcaption></figcaption></figure>

**Path Link:** [**https://cloud.pockethrms.com/Settings/Employee/Index?module=AppraisalV2\&submodule=AppraisalPeerV2**](https://cloud.pockethrms.com/Settings/Employee/Index?module=AppraisalV2\&submodule=AppraisalPeerV2)

### **How to Assign Manager and Appraisal Peer in Appraisal V2 Module?**

**Path: Cloud → Settings → AppraisalV2 → Assign Manager**

Parameters and questions decide what an Employee is rated on. This screen decides who does the rating.

HR selects an Employee, and the screen lists everyone currently set to review them, showing each reviewer's name, code, whether they are internal or external, and their priority number.

Reviewers are added in two ways. **Select Manager** picks an Employee from within the organisation, who is added as an internal reviewer. **Appraisal Peer** picks from the Peers created on the **Appraisal Peer** screen, who are added as external reviewers.

A An Employee can have more than one reviewer. For Managers, the **Priority No.** determines the order in which they review the Employee, with the numbering starting from **1, 2, and so on**. For Peers, the **Priority No.** is set to **0**. This order is relevant when the final rating is calculated from all Managers or from the last Manager. Reviewers already listed can be edited or removed.

**Note**: A Manager for the appraisal can also be added from the [Approval Matrix](https://cloud.pockethrms.com/Employee/employee/Profile?employeeID=3645\&module=profile\&empstatus=1) tab in an Employee's profile, As well as from this Screen.

<figure><img src="https://4282324958-files.gitbook.io/~/files/v0/b/gitbook-x-prod.appspot.com/o/spaces%2F-MXep_PEmh8mDPVWj49x%2Fuploads%2FVjdBKfY2biv5BeNkfgUS%2F4.1.png?alt=media&amp;token=9ccc03f3-2ac1-49b6-a869-22734ca1eae8" alt="" width="361"><figcaption></figcaption></figure>

<figure><img src="https://4282324958-files.gitbook.io/~/files/v0/b/gitbook-x-prod.appspot.com/o/spaces%2F-MXep_PEmh8mDPVWj49x%2Fuploads%2FWWSD3xkgmvz1P2WULhtx%2F4.2.png?alt=media&amp;token=b05d8ed9-4e47-493b-bab6-1bf59e13fcd8" alt=""><figcaption></figcaption></figure>

<figure><img src="https://4282324958-files.gitbook.io/~/files/v0/b/gitbook-x-prod.appspot.com/o/spaces%2F-MXep_PEmh8mDPVWj49x%2Fuploads%2FVma1OymWajVNfqZ2Faqk%2F4.3.png?alt=media&amp;token=73e42ee8-1640-4a9f-ac2a-d0454a20b195" alt=""><figcaption></figcaption></figure>

**Path Link:** [**https://cloud.pockethrms.com/Settings/Employee/Index?module=AppraisalV2\&submodule=AssignManagerV2**](https://cloud.pockethrms.com/Settings/Employee/Index?module=AppraisalV2\&submodule=AssignManagerV2)

### **How to Configure Appraisal Peer Parameters?**

**Path: Cloud → Settings → AppraisalV2 → Appraisal Peer Parameter**

Peers rate an Employee on their own set of parameters, not the ones the Employee and Manager use. This screen is where those parameters are set.

Parameters are set for one Employee and one Peer at a time, Or as per business unit, like each category or department or etc. HR selects the Employee and the Peer, then adds the parameter type, sub parameter, marks and order number for that pairing.

An **Employee-wise Progress (Only for Employee-wise Business unit)** panel on the same screen shows how many Employees have their peer parameters not yet started, partially completed or fully completed, and flags Employees who do not yet have a Peer or Manager assigned.

<figure><img src="https://4282324958-files.gitbook.io/~/files/v0/b/gitbook-x-prod.appspot.com/o/spaces%2F-MXep_PEmh8mDPVWj49x%2Fuploads%2FlggBMQpHlhuakOAZsk3y%2F5.1.png?alt=media&amp;token=e9cb1bb8-188f-49c9-a16c-4788fccf44af" alt=""><figcaption></figcaption></figure>

<figure><img src="https://4282324958-files.gitbook.io/~/files/v0/b/gitbook-x-prod.appspot.com/o/spaces%2F-MXep_PEmh8mDPVWj49x%2Fuploads%2FA1SMfmpciqU0968AlwZq%2F5.2.png?alt=media&amp;token=9bc81ed1-9839-4f8f-9e23-fe887095d139" alt=""><figcaption></figcaption></figure>

**Path Link:** [**https://cloud.pockethrms.com/Settings/Employee/Index?module=AppraisalV2\&submodule=AppraisalPeerParameterV2**](https://cloud.pockethrms.com/Settings/Employee/Index?module=AppraisalV2\&submodule=AppraisalPeerParameterV2)

### **How to Add Appraisal Peer Questions?**

**Path: Cloud → Settings → AppraisalV2 → Appraisal Peer Questions**

Once the peer parameters are in place, this screen adds the questions a Peer answers against them.

Questions are added for one Employee and one Peer at a time, Or as per business unit, like each category or department or etc. HR selects the Employee and the Peer, chooses the stage, parameter type and appraisal parameter the question sits under, then enters the question along with its weightage and order number.

An **Employee-wise Progress (Only for Employee-wise Business unit)** panel on the same screen shows how many Employees have their peer questions not yet started, partially completed or fully completed.

<figure><img src="https://4282324958-files.gitbook.io/~/files/v0/b/gitbook-x-prod.appspot.com/o/spaces%2F-MXep_PEmh8mDPVWj49x%2Fuploads%2FRfx7V6NJAiXEczYcZkqn%2F1.1.png?alt=media&amp;token=1bcf7e34-970d-4b77-854c-1939154b89e9" alt=""><figcaption></figcaption></figure>

**Path Link:** [**https://cloud.pockethrms.com/Settings/Employee/Index?module=AppraisalV2\&submodule=AppraisalManagerPeerQuestionV2**](https://cloud.pockethrms.com/Settings/Employee/Index?module=AppraisalV2\&submodule=AppraisalManagerPeerQuestionV2)

### **Appraisal Feedback Field Creation Setting in Appraisal V2 Module**

**Path: Cloud → Settings → AppraisalV2 → Appraisal Field Creation**

Parameters and questions capture ratings. This screen adds the boxes where people type something in their own words while providing Feedback — such as feedback, updated targets, skills that need improvement, or competencies.

Fields are created for a selected appraisal stage. For each field, HR decides what it is called, whether it takes a short line or a longer paragraph, how much can be typed into it, where it appears on the form, and whether filling it in is compulsory.

A field can be set to appear once for the whole Feedback form, or against every KPI or question on it.

<figure><img src="https://4282324958-files.gitbook.io/~/files/v0/b/gitbook-x-prod.appspot.com/o/spaces%2F-MXep_PEmh8mDPVWj49x%2Fuploads%2FjDmGjgfix2JaE2r7eFaU%2F5.1.png?alt=media&amp;token=6bdbd48d-2eb3-4a9d-ae5a-607064f366fd" alt=""><figcaption></figcaption></figure>

<figure><img src="https://4282324958-files.gitbook.io/~/files/v0/b/gitbook-x-prod.appspot.com/o/spaces%2F-MXep_PEmh8mDPVWj49x%2Fuploads%2FBB6ulEG7b7zx6dileFi7%2F5.2.png?alt=media&amp;token=88b18cec-594c-4c23-9f46-a87bc5e0fac8" alt=""><figcaption></figcaption></figure>

Once created, the same set of fields can be copied to other stages and other business units, so they do not have to be built again each time.

**Path Link:** [**https://cloud.pockethrms.com/Settings/Employee/Index?module=AppraisalV2\&submodule=AppraisalFieldCreationV2**](https://cloud.pockethrms.com/Settings/Employee/Index?module=AppraisalV2\&submodule=AppraisalFieldCreationV2)

### **Feedback Popup Data Configuration in Appraisal V2 Module**

**Path: Cloud → Settings → AppraisalV2 → Feedback Popup Data**

Some feedback fields need a fixed list to choose from rather than a free text box. This screen holds the values that appear in those lists.

A value is added against an appraisal stage and a selected component, along with the order it should appear in. Adding several values against the same component builds up the list that the user sees while filling in the appraisal.

<figure><img src="https://4282324958-files.gitbook.io/~/files/v0/b/gitbook-x-prod.appspot.com/o/spaces%2F-MXep_PEmh8mDPVWj49x%2Fuploads%2FYwL13JIvZRcfG2LIlzLr%2F6.1.png?alt=media&amp;token=6170c368-1521-4291-8b73-7f00716cabe8" alt=""><figcaption></figcaption></figure>

**Path Link:** [**https://cloud.pockethrms.com/Settings/Employee/Index?module=AppraisalV2\&submodule=FeedbackPopUpDataV2**](https://cloud.pockethrms.com/Settings/Employee/Index?module=AppraisalV2\&submodule=FeedbackPopUpDataV2)

### **Define Bell Curve Setting in Appraisal V2**

**Path: Cloud → Settings → AppraisalV2 → Define Bell Curve**

In most organisations, only a few employees are expected to be rated at the very top or the very bottom, with most sitting in the middle. This screen is where that expected spread is set.

Against each point on the rating scale, HR enters the percentage of employees expected to fall there. The percentages must add up to 100, and a graph on the same screen shows the shape they produce. The bell curve is defined based on the configured view, either **Grade** or **Scale**.

This expected spread is what actual ratings are later compared against on the **Rating Normalization** screen.

<figure><img src="https://4282324958-files.gitbook.io/~/files/v0/b/gitbook-x-prod.appspot.com/o/spaces%2F-MXep_PEmh8mDPVWj49x%2Fuploads%2FZ26iMY6WKzuu380XlO5I%2F7.1.png?alt=media&amp;token=d6499063-fb4d-4241-a531-c2ae68dce820" alt=""><figcaption></figcaption></figure>

**Path Link:** [**https://cloud.pockethrms.com/Settings/Employee/Index?module=AppraisalV2\&submodule=DefineBellCurveV2**](https://cloud.pockethrms.com/Settings/Employee/Index?module=AppraisalV2\&submodule=DefineBellCurveV2)

### **Rating Normalization Setting in Appraisal V2**

**Path: Cloud → Settings → AppraisalV2 → Rating Normalization**

Once appraisals are complete, the ratings people have actually received may not match the expected spread — for example, most employees may have been rated **Good** when only some were expected to be. This screen is where HR reviews that and adjusts ratings where needed.

HR selects the appraisal period and stage, and can narrow the list further by category, department, location, rating scale or a single employee. The list that appears shows each employee with their **Final Rating** and a **Calibrated Rating** alongside it, which is the rating HR can change.

<figure><img src="https://4282324958-files.gitbook.io/~/files/v0/b/gitbook-x-prod.appspot.com/o/spaces%2F-MXep_PEmh8mDPVWj49x%2Fuploads%2FuMNiuOMbz6OwxbReMX23%2F1.1.png?alt=media&amp;token=a7284b5a-ccbb-4cc0-8401-2c9ee19c6a95" alt=""><figcaption></figcaption></figure>

Below the list, a summary compares the expected spread against what employees actually received and what the calibrated ratings produce, along with how many employees would need to move at each rating point. A graph shows all three side by side.

<figure><img src="https://4282324958-files.gitbook.io/~/files/v0/b/gitbook-x-prod.appspot.com/o/spaces%2F-MXep_PEmh8mDPVWj49x%2Fuploads%2FXYNmpISi04rz9vMU3hTS%2F1.2.png?alt=media&amp;token=4877ab6d-d4c9-456c-b30f-74f4c560b8ee" alt=""><figcaption></figcaption></figure>

The list can also be downloaded for review outside the system.

**Path Link:** [**https://cloud.pockethrms.com/Settings/Employee/Index?module=AppraisalV2\&submodule=RatingNormalizationV2**](https://cloud.pockethrms.com/Settings/Employee/Index?module=AppraisalV2\&submodule=RatingNormalizationV2)

### **Appraisal Import and Export**

Setting up an appraisal for a large workforce one screen at a time takes time, and organisations often already hold their parameters, questions or ratings in a spreadsheet. These two screens let that information move between Excel and Pocket HRMS.

**Import** is used to load appraisal information in bulk — for example, uploading the parameters and questions for every business unit at the start of a cycle, assigning peers to employees, or entering manager and admin ratings collected outside the system.

**Export** is used to take existing appraisal information out — for example, to review the questions set up across stages, to share them with department heads, or to keep a copy outside the system.

### **Appraisal Import**

**Path: Cloud → Settings → AppraisalV2 → Appraisal Import**

This screen brings appraisal information into the system from an Excel file. HR first chooses what is being imported from the **Excel Import Template** list, which covers areas such as parameters, questions, KRAs, KPIs, peer assignment, manager and admin ratings, and final scores.

<figure><img src="https://4282324958-files.gitbook.io/~/files/v0/b/gitbook-x-prod.appspot.com/o/spaces%2F-MXep_PEmh8mDPVWj49x%2Fuploads%2FHHrtCc1si1563uKvkzFx%2F2.1.1.png?alt=media&amp;token=995cac19-a0f9-4bc0-ac17-8b1956901944" alt=""><figcaption></figcaption></figure>

A sample file can be downloaded for the selected template, so that the Excel file is prepared in the right layout. The file is then uploaded, and HR tells the system which column of the file holds which piece of information — the employee code, the parameter, the question, the rating, and so on. Only **.xlsx** files can be uploaded.

<figure><img src="https://4282324958-files.gitbook.io/~/files/v0/b/gitbook-x-prod.appspot.com/o/spaces%2F-MXep_PEmh8mDPVWj49x%2Fuploads%2FHVYOoZkWumx39btHGSUl%2F2.1.2.png?alt=media&amp;token=b915ca4d-63ae-4867-ac4a-b255e810d8e3" alt=""><figcaption></figcaption></figure>

These settings can be saved, so that the same mapping does not have to be set up again the next time the same kind of file is imported.

**Path Link:** [**https://cloud.pockethrms.com/Settings/Employee/Index?module=AppraisalV2\&submodule=Appraisalv2Import**](https://cloud.pockethrms.com/Settings/Employee/Index?module=AppraisalV2\&submodule=Appraisalv2Import)

### **Appraisal Export**

**Path: Cloud → Settings → AppraisalV2 → Appraisal Question Export**

This screen takes appraisal information out of the system as an Excel file. HR selects the business unit and the stage, or leaves both as **All**, and downloads the file.

<figure><img src="https://4282324958-files.gitbook.io/~/files/v0/b/gitbook-x-prod.appspot.com/o/spaces%2F-MXep_PEmh8mDPVWj49x%2Fuploads%2F03OpDeEoIIJKq5bIOGu5%2F2.2.1.png?alt=media&amp;token=2100e30f-a700-47bc-bb53-001e232cf3d8" alt=""><figcaption></figcaption></figure>

Larger exports are prepared in the background, so the file may not download immediately.

**Path Link:** [**https://cloud.pockethrms.com/Settings/Employee/Index?module=AppraisalV2\&submodule=QuestionsManagerDataExportV2**](https://cloud.pockethrms.com/Settings/Employee/Index?module=AppraisalV2\&submodule=QuestionsManagerDataExportV2)

### **How to Configure Appraisal Access Rights?**

**Path: Cloud → Settings → AppraisalV2 → Appraisal Access Rights**

Not everyone involved in an appraisal should be able to change it. This screen sets what each role can do on a given appraisal screen.

HR selects the appraisal screen, then sets the access for each role. **Admin** and **HR** can be given either **Update** access, which allows changes, or **View Only** access. **All Manager(s)** and **Last Manager** can be given **Update** access only.

Access is configured separately for each screen of the appraisal. Therefore, a role can be given permission to edit or update one section of the appraisal while having view-only access to another section.

<figure><img src="https://4282324958-files.gitbook.io/~/files/v0/b/gitbook-x-prod.appspot.com/o/spaces%2F-MXep_PEmh8mDPVWj49x%2Fuploads%2FxFLLWzyAXNmh6VxY7haa%2F2.1.png?alt=media&amp;token=f0b8c1c3-23f6-444e-ad89-24d772f72934" alt=""><figcaption></figcaption></figure>

**Path Link:** [**https://cloud.pockethrms.com/Settings/Employee/Index?module=AppraisalV2\&submodule=AppraisalAccessRightsV2**](https://cloud.pockethrms.com/Settings/Employee/Index?module=AppraisalV2\&submodule=AppraisalAccessRightsV2)

**Points to Remember**

* The PMS process varies based on how your organisation has configured it
* The option selected under **Appraisal Process** decides who rates the Employee
* Parameters, questions, rating method, eligibility and grading are all set by HR
* An appraisal stage must be active before Employees can submit their review
* Not all Employees may be eligible, depending on the criteria set
* Self-assessment, Peer assessment, Employee driven KPIs and increment apply only where configured

For any queries, contact <support@pockethrms.com>


# Transfer Module

### 1. How to do settings or configurations for the transfer module?

**Step 1**: Log into the cloud portal, go to the ‘**Settings**’ menu and under the ‘**HR**’ tab click on the ‘Transfer Settings’ subtab.

![](https://4282324958-files.gitbook.io/~/files/v0/b/gitbook-x-prod.appspot.com/o/spaces%2F-MXep_PEmh8mDPVWj49x%2Fuploads%2FBOxbpXWCh253n8OhCO8r%2F0.png?alt=media)

**Step 2**: **‘Select Setting**’ from the drop-down or **‘Add New**’ if required and select Transfer Type as ‘Intra Company’ (our system supports only intra company transfer).

**Step 3**: Select **‘HR Template’** to be sent to the employee informing them about their transfer. Along with that you also need to select various departments to whom you want to send ‘Intimation Email To’

![](https://4282324958-files.gitbook.io/~/files/v0/b/gitbook-x-prod.appspot.com/o/spaces%2F-MXep_PEmh8mDPVWj49x%2Fuploads%2FZ9O0jIbDUUyg6WNGN7aX%2F1.png?alt=media)

**Step 3**: **‘Select Field’** for the details that need to be changed along with the transfer. Once you select all the required details scroll down and click on the ‘**Save**’ button and the transfer details will be saved accordingly.

![](https://4282324958-files.gitbook.io/~/files/v0/b/gitbook-x-prod.appspot.com/o/spaces%2F-MXep_PEmh8mDPVWj49x%2Fuploads%2FIasPLKKCh1DXObPmm1Ap%2F2.png?alt=media)

**Path**: Cloud Portal>Settings>HR> Transfer Settings>Select Setting/Add New>Transfer Type-Intra Company>HR Template>Intimation Email To>Select Fields>Save

**Note**:

After transfer settings you need to ensure that necessary role allocation is provided for the Manager, HR, Line Manager and Employee users to proceed further.

**Link**: <https://cloud.pockethrms.com/Settings/Employee/Index?module=hr&submodule=TransferSetting>

For any queries, contact <support@pockethrms.com>

### 2. How to give managers the right to request employee transfer?

**Step 1**: Log into the cloud portal, go to the ‘Settings’ menu and under the ‘**Profile Info**’ tab, click on the ‘**Transfer Settings’** subtab.

![](https://4282324958-files.gitbook.io/~/files/v0/b/gitbook-x-prod.appspot.com/o/spaces%2F-MXep_PEmh8mDPVWj49x%2Fuploads%2FXZR6jLbsaP0yg60UdUqa%2F3.png?alt=media)

**Step 2**: Select Module as ‘**Transfer**’ and Select Role as ‘**Manager**’ from the respective fields and click on the ‘**Search**’ button.

![](https://4282324958-files.gitbook.io/~/files/v0/b/gitbook-x-prod.appspot.com/o/spaces%2F-MXep_PEmh8mDPVWj49x%2Fuploads%2FEKUDFNbgcJwiEF5uwCm6%2F4.png?alt=media)

**Step 3**: Tick the checkbox for the ‘**Request**’ and then the ‘Employee Transfer’ option. Click on the ‘**Save**’ button and the transfer request rights will be given to the managers.

![](https://4282324958-files.gitbook.io/~/files/v0/b/gitbook-x-prod.appspot.com/o/spaces%2F-MXep_PEmh8mDPVWj49x%2Fuploads%2Fo5emA6O2i45Dpgay6LN2%2F5.png?alt=media)

**Path**: Cloud Portal>ESS settings>Profile Info>Role Allocation>Select Module-Transfer>Select Role-Manager>Search>Request-Employee Transfer>Save

**Link**: <https://cloud.pockethrms.com/Settings/Employee/ESSIndex?module=Profile&submodule=RoleAllocation>

For any queries, contact <support@pockethrms.com>

### 3. How to give HR the right to approve or reject employee transfer?

**Step 1**: Log into the cloud portal, go to the **‘Settings’** menu and under the **‘Profile Info’** tab, click on the **‘Transfer Settings**’ subtab.

![](https://4282324958-files.gitbook.io/~/files/v0/b/gitbook-x-prod.appspot.com/o/spaces%2F-MXep_PEmh8mDPVWj49x%2Fuploads%2FevT8kKFscjAceQqC68WH%2F6.png?alt=media)

**Step 2**: Select Module as ‘**Transfer’** and Select Role as ‘**HR**’ from the respective fields and click on the ‘**Search**’ button.

![](https://4282324958-files.gitbook.io/~/files/v0/b/gitbook-x-prod.appspot.com/o/spaces%2F-MXep_PEmh8mDPVWj49x%2Fuploads%2FbNqAXMJFH0nyd35p6vkw%2F7.png?alt=media)

**Step 3**: Tick the checkbox for the ‘**Approval**’ and then the ‘**HR Transfer Approval’** option. Click on the ‘**Save**’ button and the transfer approval rights will be given to the HR accordingly.

![](https://4282324958-files.gitbook.io/~/files/v0/b/gitbook-x-prod.appspot.com/o/spaces%2F-MXep_PEmh8mDPVWj49x%2Fuploads%2F4SBi14Yy8ipP46CvX63C%2F8.png?alt=media)

**Path**: Cloud Portal>ESS settings>Profile Info>Role Allocation>Select Module-Transfer>Select Role-HR>Search> Approval-HR Transfer Approval >Save

**Link**: <https://cloud.pockethrms.com/Settings/Employee/ESSIndex?module=Profile&submodule=RoleAllocation>

For any queries, contact <support@pockethrms.com>

### 4. How to give the line manager the right to approve or reject employee transfer?

**Step 1**: Log into the cloud portal, go to the ‘**Settings**’ menu and under the **‘Profile Info**’ tab, click on the **‘Transfer Settings’** subtab.

![](https://4282324958-files.gitbook.io/~/files/v0/b/gitbook-x-prod.appspot.com/o/spaces%2F-MXep_PEmh8mDPVWj49x%2Fuploads%2F9oNzQpGYURmPL1iq3ewp%2F9.png?alt=media)

**Step 2**: Select Module as **‘Transfer’** and Select Role as **‘Manager’** from the respective fields and click on the ‘**Search**’ button.

![](https://4282324958-files.gitbook.io/~/files/v0/b/gitbook-x-prod.appspot.com/o/spaces%2F-MXep_PEmh8mDPVWj49x%2Fuploads%2FC2YkXMpieoxIQjhUqJfy%2F10.png?alt=media)

**Step 3**: Tick the checkbox for the ‘**Approval**’ and then the ‘**Line Manager Approval’** option. Click on the ‘**Save**’ button and the transfer approval rights will be given to the line manager accordingly.

![](https://4282324958-files.gitbook.io/~/files/v0/b/gitbook-x-prod.appspot.com/o/spaces%2F-MXep_PEmh8mDPVWj49x%2Fuploads%2FNNyrBgMIiv9DT09YAPPG%2F11.png?alt=media)

**Path**: Cloud Portal>ESS settings>Profile Info>Role Allocation>Select Module-Transfer>Select Role-Manager>Search>Approval-Line Manager Approval >Save

**Link**: <https://cloud.pockethrms.com/Settings/Employee/ESSIndex?module=Profile&submodule=RoleAllocation>

For any queries, contact <support@pockethrms.com>

### 5. How to do role allocation for the employee so they can view/acknowledge transferred details and download the transfer letter under the transfer module?

**Step 1**: Log into the cloud portal, go to the ‘**Settings**’ menu and under the ‘**Profile Info**’ tab, click on the ‘**Transfer Settings**’ subtab.

![](https://4282324958-files.gitbook.io/~/files/v0/b/gitbook-x-prod.appspot.com/o/spaces%2F-MXep_PEmh8mDPVWj49x%2Fuploads%2FwQOXY8vFWLkLfaCEQwTY%2F12.png?alt=media)

**Step 2**: Select Module as ‘**Transfer**’ and Select Role (User, Manager or as required) for the employee to be transferred and click on the ‘**Search**’ button.

![](https://4282324958-files.gitbook.io/~/files/v0/b/gitbook-x-prod.appspot.com/o/spaces%2F-MXep_PEmh8mDPVWj49x%2Fuploads%2FZRn28e9xNKQFcVogqTPg%2F13.png?alt=media)

**Step 3**: Tick the checkbox for the ‘**Approval**’ and then the ‘**Transfer Acknowledgement’** option. Click on the ‘**Save**’ button and the system will enable employee to be transferred accordingly.

![](https://4282324958-files.gitbook.io/~/files/v0/b/gitbook-x-prod.appspot.com/o/spaces%2F-MXep_PEmh8mDPVWj49x%2Fuploads%2FxzbD4DqnrKdsUfCMKOTL%2F14.png?alt=media)

**Note**: Once role allocation is done for the Manager, HR, Line Manager and Employee or users to be transferred you need to add manager for transfer in employee’s profile under the approval matrix.

**Path**: Cloud Portal>ESS settings>Profile Info>Role Allocation>Select Module-Transfer>Select Role-select role of the employee to be transferred>Search>Approval- Transfer Acknowledgement>Save

**Link**: <https://cloud.pockethrms.com/Settings/Employee/ESSIndex?module=Profile&submodule=RoleAllocation>

For any queries, contact <support@pockethrms.com>

### 6. How to add a manager for the transfer module in employee’s profile under the approval matrix?

**Step 1**: Log into the cloud portal, go to the ‘**Employee**’ menu and click on the ‘**Employee List’** submenu.

![](https://4282324958-files.gitbook.io/~/files/v0/b/gitbook-x-prod.appspot.com/o/spaces%2F-MXep_PEmh8mDPVWj49x%2Fuploads%2F8LxaO2V3zZzboH9FD4IX%2F15.png?alt=media)

**Step 2**: Select the employee for whom you want to add a manager and the system will take you to their profile.

![](https://4282324958-files.gitbook.io/~/files/v0/b/gitbook-x-prod.appspot.com/o/spaces%2F-MXep_PEmh8mDPVWj49x%2Fuploads%2FUiOAaa047pkWCGnuB0N7%2F16.png?alt=media)

**Step 3**: Under the **‘Approval Matrix’** tab click on the ‘Manager Details’ subtab and click on the ‘+’ icon towards the upper right side of the screen.

![](https://4282324958-files.gitbook.io/~/files/v0/b/gitbook-x-prod.appspot.com/o/spaces%2F-MXep_PEmh8mDPVWj49x%2Fuploads%2FbeXAATlHqfe2PPcfgzPt%2F17.png?alt=media)

**Step 4**: ‘Select Manager’ in the respective field using their name or employee code. Select ‘Priority’ as ‘1’, tick ‘Multi Transfer’ option and click on the ‘Save’ button. Manager for the transfer will be added for the employee accordingly.

![](https://4282324958-files.gitbook.io/~/files/v0/b/gitbook-x-prod.appspot.com/o/spaces%2F-MXep_PEmh8mDPVWj49x%2Fuploads%2Fx06eAizJzlgs0aky5pLu%2F18.png?alt=media)

**Note**:

* Don’t select any other options such as View Only, Approval Must or Approved Cancel Rights.
* Once Manager is assigned in the employee’s profile, the manager can log into their ESS portal and request employee transfer.

**Path**: Cloud Portal>Employee>Employee List>Employee Profile>Approval Matrix>Manager Details>click on the ‘+’ icon>Select Manager>Priority-1>Multi Transfer>Save

For any queries, contact <support@pockethrms.com>

### 7. How to request an employee transfer as a manager from the ESS portal?

**Step 1:** Log into the ESS portal with the manager rights, go to the ‘Transfer’ menu and select the ‘Request’ submenu.

![](https://4282324958-files.gitbook.io/~/files/v0/b/gitbook-x-prod.appspot.com/o/spaces%2F-MXep_PEmh8mDPVWj49x%2Fuploads%2F5ienDfnhQQEYC8WU8Uxx%2F19.png?alt=media)

**Step 2**: Under the ‘Employee Transfer’ tab, select details such as Settings, Employee to be transferred, New Line Manager and the Transfer Date from the respective fields. Click on the ‘Transfer’ button and the employee transfer request will be sent to HR accordingly.

![](https://4282324958-files.gitbook.io/~/files/v0/b/gitbook-x-prod.appspot.com/o/spaces%2F-MXep_PEmh8mDPVWj49x%2Fuploads%2FsxQ1OT78sDNPAyq2KSFt%2F20.png?alt=media)

**Note**: Transfer will be effective only from 1st of the month. For example - If the transfer date is selected as 20th Feb, the transfer will be considered effective from the 1st Feb.&#x20;

**Path**: ESS Portal>Transfer>Request>Employee Transfer>Select Settings>Select Employee code/name>New Line Manager>Transfer Date>Transfer

**Link**: <https://ess.pockethrms.com/Transfer/Transaction/Request?Menu=EmployeeTransfer>

For any queries, contact <support@pockethrms.com>

### 8. How to approve or reject employee transfer as an HR from the ESS portal?

**Step 1:** Log into the ESS portal with the manager rights, go to the ‘Transfer’ menu and select the ‘Approval’ submenu.

![](https://4282324958-files.gitbook.io/~/files/v0/b/gitbook-x-prod.appspot.com/o/spaces%2F-MXep_PEmh8mDPVWj49x%2Fuploads%2Fe1ahZyLQPWsTIaJzi0uN%2F0.png?alt=media)

**Step 2**: Under the ‘HR Transfer Approval’ tab, select the ‘View Detail’ button for the respective entry.

![](https://4282324958-files.gitbook.io/~/files/v0/b/gitbook-x-prod.appspot.com/o/spaces%2F-MXep_PEmh8mDPVWj49x%2Fuploads%2FHUIGJpmPVZMaHiCu7PD7%2F1.png?alt=media)

**Step 3**: Here you can view and verify details transfer information. Enter details to be changed in the ‘Proposed Details’ fields (These are the fields in which new details added during the transfer according to the transfer settings of the company).

**Step 4**: Click on the ‘Approve’ or ‘Reject’ button and the request will be approved or rejected accordingly.

![](https://4282324958-files.gitbook.io/~/files/v0/b/gitbook-x-prod.appspot.com/o/spaces%2F-MXep_PEmh8mDPVWj49x%2Fuploads%2FuN3tNmqcczsKDBf30Epn%2F2.png?alt=media)

**Note**:

* The HR can also view the employee transfer request from their notification.
* If you reject the employee transfer request the requesting manager will be notified about the same.
* Once you approve the request as an HR it goes to the line manager for approval.

**Path**: ESS Portal>Transfer>Approval> HR Transfer Approval>View Details>enter ‘Proposed Details’>Approve/Reject

For any queries, contact <support@pockethrms.com>

### 9. How to approve or reject employee transfer a line manager from the ESS portal?

**Step 1:** Log into the ESS portal with the manager rights, go to the ‘Transfer’ menu and select the ‘Approval’ submenu.

![](https://4282324958-files.gitbook.io/~/files/v0/b/gitbook-x-prod.appspot.com/o/spaces%2F-MXep_PEmh8mDPVWj49x%2Fuploads%2FwIa960LcZczf0Va3i25q%2F3.png?alt=media)

**Step 2**: Under the ‘Line Manager Approval’ tab, select the ‘View Detail’ button for the respective entry.

![](https://4282324958-files.gitbook.io/~/files/v0/b/gitbook-x-prod.appspot.com/o/spaces%2F-MXep_PEmh8mDPVWj49x%2Fuploads%2FL7SB7Gwu1cQ5TIYukwyk%2F4.png?alt=media)

**Step 3**: View the details and enter the Reason for Rejection in the respective field if required and click on the ‘Approve’ or ‘Reject’ button. The request will be approved or rejected accordingly.

![](https://4282324958-files.gitbook.io/~/files/v0/b/gitbook-x-prod.appspot.com/o/spaces%2F-MXep_PEmh8mDPVWj49x%2Fuploads%2F75QJWs6Nd0YdoYhifAMA%2F5.png?alt=media)

**Note**:

* The line manager can also open the transfer request from the notification in the ESS informing about the HR’s approval.
* Once line manager approves the transfer employee can check their transfer details acknowledgment and download transfer certificate from their ESS log in.

**Path**: ESS Portal>Transfer>Approval>Line Manager Approval>View Details>Approve/Reject

For any queries, contact <support@pockethrms.com>

### 10. How to view the transfer details acknowledgement and download the transfer letter from their ESS?

**Step 1:** Log into the ESS portal with the manager rights, go to the ‘Transfer’ menu and select the ‘Approval’ submenu.

![](https://4282324958-files.gitbook.io/~/files/v0/b/gitbook-x-prod.appspot.com/o/spaces%2F-MXep_PEmh8mDPVWj49x%2Fuploads%2FGN3ZhX3lOtu8KiNoSI48%2F6.png?alt=media)

**Step 2:** Under the ‘Transfer Acknowledgment’ tab, click on the ‘View Details’ button for your transfer entry.

![](https://4282324958-files.gitbook.io/~/files/v0/b/gitbook-x-prod.appspot.com/o/spaces%2F-MXep_PEmh8mDPVWj49x%2Fuploads%2FxAwzlPLsp1n48Pe5zX93%2F7.png?alt=media)

**Step 3**: Acknowledge the transfer by ticking the ‘I Agree’ checkbox. Click on the ‘Download’ button and the transfer certificate will be downloaded.

![](https://4282324958-files.gitbook.io/~/files/v0/b/gitbook-x-prod.appspot.com/o/spaces%2F-MXep_PEmh8mDPVWj49x%2Fuploads%2F7TL4QxkloINv6BVQMLIS%2F8.png?alt=media)

**Path**: ESS Portal>Transfer>Approval>Transfer Acknowledgement>I Agree>Download

For any queries, contact <support@pockethrms.com>


# Travel Module

Step-by-step Guide to setup the Travel Module

### **Travel Management Module**

The **Travel Management Module** in Pocket HRMS helps organizations manage employee travel efficiently by streamlining travel requests, approvals, advances, reimbursements, and related activities in one place.

It provides a smooth and structured experience for employees, managers, HR/Admin, and Finance teams throughout the travel process.

This guide covers the key features, configurations, and workflows available in the **Travel Module.**

#### **Prerequisites**

Before configuring the Travel Module, ensure the following:

* **Self-Service Role:** Assign the required ESS role to Employees, Managers, HR/Admin, and Finance users.
* **Travel Rights:** Enable the required Travel options through **Role Allocation**.
* **Travel Manager:** Assign the employee’s Travel Manager through the **Approval Matrix**.
* **Employee Details:** Ensure basic employee information such as **Employee Code** and **Business Unit** is correctly updated.

Let us start with setting up the module according to company’s requirement.

### **Cloud Configurations for Travel Management**

The **Cloud Configurations** section allows administrators to set up and manage the key settings required for the Travel Management Module.

### **Configuration**

**Path: Cloud → ESS Settings → Travel → Configuration**

**Step 1:** Log in to the **Cloud Portal**, select **ESS Settings** from the main menu, open the **Travel** tab, and then click **Configuration.**

<figure><img src="https://4282324958-files.gitbook.io/~/files/v0/b/gitbook-x-prod.appspot.com/o/spaces%2F-MXep_PEmh8mDPVWj49x%2Fuploads%2FnnMaUrmvQQJjBKbh2vTx%2FFrame%201%20-%202026-08-25T124614.616.png?alt=media&amp;token=d5d0cbe7-d0d6-46aa-b69d-8cc7921079a5" alt=""><figcaption></figcaption></figure>

**Step 2: Set Manager Amount Edit Rights**

Under **Manager Approval**, enable **Manager Amount Edit Rights** to allow the Reporting Manager to edit the reimbursement amount before approving the request. Keep it disabled to restrict the Reporting Manager to approving or rejecting the amount as submitted.

<figure><img src="https://4282324958-files.gitbook.io/~/files/v0/b/gitbook-x-prod.appspot.com/o/spaces%2F-MXep_PEmh8mDPVWj49x%2Fuploads%2FBWIpnqPjxl2NMQt6dbpb%2FFrame%202%20-%202026-08-25T124830.393.png?alt=media&amp;token=ccc13d4c-97f9-4092-9f15-44e5a6fbb716" alt=""><figcaption></figcaption></figure>

**Step 3: Enable Finance Approval for Travel Advance Requests**

Under **Finance Approval**, enable **Required for Travel Advance Request** to route travel advance requests to the Finance team for approval.

<figure><img src="https://4282324958-files.gitbook.io/~/files/v0/b/gitbook-x-prod.appspot.com/o/spaces%2F-MXep_PEmh8mDPVWj49x%2Fuploads%2FeRfa6BpLKjkphJfPIHRd%2FFrame%202%20-%202026-08-25T124901.866.png?alt=media&amp;token=dba95b6d-9422-47d8-ab82-8cf3c17f0f31" alt=""><figcaption></figcaption></figure>

**Step 4: Set Finance Amount Approval Rights**

Enable **Amount Approval Rights** to allow the Finance team to edit final amounts and approve or reject travel requests.

<figure><img src="https://4282324958-files.gitbook.io/~/files/v0/b/gitbook-x-prod.appspot.com/o/spaces%2F-MXep_PEmh8mDPVWj49x%2Fuploads%2FxOxcnURxvmw8ZGsciRPj%2FFrame%202%20-%202026-08-25T124927.511.png?alt=media&amp;token=2b20c9fc-3f55-4bcc-b5d7-39de3cb629ac" alt=""><figcaption></figcaption></figure>

**Step 5: Add the Approval Screen Note/Disclaimer**

Enter the note or disclaimer text in the **Approval Screen note/disclaimer** field. This text is shown to approvers on the approval screen.&#x20;

<figure><img src="https://4282324958-files.gitbook.io/~/files/v0/b/gitbook-x-prod.appspot.com/o/spaces%2F-MXep_PEmh8mDPVWj49x%2Fuploads%2FwhVRMzxByOyZkVI1aScB%2FFrame%202%20-%202026-08-25T125333.078.png?alt=media&amp;token=2a2e297c-7760-4af1-96b3-f8596d69d56e" alt=""><figcaption></figcaption></figure>

Click **Preview** to review it,

<figure><img src="https://4282324958-files.gitbook.io/~/files/v0/b/gitbook-x-prod.appspot.com/o/spaces%2F-MXep_PEmh8mDPVWj49x%2Fuploads%2Fy3cIrlOppSJ4yHvipRl6%2FFrame%202%20-%202026-08-25T125352.597.png?alt=media&amp;token=617e6acd-ec2d-4508-ad00-a370fc73ae0f" alt=""><figcaption></figcaption></figure>

<figure><img src="https://4282324958-files.gitbook.io/~/files/v0/b/gitbook-x-prod.appspot.com/o/spaces%2F-MXep_PEmh8mDPVWj49x%2Fuploads%2FRlAP628YvFNi0HzWar4e%2FFrame%201%20-%202026-08-25T125807.441.png?alt=media&amp;token=89533650-8651-4572-95c1-a18caf22ed50" alt=""><figcaption></figcaption></figure>

then click **Save**.

<figure><img src="https://4282324958-files.gitbook.io/~/files/v0/b/gitbook-x-prod.appspot.com/o/spaces%2F-MXep_PEmh8mDPVWj49x%2Fuploads%2FKUR7AveFDeIbB6ZHsTfJ%2FFrame%202%20-%202026-08-25T125414.793.png?alt=media&amp;token=d7f0bfab-205c-4856-a9db-663417a8b787" alt=""><figcaption></figcaption></figure>

#### **Where These Settings Apply**

| **Approver**      | **Path**                                                                                   |
| ----------------- | ------------------------------------------------------------------------------------------ |
| Reporting Manager | ESS Portal → Manager → Travel → Approval → Travel Approval / Travel Reimbursement Approval |
| Finance Team      | ESS Portal → Finance → Travel → Finance Approval                                           |

**Path Link:** [**https://cloud.pockethrms.com/Settings/Employee/ESSIndex?module=Travel\&submodule=TravelConfiguration**](https://cloud.pockethrms.com/Settings/Employee/ESSIndex?module=Travel\&submodule=TravelConfiguration)

### **Travel Master**

The **Travel Master** page lets you define the base data used across the Travel module — the purposes, modes, and other categories an employee selects while raising a travel request.

This helps in:

* Standardising the travel purposes and modes available to employees
* Keeping travel request data consistent and structured
* Supporting any additional, company-specific travel categories

**Path: Cloud → ESS Settings → Travel → Travel Master**

**Step 1: Navigate to the Travel Master Screen**

Log in to the Cloud portal and click **ESS Settings**. Go to the **Travel** tab, then click the **Travel Master** subtab.

<figure><img src="https://4282324958-files.gitbook.io/~/files/v0/b/gitbook-x-prod.appspot.com/o/spaces%2F-MXep_PEmh8mDPVWj49x%2Fuploads%2FK6TxUF03siuiapoHT11P%2FFrame%201%20-%202026-08-25T145208.045.png?alt=media&amp;token=c1210abd-4a86-416c-aad3-3415f64786c4" alt=""><figcaption></figcaption></figure>

**Step 2: Add a New Travel Master Entry**

Click the **+** icon on the **Travel Master** screen to open the **Travel Master** pop-up.

<figure><img src="https://4282324958-files.gitbook.io/~/files/v0/b/gitbook-x-prod.appspot.com/o/spaces%2F-MXep_PEmh8mDPVWj49x%2Fuploads%2FiapZ6rbFZjkUEJP48zXZ%2FFrame%201%20-%202026-08-25T145534.639.png?alt=media&amp;token=2f6ec837-83d0-4faa-b650-106ea12575d3" alt=""><figcaption></figcaption></figure>

**Step 3: Select the Travel Master Type**

From the **Select Travel Master** drop-down, choose the type of entry to add:

* **Purpose of Travel**
* **Mode of Travel**
* **Other Miscellaneous**

<figure><img src="https://4282324958-files.gitbook.io/~/files/v0/b/gitbook-x-prod.appspot.com/o/spaces%2F-MXep_PEmh8mDPVWj49x%2Fuploads%2Fv5ict9XkKx5YubL8Zgf9%2Fimage.png?alt=media&amp;token=473bf3e5-2367-4020-8822-f2937546d95e" alt=""><figcaption></figcaption></figure>

**Step 4: Enter the Description and Save**

Enter a **Description** for the selected type, then click **Save**.

<figure><img src="https://4282324958-files.gitbook.io/~/files/v0/b/gitbook-x-prod.appspot.com/o/spaces%2F-MXep_PEmh8mDPVWj49x%2Fuploads%2FSqnMwhiDA7YzFZmKcVZz%2Fimage.png?alt=media&amp;token=1a3afda9-40d3-45f3-9827-819a76f3a61a" alt=""><figcaption></figcaption></figure>

Repeat these steps for each **Purpose of Travel**, **Mode of Travel**, or **Other Miscellaneous** entry you want to configure.

#### **Viewing Saved Travel Master Entries**

Once saved, the entry appears in the list on the **Travel Master** screen.

<figure><img src="https://4282324958-files.gitbook.io/~/files/v0/b/gitbook-x-prod.appspot.com/o/spaces%2F-MXep_PEmh8mDPVWj49x%2Fuploads%2F7uvKxA0iXIkYEUyT0LRF%2FFrame%201%20-%202026-08-25T150819.111.png?alt=media&amp;token=c4dab72e-5cb8-4b35-ba89-a09e8d7f6f64" alt=""><figcaption></figcaption></figure>

**Path Link:** [**https://cloud.pockethrms.com/Settings/Employee/ESSIndex?module=Travel\&submodule=TravelMaster**](https://cloud.pockethrms.com/Settings/Employee/ESSIndex?module=Travel\&submodule=TravelMaster)

### **Travel Form Builder Settings**

The **Travel Form Builder Settings** page lets you configure the fields captured on the **Travel Request** and **Reimbursement** forms, and choose how each form's fields are sourced.

This helps in:

* Configuring the Travel Request and Reimbursement forms independently
* Choosing whether form fields come from a fixed company-wide form, a business-unit-specific form, or custom input fields
* Keeping the correct form linked to each request type

**Path: Cloud → ESS Settings → Travel → Travel Form Builder Settings**

**Step 1: Navigate to the Travel Form Builder Settings Screen**

Log in to the Cloud portal and click **ESS Settings**. Go to the **Travel** tab, then click the **Travel Form Builder Settings** subtab.

<figure><img src="https://4282324958-files.gitbook.io/~/files/v0/b/gitbook-x-prod.appspot.com/o/spaces%2F-MXep_PEmh8mDPVWj49x%2Fuploads%2FDKgRgsdCx8ARPEU2cB5m%2FFrame%201%20-%202026-08-25T151756.972.png?alt=media&amp;token=e65068bc-4cff-44c5-80e2-6e5b8e99801d" alt=""><figcaption></figcaption></figure>

**Step 2: Select the Request Type**

Choose the **Travel Request** or **Reimbursement** tab, depending on which form you want to configure.

**Step 3: Select the Field Source Type**

Choose the source type for the form's fields: **Company Wise**, **Dynamic**, or **Input Selection**. The fields displayed below change based on the selected type.

<figure><img src="https://4282324958-files.gitbook.io/~/files/v0/b/gitbook-x-prod.appspot.com/o/spaces%2F-MXep_PEmh8mDPVWj49x%2Fuploads%2FV6wI177UlFIRhfL3Jnlo%2FFrame%201%20-%202026-08-25T152417.781.png?alt=media&amp;token=2283d29e-4992-4705-95fa-aebcc250bc2d" alt=""><figcaption></figcaption></figure>

#### Field Source Types

**Company Wise**

Displays the **Form Name** drop-down only. Select the form to associate with the request type.

<figure><img src="https://4282324958-files.gitbook.io/~/files/v0/b/gitbook-x-prod.appspot.com/o/spaces%2F-MXep_PEmh8mDPVWj49x%2Fuploads%2F7eNZRxpU8Khap4skqDC8%2FFrame%201%20-%202026-08-25T152218.015.png?alt=media&amp;token=91b5ed2f-34c9-472e-89cb-fabf2c768756" alt=""><figcaption></figcaption></figure>

**Dynamic**

Displays **Business Unit**, **Value**, and **Form Name** drop-downs. Select the **Business Unit** and **Value** the form applies to, then select the **Form Name**.

<figure><img src="https://4282324958-files.gitbook.io/~/files/v0/b/gitbook-x-prod.appspot.com/o/spaces%2F-MXep_PEmh8mDPVWj49x%2Fuploads%2F57g3kl0h4iFo4GBG1Fx0%2FFrame%201%20-%202026-08-25T152207.806.png?alt=media&amp;token=e3c1cd33-6c46-4494-9db6-75b8916c665a" alt=""><figcaption></figcaption></figure>

**Input Selection**

Displays **Label Name** and **Component Name** text fields, along with the **Form Name** drop-down. Enter the **Label Name** and **Component Name**, then select the **Form Name**.

<figure><img src="https://4282324958-files.gitbook.io/~/files/v0/b/gitbook-x-prod.appspot.com/o/spaces%2F-MXep_PEmh8mDPVWj49x%2Fuploads%2FbxdsXS33qEGvNoDWKwDE%2FFrame%201%20-%202026-08-25T153002.456.png?alt=media&amp;token=14703dc3-1a53-452a-9082-9e7706f907c4" alt=""><figcaption></figcaption></figure>

**Step 4: Save the Form Configuration**

Click **Submit** to save the configuration.

<figure><img src="https://4282324958-files.gitbook.io/~/files/v0/b/gitbook-x-prod.appspot.com/o/spaces%2F-MXep_PEmh8mDPVWj49x%2Fuploads%2FrZ7Cqrd0Oo310dXPMqUP%2FFrame%201%20-%202026-08-25T153022.783.png?alt=media&amp;token=d46097fa-7d92-4e10-9d82-7424d03bc5e3" alt=""><figcaption></figcaption></figure>

**Path Link:** [**https://cloud.pockethrms.com/Settings/Employee/ESSIndex?module=Travel\&submodule=FormBuilderSettings**](https://cloud.pockethrms.com/Settings/Employee/ESSIndex?module=Travel\&submodule=FormBuilderSettings)

### **Travel Notification Settings**

The **Travel Notification Settings** page lets you configure who receives email notifications for Travel Management events, and whether Managers and HRs are notified.

This helps in:

* Routing event notifications to specific employees
* Adding direct email addresses for notification, independent of employee records
* Controlling whether Managers and HRs receive notifications for each event

**Path: Cloud → ESS Settings → Travel → Travel - Notification Settings**

**Step 1: Navigate to the Travel Notification Settings Screen**

Log in to the Cloud portal and click **ESS Settings**. Go to the **Travel** tab, then click the **Travel - Notification Settings** subtab.

<figure><img src="https://4282324958-files.gitbook.io/~/files/v0/b/gitbook-x-prod.appspot.com/o/spaces%2F-MXep_PEmh8mDPVWj49x%2Fuploads%2FisCJ6PVy16cktGdYZTZP%2FFrame%201%20-%202026-08-25T153627.115.png?alt=media&amp;token=f45c80a7-d2bb-47ba-bf78-b6bf7405490e" alt=""><figcaption></figcaption></figure>

**Step 2: Select the Entities to Notify**

Under **Entities**, add the employees who should receive a notification for the **Event**. Click the **×** on an entry to remove it.

<figure><img src="https://4282324958-files.gitbook.io/~/files/v0/b/gitbook-x-prod.appspot.com/o/spaces%2F-MXep_PEmh8mDPVWj49x%2Fuploads%2Fvfn6V10QdSJkfeV67YuX%2FFrame%201%20-%202026-08-25T153817.438.png?alt=media&amp;token=df645834-40f6-4831-80c4-fe0b6c4ccf2b" alt=""><figcaption></figcaption></figure>

**Step 3: Add Notification Email Addresses**

Under **Emails**, enter the email address(es) that should also receive the notification, independent of the selected **Entities**.

<figure><img src="https://4282324958-files.gitbook.io/~/files/v0/b/gitbook-x-prod.appspot.com/o/spaces%2F-MXep_PEmh8mDPVWj49x%2Fuploads%2F3TysOGJIsF1gAedmoX3z%2FFrame%201%20-%202026-08-25T154025.864.png?alt=media&amp;token=23800221-e4f6-4217-bfc4-f1a6e88aa468" alt=""><figcaption></figcaption></figure>

**Step 4: Enable Manager and HR Notifications**

Select the **Manager** checkbox to notify the Reporting Manager, and select the **HRs** checkbox to notify HR, for the **Event**.

<figure><img src="https://4282324958-files.gitbook.io/~/files/v0/b/gitbook-x-prod.appspot.com/o/spaces%2F-MXep_PEmh8mDPVWj49x%2Fuploads%2FVMPkgd0dDrG4FW31KDwO%2FFrame%201%20-%202026-08-25T154040.921.png?alt=media&amp;token=e3e5f86e-4882-44a9-a4a6-f6124efc20ba" alt=""><figcaption></figcaption></figure>

**Step 5: Save the Notification Settings**

Click **Save**.

<figure><img src="https://4282324958-files.gitbook.io/~/files/v0/b/gitbook-x-prod.appspot.com/o/spaces%2F-MXep_PEmh8mDPVWj49x%2Fuploads%2FIWZnrDxSiNJWJvnIjqQL%2FFrame%201%20-%202026-08-25T154055.972.png?alt=media&amp;token=c8aafdab-2560-4416-a0f1-6c1edbc1a0af" alt=""><figcaption></figcaption></figure>

#### **Removing an Event's Notification Configuration**

Click **Delete** in the **Action** column to remove that **Event's** notification configuration.

<figure><img src="https://4282324958-files.gitbook.io/~/files/v0/b/gitbook-x-prod.appspot.com/o/spaces%2F-MXep_PEmh8mDPVWj49x%2Fuploads%2F6InnJ7UQJiE1dBQxwsJJ%2FFrame%201%20-%202026-08-25T154111.935.png?alt=media&amp;token=b4659943-4e0e-4809-b030-e71f5b25c9ac" alt=""><figcaption></figcaption></figure>

**Path Link:** [**https://cloud.pockethrms.com/Settings/Employee/ESSIndex?module=Travel\&submodule=TravelNotification**](https://cloud.pockethrms.com/Settings/Employee/ESSIndex?module=Travel\&submodule=TravelNotification)&#x20;

### **Calculative Fields**

The **Calculative Fields** page lets you define formula-driven fields used on Travel forms — each field applies a **Rate** to a selected **Value**, using a mathematical **Operator**, for a specific **Business Unit** category.

This helps in:

* Defining reusable calculation rules, such as a per-kilometer travel rate
* Applying different rates for different values within a Business Unit
* Keeping travel amount calculations consistent across requests

**Path: Cloud → ESS Settings → Travel → Calculative Fields**

**Step 1: Navigate to the Calculative Fields Screen**

Log in to the Cloud portal and click **ESS Settings**. Go to the **Travel** tab, then click the **Calculative Fields** subtab.

<figure><img src="https://4282324958-files.gitbook.io/~/files/v0/b/gitbook-x-prod.appspot.com/o/spaces%2F-MXep_PEmh8mDPVWj49x%2Fuploads%2FhGjDvT2WHB8hqB7Fu3fJ%2FFrame%201%20-%202026-08-25T155034.197.png?alt=media&amp;token=d3c80218-2e60-458e-b503-cb764e79d96c" alt=""><figcaption></figcaption></figure>

**Step 2: Add a New Calculative Field**

Click the **+** icon in the top right corner of the **Calculative Fields** screen to open the **Calculative Fields** pop-up.

<figure><img src="https://4282324958-files.gitbook.io/~/files/v0/b/gitbook-x-prod.appspot.com/o/spaces%2F-MXep_PEmh8mDPVWj49x%2Fuploads%2FVIh01b59AbkE6xtph6OT%2FFrame%201%20-%202026-08-25T161130.165.png?alt=media&amp;token=05649df7-f720-4c06-afff-48c685408c6c" alt=""><figcaption></figcaption></figure>

**Step 3: Select the Business Unit and Value**

Select the **Business Unit** and the **Value** the calculative field applies to.

<figure><img src="https://4282324958-files.gitbook.io/~/files/v0/b/gitbook-x-prod.appspot.com/o/spaces%2F-MXep_PEmh8mDPVWj49x%2Fuploads%2FPMs8ctWIhC7ppeyYlQgv%2FFrame%202%20-%202026-08-25T161608.691.png?alt=media&amp;token=f6e33223-69fd-4dcd-b188-953b4cfb3d82" alt=""><figcaption></figcaption></figure>

**Step 4: Enter the Label, Operator, and Rate**

Enter a **Label** for the field, the **Operator** to use in the calculation, and the **Rate**,&#x20;

<figure><img src="https://4282324958-files.gitbook.io/~/files/v0/b/gitbook-x-prod.appspot.com/o/spaces%2F-MXep_PEmh8mDPVWj49x%2Fuploads%2FyX2lxHeXcR5wKc0wihLe%2FFrame%202%20-%202026-08-25T161627.213.png?alt=media&amp;token=91b56d8e-073d-4bb4-b9d2-0ebcc30a21d9" alt=""><figcaption></figcaption></figure>

then click **Save**.

<figure><img src="https://4282324958-files.gitbook.io/~/files/v0/b/gitbook-x-prod.appspot.com/o/spaces%2F-MXep_PEmh8mDPVWj49x%2Fuploads%2Fx9vyjv356G2dSpCMlkBM%2FFrame%202%20-%202026-08-25T161701.866.png?alt=media&amp;token=8ffecd0e-5f2e-45dc-a12e-ae004478cfc3" alt=""><figcaption></figcaption></figure>

**Business Unit**, **Value**, **Label**, **Operator**, and **Rate** are all mandatory fields.

#### **Viewing and Managing Saved Calculative Fields**

Each saved calculative field appears as a card on the **Calculative Fields** screen.

| **Pop-up Field** | **Displayed on Card As** |
| ---------------- | ------------------------ |
| Business Unit    | Business Unit            |
| Value            | Business Value           |
| Label            | Label                    |
| Operator         | Operator                 |
| Rate             | Rate                     |

Click the **edit icon** on a card to reopen it in the **Calculative Fields** pop-up. Click the **delete icon** on a card to remove it.

<figure><img src="https://4282324958-files.gitbook.io/~/files/v0/b/gitbook-x-prod.appspot.com/o/spaces%2F-MXep_PEmh8mDPVWj49x%2Fuploads%2Fxe7G07Dwi4h3igFV0U4z%2FFrame%201%20-%202026-08-25T161926.522.png?alt=media&amp;token=d343fbe1-5958-48a8-8374-7290cffba454" alt=""><figcaption></figcaption></figure>

**Path Link:** [**https://cloud.pockethrms.com/Settings/Employee/ESSIndex?module=Travel\&submodule=CalculativeFields**](https://cloud.pockethrms.com/Settings/Employee/ESSIndex?module=Travel\&submodule=CalculativeFields)

### **Travel Priority Approval**

The **Travel Priority Approval** page lets you set an approval priority and an approval cycle for each mode of travel used on Travel requests.

This helps in:

* Ranking modes of travel by approval priority
* Defining the approval cycle to apply for each mode of travel
* Controlling approval routing consistently across travel modes

**Path: Cloud → ESS Settings → Travel → Travel Priority Approval**

**Step 1: Navigate to the Travel Priority Approval Screen**

Log in to the Cloud portal and click **ESS Settings**. Go to the **Travel** tab, then click the **Travel Priority Approval** subtab.

<figure><img src="https://4282324958-files.gitbook.io/~/files/v0/b/gitbook-x-prod.appspot.com/o/spaces%2F-MXep_PEmh8mDPVWj49x%2Fuploads%2FVRVI4QwFzOSA9K2uJYkN%2FFrame%201%20-%202026-08-25T165540.305.png?alt=media&amp;token=b18b1f02-a437-493b-9dbe-5c3523d07d43" alt=""><figcaption></figcaption></figure>

**Step 2: Set the Priority for a Mode of Travel**

Against the relevant entry under **Description**, select a numeric ranking from the **Priority** drop-down.

<figure><img src="https://4282324958-files.gitbook.io/~/files/v0/b/gitbook-x-prod.appspot.com/o/spaces%2F-MXep_PEmh8mDPVWj49x%2Fuploads%2FLEB3vswvmamqi9yqF7Ch%2FFrame%201%20-%202026-08-25T165841.251.png?alt=media&amp;token=8a809876-979d-4ecd-865b-ff1bb519f4ad" alt=""><figcaption></figcaption></figure>

**Step 3: Set the Approval Cycle for a Mode of Travel**

Against the same entry, select the approval cycle from the **Approval** drop-down.

<figure><img src="https://4282324958-files.gitbook.io/~/files/v0/b/gitbook-x-prod.appspot.com/o/spaces%2F-MXep_PEmh8mDPVWj49x%2Fuploads%2FfIZGzHdcSxkQkfnxg0bs%2FFrame%201%20-%202026-08-25T165901.293.png?alt=media&amp;token=c0354867-bbe3-437d-a5e5-8c6959f15d4d" alt=""><figcaption></figcaption></figure>

**Step 4: Save the Travel Priority Approval Settings**

Click **Save**.

<figure><img src="https://4282324958-files.gitbook.io/~/files/v0/b/gitbook-x-prod.appspot.com/o/spaces%2F-MXep_PEmh8mDPVWj49x%2Fuploads%2FQFnG3lQmFQ1BwgmBNOY7%2FFrame%201%20-%202026-08-25T165926.496.png?alt=media&amp;token=5dc61638-9a72-41fc-a4c1-14f56fdcf2ee" alt=""><figcaption></figcaption></figure>

#### **Removing Travel Priority Approval Settings**

Click **Delete** to remove the saved **Travel Priority Approval** configuration.

<figure><img src="https://4282324958-files.gitbook.io/~/files/v0/b/gitbook-x-prod.appspot.com/o/spaces%2F-MXep_PEmh8mDPVWj49x%2Fuploads%2FOOy5Y1j1qD5Y940icp1M%2FFrame%201%20-%202026-08-25T171001.246.png?alt=media&amp;token=0401adf8-8411-4346-a330-1de3997c1a3b" alt=""><figcaption></figcaption></figure>

**Path Link:** [**https://cloud.pockethrms.com/Settings/Employee/ESSIndex?module=Travel\&submodule=TravelPriorityApproval**](https://cloud.pockethrms.com/Settings/Employee/ESSIndex?module=Travel\&submodule=TravelPriorityApproval)

### **ESS Portal - Transactions In Travel Module.**

### **Travel Management – Employee Request & Submission**

### **How To Submit a Travel Request through ESS Portal?** <a href="#hlk155197879" id="hlk155197879"></a>

The **Travel Request** page lets Employee submit a request for business travel, covering your travel schedule, accommodation needs, and anticipated expenses, so it can be reviewed and approved.

This helps in:

* Requesting approval for upcoming business travel in a single form
* Requesting a travel advance based on your estimated expenses
* Tracking the approval status of a submitted request

#### **Submitting a Travel Request**

**Path: ESS Portal → Travel → Request → Travel Request**

**Step 1: Navigate to the Travel Request Screen**

Log in to the **ESS portal** and click the **Travel** menu, followed by the **Request** submenu. Click the **Travel Request** tab.

<figure><img src="https://4282324958-files.gitbook.io/~/files/v0/b/gitbook-x-prod.appspot.com/o/spaces%2F-MXep_PEmh8mDPVWj49x%2Fuploads%2FDnkfadPZCLGZt84vAZvB%2FFrame%201%20-%202026-08-26T095423.670.png?alt=media&amp;token=eeb58e85-916b-4ab8-b110-b57a17e8e0aa" alt="" width="188"><figcaption></figcaption></figure>

**Step 2: Start a New Travel Request**

Click **+ Add** to open a new **Travel Request** form.

<figure><img src="https://4282324958-files.gitbook.io/~/files/v0/b/gitbook-x-prod.appspot.com/o/spaces%2F-MXep_PEmh8mDPVWj49x%2Fuploads%2F9wrMjD4xpx0K1xsiqGX0%2FFrame%201%20-%202026-08-26T095606.656.png?alt=media&amp;token=c8b7da9d-c7e3-47e8-a0bd-d7dc7bd23483" alt=""><figcaption></figcaption></figure>

**Step 3: Enter the Basic Travel Details**

Enter the **Work Order** and **Project**. Select the **Date of Travel**, **Purpose of Travel**, and **Mode Of Travel**.

<figure><img src="https://4282324958-files.gitbook.io/~/files/v0/b/gitbook-x-prod.appspot.com/o/spaces%2F-MXep_PEmh8mDPVWj49x%2Fuploads%2FD8wfYcF5RU0LJTTsCTmp%2FFrame%201%20-%202026-08-26T095837.684.png?alt=media&amp;token=9dc3b266-3851-4b80-8e6e-ed7aeb70e0fd" alt=""><figcaption></figcaption></figure>

**Step 4: Fill in the Travel Schedule**

Under **Travel Schedule**, enter the **From Location**, **To Location**, travel dates, **Mode of Travel**, departure and arrival date/time, and **Cost** for each leg of the trip. Click **+** to add another leg, or **-** to remove one

<figure><img src="https://4282324958-files.gitbook.io/~/files/v0/b/gitbook-x-prod.appspot.com/o/spaces%2F-MXep_PEmh8mDPVWj49x%2Fuploads%2Fi6PbLftJfxfVMddBKYIG%2FFrame%201%20-%202026-08-27T101442.187.png?alt=media&amp;token=a8f2c247-9d37-45b3-abc8-6dd8bece59c3" alt=""><figcaption></figcaption></figure>

**Step 5: Fill in the Accommodation Schedule**

Under **Accommodation Schedule**, enter the check-in and check-out dates, **Accommodation Details**, **No. of Days**, and **Rate (Per Day)**. Click **+** to add another entry, or **-** to remove one

<figure><img src="https://4282324958-files.gitbook.io/~/files/v0/b/gitbook-x-prod.appspot.com/o/spaces%2F-MXep_PEmh8mDPVWj49x%2Fuploads%2F1lw30htY73qih6CxbGLI%2FFrame%201%20-%202026-08-27T101531.463.png?alt=media&amp;token=c75f3dd3-4792-4dec-9134-6d65eccb03f9" alt=""><figcaption></figcaption></figure>

**Step 6: Add Miscellaneous Expenses**

Under **Miscellaneous Expenses**, enter the **No. of Days** and **Cost (Per Day)** against the relevant expense categories — such as **Local Travelling**, **Food**, or **Daily Expense** — and add any remarks.

<figure><img src="https://4282324958-files.gitbook.io/~/files/v0/b/gitbook-x-prod.appspot.com/o/spaces%2F-MXep_PEmh8mDPVWj49x%2Fuploads%2FdvUMldf8cPcGDcIsBCwv%2FFrame%201%20-%202026-08-27T101620.467.png?alt=media&amp;token=48774404-bf09-4a44-aa1c-4ca88eee8abb" alt=""><figcaption></figcaption></figure>

**Step 7: Enter Additional Details**

Under **Additional Details**, select the **End Date** and enter any notes under **Remarks 1**.

<figure><img src="https://4282324958-files.gitbook.io/~/files/v0/b/gitbook-x-prod.appspot.com/o/spaces%2F-MXep_PEmh8mDPVWj49x%2Fuploads%2FpKQ14UWiXjc2jRWabxcv%2FFrame%201%20-%202026-08-27T104412.086.png?alt=media&amp;token=5c80e3a7-0407-4ba7-8ae7-7798c656934e" alt=""><figcaption></figcaption></figure>

**Step 8: Enter Other Details**

Under **Other Details**, enter values for any listed field. These fields are configured through \[\[Calculative Fields]], which calculates each field's **Total**.

<figure><img src="https://4282324958-files.gitbook.io/~/files/v0/b/gitbook-x-prod.appspot.com/o/spaces%2F-MXep_PEmh8mDPVWj49x%2Fuploads%2FdwLZAbiVtNd7jQrOoCpE%2FFrame%201%20-%202026-08-27T104420.216.png?alt=media&amp;token=4e446adc-ee6c-42fb-bca6-435ae7ab928c" alt=""><figcaption></figcaption></figure>

**Step 9: Save the Request**

Click **Save** to submit the request to your Reporting Manager for approval,&#x20;

<figure><img src="https://4282324958-files.gitbook.io/~/files/v0/b/gitbook-x-prod.appspot.com/o/spaces%2F-MXep_PEmh8mDPVWj49x%2Fuploads%2F2hbSyzBINHS1gAgBUS9m%2FFrame%201%20-%202026-08-27T104504.289.png?alt=media&amp;token=5c49c16c-d3a6-4b30-b5b8-af784ebad06a" alt=""><figcaption></figcaption></figure>

or click **Save As Draft** to save it without submitting.

<figure><img src="https://4282324958-files.gitbook.io/~/files/v0/b/gitbook-x-prod.appspot.com/o/spaces%2F-MXep_PEmh8mDPVWj49x%2Fuploads%2FV6vxRbl5S04ifihgzHbM%2FFrame%201%20-%202026-08-27T104518.695.png?alt=media&amp;token=a7554f1b-a60e-43af-911f-fcb87aed503f" alt=""><figcaption></figcaption></figure>

The **Total Travel Schedule**, **Total Accommodation Schedule**, **Total Miscellaneous Expenses**, **Total Other Expenses**, and **Total Travel Advance** fields are calculated automatically as you fill in the form.

#### **Viewing Submitted Travel Requests**

The **Claim Entries** tab lists all submitted requests with their **Travel ID**, **Work Order**, **Travel Date**, **Travel Mode**, **Project Name**, and **Status**. Requests saved without submitting appear under the **Drafted Entries** tab.

<figure><img src="https://4282324958-files.gitbook.io/~/files/v0/b/gitbook-x-prod.appspot.com/o/spaces%2F-MXep_PEmh8mDPVWj49x%2Fuploads%2FcD5wshbfgNw7ieK2Hrf8%2FFrame%201%20-%202026-08-27T105053.771.png?alt=media&amp;token=6add7788-954d-4c47-9f10-2886c67fbfcc" alt=""><figcaption></figcaption></figure>

Click **Details** on a request to view its full travel, accommodation, and miscellaneous expense details, along with its **Travel Approval Date**, **Reimbursement Approval Date**, **Finance Approval Date**, and **Admin Booking Approval Date**. Click **Print** or **Download Excel** to export the request.

<figure><img src="https://4282324958-files.gitbook.io/~/files/v0/b/gitbook-x-prod.appspot.com/o/spaces%2F-MXep_PEmh8mDPVWj49x%2Fuploads%2FHiLTWZ8VuXGXRDb3dfyK%2FFrame%201%20-%202026-08-27T105120.965.png?alt=media&amp;token=6d6c335d-8477-41db-b3c4-3fa71831f9e2" alt=""><figcaption></figcaption></figure>

<figure><img src="https://4282324958-files.gitbook.io/~/files/v0/b/gitbook-x-prod.appspot.com/o/spaces%2F-MXep_PEmh8mDPVWj49x%2Fuploads%2Fp6Wh5A9BxUPtT8iuFZRs%2FFrame%201%20-%202026-08-27T105202.402.png?alt=media&amp;token=4e29ccf9-19bf-4dfe-b22f-348c8f96dc43" alt=""><figcaption></figcaption></figure>

<figure><img src="https://4282324958-files.gitbook.io/~/files/v0/b/gitbook-x-prod.appspot.com/o/spaces%2F-MXep_PEmh8mDPVWj49x%2Fuploads%2FPkwyOdYBCdkXAP0kA7HA%2FFrame%201%20-%202026-08-27T105235.291.png?alt=media&amp;token=1c262745-a849-49ec-81c3-bbc63bd21267" alt=""><figcaption></figcaption></figure>

#### **Editing and Resubmitting a Rejected Request**

Click **Edit** on a request with a rejected status — such as **Travel Admin Rejected** or **Travel Rejected** — to reopen it in the **Edit Travel Rejected Details** pop-up. Update the required details, review the **Total Amount** summary (**Travel Scheduled Expense**, **Accommodation Expense**, **Miscellaneous Expenses**, and **Total Other Expenses**), then click **Resubmit**.

<figure><img src="https://4282324958-files.gitbook.io/~/files/v0/b/gitbook-x-prod.appspot.com/o/spaces%2F-MXep_PEmh8mDPVWj49x%2Fuploads%2FuMrJoWsVcDpmfIbEC1zI%2FFrame%201%20-%202026-08-27T105849.633.png?alt=media&amp;token=c631c0d2-1ace-46b9-a8e3-3862e8cc46d1" alt=""><figcaption></figcaption></figure>

<figure><img src="https://4282324958-files.gitbook.io/~/files/v0/b/gitbook-x-prod.appspot.com/o/spaces%2F-MXep_PEmh8mDPVWj49x%2Fuploads%2Fir6yf78q7GenaD1hPK0H%2FFrame%201%20-%202026-08-27T105933.655.png?alt=media&amp;token=04dee942-5189-4a11-a179-056aefef3926" alt="" width="375"><figcaption></figcaption></figure>

<figure><img src="https://4282324958-files.gitbook.io/~/files/v0/b/gitbook-x-prod.appspot.com/o/spaces%2F-MXep_PEmh8mDPVWj49x%2Fuploads%2FRWW5pGAxUBw9jQZyAtr6%2FFrame%201%20-%202026-08-27T110019.455.png?alt=media&amp;token=68c4a55e-8c5a-4375-92a9-f78bb59d20d8" alt="" width="375"><figcaption></figcaption></figure>

**Path Link:** [**https://ess.pockethrms.com/Travel/Transaction/TravelRequest?Menu=TravelRequest**](https://ess.pockethrms.com/Travel/Transaction/TravelRequest?Menu=TravelRequest)

### **How To Check Status For Your Travel Request?**

The **Travel Report** screen lets you check the approval status of your submitted **Travel Requests**, track each approval stage, and download or print the full request details.

This helps in:

* Filtering your travel requests by date range and report type
* Tracking each approval stage of a request — Admin, Finance, and Reimbursement
* Downloading or printing a request's full details

#### **Checking Your Travel Request Status**

**Path: ESS Portal → Travel → My Report → Travel Report**

**Step 1: Navigate to the Travel Report Screen**

Log in to the **ESS portal**, click the **Travel** menu, then click the **My Report** submenu, followed by the **Travel Report** tab.

<figure><img src="https://4282324958-files.gitbook.io/~/files/v0/b/gitbook-x-prod.appspot.com/o/spaces%2F-MXep_PEmh8mDPVWj49x%2Fuploads%2FdWS0dmMkrbcWGOzk7AZF%2FFrame%201%20-%202026-08-27T113439.609.png?alt=media&amp;token=bcbf1bb3-3833-4a9d-895c-456761b56d43" alt="" width="188"><figcaption></figcaption></figure>

**Step 2: Filter the Report**

Select a **Filter**,&#x20;

<figure><img src="https://4282324958-files.gitbook.io/~/files/v0/b/gitbook-x-prod.appspot.com/o/spaces%2F-MXep_PEmh8mDPVWj49x%2Fuploads%2FOAJXjBw0EdfAmT6GlNpb%2FFrame%201%20-%202026-08-27T113640.845.png?alt=media&amp;token=9c892ff3-8a37-4a9d-a0ba-810e3d8e0af6" alt=""><figcaption></figcaption></figure>

set the **Date Range**,&#x20;

<figure><img src="https://4282324958-files.gitbook.io/~/files/v0/b/gitbook-x-prod.appspot.com/o/spaces%2F-MXep_PEmh8mDPVWj49x%2Fuploads%2FpU5amS0kLJxat5Fmz09q%2FFrame%201%20-%202026-08-27T113732.415.png?alt=media&amp;token=94aceee9-a141-4393-b1dc-9918c503d8c2" alt=""><figcaption></figcaption></figure>

and choose the **Report Type** — such as **Travel Detailed Report**&#x20;

<figure><img src="https://4282324958-files.gitbook.io/~/files/v0/b/gitbook-x-prod.appspot.com/o/spaces%2F-MXep_PEmh8mDPVWj49x%2Fuploads%2F6FVJcygTLOqfodercjkA%2FFrame%201%20-%202026-08-27T142116.527.png?alt=media&amp;token=229a12cc-e86e-42ea-a111-6f5449f8a17d" alt=""><figcaption></figcaption></figure>

then click **Search,**&#x20;

<figure><img src="https://4282324958-files.gitbook.io/~/files/v0/b/gitbook-x-prod.appspot.com/o/spaces%2F-MXep_PEmh8mDPVWj49x%2Fuploads%2F0JsySmFqYNwjJuMH7NAV%2FFrame%201%20-%202026-08-27T142244.944.png?alt=media&amp;token=afd2cc53-c0bc-4b1d-bc07-e55298e1960d" alt="" width="375"><figcaption></figcaption></figure>

**or** Click **Download Excel** to export the filtered report directly.

<figure><img src="https://4282324958-files.gitbook.io/~/files/v0/b/gitbook-x-prod.appspot.com/o/spaces%2F-MXep_PEmh8mDPVWj49x%2Fuploads%2FFaFOItcYj4W8BoaG9k4n%2FFrame%201%20-%202026-08-27T142252.804.png?alt=media&amp;token=604b2a9c-4076-4320-8a24-1b1de4bd60aa" alt="" width="375"><figcaption></figcaption></figure>

**Step 3: View the Travel Request List**

The list shows each entry's **Travel ID**, **Code**, **Name**, **Travel Date**, **Project**, **Status**, **Travel Advance**, **Reimburse Amount**, and any **Reimbursement Attachments**. Use the **Search** box above the list, or the pagination controls below it, to find a specific entry.

<figure><img src="https://4282324958-files.gitbook.io/~/files/v0/b/gitbook-x-prod.appspot.com/o/spaces%2F-MXep_PEmh8mDPVWj49x%2Fuploads%2Fy1c6Dq74W6RtvqPFNQ3t%2FFrame%201%20-%202026-08-27T142632.511.png?alt=media&amp;token=d64f9532-e533-4071-a99a-650f88b231ac" alt=""><figcaption></figcaption></figure>

**Step 4: View the Approval Tracking**

Click the **ⓘ** icon next to the **Status** to open **Travel Request Tracking**. This shows the **Travel Request Flow** (**Travel Request → Admin Booking Needed → Finance Advance**) along with the approver and status — **Pending** or **Waiting** — at each stage.

<figure><img src="https://4282324958-files.gitbook.io/~/files/v0/b/gitbook-x-prod.appspot.com/o/spaces%2F-MXep_PEmh8mDPVWj49x%2Fuploads%2FtEer8uWn0ShWerkveZV2%2FFrame%201%20-%202026-08-27T142708.080.png?alt=media&amp;token=acc14c71-b110-49a8-8545-91160d6d90db" alt=""><figcaption></figcaption></figure>

<figure><img src="https://4282324958-files.gitbook.io/~/files/v0/b/gitbook-x-prod.appspot.com/o/spaces%2F-MXep_PEmh8mDPVWj49x%2Fuploads%2FZNutniSktdR8Tjq9WuVA%2FFrame%201%20-%202026-08-27T142818.862.png?alt=media&amp;token=3fb2899a-dc41-4bd9-92e5-bd335b0cd115" alt=""><figcaption></figcaption></figure>

**Step 5: View the Full Request Details**

Click **Travel Details** to open the request's full details — **Travel ID**, **Work Order**, **Date of Travel**, **Mode Of Travel**, **Project**, **Purpose of Travel**, and remarks — along with its **Travel Approval Date**, **Reimbursement Approval Date**, **Finance Approval Date**, and **Admin Booking Approval Date**, its **Travel Schedule**, **Accommodation Schedule**, and **Miscellaneous Expenses**.

<figure><img src="https://4282324958-files.gitbook.io/~/files/v0/b/gitbook-x-prod.appspot.com/o/spaces%2F-MXep_PEmh8mDPVWj49x%2Fuploads%2FioF2M5T8MgM0wqhofVXz%2FFrame%201%20-%202026-08-27T142910.033.png?alt=media&amp;token=04415d23-edc3-4bab-8fd1-882d1d633617" alt=""><figcaption></figcaption></figure>

<figure><img src="https://4282324958-files.gitbook.io/~/files/v0/b/gitbook-x-prod.appspot.com/o/spaces%2F-MXep_PEmh8mDPVWj49x%2Fuploads%2FAfiAuuOWYcAHEWiMjqke%2FFrame%201%20-%202026-08-27T143005.164.png?alt=media&amp;token=85f427a9-16ae-4c58-8b45-bd465bb4e20d" alt=""><figcaption></figcaption></figure>

<figure><img src="https://4282324958-files.gitbook.io/~/files/v0/b/gitbook-x-prod.appspot.com/o/spaces%2F-MXep_PEmh8mDPVWj49x%2Fuploads%2FxTJqPhnZq95gc6Eau1uW%2FFrame%201%20-%202026-08-27T143125.482.png?alt=media&amp;token=ba82995a-7729-44eb-bede-48c95b27dde3" alt=""><figcaption></figcaption></figure>

**Step 6: Download or Print the Request**

Under **Travel Request**, click **Download** next to **Travel Request form** to download the submitted form. Click **Print** or **Download Excel** to export the request along with its **Total Travel Advance**.

<figure><img src="https://4282324958-files.gitbook.io/~/files/v0/b/gitbook-x-prod.appspot.com/o/spaces%2F-MXep_PEmh8mDPVWj49x%2Fuploads%2FxKcP7GaJtlQOzhijP6dz%2FFrame%201%20-%202026-08-27T143618.406.png?alt=media&amp;token=b2d3ea4a-0bed-429e-a6a8-1fdb948eed9a" alt=""><figcaption></figcaption></figure>

#### **Viewing Approval Notifications**

Once your Reporting Manager approves your travel entry, you receive a notification. Click the **Bell** icon in the upper right-hand corner of the screen to view it.

<figure><img src="https://4282324958-files.gitbook.io/~/files/v0/b/gitbook-x-prod.appspot.com/o/spaces%2F-MXep_PEmh8mDPVWj49x%2Fuploads%2FvoS6RFlvGiUGb4vRfxWn%2Fimage.avif?alt=media&amp;token=b16c761d-4fed-4422-8ae7-67ef74c32763" alt=""><figcaption></figcaption></figure>

**Path Link:** [**https://ess.pockethrms.com/Travel/Transaction/TravelMyReport?Menu=TravelRepor**t](https://ess.pockethrms.com/Travel/Transaction/TravelMyReport?Menu=TravelReport)

### **How To Submit A Reimbursement Request?**

The **Reimbursement Request** page lets you claim reimbursement for actual travel expenses against an approved **Travel Request**, once your travel entry has been approved by your Reporting Manager.

This helps in:

* Claiming reimbursement only against manager-approved travel entries
* Automatically calculating expense totals and the reimbursement amount against the travel advance received
* Attaching supporting documents for each expense category

#### **Submitting a Reimbursement Request**

**Path: ESS Portal → Travel → Request → Reimbursement Request**

**Step 1: Navigate to the Reimbursement Request Screen**

Log in to the ESS portal and click the **Travel** menu, followed by the **Request** submenu. Click the **Reimbursement Request** tab.

<figure><img src="https://4282324958-files.gitbook.io/~/files/v0/b/gitbook-x-prod.appspot.com/o/spaces%2F-MXep_PEmh8mDPVWj49x%2Fuploads%2FUQrX1KFfqpOdvXuHDvIr%2Fimage.png?alt=media&amp;token=4fd5b2f6-5bf8-4cba-8207-7b9e7d59134e" alt="" width="188"><figcaption></figcaption></figure>

<figure><img src="https://4282324958-files.gitbook.io/~/files/v0/b/gitbook-x-prod.appspot.com/o/spaces%2F-MXep_PEmh8mDPVWj49x%2Fuploads%2Fy4e9TGyxmGFhE2Jcd82V%2FFrame%201%20-%202026-08-27T145945.117.png?alt=media&amp;token=a9673bd9-f319-4a99-a6e0-cd7e5cce4c90" alt=""><figcaption></figcaption></figure>

**Step 2: Select the Approved Travel Entry**

Under **Claim Entries**, click **View Details** against the approved travel request you want to claim reimbursement for. This opens a summary of the entry's **Travel ID**, **Travel Date**, **Project Name**, **Travel Remark**, **Accommodation Remark**, and **Miscellaneous Remark**.

<figure><img src="https://4282324958-files.gitbook.io/~/files/v0/b/gitbook-x-prod.appspot.com/o/spaces%2F-MXep_PEmh8mDPVWj49x%2Fuploads%2F0i84t3UNfsL8fjbOwFTb%2FFrame%201%20-%202026-08-27T150016.545.png?alt=media&amp;token=b5e35a0a-f124-42c3-a318-64ed8c653963" alt=""><figcaption></figcaption></figure>

**Step 3: Open the Reimbursement Form**

Click **Reimburse** to open the entry's **Reimbursement** form.

<figure><img src="https://4282324958-files.gitbook.io/~/files/v0/b/gitbook-x-prod.appspot.com/o/spaces%2F-MXep_PEmh8mDPVWj49x%2Fuploads%2FOjw3GxrFs3j33YhDgDTB%2FFrame%201%20-%202026-08-27T150125.972.png?alt=media&amp;token=0d7bf078-7299-42d2-87c1-1bae88ce1bbf" alt=""><figcaption></figcaption></figure>

**Step 4: Enter the Accommodation and Miscellaneous Expenses**

Under **Accommodation Expense** and **Miscellaneous Expense**, enter the actual amount spent against each date and expense category — such as **Local Travelling**, **Food**, or **Daily Expense** — and add any remarks. Each row's **Total** is calculated automatically.

<figure><img src="https://4282324958-files.gitbook.io/~/files/v0/b/gitbook-x-prod.appspot.com/o/spaces%2F-MXep_PEmh8mDPVWj49x%2Fuploads%2FqNmkmMmro8AfI7KK9fyL%2FFrame%201%20-%202026-08-27T150340.621.png?alt=media&amp;token=f2f0ed96-470c-4232-902f-8d1a21e864a2" alt=""><figcaption></figcaption></figure>

**Step 5: Enter the Mode of Travel and Cost**

Enter the **Mode of Travel** and **Cost** for the **Date From-To** shown.

<figure><img src="https://4282324958-files.gitbook.io/~/files/v0/b/gitbook-x-prod.appspot.com/o/spaces%2F-MXep_PEmh8mDPVWj49x%2Fuploads%2F0Rg6kT5lQWIw77jKIaZp%2FFrame%201%20-%202026-08-27T150557.834.png?alt=media&amp;token=54fb14f5-62c5-4033-ab58-615ff8dee723" alt=""><figcaption></figcaption></figure>

**Step 6: Review the Reimbursement Amount**

Pocket HRMS fetches the **Travel Advance Received** automatically. Your **Actual Expenses** and the final **Reimbursement** amount are calculated automatically once you've entered your expenses.

<figure><img src="https://4282324958-files.gitbook.io/~/files/v0/b/gitbook-x-prod.appspot.com/o/spaces%2F-MXep_PEmh8mDPVWj49x%2Fuploads%2FGydUs64SxHaOGQeM5vb0%2FFrame%201%20-%202026-08-27T150625.892.png?alt=media&amp;token=4573018f-8a46-4440-9d86-df5a904e9ac1" alt=""><figcaption></figcaption></figure>

**Step 7: Attach Supporting Documents**

Click **Add Files** against **Travel Schedule**, **Accommodation Schedule**, or **Miscellaneous Expenses** to upload supporting documents.

<figure><img src="https://4282324958-files.gitbook.io/~/files/v0/b/gitbook-x-prod.appspot.com/o/spaces%2F-MXep_PEmh8mDPVWj49x%2Fuploads%2FKYvvu1wj5MLWz674bwjt%2FFrame%201%20-%202026-08-27T150707.214.png?alt=media&amp;token=8c58cb19-2c5f-42af-b198-d12cc9883cee" alt=""><figcaption></figcaption></figure>

**Step 8: Submit the Reimbursement Request**

Click **Submit** to send the request to your Reporting Manager for approval,&#x20;

<figure><img src="https://4282324958-files.gitbook.io/~/files/v0/b/gitbook-x-prod.appspot.com/o/spaces%2F-MXep_PEmh8mDPVWj49x%2Fuploads%2FkZdZm57A6RZJ4VILKiXa%2FFrame%201%20-%202026-08-27T150721.167.png?alt=media&amp;token=84570eff-2284-4e85-b706-12be8db6e68f" alt=""><figcaption></figcaption></figure>

or click **Save Draft** to save it without submitting.

<figure><img src="https://4282324958-files.gitbook.io/~/files/v0/b/gitbook-x-prod.appspot.com/o/spaces%2F-MXep_PEmh8mDPVWj49x%2Fuploads%2FNaYS6X3h1glVoAlkSYav%2FFrame%201%20-%202026-08-27T150733.488.png?alt=media&amp;token=4f2de71b-26c7-47c0-8718-cb037bed07af" alt=""><figcaption></figcaption></figure>

**Path Link:** [**https://ess.pockethrms.com/Travel/Transaction/TravelRequest?Menu=ReimbursementRequest**](https://ess.pockethrms.com/Travel/Transaction/TravelRequest?Menu=ReimbursementRequest)

### **Travel Management – Manager's Approval**

According to the approval matrix configuration, the designated manager is required to either approve or reject travel requests submitted by employees. **Pocket HRMS** allows you to configure multiple levels of managers for Travel Management, ensuring that travel requests are reviewed and approved according to the defined approval hierarchy.

### **How to Approve a Travel Request?**

Once an employee submits a travel request, the designated approver can review and take action on the request from the **Travel Approval** screen.

#### **Approving a Travel Request**

**Path: ESS Portal → Travel → Approval → Travel Approval**

**Step 1: Navigate to the Travel Approval Screen**

Log in to the **ESS portal** and click the **Travel** menu from the left-side navigation panel. Select **Approval**, and then click the **Travel Approval** tab.

<figure><img src="https://4282324958-files.gitbook.io/~/files/v0/b/gitbook-x-prod.appspot.com/o/spaces%2F-MXep_PEmh8mDPVWj49x%2Fuploads%2FJHGYuCxWoOvUznWqMAPD%2FFrame%201%20-%202026-08-27T161158.467.png?alt=media&amp;token=a15330e8-f15d-4ef2-9b95-4c198af8cbd8" alt="" width="188"><figcaption></figcaption></figure>

The **Travel Approval** screen allows you to filter travel requests by **Employee** and **Date Range**. Select the required employee and date range, and click **Search** to view the relevant travel requests.

> **Note:** The entries must be approved for each month by all the designated approvers.

<figure><img src="https://4282324958-files.gitbook.io/~/files/v0/b/gitbook-x-prod.appspot.com/o/spaces%2F-MXep_PEmh8mDPVWj49x%2Fuploads%2Fb5eB7eBrZtPK83JbT5Ya%2FFrame%201%20-%202026-08-27T161208.260.png?alt=media&amp;token=990d1568-5300-4d7c-b0b4-d535b2f0a594" alt=""><figcaption></figcaption></figure>

**Step 2: Select the Travel Request**

The Travel Approval list displays the available travel requests with details such as:

* **Travel ID**
* **Code**
* **Name**
* **Travel Date**
* **Project**
* **Approve**
* **Reject**

Click **View Details** against the required travel request to review the complete travel information.

<figure><img src="https://4282324958-files.gitbook.io/~/files/v0/b/gitbook-x-prod.appspot.com/o/spaces%2F-MXep_PEmh8mDPVWj49x%2Fuploads%2F9PeociLIeM1QrBHMTJkD%2FFrame%201%20-%202026-08-27T161219.562.png?alt=media&amp;token=da298acf-d8bd-4a5c-af22-963dd219da22" alt=""><figcaption></figcaption></figure>

**Step 3: Review the Travel Details**

The Travel Approval details screen displays the key information associated with the request, including:

* **Travel ID**
* **Date of Travel**
* **Project**
* **Work Order**
* **Mode of Travel**
* **Purpose of Travel**
* **Travel Schedule Remark**
* **Accommodation Remark**
* **Miscellaneous Remark**

Review these details before taking any action on the request.

<figure><img src="https://4282324958-files.gitbook.io/~/files/v0/b/gitbook-x-prod.appspot.com/o/spaces%2F-MXep_PEmh8mDPVWj49x%2Fuploads%2F1zuqc1EX26ik4efR0Giq%2FFrame%201%20-%202026-08-27T161612.381.png?alt=media&amp;token=49d6f49d-1dd8-456a-a078-e6756fb57166" alt=""><figcaption></figcaption></figure>

**Step 4: Review the Travel Schedule**

Under **Travel Schedule**, you can review the employee's travel itinerary, including:

* From Location and To Location
* From Date and To Date
* Mode of Travel
* Departure Date and Time
* Arrival Date and Time
* Travel Cost

<figure><img src="https://4282324958-files.gitbook.io/~/files/v0/b/gitbook-x-prod.appspot.com/o/spaces%2F-MXep_PEmh8mDPVWj49x%2Fuploads%2F3SZ6jKY8RcMgNkmwmpTd%2FFrame%201%20-%202026-08-27T161705.893.png?alt=media&amp;token=74d11b85-d184-420c-b7ef-29ce28d01da7" alt=""><figcaption></figcaption></figure>

**Step 5: Review the Accommodation Schedule**

The **Accommodation Schedule** section displays the accommodation details provided in the travel request, including:

* Date In and Date Out
* Accommodation Details
* Number of Days
* Rate per Day
* Total Accommodation Cost

<figure><img src="https://4282324958-files.gitbook.io/~/files/v0/b/gitbook-x-prod.appspot.com/o/spaces%2F-MXep_PEmh8mDPVWj49x%2Fuploads%2FsvGXFrvQ0vhcDNErfyNZ%2FFrame%201%20-%202026-08-27T161749.670.png?alt=media&amp;token=ff77dbf0-1e35-44c3-a00e-543e3ca41cc2" alt=""><figcaption></figcaption></figure>

**Step 6: Review Miscellaneous Expenses**

The **Miscellaneous Expenses** section displays the expenses associated with the travel request, such as:

* Local Travelling
* Miscellaneous expenses
* Other expenses
* Food
* Daily Expense

You can review the applicable dates, number of days, cost per day, total amount, and remarks entered for each expense.

<figure><img src="https://4282324958-files.gitbook.io/~/files/v0/b/gitbook-x-prod.appspot.com/o/spaces%2F-MXep_PEmh8mDPVWj49x%2Fuploads%2FxSneK4jlljnJMqsTIo2q%2FFrame%201%20-%202026-08-27T162135.807.png?alt=media&amp;token=7b57c997-bf13-4531-9e4e-68f525789fb6" alt=""><figcaption></figcaption></figure>

**Step 7: Add a Remark**

At the bottom of the Travel Approval details screen, you can enter a **Remark** before taking action on the request.

<figure><img src="https://4282324958-files.gitbook.io/~/files/v0/b/gitbook-x-prod.appspot.com/o/spaces%2F-MXep_PEmh8mDPVWj49x%2Fuploads%2Fxi6snBqvyD9fRhPOhKdQ%2FFrame%201%20-%202026-08-27T162326.497.png?alt=media&amp;token=49aae5cb-0e8f-4e49-9bd1-cff677e135f4" alt=""><figcaption></figcaption></figure>

**Step 8: Approve or Reject the Travel Request**

After reviewing all the travel details, click **Approve** to approve the travel request&#x20;

<figure><img src="https://4282324958-files.gitbook.io/~/files/v0/b/gitbook-x-prod.appspot.com/o/spaces%2F-MXep_PEmh8mDPVWj49x%2Fuploads%2F7NxHFutnJI141HNuaIFi%2FFrame%201%20-%202026-08-27T162452.663.png?alt=media&amp;token=d3f4927b-c164-4716-921a-7485875820b7" alt=""><figcaption></figcaption></figure>

or **Reject** to reject it.

<figure><img src="https://4282324958-files.gitbook.io/~/files/v0/b/gitbook-x-prod.appspot.com/o/spaces%2F-MXep_PEmh8mDPVWj49x%2Fuploads%2F8KFwWT4i4gKcFf6QpgN2%2FFrame%201%20-%202026-08-27T162507.195.png?alt=media&amp;token=71c7b752-0530-464f-9e11-79c062f79d61" alt=""><figcaption></figcaption></figure>

The system processes the selected action and updates the travel request accordingly.

Once the travel request is approved by all the managers configured in the approval matrix, the employee can proceed with submitting a [**Reimbursement Request**](#how-to-submit-a-reimbursement-request) against the approved travel entry.

**Path Link:** [**https://ess.pockethrms.com/Travel/Transaction/TravelApproval?Menu=TravelApproval**](https://ess.pockethrms.com/Travel/Transaction/TravelApproval?Menu=TravelApproval)

### **How to Approve a Travel Reimbursement Request?**

Once an employee submits their **travel reimbursement request**, their respective manager receives an alert. The **Travel Reimbursement Approval** screen allows managers to verify actual travel expenses against the travel advance received, review attached documents, and approve or reject the request before it moves to the finance department.

**Path: ESS Portal → Travel → Approval → Travel Reimbursement Approval**

**Step 1: Navigate to the Approval Screen**

You can access pending requests by clicking the **Bell Icon** at the top right corner of your **ESS portal** for notifications. Alternatively, select the **Travel menu** from the left-hand sidebar, click **Approval**, and navigate to the **Travel Reimbursement Approval tab**.

<figure><img src="https://4282324958-files.gitbook.io/~/files/v0/b/gitbook-x-prod.appspot.com/o/spaces%2F-MXep_PEmh8mDPVWj49x%2Fuploads%2Fxg5RSnTtFAMnKuapegp6%2FFrame%201%20-%202026-08-27T170025.550.png?alt=media&amp;token=86764f5c-3b3a-45dc-98b9-099b555bc4a7" alt="" width="188"><figcaption></figcaption></figure>

**Step 2: Locate the Employee's Request**

Use the **Select Employee** dropdown and **Date Range** fields to filter requests, then click **Search**. A list of pending reimbursement entries will appear, displaying the **Travel ID**, **Employee Name**, **Travel Date**, and the **Reimbursement Amount.**

<figure><img src="https://4282324958-files.gitbook.io/~/files/v0/b/gitbook-x-prod.appspot.com/o/spaces%2F-MXep_PEmh8mDPVWj49x%2Fuploads%2FBk8W83JxofruIHjuHOZC%2FFrame%201%20-%202026-08-27T171314.199.png?alt=media&amp;token=4a3728d1-41f3-4205-9b1a-c4245cdcd064" alt=""><figcaption></figcaption></figure>

<figure><img src="https://4282324958-files.gitbook.io/~/files/v0/b/gitbook-x-prod.appspot.com/o/spaces%2F-MXep_PEmh8mDPVWj49x%2Fuploads%2FYO2yN1HuluajUnJire3w%2FFrame%201%20-%202026-08-27T171727.229.png?alt=media&amp;token=1bca3389-e676-4adc-b477-7936e8bfdab8" alt=""><figcaption></figcaption></figure>

**Step 3: View Details and Attachments**

To thoroughly review a specific request, click the **View Details** button under the Action column. Here, you can also download any booking attachments provided by the employee by clicking **Download** under the Booking Attachment column.

<figure><img src="https://4282324958-files.gitbook.io/~/files/v0/b/gitbook-x-prod.appspot.com/o/spaces%2F-MXep_PEmh8mDPVWj49x%2Fuploads%2F51e2h00KmGuVDp1QeCyX%2FFrame%201%20-%202026-08-27T171748.994.png?alt=media&amp;token=f2adb4b4-f252-4a6b-ae8b-e9fd2bc21e27" alt=""><figcaption></figcaption></figure>

**Step 4: Verify Schedules and Expense Breakdowns**

Upon opening the details, verify the granular data submitted by the employee by reviewing the **Travel Schedule, Accommodation Schedule, and Miscellaneous Expenses.** Scroll down to cross-check specific entries and review any additional custom fields in the Other Details section.

**Step 5: Review the Final Calculations**

At the bottom of the form, review the **reimbursement summary table.** This automatically compares the Employee Submitted amounts with the Current Value. The system will display the Actual Expenses, deduct the Travel Advance Received, and show the final auto-calculated Reimbursement amount.

<figure><img src="https://4282324958-files.gitbook.io/~/files/v0/b/gitbook-x-prod.appspot.com/o/spaces%2F-MXep_PEmh8mDPVWj49x%2Fuploads%2FoZSqpURXuiYGZSJ65bzo%2FFrame%201%20-%202026-08-27T172252.780.png?alt=media&amp;token=d323278f-ebb3-4347-a5c1-54ac2b7c5f9d" alt=""><figcaption></figcaption></figure>

**Step 6: Add Remarks and Approve/Reject**

Enter any **necessary comments** or **feedback** in the Remarks box. Finally,

<figure><img src="https://4282324958-files.gitbook.io/~/files/v0/b/gitbook-x-prod.appspot.com/o/spaces%2F-MXep_PEmh8mDPVWj49x%2Fuploads%2FiHluQkOilPQv2TuAY1uf%2FFrame%201%20-%202026-08-27T172311.092.png?alt=media&amp;token=fda31cc3-4631-49ea-82fd-f80b8196a62a" alt=""><figcaption></figcaption></figure>

&#x20;click the **Approve** button to forward the request to the finance department,&#x20;

<figure><img src="https://4282324958-files.gitbook.io/~/files/v0/b/gitbook-x-prod.appspot.com/o/spaces%2F-MXep_PEmh8mDPVWj49x%2Fuploads%2FL2DTLOAZnRwlDmMtiQgJ%2FFrame%201%20-%202026-08-27T172323.580.png?alt=media&amp;token=27dc8cd7-42ce-4cfa-9cab-b73aed599cad" alt=""><figcaption></figcaption></figure>

or click **Reject** if the claim is invalid or requires corrections.

<figure><img src="https://4282324958-files.gitbook.io/~/files/v0/b/gitbook-x-prod.appspot.com/o/spaces%2F-MXep_PEmh8mDPVWj49x%2Fuploads%2FQzVLUUkeKvwnRm38EUJr%2FFrame%201%20-%202026-08-27T172344.158.png?alt=media&amp;token=e3f76a71-8d20-4e9e-a0a6-783555d492f5" alt=""><figcaption></figcaption></figure>

**Path Link:** [h**ttps://ess.pockethrms.com/Travel/Transaction/TravelApproval?Menu=TravelReimbursementApproval**](https://ess.pockethrms.com/Travel/Transaction/TravelApproval?Menu=TravelReimbursementApproval)

### **How to Get the Employee Travel Report?**

In **Pocket HRMS**, you can generate and view travel reports for your team with just a few clicks. This allows you to easily monitor both travel requests and their associated **reimbursement statuses.**

**Path: ESS Portal → Travel → My Team Report**

**Step 1: Navigate to the Team Report Menu**

Click on the **Travel menu** from the left-hand sidebar, followed by the **My Team Report** option.

<figure><img src="https://4282324958-files.gitbook.io/~/files/v0/b/gitbook-x-prod.appspot.com/o/spaces%2F-MXep_PEmh8mDPVWj49x%2Fuploads%2FRr1juoC6eKXjYJ1KqtWS%2FFrame%201%20-%202026-08-27T173221.874.png?alt=media&amp;token=0c1e7900-1029-459c-b2d1-543474a6920c" alt="" width="188"><figcaption></figcaption></figure>

**Step 2: Access Travel and Reimbursement Details**

This will take you to the **Travel report** page. Here, you can view specific information by clicking the **Travel Details** or **Reimbursement Details** buttons. You can further refine the data by using the available filters or by searching for **specific employees** using their **employee code.**

<figure><img src="https://4282324958-files.gitbook.io/~/files/v0/b/gitbook-x-prod.appspot.com/o/spaces%2F-MXep_PEmh8mDPVWj49x%2Fuploads%2Fv4J0luZ4IWLAVHA9ZHhz%2Fimage%20(1).avif?alt=media&amp;token=dd34914a-793b-4ee2-8b5c-11074fe95b65" alt=""><figcaption></figcaption></figure>

**Path Link:** [**https://ess.pockethrms.com/Travel/Transaction/TravelTeamReport**](https://ess.pockethrms.com/Travel/Transaction/TravelTeamReport)

### **Travel Management – Finance Department Approval**

### **How to Approve a Travel Request as a Finance Personnel?**

As a person responsible for financial approval, you can review manager-approved travel entries to process and release the requested travel advance or reimbursement amount to the employee.

**Path: ESS Portal → Travel → Finance Approval**

**Step 1: Navigate to the Finance Approval Screen**

Click on the **Travel menu** from the left side of the screen and select the **Finance Approval** option. You will be directed to a screen where all the entries that are approved by the managers will be visible to you.

<figure><img src="https://4282324958-files.gitbook.io/~/files/v0/b/gitbook-x-prod.appspot.com/o/spaces%2F-MXep_PEmh8mDPVWj49x%2Fuploads%2FjxDKBaqllkutY7aIPdOQ%2FFrame%201%20-%202026-08-27T174735.277.png?alt=media&amp;token=405c26d9-48a0-4000-ad8e-b4dacd1a1a71" alt="" width="188"><figcaption></figcaption></figure>

**Step 2: Filter and Access the Request**

You can use the **Date Range** or **Select Employee fields** and click **Search** to find specific requests.&#x20;

<figure><img src="https://4282324958-files.gitbook.io/~/files/v0/b/gitbook-x-prod.appspot.com/o/spaces%2F-MXep_PEmh8mDPVWj49x%2Fuploads%2F86dy2kc2SVX7iDSfhQbj%2FFrame%201%20-%202026-08-27T175303.071.png?alt=media&amp;token=dd8fdfdd-8107-496a-9e2b-9ac5c5763abd" alt=""><figcaption></figcaption></figure>

To review a request, click on the **View Details** button under the Action column, where you can see the amount approved by the managers. You can also click **Manager Remarks** to view the previous approver's notes.

<figure><img src="https://4282324958-files.gitbook.io/~/files/v0/b/gitbook-x-prod.appspot.com/o/spaces%2F-MXep_PEmh8mDPVWj49x%2Fuploads%2FsEhFm0ul8Kf3mDgLe4nE%2FFrame%201%20-%202026-08-27T175418.633.png?alt=media&amp;token=c065c0a1-d488-4950-9811-fdc04de3d257" alt=""><figcaption></figcaption></figure>

**Step 3: Review the Travel and Expense Schedules**

Upon opening the details, verify the granular data submitted for the trip. You can scroll through the Travel Schedule, Accommodation Schedule, and Miscellaneous Expenses to ensure all financial limits and policies are respected.

**Step 4: Add Remarks and Finalize the Approval**

Scroll to the bottom of the page to the Other Details section to view the **Total Travel Advance**.&#x20;

<figure><img src="https://4282324958-files.gitbook.io/~/files/v0/b/gitbook-x-prod.appspot.com/o/spaces%2F-MXep_PEmh8mDPVWj49x%2Fuploads%2FUN8dKLcjfvoyJaKw3bG9%2FFrame%201%20-%202026-08-27T175827.987.png?alt=media&amp;token=73b6dcc7-f755-4cca-b72d-6368df6c5ffe" alt=""><figcaption></figcaption></figure>

Here you can add your **comments** in the Finance Advance **Remark box**.&#x20;

<figure><img src="https://4282324958-files.gitbook.io/~/files/v0/b/gitbook-x-prod.appspot.com/o/spaces%2F-MXep_PEmh8mDPVWj49x%2Fuploads%2F3QQySLpv2DGeH6OL22z2%2FFrame%201%20-%202026-08-27T175842.641.png?alt=media&amp;token=eb06a656-5e73-4d63-85b9-bff31418320f" alt=""><figcaption></figcaption></figure>

Finally, click the **Approve** button to approve the request and release the reimbursement amount to the employee,&#x20;

<figure><img src="https://4282324958-files.gitbook.io/~/files/v0/b/gitbook-x-prod.appspot.com/o/spaces%2F-MXep_PEmh8mDPVWj49x%2Fuploads%2FWNnOSUwglVifjKUtKfF7%2FFrame%201%20-%202026-08-27T175859.770.png?alt=media&amp;token=cabb36eb-0ff1-42ce-9513-f333a9f2dbf1" alt=""><figcaption></figcaption></figure>

or click **Reject** if the claim cannot be processed.

<figure><img src="https://4282324958-files.gitbook.io/~/files/v0/b/gitbook-x-prod.appspot.com/o/spaces%2F-MXep_PEmh8mDPVWj49x%2Fuploads%2FHJUa7gY0Nr02s4FB860A%2FFrame%201%20-%202026-08-27T175910.164.png?alt=media&amp;token=3f4f93a9-9979-455e-bdba-b704d74f74d5" alt=""><figcaption></figcaption></figure>

**Path Link:** [**https://ess.pockethrms.com/Travel/Transaction/TravelFinanceApproval?Menu=TravelAdvanceFinanceApproval**](https://ess.pockethrms.com/Travel/Transaction/TravelFinanceApproval?Menu=TravelAdvanceFinanceApproval)

**For any queries, contact** [**support@pockethrms.com**](mailto:support@pockethrms.com)


# Feature Guides


# Data Wizard Setting Transfer

### What is Data Wizard?

The **Data Wizard** is a tool that helps users **set up and extract reports** based on their preferences. Users can apply **filters and settings** to generate reports exactly how they need them.

### What is the Setting Transfer Feature?

Sometimes, different users in different companies need the **same report settings** to save time and effort. Instead of setting everything up again, the **Setting Transfer feature** allows you to copy existing settings from **one user in a company** to **another user in a different company**.

This ensures **consistency** and makes it easier for teams to work with reports in multiple companies.

### Understanding the Data Wizard Setting Transfer Screen

The image shows the **‘Data Wizard Setting Transfer’** screen, which allows users to transfer report settings from one user to another across different companies.

**Fields on the Screen:**

* **From User** – The user whose report settings will be copied.

In the example, the selected user is '**<demo@pocket.com>'**.

* **Setting Name** – The specific report setting that will be transferred.

Here, the selected setting is '**Leave Summary'**.

* **To Company** – The company where the settings will be copied.

In this case, the target company is '**Prajwal - First Company'**.

* **To User** – The user in the target company who will receive the settings.

The selected user is '**Prajwal…………@gmail.com'**.

* **Transfer Button** – Clicking this button will **initiate the transfer** process and apply the selected settings to the target user.

### How to transfer data wizard settings?

**Step 1**: Log into the cloud portal, go to the ‘Settings’ menu and under the ‘HR’ tab click on the ‘Data Wizard Setting Transfer’ subtab.

![](https://4282324958-files.gitbook.io/~/files/v0/b/gitbook-x-prod.appspot.com/o/spaces%2F-MXep_PEmh8mDPVWj49x%2Fuploads%2FbWovdf0yEcQgXQtefU9S%2F0.png?alt=media)

**Step 2**: Select the user who has the report settings you want to transfer, from the ‘From User’ dropdown.

**Step 3**: From the ‘Setting Name’ dropdown, select the report setting that needs to be copied.

**Step 4**: From the ‘To Company dropdown’. Select the company where the settings should be transferred.

**Step 5**: From the ‘To User dropdown’, select the user in the target company who will receive the settings.

**Step 6**: Review your selections

* **From User**: The user who has the settings.
* **Setting Name**: The report settings to transfer.
* **To Company**: The company receiving the settings.
* **To User**: The recipient of the settings.

**Step 7**: Click the ‘Transfer’ button to finalize the process.

![](https://4282324958-files.gitbook.io/~/files/v0/b/gitbook-x-prod.appspot.com/o/spaces%2F-MXep_PEmh8mDPVWj49x%2Fuploads%2FtqNnNexcvSY1BqGiTpk0%2F1.png?alt=media)

**Path**: Cloud > Settings > HR > Data Wizard Setting Transfer > select details >Transfer

**Link**: <https://cloud.pockethrms.com/Settings/Employee/Index?module=hr&submodule=SettingsTransfer>

For any queries, contact <support@pockethrms.com>


# Tax Calculator ESS Portal

The Tax Calculator in the Employee Self-Service (ESS) portal helps employees easily compare the Old Tax Regime and the New Tax Regime to decide which one suits them better.

The tax calculator uses the latest salary processed and declarations to give a precise estimate of how much income tax an employee may have to pay in the financial year.

### What does the tax calculator do?

* Projects annual income based on your processed salary
* Estimates total deductions (as per your declarations)
* Tax calculation according to both regimes
* Calculates Surcharge (if applicable) and 4% Health and Education Cess

smHRt suggestion: Based on the above parameter the calculator suggests which regime will help you save more tax

### How is the tax calculated?

The tax is calculated according to the following factors.

**1. Gross Total Income**

The calculator checks the number of months the salary is already processed, calculates the average and then projects it for the entire year.

For example,

* If salary is processed for only April: ₹35,000 → Annual projection = ₹35,000 × 12 = ₹4,20,000
* If salary is processed for April and March: Calculate Average → Annual projection = ₹4,20,000

**2. Standard Deduction**

* ₹50,000 under Old Regime
* ₹75,000 under New Regime

**3. Declared Deductions**

The Declared Deductions are fetched from employee declarations made via ESS or updated by HR on the cloud portal.

**Note**: Declared deductions are only applicable in the Old Regime.

**4. Total Income**

Total Income = Gross Income - Standard Deduction - Declared Deductions (if any)

**5. Tax Slab Applied**

Tax is calculated according to the respective tax regimes as seen below.

Old Regime: Income Range and Tax Rate

* ₹0 – ₹2,50,000: 0%
* ₹2,50,001 – ₹5,00,000: 5%
* ₹5,00,001 – ₹10,00,000: 20%
* Above ₹10,00,000: 30%

New Regime: Income Range and Tax Rate

* ₹0 – ₹3,00,000: 0%
* ₹3,00,001 – ₹7,00,000: 5%
* ₹7,00,001 – ₹10,00,000: 10%
* ₹10,00,001 – ₹12,00,000: 15%
* ₹12,00,001 – ₹15,00,000: 20%
* Above ₹15,00,000: 30%

**6. Surcharge (if applicable)**

Old Regime: Surcharge Rates

* ₹50L – ₹1Cr: 10%
* ₹1Cr – ₹2Cr: 15%
* ₹2Cr – ₹5Cr: 25%
* Above ₹5Cr: 37%

New Regime: Surcharge Rates

* ₹50L – ₹1Cr: 10%
* ₹1Cr – ₹2Cr: 15%
* Above ₹2Cr: 25%

**7. Health & Education Cess**

Health and Education Cess is calculated as 4% of the summation of tax and surcharges. 8. Total Tax Payable

**Total Tax** = Tax + Surcharge + Cess

**smHRt Recommendation**

The calculator clearly shows you how much you’ll save under each regime and gives you suggestion with precise number For example, “You will save ₹7,300 if you opt for the New Tax Regime”.

### Why to use the tax calculator tool?

The tax calculator gives you:

* Simple, accurate, and updated with the latest tax rules
* Helps you make smart choices before submitting investment proofs

![](https://4282324958-files.gitbook.io/~/files/v0/b/gitbook-x-prod.appspot.com/o/spaces%2F-MXep_PEmh8mDPVWj49x%2Fuploads%2F6wmGZEO2PlG0wQLyP1BQ%2F0.png?alt=media)

### How can I compare taxes under the old and new tax regimes in the ESS portal?

**Step 1**: Log into the ESS portal, go to the ‘Profile’ menu and click on the ‘My Tax Details’ submenu.

![](https://4282324958-files.gitbook.io/~/files/v0/b/gitbook-x-prod.appspot.com/o/spaces%2F-MXep_PEmh8mDPVWj49x%2Fuploads%2FDvCvgAXbnYZ91hsCXgbN%2F1.png?alt=media)

**Step 2**: Go to the ‘Tax Calculator’ tab to check the comparison between your ‘Total Tax Payable’ under the Old Tax Regime and the New Tax Regime according to the latest tax rules. The system will also show you the exact amount you can save above the comparison table.

![](https://4282324958-files.gitbook.io/~/files/v0/b/gitbook-x-prod.appspot.com/o/spaces%2F-MXep_PEmh8mDPVWj49x%2Fuploads%2F7bXl0Q6TqLjgHVgS60Ha%2F2.png?alt=media)

**Note**: The calculated according to the declared deductions and your salary.

**Link**: <https://ess.pockethrms.com/Employee/Payroll/MyTaxDetails?Menu=taxcalculator>

**Path**: ESS Portal > Profile > My Tax Details > Tax Calculator

For any queries, contact <support@pockethrms.com>


# Payroll Maker Checker

### What is payroll maker checker?

The Payroll Maker-Checker feature in Pocket HRMS software adds an extra layer of validation to the payroll process. It follows a dual-approval system where one user (Maker) prepares the payroll, and another user (Checker) reviews and approves it before processing.

This ensures accuracy, reduces errors, prevents unauthorized changes, and enhances compliance with company policies and regulations.

With role-based access controls, audit trails, and automated notifications, this module streamlines payroll verification while maintaining transparency and accountability.

### How to give user rights for the payroll maker role?

**Path**: Cloud Portal > Settings> Organization> User> ‘View User Rights’ > Category > Payroll > select required categories >Save

**Step 1**: Log into the cloud portal with admin credentials. Go to the ‘Settings’ menu and under the ‘Organization’ tab, click on the ‘Users’ subtab.

**Step 2**: Click the respective ‘View User Rights’ button for the user to whom you want to give the payroll maker rights.

![](https://4282324958-files.gitbook.io/~/files/v0/b/gitbook-x-prod.appspot.com/o/spaces%2F-MXep_PEmh8mDPVWj49x%2Fuploads%2F1OZe3DdoK5w7zArubQhO%2F0.png?alt=media)

**Step 3**: In the ‘User Rights’ pop-up, tick checkboxes for the required ‘Categories’ and ‘Payroll’ menu options and click on the ‘Save’ button. The user rights will be updated accordingly.

![](https://4282324958-files.gitbook.io/~/files/v0/b/gitbook-x-prod.appspot.com/o/spaces%2F-MXep_PEmh8mDPVWj49x%2Fuploads%2FVt03rbfxc8giZwlh0p0u%2F1.png?alt=media)

**Note**: You can also [add a new user](https://docs.pockethrms.com/hr-and-admin-portal/cloud-configuration/organization/users#how-to-create-a-new-user-in-the-cloud-portal) if required.

**Link**: <https://cloud.pockethrms.com/Settings/Employee/Index?module=organization&submodule=users>

For any queries, contact <support@pockethrms.com>

### How to give user rights for the payroll checker role?

**Path**: Cloud Portal (Admin) Settings> Organisation> User> ‘View User Rights’ > Category > Payroll > select required categories >Save

**Step 1**: Log into the cloud portal with admin credentials. Go to the ‘Settings’ menu and under the ‘Organization’ tab, click on the ‘Users’ subtab.

**Step 2**: Click the respective ‘View User Rights’ button for the user to whom you want to give the payroll checker rights.

![](https://4282324958-files.gitbook.io/~/files/v0/b/gitbook-x-prod.appspot.com/o/spaces%2F-MXep_PEmh8mDPVWj49x%2Fuploads%2FQkHGoOBIEIkcW9egMuux%2F2.png?alt=media)

**Step 3**: In the ‘User Rights’ pop-up, tick checkboxes for the required ‘Categories’ and ‘Payroll’ menu options and click on the ‘Save’ button. The user rights will be updated accordingly.

![](https://4282324958-files.gitbook.io/~/files/v0/b/gitbook-x-prod.appspot.com/o/spaces%2F-MXep_PEmh8mDPVWj49x%2Fuploads%2F2z5uHEGEClF9gPZ5Zy75%2F3.png?alt=media)

**Note**: You can also [add a new user](https://docs.pockethrms.com/hr-and-admin-portal/cloud-configuration/organization/users#how-to-create-a-new-user-in-the-cloud-portal) if required.

**Link**: <https://cloud.pockethrms.com/Settings/Employee/Index?module=organization&submodule=users>

For any queries, contact <support@pockethrms.com>

### How to set up payroll maker checker or approval matrix for payroll maker checker?

**Path**: Cloud Portal (Admin) > Settings > Organization > Payroll Maker Checker > click ‘Setting Icon’ > select User, Priority > Save

**Step 1**: Log into the cloud portal with Admin credentials. Go to the ‘Settings’ menu, under the ‘Organization’ tab click on the ‘Payroll Maker Checker’ subtab.

![](https://4282324958-files.gitbook.io/~/files/v0/b/gitbook-x-prod.appspot.com/o/spaces%2F-MXep_PEmh8mDPVWj49x%2Fuploads%2Fk51OI6ENeDsa0ZXR5UMd%2F4.png?alt=media)

**Step 2**: On the Payroll Maker Checker page click on the ‘Settings Icon’ towards upper right corner of the screen.

![](https://4282324958-files.gitbook.io/~/files/v0/b/gitbook-x-prod.appspot.com/o/spaces%2F-MXep_PEmh8mDPVWj49x%2Fuploads%2FNosS8YOA5NfSvJX61RQM%2F5.png?alt=media)

**Step 3**: ‘Select User’ and enter the ‘Priority’ and click on the ‘Save’ button. The approval matrix user priority will be sent accordingly.

The priority defined will be used to send the processed payroll for approval in that order. Once user with highest priority approves the payroll data, it will be posted.

![](https://4282324958-files.gitbook.io/~/files/v0/b/gitbook-x-prod.appspot.com/o/spaces%2F-MXep_PEmh8mDPVWj49x%2Fuploads%2FbAcI0m4nkTQYFZCM8Wsx%2F6.png?alt=media)

**For example**,

* Payroll data first goes to the Priority - 1 User, after their approval it goes to Priority - 2 User for approval.
* If there is no Priority - 2 User, approval by Priority - 1 user will be considered final and payroll will be posted.

**Link**: [https://cloud.pockethrms.com/Settings/Employee/Index?module=organization\&submodule=PayrollMakerChecker](https://cloud.pockethrms.com/Settings/Employee/Index?module=organization\&submodule=PayrollMakerChecker%22%20\t%20%22_blank)

For any queries, contact <support@pockethrms.com>

### How to submit processed payroll data for approval to payroll checker?

After processing [payroll for employees in bulk](https://docs.pockethrms.com/hr-and-admin-portal/cloud-configuration/payroll/payroll-guide/payroll-with-attendance#id-5.-how-to-run-process-payroll-or-how-to-run-smhrt-payroll) or processing [payroll for a single employee](https://docs.pockethrms.com/faqs/cloud-portal/employee/employee-list/payroll#b.-how-to-run-payroll-for-a-single-employee), you can go to the smHRt payroll screen to submit payroll data for approval.

**Path**: Cloud Payroll (Payroll Maker) > Settings > Payroll > Utilities > smHRt Payroll > Click here to Send Payroll Data for Approval

**Step 1**: Log into the cloud portal with Payroll Maker credentials. Go to the ‘Payroll’ menu and under the ‘Utilities’ click on the ‘smHRt Payroll’ option.

![](https://4282324958-files.gitbook.io/~/files/v0/b/gitbook-x-prod.appspot.com/o/spaces%2F-MXep_PEmh8mDPVWj49x%2Fuploads%2F3JdtTYTsWHlcx7AJijbP%2F7.png?alt=media)

**Step 2**: On the smHRt payroll screen once you process payroll, click the ‘Click here to Send Payroll Data for Approval’ button at the top of the screen.

![](https://4282324958-files.gitbook.io/~/files/v0/b/gitbook-x-prod.appspot.com/o/spaces%2F-MXep_PEmh8mDPVWj49x%2Fuploads%2FtGSKsKdFz3N2pjn2up2G%2F8.png?alt=media)

**Step 3**: Select Month and year and click on the ‘Excel View’ button to check the processed payroll data on the screen.

![](https://4282324958-files.gitbook.io/~/files/v0/b/gitbook-x-prod.appspot.com/o/spaces%2F-MXep_PEmh8mDPVWj49x%2Fuploads%2F0ILf47jchGwGfcGmyb95%2F9.png?alt=media)

**Step 4**: Ensure that the processed payroll data is correct, click the ‘Post’ button and it will be sent for the approval to the payroll checker.

![](https://4282324958-files.gitbook.io/~/files/v0/b/gitbook-x-prod.appspot.com/o/spaces%2F-MXep_PEmh8mDPVWj49x%2Fuploads%2FWtCLu56IIWsSQoeXU071%2F10.png?alt=media)

**Note**:

* Payroll data first goes to the Priority - 1 User, after their approval it goes to Priority - 2 User for approval.
* If there is no Priority - 2 User, approval by Priority - 1 user will be considered final and payroll will be posted.

**Link**: <https://cloud.pockethrms.com/payroll/PayrollMakerChecker/PayrollApprovalRequest>

For any queries, contact <support@pockethrms.com>

### How to check and approve payroll data as payroll checker?

**Path**: Cloud Portal (Payroll Checker) > Payroll > Utilities > Payroll Approval > click Month-Year > check various payroll reports & data > Approve/Reject

**Step 1**: Log into the cloud portal with Payroll Checker credentials. Go to the ‘Payroll’ menu and under the ‘Utilities’ click on the ‘Payroll Approval’ option.

![](https://4282324958-files.gitbook.io/~/files/v0/b/gitbook-x-prod.appspot.com/o/spaces%2F-MXep_PEmh8mDPVWj49x%2Fuploads%2FoRQSUP1VyVw562xlLaVT%2F11.png?alt=media)

**Step 2**: Click the Month-Year towards the upper left side of the screen.

![](https://4282324958-files.gitbook.io/~/files/v0/b/gitbook-x-prod.appspot.com/o/spaces%2F-MXep_PEmh8mDPVWj49x%2Fuploads%2FDIyznicWL5Kv4jzjCow7%2F12.png?alt=media)

**Step 3**: Review the various reports and dashboard provided by system to verify payroll data and click the ‘Approve’ or ‘Reject’ button as required.

![](https://4282324958-files.gitbook.io/~/files/v0/b/gitbook-x-prod.appspot.com/o/spaces%2F-MXep_PEmh8mDPVWj49x%2Fuploads%2FVUpCvJExAOrthZT1vdht%2F13.png?alt=media)

**Note**:

* If approved, the payroll data will be sent to the next approver if available. Else, it will be posted into the system.
* If click ‘Reject’ button you can enter your remark and click on the ‘Save’ button so the payroll maker can check your comment.
* The rejected, the payroll will not be posted, and the payroll maker will have to re-process and send again for approval.

**Link**: <https://cloud.pockethrms.com/payroll/PayrollMakerChecker/PayrollApproval>

For any queries, contact <support@pockethrms.com>


# Custom Working Hour Report

### What is Custom Working Hour Report?

The Custom Working Hour Report helps managers track employees whose daily work hours are below or above set limits for a chosen date range. It offers both detailed and consolidated summary views for easy reporting.

### How to View Custom Working Hour Report?

You can view both detailed report and consolidate custom working hour report, from the ESS portal by following two paths:

1. **Path:** **ESS > Leave > My Team Report > More > Custom Working Hour Report > Fill in the details like (date, daily working hours and report type\[detailed/consolidate]) > Search.**

**Step 1:** Login to ESS portal, go to ‘Leave’ menu, and select ‘My Team Report’ submenu.

![](https://4282324958-files.gitbook.io/~/files/v0/b/gitbook-x-prod.appspot.com/o/spaces%2F-MXep_PEmh8mDPVWj49x%2Fuploads%2FRtP6mHVPiqeGLiskoGdv%2F0.png?alt=media)

**Step 2:** Select the ‘More’ tab and click on ‘Custom Working Hour Report’ from the dropdown.

![](https://4282324958-files.gitbook.io/~/files/v0/b/gitbook-x-prod.appspot.com/o/spaces%2F-MXep_PEmh8mDPVWj49x%2Fuploads%2Fdcjzr3dahDCWIJjESE3t%2F2.png?alt=media)

![](https://4282324958-files.gitbook.io/~/files/v0/b/gitbook-x-prod.appspot.com/o/spaces%2F-MXep_PEmh8mDPVWj49x%2Fuploads%2FbpuZrvP2UN9e2dlGlyRO%2F1.png?alt=media)

**Step 3:** Fill in the details (like Date, Daily Working Hours and Report Type\[detailed/consolidate]) from the drop-down, and click on ‘Search’ to View the custom working hour report (detailed/consolidate).

![](https://4282324958-files.gitbook.io/~/files/v0/b/gitbook-x-prod.appspot.com/o/spaces%2F-MXep_PEmh8mDPVWj49x%2Fuploads%2FbHZBrFkNuiSuRp1k0SDk%2F3.png?alt=media)

![](https://4282324958-files.gitbook.io/~/files/v0/b/gitbook-x-prod.appspot.com/o/spaces%2F-MXep_PEmh8mDPVWj49x%2Fuploads%2FjpF008tud9CJvIY0b8kN%2F4.png?alt=media)

**Note**: In case you want to view the detailed/ consolidate report of a single employee, then fill the ‘Employee’ column with the ‘Employee ID’.

![](https://4282324958-files.gitbook.io/~/files/v0/b/gitbook-x-prod.appspot.com/o/spaces%2F-MXep_PEmh8mDPVWj49x%2Fuploads%2Fz80PDWHricjIyKKJVF7T%2F5.png?alt=media)

![](https://4282324958-files.gitbook.io/~/files/v0/b/gitbook-x-prod.appspot.com/o/spaces%2F-MXep_PEmh8mDPVWj49x%2Fuploads%2FPQ18evtcTOZzLtzwMS95%2F6.png?alt=media)

**Link**:<https://ess.pockethrms.com/Leave/TeamReport/MyTeamLeaveReport?Menu=WorkingHourReport>

2. **Path: ESS Login> Leave > Employee Report > More > Custom Working Hour Report > Fill in the details like (Date, Daily working hours and Report type\[detailed/consolidate]) > Search.**

**Step 1:** Login to ESS portal, go to ‘Leave’ menu, and select ‘Employee Report’ from the sub-menu.

<figure><img src="https://4282324958-files.gitbook.io/~/files/v0/b/gitbook-x-prod.appspot.com/o/spaces%2F-MXep_PEmh8mDPVWj49x%2Fuploads%2Fp1NfW9rNgXf1IfY19gjX%2F7.png?alt=media" alt=""><figcaption></figcaption></figure>

**Step 2:** Select the ‘More’ tab and click on ‘Custom Working Hour Report’ from the dropdown.

<figure><img src="https://4282324958-files.gitbook.io/~/files/v0/b/gitbook-x-prod.appspot.com/o/spaces%2F-MXep_PEmh8mDPVWj49x%2Fuploads%2FAvb66hgCjZIA8ojuaZhk%2F9.png?alt=media" alt=""><figcaption></figcaption></figure>

<figure><img src="https://4282324958-files.gitbook.io/~/files/v0/b/gitbook-x-prod.appspot.com/o/spaces%2F-MXep_PEmh8mDPVWj49x%2Fuploads%2FP4trSk5fG6iimYabUWxD%2F8.png?alt=media" alt=""><figcaption></figcaption></figure>

**Step 3:** Fill in the details (like Date, Daily Working Hours and Report Type\[detailed/consolidate]) from the drop-down, and click on ‘Search’ to View the custom working hour report (detailed/consolidate).

![](https://4282324958-files.gitbook.io/~/files/v0/b/gitbook-x-prod.appspot.com/o/spaces%2F-MXep_PEmh8mDPVWj49x%2Fuploads%2FbNmBeC1zF5K3M5JVBPu1%2F10.png?alt=media)

![](https://4282324958-files.gitbook.io/~/files/v0/b/gitbook-x-prod.appspot.com/o/spaces%2F-MXep_PEmh8mDPVWj49x%2Fuploads%2FmPWIneiYbpeL3UWxGDIw%2F11.png?alt=media)

**Note**: In case you want to view the detailed/consolidate report of a single employee, then fill the ‘Employee’ column with the ‘Employee ID’.

![](https://4282324958-files.gitbook.io/~/files/v0/b/gitbook-x-prod.appspot.com/o/spaces%2F-MXep_PEmh8mDPVWj49x%2Fuploads%2Fqv2CpLrjG83JvToEwtlB%2F12.png?alt=media)

![](https://4282324958-files.gitbook.io/~/files/v0/b/gitbook-x-prod.appspot.com/o/spaces%2F-MXep_PEmh8mDPVWj49x%2Fuploads%2FJWXTyYQ9uIAxv2CMOZb4%2F13.png?alt=media)

**Link:**<https://ess.pockethrms.com/Leave/EmployeeReport/EmployeeLeaveReport?Menu=WorkingHourReport>

### How to Download Custom Working Hour Report?

You can download both detailed report and consolidate custom working hour report, from the ESS portal by following two paths:

1. **Path:** **ESS > Leave > My Team Report > More > Custom Working Hour Report > Fill in the details like (employee, date, daily working hours and report type\[detailed/consolidate]) > Download Excel.**

**Step 1:** Login to ESS portal, go to ‘**Leave**’ menu, and select ‘**My Team Report’** submenu.

<figure><img src="https://4282324958-files.gitbook.io/~/files/v0/b/gitbook-x-prod.appspot.com/o/spaces%2F-MXep_PEmh8mDPVWj49x%2Fuploads%2Fayj93E6jAWJNLkFZqSex%2F14.png?alt=media" alt=""><figcaption></figcaption></figure>

**Step 2:** Select the ‘**More**’ tab and click on ‘**Custom Working Hour Report’** from the dropdown.

![](https://4282324958-files.gitbook.io/~/files/v0/b/gitbook-x-prod.appspot.com/o/spaces%2F-MXep_PEmh8mDPVWj49x%2Fuploads%2FyOGblGOYuxqWK9BMIFuy%2F16.png?alt=media)

![](https://4282324958-files.gitbook.io/~/files/v0/b/gitbook-x-prod.appspot.com/o/spaces%2F-MXep_PEmh8mDPVWj49x%2Fuploads%2FoY8ZETba9qk8mnL7YSoJ%2F15.png?alt=media)

**Step 3:** **:** Fill in the details (like Date, Daily Working Hours and Report Type\[detailed/consolidate]) from the drop-down, keep the ‘**Employee**’ column blank and click on **‘Download Excel’** to download the custom working hour report (detailed/consolidate) of all the employees..

![](https://4282324958-files.gitbook.io/~/files/v0/b/gitbook-x-prod.appspot.com/o/spaces%2F-MXep_PEmh8mDPVWj49x%2Fuploads%2FRySxRYnb4q9OYwQcyHHZ%2F17.png?alt=media)

![](https://4282324958-files.gitbook.io/~/files/v0/b/gitbook-x-prod.appspot.com/o/spaces%2F-MXep_PEmh8mDPVWj49x%2Fuploads%2F91W4t8QN4QIx734vQ9so%2F18.png?alt=media)

**Note**: If you want to download the custom working hour report for a single employee, then fill the ‘**Employee**’ section with the ‘Employee ID’ and click on **‘Download Excel’.**

![](https://4282324958-files.gitbook.io/~/files/v0/b/gitbook-x-prod.appspot.com/o/spaces%2F-MXep_PEmh8mDPVWj49x%2Fuploads%2Fp8v1v6QgmzT2WM3agpuu%2F19.png?alt=media)

![](https://4282324958-files.gitbook.io/~/files/v0/b/gitbook-x-prod.appspot.com/o/spaces%2F-MXep_PEmh8mDPVWj49x%2Fuploads%2F6RdUQvsBhYKrwiYjEHoC%2F20.png?alt=media)

The Excel file will be downloaded in your system.

Link:<https://ess.pockethrms.com/Leave/TeamReport/MyTeamLeaveReport?Menu=WorkingHourReport>

2. **Path: ESS Login> Leave > Employee Report > More > Custom Working Hour Report > Fill in the details like (employee, date, daily working hours and report type\[detailed/consolidate]) > Download Excel.**

**Step 1:** Login to ESS portal, go to ‘**Leave**’ menu, and select **‘Employee Report’** from the sub-menu.

<figure><img src="https://4282324958-files.gitbook.io/~/files/v0/b/gitbook-x-prod.appspot.com/o/spaces%2F-MXep_PEmh8mDPVWj49x%2Fuploads%2FRYoZ8P4aVKrCRxE2sCOO%2Fimage.png?alt=media&amp;token=23231fee-3f7a-4f02-8bd0-90d887de1cac" alt=""><figcaption></figcaption></figure>

**Step 2:** Select the ‘**More**’ tab and click on **‘Custom Working Hour Report’** from the dropdown.

<figure><img src="https://4282324958-files.gitbook.io/~/files/v0/b/gitbook-x-prod.appspot.com/o/spaces%2F-MXep_PEmh8mDPVWj49x%2Fuploads%2FO2YnpRfo5zY8ZzHD3Mjt%2Fimage.png?alt=media&amp;token=60014328-a886-4534-b003-85e90e6a6f46" alt=""><figcaption></figcaption></figure>

<figure><img src="https://4282324958-files.gitbook.io/~/files/v0/b/gitbook-x-prod.appspot.com/o/spaces%2F-MXep_PEmh8mDPVWj49x%2Fuploads%2FmaAzfQMdBQG6Dp6R33lJ%2Fimage.png?alt=media&amp;token=f58c55e2-6a50-43d6-a263-2092e1fa1430" alt=""><figcaption></figcaption></figure>

**Step 3:** Fill in the details (like Date, Daily Working Hours and Report Type\[detailed/consolidate]) from the drop-down, keep the ‘Employee’ column blank and click on ‘Download Excel’ to download the custom working hour report (detailed/consolidate) of all the employees.

<figure><img src="https://4282324958-files.gitbook.io/~/files/v0/b/gitbook-x-prod.appspot.com/o/spaces%2F-MXep_PEmh8mDPVWj49x%2Fuploads%2FKlAynYJLzSicdajJuAvB%2Fimage.png?alt=media&amp;token=2f128bfc-08a7-43ba-a0e5-24626588b046" alt=""><figcaption></figcaption></figure>

<figure><img src="https://4282324958-files.gitbook.io/~/files/v0/b/gitbook-x-prod.appspot.com/o/spaces%2F-MXep_PEmh8mDPVWj49x%2Fuploads%2FfDeD68dn5LWhhcfGg9Qq%2Fimage.png?alt=media&amp;token=78944a10-4a6f-48c6-b991-4ddba8a7a6b5" alt=""><figcaption></figcaption></figure>

**Note**: If you want to download the custom working hour report for a single employee, then fill the ‘Employee’ section with the ‘Employee ID’ and click on ‘Download Excel’.

<figure><img src="https://4282324958-files.gitbook.io/~/files/v0/b/gitbook-x-prod.appspot.com/o/spaces%2F-MXep_PEmh8mDPVWj49x%2Fuploads%2FMGnuRFAaq0mTlhDZQx2k%2Fimage.png?alt=media&amp;token=02a184f4-db15-473e-b5c4-9834eff8a0bd" alt=""><figcaption></figcaption></figure>

<figure><img src="https://4282324958-files.gitbook.io/~/files/v0/b/gitbook-x-prod.appspot.com/o/spaces%2F-MXep_PEmh8mDPVWj49x%2Fuploads%2Fu3GP7VAK52LMNMn9uFIr%2Fimage.png?alt=media&amp;token=f538dce5-8013-488e-a2f1-e5261b1500c2" alt=""><figcaption></figcaption></figure>

The Excel file will be downloaded in your system.

**Link:** <https://ess.pockethrms.com/Leave/EmployeeReport/EmployeeLeaveReport?Menu=WorkingHourReport>

### What to Do if the ‘Custom Working Hour Report’ is not Visible in the ESS of the Manager?

If the ‘Custom Working Hour Report’ field is not visible, please check the below mentioned points:

* Please ensure on cloud portal that the ‘My Team Report’ and ‘Employee Report’ access is correctly configured and is assigned to the manager from whose ESS you are trying to view the report. If not assigned, then follow the path below to assign it:

**Path:** Cloud portal> ESS settings> Profile Info > Role Allocation > Select module (Leave), Select role (Manager) > Search >Tick on My Team Report > Save

**Step 1**: Login to cloud portal, go to **‘ESS Setting’** menu, and select **‘Profile Info’** from tab.

<figure><img src="https://4282324958-files.gitbook.io/~/files/v0/b/gitbook-x-prod.appspot.com/o/spaces%2F-MXep_PEmh8mDPVWj49x%2Fuploads%2F3Sh8PqxNkfARo6TEjenE%2Fimage.png?alt=media&amp;token=e9f05e39-e1f6-48ba-8cf2-67c42d3d9d59" alt=""><figcaption></figcaption></figure>

**Step 2**: Select **‘Role Allocation’**, fill the details: Select ‘**Module**’ as ‘**Leave**’, **‘Select Role’** as ‘**manager** ‘and click on ‘**Search**’.

<figure><img src="https://4282324958-files.gitbook.io/~/files/v0/b/gitbook-x-prod.appspot.com/o/spaces%2F-MXep_PEmh8mDPVWj49x%2Fuploads%2FrTVzutsnrpHRRgjxZnhu%2Fimage.png?alt=media&amp;token=d1d15236-b026-43f8-9b6f-df223383619f" alt=""><figcaption></figcaption></figure>

**Step 3**: Tick on **‘My Team Report’** and **'Employee Report’** then click on ‘**Save**’.

<figure><img src="https://4282324958-files.gitbook.io/~/files/v0/b/gitbook-x-prod.appspot.com/o/spaces%2F-MXep_PEmh8mDPVWj49x%2Fuploads%2FLc5OSE18Ju0b2ow3KSeY%2Fimage.png?alt=media&amp;token=36dac821-1535-4096-b1aa-ce78d3f5aee7" alt=""><figcaption></figcaption></figure>

**Link**: <https://cloud.pockethrms.com/Settings/Employee/ESSIndex?module=Profile&submodule=RoleAllocation>

* Refresh Your page to check if the ‘Custom Working Hour Report’ field is available or not.
* Contact our agent on chat if the issue persists after making the changes.

For any queries, contact <support@pockethrms.com>

Or Connect with our Agent on Chat.


# E Posh

### E-Posh (Detail Guide)

### 1. What is E-Posh

E-Posh refers to a **digital or online system** designed to help organizations comply with India’s Prevention of Sexual Harassment (Posh) Act, 2013 by managing all related processes electronically.

### 1.1 How to Set-up E-Posh in Pocket HRMS?

To set E-posh in Pocket HRMS, please follow the path and process mentioned below:

**Path:** Cloud Login > ESS Setting > E-posh > Set-up > Fill In details > Save.

**Step 1:** Log in to the '**Cloud**' portal and go to '**ESS Setting**' menu.

<figure><img src="https://content.gitbook.com/content/-MXep_PEmh8mDPVWj49x/blobs/KBzbb45cXzQwphftQbRQ/Unknown%20image" alt=""><figcaption></figcaption></figure>

**Step 2:** Select '**E-posh**' tab and click on '**Set-up**'.

![](https://content.gitbook.com/content/-MXep_PEmh8mDPVWj49x/blobs/HZOvLD3rR7N4f9ltoedG/Unknown%20image)

**Step 3:** '**Fill In details**' Such as:

![](https://content.gitbook.com/content/-MXep_PEmh8mDPVWj49x/blobs/cPQ3LlvExUpj1xtIaij0/Unknown%20image)

* **Chairperson/Presiding Officer**- Fill the name of the chairperson you want to appoint for E-Posh Committee

**Note-** (According to Posh Act, the chairperson or residing Officer should be a Female. But you can assign the chairperson as male/female per your convenience in Pocket HRMS). System will however prompt you if a male employee is being appointed as a Chairperson.

* **Committee Members**- Fill the names of the committee members apart from the chairperson.

**Note-** (As per POSH committee, there should be more than 50percent female employees in the committee. But you can assign the members male/female per your convenience in Pocket HRMS). System will however prompt you if a more than 50% male employees are being appointed as Committee Members.

**Please note**- There has to be one Chairperson and at least two committee members in the E-Posh Committee.

* **Complaint Committee ID**- It is the email ID in which complaints will be received. This email ID will be shown to the Employees on their E-Posh dashboard in addition to the Complaint Raising functionality. Employees can use this email ID to directly get in touch with the Committee. The Email notifications of all the events will also be received on this email ID.
* **Complaint Auto Response**- If you keep the complaint auto response button on or enabled, then an automatic message will be triggered to the employees who raise the complaints. It is to acknowledge the receipt of their complaints.
* **Response Content-** It is the email content that is triggered automatically in response to the employees complaints when received. It is triggered when complaint auto response is kept on. You can edit/change the message by clicking on the ‘**Edit Icon’** on its right > **change the content > save it.**

<figure><img src="https://content.gitbook.com/content/-MXep_PEmh8mDPVWj49x/blobs/9iSissQUhtObtXWCMHI4/Unknown%20image" alt=""><figcaption></figcaption></figure>

![](https://content.gitbook.com/content/-MXep_PEmh8mDPVWj49x/blobs/5zTXZaX2T4SNnkaODOkw/Unknown%20image)

**Note-** In case you want to know in details about the Act against Sexual Harassment of Women at Workplace, Click on **‘Here’** on the top.

<figure><img src="https://content.gitbook.com/content/-MXep_PEmh8mDPVWj49x/blobs/rzXpjCtCnmlB9dCD1GFR/Unknown%20image" alt=""><figcaption></figcaption></figure>

**Step 4:** After filling up all details, click '**Save**'. The set-up will be done successfully.

<figure><img src="https://content.gitbook.com/content/-MXep_PEmh8mDPVWj49x/blobs/VCf2fEekRwJpb9fKAcLP/Unknown%20image" alt=""><figcaption></figcaption></figure>

**Link:**<https://cloud.pockethrms.com/Settings/Employee/ESSIndex?module=EPOSH&submodule=eposhsettings>

### 1.2 How to Allocate Roles to Employees in E-posh?

**Path:** Cloud Login > ESS Setting > Profile Info > Role Allocation > Select Module as E-Posh > Select Role > Search > Give Access.

**Step 1:** Log in to the '**Cloud**' portal and go to '**ESS Setting**' menu, Select '**Profile Info**' tab and then '**Role Allocation**'.

<figure><img src="https://content.gitbook.com/content/-MXep_PEmh8mDPVWj49x/blobs/IDviEGVGoYlMW24RN99f/Unknown%20image" alt=""><figcaption></figcaption></figure>

<figure><img src="https://content.gitbook.com/content/-MXep_PEmh8mDPVWj49x/blobs/pA9DBB27EiZnBmb2S4Ve/Unknown%20image" alt=""><figcaption></figcaption></figure>

**Step 3:** Select '**Module**' as '**E-Posh**' from the drop-down, select the desired '**Role**' to which you want to give access and click on ‘**Search**’.

<figure><img src="https://content.gitbook.com/content/-MXep_PEmh8mDPVWj49x/blobs/18YzXiusbkjnKLtIsaTx/Unknown%20image" alt=""><figcaption></figcaption></figure>

**Step 4:** Enable '**Access**', by ticking the required fields.

There are 3 categories to give access to:

* **Complaint List-** Access to complaint List is only given to the E-posh committee members and chairperson to check or track the progress of Complaints.
* **Dashboard-** Access to dashboard is compulsory as employees will raise complaint from their dashboard.
* **My Complaints-** Access to My complaints is compulsory as this will enable employees to view the status of their complaints.

  <figure><img src="https://content.gitbook.com/content/-MXep_PEmh8mDPVWj49x/blobs/FvDwgdypJM2Q1L0v9euv/Unknown%20image" alt=""><figcaption></figcaption></figure>

&#x20;                                                                          Or

<figure><img src="https://content.gitbook.com/content/-MXep_PEmh8mDPVWj49x/blobs/FVKtB1R3bn5mTNleKCPn/Unknown%20image" alt=""><figcaption></figcaption></figure>

**Step 5:** Then click on ‘**Save**’.

<figure><img src="https://content.gitbook.com/content/-MXep_PEmh8mDPVWj49x/blobs/RlkgCAcRmoGtfIonywji/Unknown%20image" alt=""><figcaption></figcaption></figure>

**Link:**<https://cloud.pockethrms.com/Settings/Employee/ESSIndex?module=Profile&submodule=RoleAllocation>

### 1.3 How to Raise a Complaint?

You can raise a complaint from your ESS portal for self or for any colleague of yours by following the path and process mentioned below:

**Path:** ESS portal login of self > E-posh > Dashboard > Dashboard Tab > Raise Voice > Fill In details (For Self or Co-worker) > Submit.

**Step 1:** Log in to the '**ESS**' portal of self, select '**E-posh**' and go to the '**Dashboard**'.

<figure><img src="https://content.gitbook.com/content/-MXep_PEmh8mDPVWj49x/blobs/KFt6jGfdVn27J7SQ1kNn/Unknown%20image" alt=""><figcaption></figcaption></figure>

**Step 2:** Click on **‘Dashboard’** tab and select '**Raise Voice**'.

![](https://content.gitbook.com/content/-MXep_PEmh8mDPVWj49x/blobs/XFmV7hUt2JbzxctwbImA/Unknown%20image)

**Step 3: Fill in Details:**

* **For Self-** It means the harassment incident has occurred with you and for that you want to raise a complaint.

If you want to raise complaint for self, then fill the details such as:

* **Hide my identity**- Tick on it, if you don’t want your name to be reflected in complaint or leave it unticked, if you want your name to be reflected in the complaint.
* **Offender(s)-** You can add one offender or multiple offenders name in this section
* **Type of Incident**- You can choose the type of incident from the list of incidents provided as per POSH Act. You can also check the details of types of incident by clicking on **‘i Icon’** in yellow beside it. Choose the type as per your need. You can also choose multiple types, in case your incident resembles with 2-3 types or all types mentioned in the option.
* **Date & Time**- mention the date and time when the incident has occurred with you.
* **Evidence Upload**- It is not a mandatory field, so you can either skip it or attach any proof or document to support your complaint.
* **Incident Details**- Here you can mention the details of incident occurred with you.

<figure><img src="https://content.gitbook.com/content/-MXep_PEmh8mDPVWj49x/blobs/naTN6SxtzwbQlLUI8iiJ/Unknown%20image" alt=""><figcaption></figcaption></figure>

* **Co-Worker-** Choosing co-worker specifies that you are raising the complaint on behalf of other worker with whom an incident has occurred and they are reluctant to complain due to fear, stress or other issue.

In case you want to raise the complaint for a co-worker, fill in the details such as:

* **Victim(s)-** Name of the victim or victims with whom harassment has occurred.
* **Offender(s)-** You can add one offender or multiple offenders name in this section
* **Type of Incident**- You can choose the type of incident from the list of incidents provided as per POSH Act. You can also check the details of types of incident by clicking on **‘i Icon’** in yellow beside it. Choose the type as per your need. You can also choose multiple types, in case your incident resembles with 2-3 types or all types mentioned in the option.
* **Date & Time**- mention the date and time when the incident has occurred with you.
* **Evidence Upload**- It is not a mandatory field, so you can either skip it or attach any proof or document to support your complaint.
* **Incident Details**- Here you can mention the details of incident occurred with your co-worker.

![](https://content.gitbook.com/content/-MXep_PEmh8mDPVWj49x/blobs/xdEd7RgYPZRmm0kdncrG/Unknown%20image)

**Step 4:** **Click** ‘**Submit**’ to raise the complaint.

<figure><img src="https://content.gitbook.com/content/-MXep_PEmh8mDPVWj49x/blobs/QphI73NZVDNSN6aP1twF/Unknown%20image" alt=""><figcaption></figcaption></figure>

### 1.4 How to Track My Complaints or the Complaints Raised?

**Path**: ESS portal login of self > E-Posh > My Complaints > My Complaints Tab >

**Step 1:** Log in to the '**ESS**' portal of self, select '**E-Posh**' menu and go to '**My Complaints**'.

<figure><img src="https://content.gitbook.com/content/-MXep_PEmh8mDPVWj49x/blobs/Ttn70afLW8WLp2cD8R8r/Unknown%20image" alt=""><figcaption></figcaption></figure>

**Step 2:** Go to ‘**My Complaints’** tab.

![](https://content.gitbook.com/content/-MXep_PEmh8mDPVWj49x/blobs/eGymmslePC8NAs2vCY2s/Unknown%20image)

**Step 3**: Here you will view all the details of your complaints, and take actions such as sending reminder to the E posh Committee members. This page has the following elements:

* You can view Open Tickets by clicking on open tickets, closed tickets or all tickets.
* You can ‘**Download**’ the report by clicking on the ‘**Report**’ icon
* You can also ‘**Sort**’ the complaints as per your requirement.
* Details of Complaint No., incident type, incident date, status of complaint, raise by / for self, agent assigned and action button to send reminder, or close or mark resolved for any complaint, etc.

![](https://content.gitbook.com/content/-MXep_PEmh8mDPVWj49x/blobs/lC511inN5pxWP7fWm2k5/Unknown%20image)

Step 4: After Clicking the **‘Action’** button you will land in a page where you can add the following:

* **Reply-** By clicking on it you can send a message the committee member regarding resolving the complaint, or as a reminder, etc.
* **Status**- You can change the status of complaint to ‘Open’, ‘**Close**’ or ‘**Resolved**’.
* **Back**- Click it to go back to the **‘My Complaints’** page.

![](https://content.gitbook.com/content/-MXep_PEmh8mDPVWj49x/blobs/hGp6neDYzgMxLI54v2eA/Unknown%20image)

### 1.5 How Can the Committee Members Track the Complains?

**Path**: ESS portal Login of Committee Member/Presiding Officer> E-Posh > Complaint List

**Step 1:** Log in to the '**ESS**' portal as a '**Committee Member/Presiding Officer**', Select '**E-Posh**' menu and go to '**Complaint List**'.

<figure><img src="https://content.gitbook.com/content/-MXep_PEmh8mDPVWj49x/blobs/ZPqhg4y6sgSiPhbnHDAy/Unknown%20image" alt=""><figcaption></figcaption></figure>

**Step 2:** Click on ‘**Complaint List’** Tab.

![](https://content.gitbook.com/content/-MXep_PEmh8mDPVWj49x/blobs/7CKT45ZAKHmiJ9sLCuVh/Unknown%20image)

**Step 3:** In this page you can view the details of complaints received and you can also edit/change actions being a committee member or chairperson. It has the following elements:

* You can view Open Tickets by clicking on open tickets, closed tickets or all tickets.
* You can ‘Download’ the report by clicking on the ‘Report’ icon
* You can also ‘Sort’ the complaints as per your requirement.
* Details of Complaint No., incident type, incident date, status of complaint, raise by, agent assigned and action button to send reply to the concerned employee.

![](https://content.gitbook.com/content/-MXep_PEmh8mDPVWj49x/blobs/MNJPQsdslAU6j6UHGAa2/Unknown%20image)

**Step 4:** You can change the ‘Agent Assigned’ by clicking on it. It can only be done when ‘Agent’ has not been assigned to any particular complaint.

* **In case You want to assign it to some other committee member**- Click Assign to then click on Assign button of the selected member.

![](https://content.gitbook.com/content/-MXep_PEmh8mDPVWj49x/blobs/YGvBDR3ON8VFeH4Gzqt7/Unknown%20image)

* **In Case you want to assign the case to self**- Click on Self assign.

![](https://content.gitbook.com/content/-MXep_PEmh8mDPVWj49x/blobs/OxCMRnPpJoGzYYMh6m9B/Unknown%20image)

**Step 5:** In case you click the ‘Action Button’, you can do the following:

![](https://content.gitbook.com/content/-MXep_PEmh8mDPVWj49x/blobs/Gt7ngYIy6xYXnmJXnmpb/Unknown%20image)

### 1.6 What is Complaint Timeline?

Complaint Timeline showcases the complaints based on 3 filter. You can filter the complaints by adding the Complaint ID, or agent name in activity by, or Events.

**Path:** ESS portal Login of Committee Member/Presiding Officer > E-Posh > Complaint List > Complaint Timeline > Filter as per your need > Search.

**Step 1:** Log in to the '**ESS**' portal as a '**Committee Member/Presiding Officer**', Select '**E-Posh**' and go to '**Complaint List**'.

<figure><img src="https://content.gitbook.com/content/-MXep_PEmh8mDPVWj49x/blobs/ZPqhg4y6sgSiPhbnHDAy/Unknown%20image" alt=""><figcaption></figcaption></figure>

**Step 3:** Select '**Complaint Timeline**'.

![](https://content.gitbook.com/content/-MXep_PEmh8mDPVWj49x/blobs/lisCE2LdSK8eG5PvX7IK/Unknown%20image)

**Step 4:** '**Filter as per your need**' and click '**Search**'.

* Complaint ID- Here, you can put the complaint Id number and click on search to view the details of that particular complain.

<figure><img src="https://content.gitbook.com/content/-MXep_PEmh8mDPVWj49x/blobs/zCeOwiAzByniLQSDYBfo/Unknown%20image" alt=""><figcaption></figcaption></figure>

* Activity By- Here, you can add the committee member name to view the details of the complaint.

<figure><img src="https://content.gitbook.com/content/-MXep_PEmh8mDPVWj49x/blobs/xkLN5dKsqMzy4iVLmEGs/Unknown%20image" alt=""><figcaption></figcaption></figure>

* **Event-** Here, you can add the events from the drop-down which is either- ‘Created’, ‘Assigned’ or ‘Archived’ and click on ‘Search’.

![](https://content.gitbook.com/content/-MXep_PEmh8mDPVWj49x/blobs/tYi39W5mkhKuXfk6i7Gj/Unknown%20image)

For any queries, contact <support@pockethrms.com>


# Statutory Bonus Guide

### Statutory Bonus – Step-by-Step User Guide

Statutory Bonus is a mandatory benefit under the [Payment of Bonus Act, 1965](https://clc.gov.in/clc/acts-rules/payment-bonus-act-0#19.%20Time-limit%20for%20payment%20of%20bonus) for eligible employees. Pocket HRMS automates this through a 0-click auto bonus workflow—once configured, the system calculates monthly bonus accruals, stores them for the full Calculation Period, and pays them automatically in the chosen payout month or during Full & Final Settlement.

How Monthly Bonus Works

* Monthly accrual uses the default statutory formula: (Earned Basic + Earned DA) × 8.33%
* This formula is configurable based on company policy.
* Accruals are stored every month until payout.
* If an employee leaves before the payout month, the system uses the stored accruals to automatically pay the applicable bonus in Full & Final Settlement.

One-Time Setup Steps (At a Glance)

1. Enable Statutory Bonus – Activate the feature.
2. Select Accrual Component – Used for monthly bonus calculation.
3. Define Calculation Period – Months during which bonus accrues.
4. Select Payout Component – Used to pay the total bonus.
5. Choose Payout Month – Month in which bonus will be released.

<figure><img src="https://4282324958-files.gitbook.io/~/files/v0/b/gitbook-x-prod.appspot.com/o/spaces%2F-MXep_PEmh8mDPVWj49x%2Fuploads%2FInhQEYa9Etw2yGp5oJe4%2Fimage.png?alt=media&amp;token=98cd1836-b661-4434-9c0e-acf3c6bdcbda" alt=""><figcaption></figcaption></figure>

### How to Configure and Manage Statutory Bonus?

Follow the steps below to configure statutory bonus:

**Step 1:** Statutory Bonus Setup To configure the bonus settings, you must complete the following actions:

* Enable Statutory Bonus Calculation to activate the feature.
* Select the Accrual Component to determine how the bonus is accumulated.
* Define the Calculation Period to establish the specific timeframe for the bonus cycle.
* Select the Payout Component to designate the salary head for the payment.
* Select the Payout Month to schedule when the bonus will be disbursed.

**Step 2:** Accrual in Monthly Salary

**Step 3:** Bonus in the Payout Month

**Step 4:** Statutory Bonus in Full & Final Settlement

**Explanations:**

### Step 1: Statutory Bonus Setup

&#x20;Path: [Cloud → Settings → Payroll → Pay Settings → Statutory Bonus](https://cloud.pockethrms.com/Settings/Employee/Index?module=payroll\&submodule=StatutoryBonus)

Here you will find the configuration panel used to define how the Statutory Bonus will be accrued and paid.

<figure><img src="https://4282324958-files.gitbook.io/~/files/v0/b/gitbook-x-prod.appspot.com/o/spaces%2F-MXep_PEmh8mDPVWj49x%2Fuploads%2FVbOlCwXUEtZfX9EB2aSr%2Fimage.png?alt=media&amp;token=51f79864-2763-49c6-94ac-c0a3b17a7e98" alt=""><figcaption></figcaption></figure>

**Enable Statutory Bonus Calculation:**

·         Turn ON the toggle “Apply Statutory Bonus” to begin configuration.

·         This enables the system to start calculating monthly bonus accruals based on your settings.

·        Please note that the effect will take place from the next payroll after enabling the setting.

<figure><img src="https://4282324958-files.gitbook.io/~/files/v0/b/gitbook-x-prod.appspot.com/o/spaces%2F-MXep_PEmh8mDPVWj49x%2Fuploads%2FNMUktLHwmor1756UAUyW%2Fimage.png?alt=media&amp;token=b9b5d953-3117-4047-8c78-2a39a310e1e3" alt=""><figcaption></figcaption></figure>

**Select the Accrual Component:**&#x20;

Choose the component that will be used to accrue monthly Statutory Bonus values.

<figure><img src="https://4282324958-files.gitbook.io/~/files/v0/b/gitbook-x-prod.appspot.com/o/spaces%2F-MXep_PEmh8mDPVWj49x%2Fuploads%2FDcm5KSZiRxNDQ9EUMOut%2Fimage.png?alt=media&amp;token=ec4fab43-efbf-407e-96c3-34f2dd232619" alt=""><figcaption></figcaption></figure>

Important Notes

* This component must be created in:\
  Path: [Cloud → Settings → Payroll → Payroll Components → Earnings](https://cloud.pockethrms.com/Settings/Employee/Index?module=payroll\&submodule=salarycomponent)
* It must have NO default behaviours enabled, since it is only meant to accrue the amount and not pay it.

&#x20;

<figure><img src="https://4282324958-files.gitbook.io/~/files/v0/b/gitbook-x-prod.appspot.com/o/spaces%2F-MXep_PEmh8mDPVWj49x%2Fuploads%2FCjv4QLOeRXgBFcKclyLC%2Fimage.png?alt=media&amp;token=d7f4c92e-ed6c-4cd2-8854-bf0d967c8cad" alt=""><figcaption></figcaption></figure>

**Accrual Formula Configuration**

·  Standard Statutory Bonus formula used in this guide: **(Earned Basic + Earned DA) × 8.33%**

·         This is **configurable** as per your organization’s policy.

·  Example configuration: **(EARNEDBASIC + EARNEDDA) \* 0.0833**

·  Configure the formula at:\
Path: [Cloud → Settings → Payroll → Salary Structure → Earning Formula](https://cloud.pockethrms.com/Settings/Employee/Index?module=payroll\&submodule=SalaryStructure)

·  Apply it to **all relevant categories** so the system can:

·         Compute the bonus **monthly**

·         **Store it as accrual** (not included in Gross)

·        **Pay it only in the payout month**.

<figure><img src="https://4282324958-files.gitbook.io/~/files/v0/b/gitbook-x-prod.appspot.com/o/spaces%2F-MXep_PEmh8mDPVWj49x%2Fuploads%2FWwVxDyONCL65HJ4K5QNw%2Fimage.png?alt=media&amp;token=05cb5a77-1cca-47d1-a2a7-4aa37d32b4a8" alt=""><figcaption></figcaption></figure>

**Define the Calculation Period**

·         Select the months for which bonus will accrue.

·         Example: *Nov (Previous Year) to Oct (Current Year)* → *Nov 2024 to Oct 2025*.

·         The system will auto-calculate monthly bonus for all payrolls processed within this period.

<figure><img src="https://4282324958-files.gitbook.io/~/files/v0/b/gitbook-x-prod.appspot.com/o/spaces%2F-MXep_PEmh8mDPVWj49x%2Fuploads%2F7tHRUSOtpwgaiwX4Zn8q%2Fimage.png?alt=media&amp;token=0ee74477-4fa4-4211-ace0-dc6087555fe7" alt=""><figcaption></figcaption></figure>

**Select the Payout Component:**

This component is responsible for paying out the statutory bonus by summing all accrued values during the set calculation period (refer example period).

<figure><img src="https://4282324958-files.gitbook.io/~/files/v0/b/gitbook-x-prod.appspot.com/o/spaces%2F-MXep_PEmh8mDPVWj49x%2Fuploads%2F1MGn1ZW9nMhMK5b3ZZXf%2Fimage.png?alt=media&amp;token=978aa756-86e3-4000-9ac3-e20da5175bd9" alt=""><figcaption></figcaption></figure>

**Required Behaviours for the Payout Component**

Enable the following ONLY:

* Include Gross Pay
* Tax
* Include for ETDS

&#x20;

<figure><img src="https://4282324958-files.gitbook.io/~/files/v0/b/gitbook-x-prod.appspot.com/o/spaces%2F-MXep_PEmh8mDPVWj49x%2Fuploads%2FgESpB5NTCuFsZXbeEMuX%2Fimage.png?alt=media&amp;token=37cb19a3-9419-415e-8f3f-c7cb568a0b27" alt=""><figcaption></figcaption></figure>

**Payout Component Calculation Settings** (for all the relevant categories)

* Type: Direct
* Rounding: 1 Rupee

This ensures accurate summation during the payout month.

<figure><img src="https://4282324958-files.gitbook.io/~/files/v0/b/gitbook-x-prod.appspot.com/o/spaces%2F-MXep_PEmh8mDPVWj49x%2Fuploads%2FiGLdshchI5osn2JblriQ%2Fimage.png?alt=media&amp;token=df11737e-7280-48c6-a824-1d5aee1f2b9e" alt=""><figcaption></figcaption></figure>

**Select the Payout Month**

·         Choose the month in which the total bonus accrued will be paid.

·         Example: If bonus accrues from Nov (Previous Year) to Oct (Current Year), it will be paid in Nov of the Current Year.

·         As per [The Payment of Bonus Act, 1965](https://clc.gov.in/clc/acts-rules/payment-bonus-act-0#19.%20Time-limit%20for%20payment%20of%20bonus), bonus is payable within eight months from the close of the accounting year.

·         After selecting all fields, click Save to finalize the configuration.

<figure><img src="https://4282324958-files.gitbook.io/~/files/v0/b/gitbook-x-prod.appspot.com/o/spaces%2F-MXep_PEmh8mDPVWj49x%2Fuploads%2FUrHEMtfvr4yhUvpXB9C0%2Fimage.png?alt=media&amp;token=3b31d139-6469-4053-8a96-3d71b5d04c8e" alt=""><figcaption></figcaption></figure>

### Step 2: Accrual in Monthly Salary

To verify monthly auto-accrual of the bonus, open the employee salary page:\
Path: [Employee Profile → Payroll → Salary Details](https://cloud.pockethrms.com/Employee/employee/Profile?employeeID=7731\&module=profile\&empstatus=1)

You will see the **Accrual Component** showing the monthly computed bonus amount (as seen in the example below).\
\
Please note:

·         It is **NOT added to Gross**

·         It is **NOT paid monthly**

·         It is **ONLY stored as an accrual**

This continues automatically for every month in the Calculation Period.

<figure><img src="https://4282324958-files.gitbook.io/~/files/v0/b/gitbook-x-prod.appspot.com/o/spaces%2F-MXep_PEmh8mDPVWj49x%2Fuploads%2FbFB1CpWjSJ0XLMUseS2x%2Fimage.png?alt=media&amp;token=dff45556-cd56-410f-a2ca-bd7dad7f8156" alt=""><figcaption></figcaption></figure>

### Step 3: Bonus in the Payout Month

In the selected pay-out month, the system automatically:

·         Displays the **Payout Component** (e.g., Statutory Bonus, as seen in the example below)

·         Shows the **total accumulated bonus amount** for the entire period

·         Adds the amount to:

o    **Gross Pay**

o    **Net Salary (paid to employee)**

o    **Taxable Income & ETDS**

No manual action is required.

<figure><img src="https://4282324958-files.gitbook.io/~/files/v0/b/gitbook-x-prod.appspot.com/o/spaces%2F-MXep_PEmh8mDPVWj49x%2Fuploads%2F3tC2w0Q1rbbhOgfHZPjK%2Fimage.png?alt=media&amp;token=54160eb8-c7bc-4189-bb0e-e576cc79e55b" alt=""><figcaption></figcaption></figure>

### Step 4: Statutory Bonus in Full & Final Settlement

If an employee resigns before the payout month, Pocket HRMS will still pay them the bonus for the months they have completed in the accrual cycle.

**Example:**\
Employee resigns in June → completed 8 months → system auto-calculates bonus for those 8 months and displays it as **FnF Bonus** on the Full & Final Settlement screen.

Automatic FnF Bonus Calculation

* System sums all accrued bonus months up to the exit date.
* Shows the total as FnF Bonus during FnF processing (as seen in the example below).

<figure><img src="https://4282324958-files.gitbook.io/~/files/v0/b/gitbook-x-prod.appspot.com/o/spaces%2F-MXep_PEmh8mDPVWj49x%2Fuploads%2Fb4vf6c46GaQBTnz2VjGX%2Fimage.png?alt=media&amp;token=7dd506b5-6f65-4424-84e0-a7d0ebc516ad" alt=""><figcaption></figcaption></figure>

**FnF Bonus Component Requirements**

Create a new component with:

·         **Field Name:** `FNFBNS`

·         **Label Name:** **FnF Bonus** (label can be renamed later, but field name must remain `FNFBNS`)

Enable these behaviours:

·         Monthly Input

·         Full and Final Settlement

·         Tax

·         Include Gross Pay

·        Include for ETDS

&#x20;

<figure><img src="https://4282324958-files.gitbook.io/~/files/v0/b/gitbook-x-prod.appspot.com/o/spaces%2F-MXep_PEmh8mDPVWj49x%2Fuploads%2FmyzAE5NC5VbmFTEYrJuQ%2Fimage.png?alt=media&amp;token=979e3ab4-7e27-4da1-8701-dd32d073a339" alt=""><figcaption></figcaption></figure>

Calculation Settings (for all the relevant categories):

* Type: Direct
* Rounding: 1 Rupee

<figure><img src="https://4282324958-files.gitbook.io/~/files/v0/b/gitbook-x-prod.appspot.com/o/spaces%2F-MXep_PEmh8mDPVWj49x%2Fuploads%2FFNu1oeWbErK33VGhZQen%2Fimage.png?alt=media&amp;token=d8dfe9d0-1ced-4e3f-85b4-895042b9b637" alt=""><figcaption></figcaption></figure>

**Scenario 1: Employee is Active in the Payout Month**

**Bonus Calculation Period:** November 2024 → October 2025**Accrual Formula:** (Earned Basic + Earned DA) × 8.33%**Bonus Payout Month:** November 2025

**What is happening here?**

* Every month, the system calculates bonus based on that month’s Earned Basic + Earned DA.
* The monthly bonus amount is **stored as accrual** and **not paid** during the year.
* In the payout month (Nov 2025), the system **adds up all accrued months** and pays the full amount in salary.
* Since the employee is active, the bonus is paid through **regular monthly salary**.

| **Month** | **Earned Basic** | **Earned DA** | **Accrued Bonus** | **Paid Out Bonus** |
| --------- | ---------------- | ------------- | ----------------- | ------------------ |
| Nov-24    | 50000            | 25000         | **6248**          |                    |
| Dec-24    | 50000            | 25000         | **6248**          |                    |
| Jan-25    | 50000            | 25000         | **6248**          |                    |
| Feb-25    | 50000            | 25000         | **6248**          |                    |
| Mar-25    | 50000            | 25000         | **6248**          |                    |
| Apr-25    | 50000            | 25000         | **6248**          |                    |
| May-25    | 50000            | 25000         | **6248**          |                    |
| Jun-25    | 55000            | 27500         | **6872**          |                    |
| Jul-25    | 55000            | 27500         | **6872**          |                    |
| Aug-25    | 55000            | 27500         | **6872**          |                    |
| Sep-25    | 55000            | 27500         | **6872**          |                    |
| Oct-25    | 55000            | 27500         | **6872**          |                    |
| Nov-25    | 55000            | 27500         | 6872              | **78096**          |

**Scenario 2: Employee Exits in June 2025 (FnF Scenario)**

**Bonus Calculation Period:** November 2024 → October 2025**Accrual Formula:** (Earned Basic + Earned DA) × 8.33%**Bonus Payout Month:** November 2025

**What is happening here?**

* Employee exits before the payout month.
* As per Bonus Act, the employee must still receive bonus for the months worked.
* System automatically **totals accruals from Nov 2024 to June 2025** only.
* The amount appears as **FnF Bonus** during Full & Final Settlement.
* No values beyond June are considered because the employee has not worked in later months.

| **Month** | **Earned Basic** | **Earned DA** | **Accrued Bonus** | **Paid Out Bonus** |
| --------- | ---------------- | ------------- | ----------------- | ------------------ |
| Nov-24    | 50000            | 25000         | **6248**          |                    |
| Dec-24    | 50000            | 25000         | **6248**          |                    |
| Jan-25    | 50000            | 25000         | **6248**          |                    |
| Feb-25    | 50000            | 25000         | **6248**          |                    |
| Mar-25    | 50000            | 25000         | **6248**          |                    |
| Apr-25    | 50000            | 25000         | **6248**          |                    |
| May-25    | 50000            | 25000         | **6248**          |                    |
| Jun-25    | 55000            | 27500         | **6872**          | **50608**          |

For any queries, contact <support@pockethrms.com>


# HR Letter Acknowledgement

### **HR Letter Acknowledgement**

**Overview**

The **HR Letter Acknowledgement** feature in Pocket HRMS enables organizations to send official HR documents to employees and obtain their digital acknowledgment and signature. This ensures that employees confirm receipt and acceptance of important HR communications such as policies, letters, notices, or declarations.

Using this feature, HR teams can:

* Send HR letters to employees through the system
* Require employees to acknowledge documents before accessing them
* Capture employee signatures digitally
* Maintain a proper audit trail of acknowledged documents

The feature improves **compliance, transparency, and documentation tracking** while eliminating the need for manual signatures or physical paperwork.

### **How to Configure HR Letter Acknowledgement**

**Path**: [Cloud → Settings → HR Letter](https://cloud.pockethrms.com/Settings/Employee/Index?module=hr\&submodule=HRLetter)

**Step 1:** Navigate to **Cloud → Settings → HR Letter**.

![](https://content.gitbook.com/content/-MXep_PEmh8mDPVWj49x/blobs/YFuCDypsdljqvtfVxoLu/Unknown%20image)

**Step 2:** Click on **Add** to create a new HR Letter. Alternatively, click on the **three dots menu** on any existing HR Letter and select **Edit**.

![](https://content.gitbook.com/content/-MXep_PEmh8mDPVWj49x/blobs/4lKBRJOglow1Cd4phSsJ/Unknown%20image)

**Step 3:** Enable **Acknowledgement Required** by selecting **Yes**.Add a **Disclaimer Text** that will be shown to the employee before they acknowledge the document.

![](https://content.gitbook.com/content/-MXep_PEmh8mDPVWj49x/blobs/GWiWOIkSuuhU9zMhrjiF/Unknown%20image)

**Step 4:** Click **Update** and save the HR Letter.

<figure><img src="https://content.gitbook.com/content/-MXep_PEmh8mDPVWj49x/blobs/kJGgPazr5MhyADtwo43t/Unknown%20image" alt=""><figcaption></figcaption></figure>

### **How to Send Documents to Employees**

**Path**: [Cloud → Employee → Documents](https://cloud.pockethrms.com/Payroll/HRLetter/ViewTemplate)

**Step 1:** Navigate to **Cloud → Employee → Documents**.

![](https://content.gitbook.com/content/-MXep_PEmh8mDPVWj49x/blobs/aFbBLyIKp0iY2U9fc8T3/Unknown%20image)

**Step 2:** Select the following details:

* **Employee Status** (All / Live / Left)
* **Employee Category**
* **HR Letter** to be sent
* **Employee(s)** who should receive the letter

Click **Send Mail** to send the document to the selected employees.

![](https://content.gitbook.com/content/-MXep_PEmh8mDPVWj49x/blobs/3A4J1yd0yvjPhKyHq588/Unknown%20image)

### **How Employees Can Access the Letter**

Employees can access the letter through the following methods:

#### **Option 1: Through Email Notification**

Employees will receive an **email notification** informing them that a letter has been sent and requires acknowledgment.

They can click the **“Click here to Acknowledge”** button, which will redirect them to: **ESS → Profile → Other Details → Documents**

![](https://content.gitbook.com/content/-MXep_PEmh8mDPVWj49x/blobs/TKMTSUqkXIgM7eko0CBN/Unknown%20image)

#### **Option 2: Through ESS Notification**

Employees will also receive a **notification in the ESS portal** indicating that a document requires acknowledgment.

Clicking the notification will redirect them to: **ESS → Profile → Other Details → Documents**

![](https://content.gitbook.com/content/-MXep_PEmh8mDPVWj49x/blobs/OwaieRk6OSvlO3qEOH8s/Unknown%20image)

#### **Option 3: Manual Navigation**

Employees can manually navigate to:📍 **ESS → Profile → Other Details → Documents**

![](https://content.gitbook.com/content/-MXep_PEmh8mDPVWj49x/blobs/AcGc2UjmcCBck2wTOQGD/Unknown%20image)

### **How Employees Can Acknowledge and Sign the Letter**

**Step 1:** After navigating to **ESS → Profile → Other Details → Documents**, locate the received letter.

**Step 2:** Click **View & Acknowledge** against the letter.

![](https://content.gitbook.com/content/-MXep_PEmh8mDPVWj49x/blobs/QtkQRsExpOxF9Zyoq2LT/Unknown%20image)

**Step 3:** The system will display the **Disclaimer Text**.Click **Proceed** to continue.

![](https://content.gitbook.com/content/-MXep_PEmh8mDPVWj49x/blobs/2gnyjZ9CjspQed8R4qLl/Unknown%20image)

**Step 4:** The employee can view the HR Letter. After reading it, click **Add Signature**.

![](https://content.gitbook.com/content/-MXep_PEmh8mDPVWj49x/blobs/YNcrYEsU0Jegp2yjTILb/Unknown%20image)

**Step 5:** The system provides **three options to sign the document**:

* **Draw** – Sign using a drawing interface
* **Type** – Generate a signature by typing
* **Upload** – Upload a signature image

Once the signature is added, click **Create**.

![](https://content.gitbook.com/content/-MXep_PEmh8mDPVWj49x/blobs/Q22Efb9Ub1MjEBL5whiv/Unknown%20image)

![](https://content.gitbook.com/content/-MXep_PEmh8mDPVWj49x/blobs/CocFX53FpNaJLVTObxPq/Unknown%20image)

![](https://content.gitbook.com/content/-MXep_PEmh8mDPVWj49x/blobs/CocFX53FpNaJLVTObxPq/Unknown%20image)

**Step 6:** The employee can **resize and position the signature** on the letter.

Click **Finish & Sign** to complete the process.

![](https://content.gitbook.com/content/-MXep_PEmh8mDPVWj49x/blobs/8B2V98HhtIioE2xb51xM/Unknown%20image)

**Step 7:** After successful acknowledgment:

* The status will change to **Acknowledged**
* The **View & Acknowledge** button will be replaced with **Download**
* Employees can download the **PDF copy of the signed letter**

![](https://content.gitbook.com/content/-MXep_PEmh8mDPVWj49x/blobs/rA4fZbSxk61yfpIuIlN4/Unknown%20image)

![](https://content.gitbook.com/content/-MXep_PEmh8mDPVWj49x/blobs/27J24ioiTEK4ykrbyVQv/Unknown%20image)

### **How HR Can Check the Acknowledged Letter**

**Path:** Cloud → Employee → Employee List → Employee Profile → Profile Section → Employee Documents

**Step 1:** Navigate to:**Cloud → Employee → Employee List → Employee Profile → Profile Section → Employee Documents**

![](https://content.gitbook.com/content/-MXep_PEmh8mDPVWj49x/blobs/4rxYCbD7bXeSkQuJ222T/Unknown%20image)

**Step 2:** The acknowledged HR Letter will appear in this section.

HR can click **Download** to download the **PDF version of the letter along with the employee's signature**.

![](https://content.gitbook.com/content/-MXep_PEmh8mDPVWj49x/blobs/27J24ioiTEK4ykrbyVQv/Unknown%20image)

For any queries, contact <support@pockethrms.com>


# SmHRt Report Generation

### **Configure Custom Fields**

Every report in Pocket HRMS comes with a fixed set of fields within a system. **Configure Custom Fields** is a framework that lets you change that Field layout yourself, for a single report — without changing what the report data actually calculates.

**Important Note:** **Configure Custom Fields** is being rolled out in phases. It is currently available in the Attendance module, for the reports listed below, and is being extended to other reports/modules.

<figure><img src="https://4282324958-files.gitbook.io/~/files/v0/b/gitbook-x-prod.appspot.com/o/spaces%2F-MXep_PEmh8mDPVWj49x%2Fuploads%2FvNj5UZZArtJ2oP72Kalb%2FTABLE.png?alt=media&amp;token=ae822bbb-4b61-4360-969c-70d33ab64bb1" alt=""><figcaption></figcaption></figure>

**Before You Begin**

Make sure of the following:

* You are logged in to the Pocket HRMS Cloud Portal with access to the Reports section
* The report you want to configure shows a settings icon in its header
* The master fields you want to add are enabled in your company's Employee Profile Configurations.

### **How to Configure Custom Fields in a Report?**

**Path:** Cloud Portal > Reports > Select a Module > Click on the Settings Icon > Configure Custom Fields.

**Step 1:** Log in to the **Cloud Portal**, open **Reports**, select the **module** you need, and then select the **report** you want to configure before generating.

<figure><img src="https://4282324958-files.gitbook.io/~/files/v0/b/gitbook-x-prod.appspot.com/o/spaces%2F-MXep_PEmh8mDPVWj49x%2Fuploads%2FKRxxP5CIBPg73FYtoXlj%2FFrame%201%20-%202026-07-29T164317.600.png?alt=media&amp;token=3112ba31-c789-4dff-9a76-bbede9e6e64d" alt="" width="346"><figcaption></figcaption></figure>

**Step 2:** Click the **settings icon** in the report header to open the **Configure Custom Fields window.**

<figure><img src="https://4282324958-files.gitbook.io/~/files/v0/b/gitbook-x-prod.appspot.com/o/spaces%2F-MXep_PEmh8mDPVWj49x%2Fuploads%2FdQSOOJqFMPfmP4U1F4UY%2FFrame%201%20-%202026-07-29T164408.943.png?alt=media&amp;token=738a6a01-8ec9-4b4d-897a-62f5fecafd32" alt=""><figcaption></figcaption></figure>

**Step 3:** Add the **fields** you want from the Available Master Fields panel on the left side. Click the **plus sign** against a field, or **drag** the field towards right panel, to add it to your layout.

<figure><img src="https://4282324958-files.gitbook.io/~/files/v0/b/gitbook-x-prod.appspot.com/o/spaces%2F-MXep_PEmh8mDPVWj49x%2Fuploads%2FI6dNx7yUs2ooxIwyxcK6%2FFrame%201%20-%202026-07-29T165038.701.png?alt=media&amp;token=c1421d3a-2836-4195-aceb-d129d3b6c067" alt=""><figcaption></figcaption></figure>

**Step 4:** Use the **search box** above the panels to find a particular field, or click **Add all fields** to add every available field in one action.

<figure><img src="https://4282324958-files.gitbook.io/~/files/v0/b/gitbook-x-prod.appspot.com/o/spaces%2F-MXep_PEmh8mDPVWj49x%2Fuploads%2FtbTi5lE5zBw8ZKkvCE8A%2FFrame%201%20-%202026-07-29T165320.032.png?alt=media&amp;token=46af4470-7bee-457f-82f5-8a3a51a80a7c" alt=""><figcaption></figcaption></figure>

**Step 5:** Check your layout in the **Selected Right panel**. Each row shows the position number, the Field name and a source tag, and the **count above the panel** shows how many fields you have selected.

<figure><img src="https://4282324958-files.gitbook.io/~/files/v0/b/gitbook-x-prod.appspot.com/o/spaces%2F-MXep_PEmh8mDPVWj49x%2Fuploads%2FupPY0m81v2DimrWGLTnW%2FFrame%201%20-%202026-07-29T165649.380.png?alt=media&amp;token=363f090f-cbc6-48f1-b571-89df7845512e" alt=""><figcaption></figcaption></figure>

**Step 6:** **Drag a row by its handle** to move a field row up or down. The position numbers update as you move it.

<figure><img src="https://4282324958-files.gitbook.io/~/files/v0/b/gitbook-x-prod.appspot.com/o/spaces%2F-MXep_PEmh8mDPVWj49x%2Fuploads%2FJaJIDSwx6fVHkgJbgwVU%2FFrame%201%20-%202026-07-29T165803.019.png?alt=media&amp;token=57c43c9b-03c8-4e13-8abb-c585b22f9fb4" alt=""><figcaption></figcaption></figure>

**Step 7:** Click a **field name to rename it**, and type the heading you want in its place.

<figure><img src="https://4282324958-files.gitbook.io/~/files/v0/b/gitbook-x-prod.appspot.com/o/spaces%2F-MXep_PEmh8mDPVWj49x%2Fuploads%2FW20oiriM2Av8usF4MO7G%2FFrame%201%20-%202026-07-29T170001.569.png?alt=media&amp;token=f3acaf2c-692c-46c6-9eea-94ae1581acca" alt=""><figcaption></figcaption></figure>

**Step 8:** Click the **cross** at the right edge of a row to **remove** that field. To clear the entire selection and start again, click **Reset (Predefined fields will be reflected)**.

<figure><img src="https://4282324958-files.gitbook.io/~/files/v0/b/gitbook-x-prod.appspot.com/o/spaces%2F-MXep_PEmh8mDPVWj49x%2Fuploads%2FtiVRYanaw5yRA2NdbPDV%2FFrame%201%20-%202026-07-29T170146.429.png?alt=media&amp;token=07b5aae9-8eb2-4eee-abbe-eac747fc32e9" alt=""><figcaption></figcaption></figure>

**Step 9:** Click **Save configuration** to apply the layout. To close the window without saving, click **Cancel** instead.

<figure><img src="https://4282324958-files.gitbook.io/~/files/v0/b/gitbook-x-prod.appspot.com/o/spaces%2F-MXep_PEmh8mDPVWj49x%2Fuploads%2FWt04ZN2RGpkadIkR1rVO%2FFrame%201%20-%202026-07-29T170509.222.png?alt=media&amp;token=62606b0d-addd-425d-8bdf-ca78446ed872" alt="" width="375"><figcaption></figcaption></figure>

<figure><img src="https://4282324958-files.gitbook.io/~/files/v0/b/gitbook-x-prod.appspot.com/o/spaces%2F-MXep_PEmh8mDPVWj49x%2Fuploads%2FR5WoJx5wCnoZfavx7XsG%2FFrame%201%20-%202026-07-29T170537.525.png?alt=media&amp;token=635a4d6a-da6b-462e-855b-7efaea1d89c4" alt="" width="375"><figcaption></figcaption></figure>

**Available Fields:** Fields are arranged in groups, and each field shows its display name with the technical name below it.

**Help and Reference:** The Help and Reference link at the top of the window opens the full reference guide for this feature on pocket docs.

### **Benefits Of Custom Fields Configuration:**

* **One-time setup** — configure the layout once, and every later download uses it automatically.
* **Consistent across the company** — anyone who downloads that report gets the same fields, order and headings.
* **No second export** — employee details come directly from Profile Config, so no manual matching.
* **Your own headings** — rename any fields to what your team, auditor or bank actually calls it.
* **A cleaner file** — fields you never use can be dropped from the download entirely.
* **Correct formatting** — each field can carry its own Excel format for required fields.
* **Safe to try** — with no saved layout the report behaves as always, and a saved layout can be removed at any time.

**For any queries, contact** <support@pockethrms.com>


# People Connect And Dashboard Attendance Setting

### **People Connect And Dashboard Attendance Setting**

The **People Connect & Dashboard Attendance Setting** page controls two things on the ESS dashboard and mobile app — the **People Connect** employee directory and the **Team Attendance** card.

Both are set up on the same page, and each one works on its own. Turning one on or off does not affect the other.

**This helps in:**

* Controlling what employees see on the ESS dashboard from one page
* Showing the employee directory only to selected business units or categories
* Showing team attendance only for the teams you create

**Open the Setting Page**

**Path: Cloud → ESS Settings → Profile Info → People Connect & Dashboard Attendance**

1. Log in to the Pocket HRMS Cloud Portal and click **ESS Settings** on the left menu.
2. Click **Profile Info**.

<figure><img src="https://4282324958-files.gitbook.io/~/files/v0/b/gitbook-x-prod.appspot.com/o/spaces%2F-MXep_PEmh8mDPVWj49x%2Fuploads%2FlPA9LFgDyHvATw1Ldx78%2FFrame%201%20(94).png?alt=media&amp;token=db6586c0-6185-44ef-b6b9-da4c9fcbc943" alt="" width="239"><figcaption></figcaption></figure>

3. Click **People Connect & Dashboard Attendance**.

<figure><img src="https://4282324958-files.gitbook.io/~/files/v0/b/gitbook-x-prod.appspot.com/o/spaces%2F-MXep_PEmh8mDPVWj49x%2Fuploads%2FwidFnMFpomzn6vp4Uyg4%2FFrame%201%20(95).png?alt=media&amp;token=78749462-7cb1-429d-af0f-1db7ca8decb5" alt=""><figcaption></figcaption></figure>

The page opens with two sections — **People Connect** and **Team Attendance**.

### **People Connect Setup**

This section decides who can open the **People Connect** directory on ESS, and which employees they can see in it.

**Step 1: Turn On the People Directory**

Turn on **Allow Access to People Directory**.

The page shows **People Connect is activated on ESS** when it is on, and **People Connect is deactivated** when it is off.

<figure><img src="https://4282324958-files.gitbook.io/~/files/v0/b/gitbook-x-prod.appspot.com/o/spaces%2F-MXep_PEmh8mDPVWj49x%2Fuploads%2Fnc7QTw0YhOz51WNSNhGd%2FFrame%201%20(96).png?alt=media&amp;token=2b6f6c6d-fe38-47fc-9611-cdd34189c2ed" alt=""><figcaption></figcaption></figure>

**Step 2: Choose Who Can Be Seen**

Under **Visibility Access**, choose one of the three options below.

| **Option**             | **Employees that can be seen**                  |
| ---------------------- | ----------------------------------------------- |
| **All Employees**      | Every active employee in the company            |
| **Business Unit Wise** | Only employees of the business units you select |
| **Category Wise**      | Only employees of the categories you select     |

<figure><img src="https://4282324958-files.gitbook.io/~/files/v0/b/gitbook-x-prod.appspot.com/o/spaces%2F-MXep_PEmh8mDPVWj49x%2Fuploads%2FYime3VWqy42V0ixSh2VU%2FFrame%201%20(97).png?alt=media&amp;token=bc049ea9-4eea-47c9-ae64-cf1138f542c2" alt=""><figcaption></figcaption></figure>

**Step 2.1: All Employees**

No further setup is needed. The directory shows every active employee.

<figure><img src="https://4282324958-files.gitbook.io/~/files/v0/b/gitbook-x-prod.appspot.com/o/spaces%2F-MXep_PEmh8mDPVWj49x%2Fuploads%2FBz3UruX138Shw0TXc4oN%2FFrame%201%20(98).png?alt=media&amp;token=f63df13a-e0b3-40ba-8995-2ca326754456" alt=""><figcaption></figcaption></figure>

**Step 2.2: Business Unit Wise**

a. Under **Business Unit Source**, choose **Department**, **Location** or **Branch**.

<figure><img src="https://4282324958-files.gitbook.io/~/files/v0/b/gitbook-x-prod.appspot.com/o/spaces%2F-MXep_PEmh8mDPVWj49x%2Fuploads%2FoKFkGktqJwSjQt4APGAE%2FFrame%201%20(100).png?alt=media&amp;token=40145f88-d644-43c4-b2b4-be1789a517ca" alt=""><figcaption></figcaption></figure>

b. Under **Select Business Units for People Connect**, tick the units you want to include. Use **Search** to find a unit, or **Select All** and **Clear All** to tick or untick the whole list.

<figure><img src="https://4282324958-files.gitbook.io/~/files/v0/b/gitbook-x-prod.appspot.com/o/spaces%2F-MXep_PEmh8mDPVWj49x%2Fuploads%2F409My6aBh0qxCVjlTiFI%2FFrame%201%20-%202026-08-05T173316.084.png?alt=media&amp;token=28021dbb-fbc8-49a6-9fcf-f2d19834d184" alt=""><figcaption></figcaption></figure>

**Step 2.3: Category Wise**

Under **Select Categories for People Connect**, tick the categories you want to include.&#x20;

<figure><img src="https://4282324958-files.gitbook.io/~/files/v0/b/gitbook-x-prod.appspot.com/o/spaces%2F-MXep_PEmh8mDPVWj49x%2Fuploads%2Fi5omasMzMSn3m6PuGfH7%2FFrame%201%20-%202026-08-05T173604.670.png?alt=media&amp;token=48166d6e-5388-4d6b-a6dd-03af1ad8843e" alt=""><figcaption></figcaption></figure>

Use **Search** to find a category, or **Select All** and **Clear All** to tick or untick the whole list.

<figure><img src="https://4282324958-files.gitbook.io/~/files/v0/b/gitbook-x-prod.appspot.com/o/spaces%2F-MXep_PEmh8mDPVWj49x%2Fuploads%2F3z6v555H27KhMkEPAudU%2FFrame%201%20-%202026-08-05T174050.482.png?alt=media&amp;token=e682f78c-f689-4a43-853b-25d745ea1089" alt=""><figcaption></figcaption></figure>

### **Team Attendance Setup**

This section decides whether the **Team Attendance** card appears, and which teams it covers.

**Step 1: Turn On Team Attendance**

Turn on **Activate team attendance on ESS & Mobile app**.

The page shows **Team attendance is activated on ESS & Mobile app** when it is on, and **Team attendance is deactivated** when it is off.

**Important:** The rest of this section stays greyed out until this is turned on.

<figure><img src="https://4282324958-files.gitbook.io/~/files/v0/b/gitbook-x-prod.appspot.com/o/spaces%2F-MXep_PEmh8mDPVWj49x%2Fuploads%2FJ8HZsKCzT1f9Mef0lFPM%2FFrame%201%20-%202026-08-05T174453.213.png?alt=media&amp;token=962127c8-f5f5-4368-9b8c-cbdc40fb9153" alt=""><figcaption></figcaption></figure>

**Step 2: Create and Manage Teams**

**Step 2.1: Create a Team**

a. Under **Create Team**, choose the **Business Unit**. You can choose only one, and every team is created from it. For example, if you choose **Department**, all teams are created department wise.

<figure><img src="https://4282324958-files.gitbook.io/~/files/v0/b/gitbook-x-prod.appspot.com/o/spaces%2F-MXep_PEmh8mDPVWj49x%2Fuploads%2FTBeWf992VdxOKAAuqGkv%2FFrame%201%20-%202026-08-05T174623.226.png?alt=media&amp;token=1cdfd8a4-ac52-4c8b-886a-9d5d4c30cc20" alt=""><figcaption></figcaption></figure>

b. Under **Business Value**, tick the values you want. Use **Search** to find a value, or **Select All** and **Clear All** to tick or untick the whole list.

<figure><img src="https://4282324958-files.gitbook.io/~/files/v0/b/gitbook-x-prod.appspot.com/o/spaces%2F-MXep_PEmh8mDPVWj49x%2Fuploads%2FgQQAV1hVuzW0XCxq7II9%2FFrame%201%20-%202026-08-05T174643.694.png?alt=media&amp;token=c24c882a-46e8-4362-aea0-2992bed432f6" alt=""><figcaption></figcaption></figure>

c. Click **+ Create**. The values you ticked are added to the **Created Teams** list.

<figure><img src="https://4282324958-files.gitbook.io/~/files/v0/b/gitbook-x-prod.appspot.com/o/spaces%2F-MXep_PEmh8mDPVWj49x%2Fuploads%2FpcXeR7HiN1EoRPok3b2Y%2FFrame%201%20-%202026-08-05T174654.926.png?alt=media&amp;token=ad3fed60-346b-43ca-a344-70fea6ba9595" alt=""><figcaption></figcaption></figure>

**Important:** Once teams exist, you cannot change the **Business Unit**. Delete all the teams first.

**Step 2.2: Set the Team Attendance Options**

Tick **Enable team attendance** to show attendance data.

<figure><img src="https://4282324958-files.gitbook.io/~/files/v0/b/gitbook-x-prod.appspot.com/o/spaces%2F-MXep_PEmh8mDPVWj49x%2Fuploads%2FJNGhP8J683tJtskSCbVR%2FFrame%201%20-%202026-08-05T174842.435.png?alt=media&amp;token=0b319a4a-1fb0-4e87-88ba-676516ae080d" alt=""><figcaption></figcaption></figure>

Tick **Enable showing punches on dashboard** to show punch timings along with each employee's attendance status. When this is off, only the status is shown — **Present**, **Absent**, **On Leave** or **On Duty** — without any punch timings.

<figure><img src="https://4282324958-files.gitbook.io/~/files/v0/b/gitbook-x-prod.appspot.com/o/spaces%2F-MXep_PEmh8mDPVWj49x%2Fuploads%2F6CdReCvOPUDsfwt5ZGJi%2FFrame%201%20-%202026-08-05T174850.737.png?alt=media&amp;token=f4444c41-2187-4d68-9519-a154c5890293" alt=""><figcaption></figcaption></figure>

**Important:** If you untick **Enable showing punches on dashboard** and click **Save**, **Show Punches** is turned off for every team in the list. To control punch timings for one team only, use the **Show Punches** toggle on that team's row.

**Step 2.3: Check the Created Teams List**

The **Created Teams** list shows every team you have added.

| **Column**          | **Description**                               |
| ------------------- | --------------------------------------------- |
| **Business Unit**   | The business unit the team is based on        |
| **Business Value**  | The value within that business unit           |
| **Team Attendance** | Turns attendance data on or off for that team |
| **Show Punches**    | Turns punch timings on or off for that team   |
| **Actions**         | Holds the delete icon                         |

<figure><img src="https://4282324958-files.gitbook.io/~/files/v0/b/gitbook-x-prod.appspot.com/o/spaces%2F-MXep_PEmh8mDPVWj49x%2Fuploads%2F1MGG2Z8f9oN0oKfKhqW0%2FFrame%201%20-%202026-08-05T175108.500.png?alt=media&amp;token=d959df01-d41f-4e10-bf89-79551322a642" alt=""><figcaption></figcaption></figure>

**Step 2.4: Delete a Team**

Click the delete icon in the **Actions** column.

<figure><img src="https://4282324958-files.gitbook.io/~/files/v0/b/gitbook-x-prod.appspot.com/o/spaces%2F-MXep_PEmh8mDPVWj49x%2Fuploads%2FjGZRuY3zm5A6dU5Lo8OQ%2FFrame%201%20-%202026-08-05T175240.785.png?alt=media&amp;token=2d34dc02-a97c-419d-9835-ef89df96cdf1" alt=""><figcaption></figcaption></figure>

The **Delete Team?** window opens. Click **Yes, Delete** to remove the team, or **Cancel** to keep it.

<figure><img src="https://4282324958-files.gitbook.io/~/files/v0/b/gitbook-x-prod.appspot.com/o/spaces%2F-MXep_PEmh8mDPVWj49x%2Fuploads%2FPbEztYqUKian33Fiitok%2FFrame%201%20-%202026-08-05T175343.639.png?alt=media&amp;token=20f5587d-d373-44c3-88c3-fcb6ad2daaff" alt=""><figcaption></figcaption></figure>

**Important:** After the team is deleted, the employees in it can no longer see team attendance. The action may be recorded in the audit trail.

**Save the Settings**

Click **Save** at the bottom of the page.

**Important:** One **Save** covers the whole page. Set up **People Connect** and **Team Attendance** as needed, then click **Save** once.

<figure><img src="https://4282324958-files.gitbook.io/~/files/v0/b/gitbook-x-prod.appspot.com/o/spaces%2F-MXep_PEmh8mDPVWj49x%2Fuploads%2FCMljAptSHVLHLQV9TVPU%2FFrame%201%20-%202026-08-17T141918.565.png?alt=media&amp;token=d6adddd6-35da-43d3-a2cc-a26565c6898f" alt=""><figcaption></figcaption></figure>

### **What Employees See on the ESS Dashboard**

| **People Connect** | **Team Attendance** | **Shown on the ESS dashboard**                                                                                                                      |
| ------------------ | ------------------- | --------------------------------------------------------------------------------------------------------------------------------------------------- |
| On                 | Off                 | **People Connect** card only, with no attendance data                                                                                               |
| Off                | On                  | **Team Attendance** card only, showing the teams you created                                                                                        |
| On                 | On                  | Both cards. **Team Attendance** shows the teams you created, and **People Connect** shows employees as per the **Visibility Access** option chosen. |
| Off                | Off                 | Neither card is shown                                                                                                                               |

### **Team Attendance Card**

The **Team Attendance** card shows the team's status for the day. **Last Updated** shows when the data was last refreshed. Click the refresh icon to update it.

<figure><img src="https://4282324958-files.gitbook.io/~/files/v0/b/gitbook-x-prod.appspot.com/o/spaces%2F-MXep_PEmh8mDPVWj49x%2Fuploads%2FsNi3HdDOxtTwowoimbIF%2FFrame%201%20-%202026-08-17T122442.597.png?alt=media&amp;token=fc9c6b7e-699f-47ef-a0fc-0f502374d6ee" alt="" width="366"><figcaption></figcaption></figure>

The card groups the team by status.

| **Status**   | **Shows**                                    |
| ------------ | -------------------------------------------- |
| **Present**  | Team members who have punched in for the day |
| **On Leave** | Team members on leave for the day            |
| **On Duty**  | Team members marked on duty for the day      |
| **Absent**   | Team members marked absent for the day       |

Each status shows a count and a **See all** link. Click **See all** to open the full list of employees under that status.

<figure><img src="https://4282324958-files.gitbook.io/~/files/v0/b/gitbook-x-prod.appspot.com/o/spaces%2F-MXep_PEmh8mDPVWj49x%2Fuploads%2FHp1LO0R1xIiCTGdEHZrp%2FFrame%201%20-%202026-08-17T122720.946.png?alt=media&amp;token=1d201f2d-8dcb-4477-a695-e64116a4dfea" alt="" width="366"><figcaption></figcaption></figure>

### **People Connect Card**

The **People Connect** card gives employees access to the directory.

Click **open** to view it.

<figure><img src="https://4282324958-files.gitbook.io/~/files/v0/b/gitbook-x-prod.appspot.com/o/spaces%2F-MXep_PEmh8mDPVWj49x%2Fuploads%2FFUrNn1ZCRKD6z2ak3TH0%2FFrame%201%20-%202026-08-17T122847.984.png?alt=media&amp;token=adc35611-6f09-4bb5-b2f6-58fa00928410" alt="" width="366"><figcaption></figcaption></figure>

**My Team**

**My Team** shows the employees the user is allowed to see.

<figure><img src="https://4282324958-files.gitbook.io/~/files/v0/b/gitbook-x-prod.appspot.com/o/spaces%2F-MXep_PEmh8mDPVWj49x%2Fuploads%2FhJMVsnujK7cWPWOXJxCh%2FFrame%202%20-%202026-08-17T123005.436.png?alt=media&amp;token=3dfcfeea-3c59-4f87-8768-ec96f331fe17" alt=""><figcaption></figcaption></figure>

When **Visibility Access** is set to **All Employees**, **My Team** shows every active employee in the company. When it is set to **Business Unit Wise** or **Category Wise**, it shows only the employees of the selected business units or categories. Employees outside that scope are not shown at all.

**Today Attendance**

Filter the list by the day's attendance status — **All**, **Present**, **On Leave**, **On Duty** or **Absent**.

<figure><img src="https://4282324958-files.gitbook.io/~/files/v0/b/gitbook-x-prod.appspot.com/o/spaces%2F-MXep_PEmh8mDPVWj49x%2Fuploads%2FmzcZyYtRHAwE9NzatTsw%2FFrame%202%20-%202026-08-17T123058.730.png?alt=media&amp;token=a997ded2-0fff-419c-a5f2-cdbe358d5fa8" alt=""><figcaption></figcaption></figure>

**Search**

Type a name, employee code or designation to find an employee.

<figure><img src="https://4282324958-files.gitbook.io/~/files/v0/b/gitbook-x-prod.appspot.com/o/spaces%2F-MXep_PEmh8mDPVWj49x%2Fuploads%2FfZeoY27U4eGBx6q5Mqnd%2FFrame%202%20-%202026-08-17T123148.645.png?alt=media&amp;token=68c670fb-5ecc-4531-8ac2-c300cc4e39b0" alt=""><figcaption></figcaption></figure>

**Employee Cards**

Each employee is shown as a card with the details below.

| **Detail**                     | **Description**                                                                                                                                                                              |
| ------------------------------ | -------------------------------------------------------------------------------------------------------------------------------------------------------------------------------------------- |
| Photo                          | The employee's profile image. If there is no image, their initials are shown instead.                                                                                                        |
| Name and employee code         | The employee's name and code                                                                                                                                                                 |
| Attendance status              | The employee's status for the day                                                                                                                                                            |
| Designation                    | The employee's designation                                                                                                                                                                   |
| Business unit                  | The employee's business unit                                                                                                                                                                 |
| Location                       | The employee's location                                                                                                                                                                      |
| Category                       | The employee's category                                                                                                                                                                      |
| Email address                  | The employee's email address                                                                                                                                                                 |
| **Punch In** and **Punch Out** | The employee's punch timings for the day. These appear only when **Enable showing punches on dashboard** is on. When it is off, they are removed from the card and only the status is shown. |
| **On Leave From**              | The date the leave starts. This replaces the punch timings for an employee who is on leave.                                                                                                  |

<figure><img src="https://4282324958-files.gitbook.io/~/files/v0/b/gitbook-x-prod.appspot.com/o/spaces%2F-MXep_PEmh8mDPVWj49x%2Fuploads%2F19RyM5jttlL5cDCx2Cal%2FFrame%202%20-%202026-08-17T123316.114.png?alt=media&amp;token=9304a2e4-d272-4940-a2fa-2d78ee3612b3" alt=""><figcaption></figcaption></figure>

For an employee on leave, the status also shows the date the leave runs until.

<figure><img src="https://4282324958-files.gitbook.io/~/files/v0/b/gitbook-x-prod.appspot.com/o/spaces%2F-MXep_PEmh8mDPVWj49x%2Fuploads%2FWuUuG76pscED6z0I6WJF%2FFrame%201%20-%202026-08-17T123719.000.png?alt=media&amp;token=cd0d4533-ebd3-4626-ac71-fa7a5a453b1f" alt=""><figcaption></figcaption></figure>

**Employee Details**

Click **View** on a card to open the **Employee Details** window.

<figure><img src="https://4282324958-files.gitbook.io/~/files/v0/b/gitbook-x-prod.appspot.com/o/spaces%2F-MXep_PEmh8mDPVWj49x%2Fuploads%2FnGOalQqNIVNyQyVGhIBn%2FFrame%202%20-%202026-08-17T123801.962.png?alt=media&amp;token=b19ac646-990d-4977-ae00-5ba40d06fa52" alt=""><figcaption></figcaption></figure>

The window header shows the employee's photo, name, designation and employee code.&#x20;

<figure><img src="https://4282324958-files.gitbook.io/~/files/v0/b/gitbook-x-prod.appspot.com/o/spaces%2F-MXep_PEmh8mDPVWj49x%2Fuploads%2FTOZroTSO5xp9rVO1ngPP%2FFrame%201%20-%202026-08-17T123857.528.png?alt=media&amp;token=d280ba42-2689-432d-a5f0-32ee6e0cd940" alt=""><figcaption></figcaption></figure>

Below it, the details are split into two panels.

| **Panel**               | **Details shown**                                    |
| ----------------------- | ---------------------------------------------------- |
| **Work Information**    | Department, category, location and reporting manager |
| **Contact Information** | Work email, personal email and mobile number         |

Where a detail is not filled in for the employee, the window shows **Not Available**.

<figure><img src="https://4282324958-files.gitbook.io/~/files/v0/b/gitbook-x-prod.appspot.com/o/spaces%2F-MXep_PEmh8mDPVWj49x%2Fuploads%2Frb8kRnYwfpmC72azqtOe%2FFrame%201%20-%202026-08-17T124036.272.png?alt=media&amp;token=8e4718c0-5ae0-4108-b4a4-751d32fa82a3" alt=""><figcaption></figcaption></figure>

Each detail under **Contact Information** has a copy icon next to it. Click the icon to copy that detail, then paste it wherever you need without typing it out.

<figure><img src="https://4282324958-files.gitbook.io/~/files/v0/b/gitbook-x-prod.appspot.com/o/spaces%2F-MXep_PEmh8mDPVWj49x%2Fuploads%2FFZam9hwkQ3wdNxpDHhr1%2FFrame%201%20-%202026-08-17T123946.888.png?alt=media&amp;token=661e9417-e361-40f5-b897-f83fea8fe9b2" alt=""><figcaption></figcaption></figure>

Click **Close** to return to the directory.

<figure><img src="https://4282324958-files.gitbook.io/~/files/v0/b/gitbook-x-prod.appspot.com/o/spaces%2F-MXep_PEmh8mDPVWj49x%2Fuploads%2FrUd6tVvkzhiuRCfVfD7T%2FFrame%201%20-%202026-08-17T124003.728.png?alt=media&amp;token=aea79581-fbbc-430a-8b78-dc426a3fcbd6" alt=""><figcaption></figcaption></figure>

**For any queries, contact** [**support@pockethrms.com**](mailto:support@pockethrms.com)


# Notification Management Center

### **Notification Management Center**

The **Notification Management Center** lets you choose which channels deliver alerts for each module and event, and search past notifications from one place.

Channels are set per event, across **ESS (Desktop)**, **Email**, **Mobile Push** and **WhatsApp**.

This helps in:

* Controlling how alerts are delivered for each module
* Turning a channel on or off for all events in a module in one action
* Tracking whether a notification was delivered, read or failed
* Finding past notifications without checking each module separately

### **How to View and Modify Settings on the Notification Management Page?**

**Path:** [**Login into ESS Portal → Profile Image → Notification Management**](https://ess.pockethrms.com/NotificationCenter/Index)

**Step 1: Open Notification Management**

Log in to the **ESS portal** and Click your **Profile Image** in the top-right corner, then select **Notification Management**.

<figure><img src="https://4282324958-files.gitbook.io/~/files/v0/b/gitbook-x-prod.appspot.com/o/spaces%2F-MXep_PEmh8mDPVWj49x%2Fuploads%2F4xuuHTxAh6GbyWl0ECoZ%2FFrame%201%20-%202026-09-18T102551.143.png?alt=media&amp;token=e59cc06f-4f1a-4e00-bab1-0aa5e5bd690c" alt=""><figcaption></figcaption></figure>

**Step 2: Select a Module**

Under **Modules**, select the module whose notifications you want to configure. You can also type the module name in **Search modules...** to find it.

The modules listed depend on the modules enabled for your company.

<figure><img src="https://4282324958-files.gitbook.io/~/files/v0/b/gitbook-x-prod.appspot.com/o/spaces%2F-MXep_PEmh8mDPVWj49x%2Fuploads%2F7e4fJmMwlf7ZjVfSWjv8%2FFrame%201%20-%202026-09-18T103154.208.png?alt=media&amp;token=274d6227-f661-44ea-b1ad-e9df9094195b" alt=""><figcaption></figcaption></figure>

The system displays the events of the selected module, along with the number of events next to the module name, for example **Confirmation (16 events)**.

<figure><img src="https://4282324958-files.gitbook.io/~/files/v0/b/gitbook-x-prod.appspot.com/o/spaces%2F-MXep_PEmh8mDPVWj49x%2Fuploads%2FKBFY6ix48Zjk2ddJ6c7F%2FFrame%201%20-%202026-09-18T103301.148.png?alt=media&amp;token=8877ab88-7d64-4e4f-b90e-db5a0a7d34f7" alt=""><figcaption></figcaption></figure>

Each event shows its **name** and a **short description** of when it is sent. Click the **ⓘ icon** next to an event name for more information.

<figure><img src="https://4282324958-files.gitbook.io/~/files/v0/b/gitbook-x-prod.appspot.com/o/spaces%2F-MXep_PEmh8mDPVWj49x%2Fuploads%2FkyvopqbT2J4rAHfYKJ0h%2FFrame%201%20-%202026-09-18T103418.492.png?alt=media&amp;token=15aff14d-916d-4024-b683-92f8efb95431" alt=""><figcaption></figcaption></figure>

**Step 3: Set Channels for All Events Using Bulk Channel Controls**

Under **Notification Channel Preferences**, use the toggles in the **Bulk Channel Controls** row to enable or disable a channel for all events of the selected module. Other modules are not affected.

<figure><img src="https://4282324958-files.gitbook.io/~/files/v0/b/gitbook-x-prod.appspot.com/o/spaces%2F-MXep_PEmh8mDPVWj49x%2Fuploads%2FGAVz2zvZff9qbEXEItbE%2FFrame%201%20-%202026-09-18T103732.333.png?alt=media&amp;token=4ab2aa12-c98f-49b2-ad2d-a60c5d373ad0" alt=""><figcaption></figcaption></figure>

When a channel is turned off in **Bulk Channel Controls**, the toggle for that channel is turned off for every event in the module.

<figure><img src="https://4282324958-files.gitbook.io/~/files/v0/b/gitbook-x-prod.appspot.com/o/spaces%2F-MXep_PEmh8mDPVWj49x%2Fuploads%2FlGWjNRn1TD91nAWQrnfF%2FFrame%201%20-%202026-09-18T103953.903.png?alt=media&amp;token=aa8ea8e0-96da-4ad3-aad2-fbbad246c5ca" alt=""><figcaption></figcaption></figure>

**Step 4: Set Channels for Each Event**

For each event, enable or disable the toggle under each channel.

| **Channel**       | **Delivers the notification through** |
| ----------------- | ------------------------------------- |
| **ESS (Desktop)** | The ESS portal                        |
| **Email**         | Email                                 |
| **Mobile Push**   | Push notification on the mobile app   |
| **WhatsApp**      | WhatsApp                              |

<figure><img src="https://4282324958-files.gitbook.io/~/files/v0/b/gitbook-x-prod.appspot.com/o/spaces%2F-MXep_PEmh8mDPVWj49x%2Fuploads%2FWsYnV7sN4SVcDQvb2smg%2FFrame%201%20-%202026-09-18T104232.164.png?alt=media&amp;token=b02eb9d5-94c6-4281-a81d-6d2edc51265b" alt=""><figcaption></figcaption></figure>

Where a channel is not available for an event, the system displays **Not applicable** or **—** in place of the toggle.

<figure><img src="https://4282324958-files.gitbook.io/~/files/v0/b/gitbook-x-prod.appspot.com/o/spaces%2F-MXep_PEmh8mDPVWj49x%2Fuploads%2FclHL08M4RQtksy0pO3AB%2FFrame%201%20-%202026-09-18T104442.250.png?alt=media&amp;token=a1b2e784-2aa4-4faa-bce9-b0667ba29885" alt=""><figcaption></figcaption></figure>

\
**Important:** Changes are saved automatically when you turn a toggle on or off, and the system displays the message **Preference updated**. There is no **Save** button.

<figure><img src="https://4282324958-files.gitbook.io/~/files/v0/b/gitbook-x-prod.appspot.com/o/spaces%2F-MXep_PEmh8mDPVWj49x%2Fuploads%2FGp7Wqy491rTUrJLPTLTo%2FFrame%201%20-%202026-09-18T104727.469.png?alt=media&amp;token=b5ad61c1-2fa7-4ad2-8eef-73202d2b0ef1" alt=""><figcaption></figcaption></figure>

**Important:** The **WhatsApp** status at the top of the screen shows whether WhatsApp is set up for your company.

It shows **Configured** when WhatsApp is set up,

<figure><img src="https://4282324958-files.gitbook.io/~/files/v0/b/gitbook-x-prod.appspot.com/o/spaces%2F-MXep_PEmh8mDPVWj49x%2Fuploads%2FTlDTmivAkRrGNhFWYDId%2FFrame%201%20-%202026-09-18T105040.163.png?alt=media&amp;token=303cd045-b271-4140-b167-9a21a9e2e92e" alt=""><figcaption></figcaption></figure>

\
and **Not Configured** when it is not.

<figure><img src="https://4282324958-files.gitbook.io/~/files/v0/b/gitbook-x-prod.appspot.com/o/spaces%2F-MXep_PEmh8mDPVWj49x%2Fuploads%2FIcdRl0aGmqXsndL3GT3I%2FFrame%201%20-%202026-09-18T105011.135.png?alt=media&amp;token=40c31c1b-023a-405b-9d08-610f64bd8f1f" alt=""><figcaption></figcaption></figure>

\
When the status is **Not Configured**, the WhatsApp toggles still appear on the screen, but they are greyed out and cannot be changed.

<figure><img src="https://4282324958-files.gitbook.io/~/files/v0/b/gitbook-x-prod.appspot.com/o/spaces%2F-MXep_PEmh8mDPVWj49x%2Fuploads%2FvqR6MCVWulMejmwyhWwN%2FFrame%201%20-%202026-09-18T105257.173.png?alt=media&amp;token=4aaaaa7a-4308-49b6-8a2f-1ae3c7b80bd9" alt=""><figcaption></figcaption></figure>

### **Find Notifications & Audit Logs**

To view past notifications, click **Find Notifications** next to **Need past logs?** at the top of the screen.

<figure><img src="https://4282324958-files.gitbook.io/~/files/v0/b/gitbook-x-prod.appspot.com/o/spaces%2F-MXep_PEmh8mDPVWj49x%2Fuploads%2FN2ssJAAbyEMgVDNQyHSp%2FFrame%201%20-%202026-09-18T105351.237.png?alt=media&amp;token=d283627d-57ab-4497-bda3-25f14b5a28ab" alt=""><figcaption></figcaption></figure>

\
The system opens the **Find Notifications & Audit Logs** window, which lists historical notification dispatches across all modules and channels.

<figure><img src="https://4282324958-files.gitbook.io/~/files/v0/b/gitbook-x-prod.appspot.com/o/spaces%2F-MXep_PEmh8mDPVWj49x%2Fuploads%2FnRCz6K2kqx0wgkUBR2kx%2FFrame%201%20-%202026-09-18T105627.206.png?alt=media&amp;token=6fa90ce8-986a-4c4c-b99c-96a9da756bc1" alt=""><figcaption></figcaption></figure>

**Step 1: Select the Modules to Search**

Under **Search In**, select the modules to search. By default, **All Modules** is selected.

Tick or untick the checkbox next to each module to include or exclude it.

<figure><img src="https://4282324958-files.gitbook.io/~/files/v0/b/gitbook-x-prod.appspot.com/o/spaces%2F-MXep_PEmh8mDPVWj49x%2Fuploads%2FLLrkRjPwjFDG21FMyJbd%2FFrame%201%20-%202026-09-18T105808.214.png?alt=media&amp;token=9a6797cd-072e-4f97-9080-a9527d90b417" alt=""><figcaption></figcaption></figure>

**Step 2: Select the Date Range**

Under **Received On**, select the period for which you want to view notifications. By default, **All Time** is selected.

The following options are available:

* All Time
* This Month
* Today
* Last 7 Days
* Last 30 Days

<figure><img src="https://4282324958-files.gitbook.io/~/files/v0/b/gitbook-x-prod.appspot.com/o/spaces%2F-MXep_PEmh8mDPVWj49x%2Fuploads%2FkEiMkeeiJmJSqbMPYbme%2FFrame%201%20-%202026-09-18T105942.385.png?alt=media&amp;token=b15e008b-c519-43e1-a1ed-161d9af2491c" alt=""><figcaption></figcaption></figure>

**Step 3: Filter by Status**

Under **Status**, select one of the following:

| **Status**    | **Shows**                            |
| ------------- | ------------------------------------ |
| **All**       | All notifications                    |
| **Delivered** | Notifications that were delivered    |
| **Read**      | Notifications that were read         |
| **Failed**    | Notifications that failed to deliver |

<figure><img src="https://4282324958-files.gitbook.io/~/files/v0/b/gitbook-x-prod.appspot.com/o/spaces%2F-MXep_PEmh8mDPVWj49x%2Fuploads%2F0KAcREOzGJbo3sXTjla5%2FFrame%201%20-%202026-09-18T110108.182.png?alt=media&amp;token=3a0238eb-1fed-4e87-85b9-584dd862f804" alt=""><figcaption></figcaption></figure>

**Step 4: Search for a Notification**

Enter a keyword in **Search notification...** to find a specific notification.

<figure><img src="https://4282324958-files.gitbook.io/~/files/v0/b/gitbook-x-prod.appspot.com/o/spaces%2F-MXep_PEmh8mDPVWj49x%2Fuploads%2FcMBx0FVfbG2Uys4Cc9kO%2FFrame%201%20-%202026-09-18T110203.219.png?alt=media&amp;token=a08a6151-95cf-4818-b1d6-fed2132069df" alt=""><figcaption></figcaption></figure>

**Step 5: Open the Related Page**

Click **Read in ESS** on a log entry to open the page that the notification relates to.

<figure><img src="https://4282324958-files.gitbook.io/~/files/v0/b/gitbook-x-prod.appspot.com/o/spaces%2F-MXep_PEmh8mDPVWj49x%2Fuploads%2FYJfEjNw8WD50I0IU9xoO%2FFrame%201%20-%202026-09-18T110247.245.png?alt=media&amp;token=d4e4589a-612c-4999-b7e1-36690800978e" alt=""><figcaption></figcaption></figure>

**Step 6: Reset Filters**

Click **Reset Filters** to clear all selected filters.

<figure><img src="https://4282324958-files.gitbook.io/~/files/v0/b/gitbook-x-prod.appspot.com/o/spaces%2F-MXep_PEmh8mDPVWj49x%2Fuploads%2Frr0QGaNzT389Ra64rUCC%2FFrame%201%20-%202026-09-18T110315.960.png?alt=media&amp;token=a156cef5-5e4b-463e-b3b3-91a94a2c4765" alt=""><figcaption></figcaption></figure>

#### **Reading the Log**

The system displays the total number of entries and the filters applied.

For example, **Showing 12 notification log entries** with **Filters: Received On: All Time • Status: ALL**.

Each entry shows:

* Employee name and employee code
* Module name
* Notification message, **for example :** ***Approval Request For Timesheet Summary ABD00013 (Abhishek)*** along with Date and time the notification was received
* **Read in ESS**, which opens the page the notification relates to.

<figure><img src="https://4282324958-files.gitbook.io/~/files/v0/b/gitbook-x-prod.appspot.com/o/spaces%2F-MXep_PEmh8mDPVWj49x%2Fuploads%2FXtGOXwkDXkfiFULR3M7s%2FFrame%201%20-%202026-09-18T110640.156.png?alt=media&amp;token=1acb3672-78db-4028-ae9e-3f86f4a140a4" alt=""><figcaption></figcaption></figure>

\
**Last Synced** at the top of the window shows when the log was last updated.

<figure><img src="https://4282324958-files.gitbook.io/~/files/v0/b/gitbook-x-prod.appspot.com/o/spaces%2F-MXep_PEmh8mDPVWj49x%2Fuploads%2FPGXQUt2Frjd2j5zzMU7f%2FFrame%201%20-%202026-09-18T110723.177.png?alt=media&amp;token=a403c4f0-a9c4-4395-8766-e344ca38a19e" alt=""><figcaption></figcaption></figure>

\
Use **Previous** and **Next** at the bottom of the window to move between pages. Each page shows up to 10 entries.

<figure><img src="https://4282324958-files.gitbook.io/~/files/v0/b/gitbook-x-prod.appspot.com/o/spaces%2F-MXep_PEmh8mDPVWj49x%2Fuploads%2Fi8e5LvgV6mLmKXNPmwKI%2FFrame%201%20-%202026-09-18T110801.275.png?alt=media&amp;token=968042bd-8d6a-4c4c-9a2f-3fc2a4676bbc" alt=""><figcaption></figcaption></figure>

\
**Path Link**[**: https://ess.pockethrms.com/NotificationCenter/Index**](https://ess.pockethrms.com/NotificationCenter/Index)

For any queries, contact [**support@pockethrms.com**](mailto:support@pockethrms.com)


# Magic Link

## What is a Magic Link?

A **Magic Link** is a password-free login method where a user clicks a **unique, Time-sensitive link** sent to their email to log in instantly.

Within **Pocket HRMS**, it allows you to give a specific consultant temporary access to your HR portal **(Cloud or ESS)** while keeping your data protected.

**‘Magic Link’** gives you more control, transparency, and security when granting access to your Cloud or ESS portal for troubleshooting and support.

## Why Magic Link?

* Ensures compliance with the **Digital Personal Data Protection Act, 2023**
* Tracks and audits all changes made by consultants
* Reinforces Pocket HRMS’ commitment to **data privacy and security**

## How to Generate a Magic Link?

**Path:** Login to Cloud Portal > Help Icon (smHRt searchHR) > Generate Magic Link > Fill Details > Generate Magic Link.

**Step 1:** Login into your **Cloud portal** and click the **Help icon** next to **smHRt searchHR** Bar.

<figure><img src="https://4282324958-files.gitbook.io/~/files/v0/b/gitbook-x-prod.appspot.com/o/spaces%2F-MXep_PEmh8mDPVWj49x%2Fuploads%2Fz5wQjoswbgDycMI2yMKz%2FFrame%202%20(7).png?alt=media&amp;token=82bf33c9-0fed-4da9-b7f3-8df82cad36ff" alt=""><figcaption></figcaption></figure>

**Step 2:** Click **Generate Magic Link**.

<img src="https://content.gitbook.com/content/-MXep_PEmh8mDPVWj49x/blobs/RAN839pIvAr9d69bSCzZ/Unknown%20image" alt="" width="375">

**Step 3:** Fill in the pop-up form with details such as:

1. **Access Type:** Cloud or ESS portal
2. **Consultant Name:** Select the consultant
3. **Reason:** Enter the purpose of access
4. **Access Duration:** Hours, days, or weeks
5. **User Profile**: Select which user’s access is shared

<figure><img src="https://4282324958-files.gitbook.io/~/files/v0/b/gitbook-x-prod.appspot.com/o/spaces%2F-MXep_PEmh8mDPVWj49x%2Fuploads%2FihVDI8pPqT6IQZL71Lt4%2FFrame%201%20(63).png?alt=media&amp;token=3c828bf3-db33-426b-82e3-29042cf3c49b" alt="" width="309"><figcaption></figcaption></figure>

\
**Step 4:** Click **Generate Magic Link.** The consultant will receive an email with a link.

<figure><img src="https://4282324958-files.gitbook.io/~/files/v0/b/gitbook-x-prod.appspot.com/o/spaces%2F-MXep_PEmh8mDPVWj49x%2Fuploads%2FDKWOLTfyqxqKUpRVdPMH%2FFrame%202%20(5).png?alt=media&amp;token=99e302de-029d-4dfd-a1fe-e6b624f57a48" alt="" width="302"><figcaption></figcaption></figure>

**Step 5:** The consultant clicks the link to access the portal.

**Step 6:** Access automatically **expires after the selected time.**

## Key Benefits

* **Controlled Access:** Limit time, user, and portal
* **Audit Trail:** Track all consultant actions
* **Faster Support:** Troubleshoot without compromising security
* **Enhanced Security:** Access is restricted to the chosen profile and duration

Although it may seem like an extra step, **Magic Link** keeps every access fully tracked, giving you and your team peace of mind, while we provide support.

If you have any questions or require assistance, please contact your account manager

**Path Link:** <https://cloud.pockethrms.com/Identity/Home/supportNew>

**For any queries, contact** <support@pockethrms.com>


# HR & Admin Portal

Pocket HRMS simplifies employee management with Cutting-edge features employing Artificial Intelligence.


# Cloud Configuration

This pages provides you navigation to the step by step guide for cloud configurations for various modules.


# Organization


# Company Setup

Company and Admin configuration


# New Company

Adding a company

This option allows you to create a NEW company on the dashboard. Pocket HRMS dashboard can have multiple companies with unique user rights and configuration. The configuration may include salary structure, attendance system, leave rule, etc.&#x20;

This module of initial setup and administration will help you learn the step-wise procedure to set up and configure new companies on the dashboard.

### How to create a new company?

**Step 1:** Go to '**Settings**'

![](https://4282324958-files.gitbook.io/~/files/v0/b/gitbook-legacy-files/o/assets%2F-MXep_PEmh8mDPVWj49x%2F-MY4f1bCFM2vGwUDHH7Z%2F-MY4heG0rQbbwJzvmSUa%2Fnew%20company%201.png?alt=media\&token=2a76168e-a077-4031-8b75-93607258717a)

**Step 2:** Proceed to 'Company Profile' and click on the '+' sign as shown in the screenshot below.&#x20;

![](https://4282324958-files.gitbook.io/~/files/v0/b/gitbook-legacy-files/o/assets%2F-MXep_PEmh8mDPVWj49x%2F-MY4f1bCFM2vGwUDHH7Z%2F-MY4hjFD-7gtWuJxFwR1%2Fnew%20company%202.png?alt=media\&token=0c88d4ae-9033-4f6c-a91e-899593e3f6ef)

**Step 3:** Upon clicking on the '+' button, a screen asking basic information about the new company will pop-out. Fill in the details like Company name, Company address, Self Service Company Code, and Telephone. Click on 'Create Company'.

![](https://4282324958-files.gitbook.io/~/files/v0/b/gitbook-legacy-files/o/assets%2F-MXep_PEmh8mDPVWj49x%2F-MY4f1bCFM2vGwUDHH7Z%2F-MY4iLsdgMI2W9T-u_IH%2Fnew%20company%203.png?alt=media\&token=70116f04-1d2a-4d35-b4cb-83b88e09affe)

Now you have successfully created a new company on your dashboard in Pocket HRMS.&#x20;

***Note:** If you see any error or need personal assistance in creating a new company, find us at* [*support@pockethrms.com*](mailto:support@pockethrms.com)


# Category & Pop-ups

Creation of Category and mandatory pop-up components

This section explains how to create employee categories for the company. Different categories like interns, executives, managers, contractors, etc. help in segregating staff people and performing human resource management easily.&#x20;

The page also includes steps to create pop-up components under different parameters like location, modes, department, and so on. Pop-up data helps you select the required data at the required place.&#x20;

#### Pre-requisites:

:heavy\_check\_mark: Admin credentials

:heavy\_check\_mark:User rights

*Note - Kindly contact your Admin/ HR for rights if you are not able to perform the steps below.*

### **How to create and edit category?**

**Step 1**: Go to 'Settings'

![](https://4282324958-files.gitbook.io/~/files/v0/b/gitbook-legacy-files/o/assets%2F-MXep_PEmh8mDPVWj49x%2F-MY4jqi-tN2i5p8gT1uW%2F-MY4kxSsGfj_uTfE5VT7%2F1.png?alt=media\&token=0010680f-ec23-4e9c-a07e-99b378ee5193)

**Step 2:** Proceed to 'HR' column

![](https://4282324958-files.gitbook.io/~/files/v0/b/gitbook-legacy-files/o/assets%2F-MXep_PEmh8mDPVWj49x%2F-MY4jqi-tN2i5p8gT1uW%2F-MY4l0P9Lhy-43Z2I6sE%2F2.png?alt=media\&token=dbe85cad-3eb6-4af6-9287-0569e32bd608)

**Step** **3:** Select 'Category' option. Click on '+' to add a new category in HR.&#x20;

![](https://4282324958-files.gitbook.io/~/files/v0/b/gitbook-legacy-files/o/assets%2F-MXep_PEmh8mDPVWj49x%2F-MY4jqi-tN2i5p8gT1uW%2F-MY4l4tio6_pVuJZ_tTA%2Fcategory.png?alt=media\&token=be7500b6-177b-4f04-af84-031b36a03539)

New category window appears as below. Upon filling the mandatory fields, click on 'Save'.

![](https://4282324958-files.gitbook.io/~/files/v0/b/gitbook-legacy-files/o/assets%2F-MXep_PEmh8mDPVWj49x%2F-MY4jqi-tN2i5p8gT1uW%2F-MY4lBwsVVOXXCymE7TS%2F4.png?alt=media\&token=c4bc9731-39db-464f-8ef3-53c9f0002c82)

**Step 4:** You can also edit and delete created categories by clicking on respective options as shown below.

![](https://4282324958-files.gitbook.io/~/files/v0/b/gitbook-legacy-files/o/assets%2F-MXep_PEmh8mDPVWj49x%2F-MY4jqi-tN2i5p8gT1uW%2F-MY4lJf3ox2VIJRm1lQp%2Fpop%20up.png?alt=media\&token=07ed938b-716e-4647-a465-9473d2d3c4ec)

### **How to add Pop-up data?**

**Step 1:** Select 'Pop Up Data' in HR following the path similar to above. \[Settings > HR > Pop up Data]

![](https://4282324958-files.gitbook.io/~/files/v0/b/gitbook-legacy-files/o/assets%2F-MXep_PEmh8mDPVWj49x%2F-MY4jqi-tN2i5p8gT1uW%2F-MY4mWOXhSf8K-3ArWt5%2F5\(1.1\).png?alt=media\&token=2c218e0c-665b-4417-8355-54313d005d3a)

Select 'Component' and 'Value' to edit/ delete the previously added pop up data.

**Step 2:** Click on the '+' sign to add new pop-up data for any value as shown in the screenshot below.&#x20;

![](https://4282324958-files.gitbook.io/~/files/v0/b/gitbook-legacy-files/o/assets%2F-MXep_PEmh8mDPVWj49x%2F-MY4jqi-tN2i5p8gT1uW%2F-MY4lw7U-593mBf60eLv%2Fpopup33.png?alt=media\&token=149bfb0e-c08b-4093-a51a-6756f98c56bb)

**Step 3:** You can also edit and delete created pop up data by clicking on the respective options as shown below.

![](https://4282324958-files.gitbook.io/~/files/v0/b/gitbook-legacy-files/o/assets%2F-MXep_PEmh8mDPVWj49x%2F-MY4jqi-tN2i5p8gT1uW%2F-MY4mdB7_Y4oVVhT5YWK%2F6\(1.2\).png?alt=media\&token=8cef881c-ae7b-4a3f-9ec9-ca03f71802ae)

***Note:** If you are unable to create categories and pop up data, kindly contact us at* [*support@pockethrms.com*](mailto:support@pockethrms.com)&#x20;


# Financial Year & Leave

Financial year and leave accounting setup

### How to Change the Default Financial Year?

\
**Path:** Cloud> settings > income tax > financial year > edit icon for which financial year report required > set as default financial year> save

**Step 1:** Log into cloud portal, go to ‘Settings’ menu, select ‘Income Tax’ tab, go to the ‘Financial Year’ from sub menu and click on the ‘edit icon’ on the right top corner of the financial year which you need.

![](https://4282324958-files.gitbook.io/~/files/v0/b/gitbook-x-prod.appspot.com/o/spaces%2F-MXep_PEmh8mDPVWj49x%2Fuploads%2FPjlEVRVceADtQKLMHn8e%2F0.png?alt=media)

**Step 2:** Select the option ‘Set as default financial year’, and click on ‘Save’.

![](https://4282324958-files.gitbook.io/~/files/v0/b/gitbook-x-prod.appspot.com/o/spaces%2F-MXep_PEmh8mDPVWj49x%2Fuploads%2FPKg8O1x1vXc0GrMUmsaX%2F1.png?alt=media)

For any queries, contact <support@pockethrms.com>
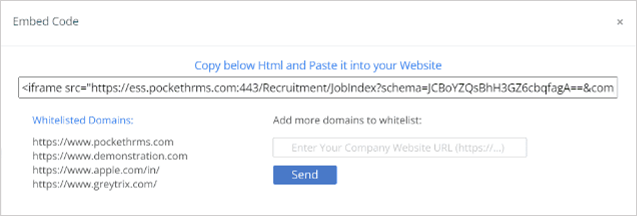
### **How to set leave parameters?**

**Step 1:** Go to 'Settings'

![](https://4282324958-files.gitbook.io/~/files/v0/b/gitbook-legacy-files/o/assets%2F-MXep_PEmh8mDPVWj49x%2F-MY4mgTOWswiAad-3nbH%2F-MY4oLkRLOylwBdBdEfU%2F5png.png?alt=media\&token=60e98690-1130-4fa7-85e6-04a5f15fd355)

**Step 2:** Proceed towards the 'Leave' column.&#x20;

![](https://4282324958-files.gitbook.io/~/files/v0/b/gitbook-legacy-files/o/assets%2F-MXep_PEmh8mDPVWj49x%2F-MY4mgTOWswiAad-3nbH%2F-MY4oPe-exXv06WoUSV7%2F6.png?alt=media\&token=65c31c0f-79fb-43ef-b347-0f4ab2d74738)

**Step 3:** Under 'Define Calendar' option, you can set leave financial year and leave parameters with respect to categories. &#x20;

![](https://4282324958-files.gitbook.io/~/files/v0/b/gitbook-legacy-files/o/assets%2F-MXep_PEmh8mDPVWj49x%2F-MY4mgTOWswiAad-3nbH%2F-MY4p1w4zdzHYijb2TzF%2F7.png?alt=media\&token=f01462c0-34e4-4ec1-b148-1507ee9bcd81)

**Step 4:** 'Leave Definition' option is used to define leave types for employees. Different types of leaves are; PL (Paid Leave), LD (Loss of Pay day), CL (Casual Leave), etc.&#x20;

![](https://4282324958-files.gitbook.io/~/files/v0/b/gitbook-legacy-files/o/assets%2F-MXep_PEmh8mDPVWj49x%2F-MY4mgTOWswiAad-3nbH%2F-MY4pLVaqAsyZQYpkUE0%2F8.png?alt=media\&token=8b526623-fdd3-4b55-84f8-04ff420305c0)

**Step 5:** Option 'Leave Configuration' is used to set financial setting & monthly eligibility for the selected leave type.&#x20;

![](https://4282324958-files.gitbook.io/~/files/v0/b/gitbook-legacy-files/o/assets%2F-MXep_PEmh8mDPVWj49x%2F-MY4mgTOWswiAad-3nbH%2F-MY4pTDi6sllqs5QEz6l%2F9.png?alt=media\&token=748d8d65-f85e-4478-a8b1-23ca0594dca3)

**Step 6:** Next option 'Weekly Off' is used to create fixed holidays like weekends. You need to checkmark the boxes corresponding to days you want to select. Also, you can set half day leave or full day leave as shown in the screenshot below.

![](https://4282324958-files.gitbook.io/~/files/v0/b/gitbook-legacy-files/o/assets%2F-MXep_PEmh8mDPVWj49x%2F-MY4mgTOWswiAad-3nbH%2F-MY4pZ4JgiSCi2PfewAD%2F10.png?alt=media\&token=112be47c-9854-4cd2-8cf4-f03d976ad953)

**Step 7:** 'Holiday' setting is used to create public or optional holidays for employees. Select the financial year and location to configure for.

![](https://4282324958-files.gitbook.io/~/files/v0/b/gitbook-legacy-files/o/assets%2F-MXep_PEmh8mDPVWj49x%2F-MY4mgTOWswiAad-3nbH%2F-MY4pgq7gknQ0eg-5Asi%2F11.png?alt=media\&token=72c41cfa-dd31-4efb-9d37-1c48c23e59ec)

**Step 8:** Option 'Leave Credit' is used to credit different leaves like CL (casual leaves), PL (paid leaves), etc. Select a category and leave type to be credited for the employee. Fill in the details as shown in the screenshot below and click on 'Save'.&#x20;

![](https://4282324958-files.gitbook.io/~/files/v0/b/gitbook-legacy-files/o/assets%2F-MXep_PEmh8mDPVWj49x%2F-MY4mgTOWswiAad-3nbH%2F-MY4py7jB0FTDNfxVze6%2F12.png?alt=media\&token=8359d089-78ae-4ce8-ae2d-7cdcad5e4482)

**Step 9:** 'CompOff Credit' option is used to view/grant compensatory leave to employees for working overtime or as compensation. Select employee code and dates to view working hours and credit leave by clicking on 'Save'.&#x20;

![](https://4282324958-files.gitbook.io/~/files/v0/b/gitbook-legacy-files/o/assets%2F-MXep_PEmh8mDPVWj49x%2F-MY4mgTOWswiAad-3nbH%2F-MY4q1PZ5pBWsqNrQfw8%2F13.png?alt=media\&token=3479cc6d-b820-47c9-96f2-dc43d163f694)

**Step 10:** 'Leave Eligibility' option is used to set leave earning for employees. The leave accrual rule involves setting number of days and exclusions while calculating attendance. After selecting required parameters, click on 'Save'.&#x20;

![](https://4282324958-files.gitbook.io/~/files/v0/b/gitbook-legacy-files/o/assets%2F-MXep_PEmh8mDPVWj49x%2F-MY4mgTOWswiAad-3nbH%2F-MY4q59z9xoGSFPMuYgW%2F14.png?alt=media\&token=fa502360-eb8c-47d7-bb4c-3f667499a789)

***Note:** If you are unable to set financial year or facing difficulty in setting leave parameters, kindly contact us at* [*support@pockethrms.com*](mailto:support@pockethrms.com)


# SMTP Settings

SMTP settings

SMTP (Simple Mail Transfer Protocol) is a setup useful in sending mails at an organisation. Be it internal mailing or external, your email client such as Outlook, Apple Mail, Mailbird, etc. runs on SMTP protocol to send e-mails to the right receiver.&#x20;

The SMTP from TCP/IP protocol stores and forwards emails through network and prevents cross emails.&#x20;

This section will help you learn the steps involved in setting up an SMTP protocol on Pocket HRMS.

### How to set up SMTP?

**Step 1:** Log into the cloud portal, go to the 'Settings' menu and, under the ‘Organization’ tab, click on the 'SMTP Settings' sub-tab. To add new SMTP settings, click on the ‘+’ icon towards the upper left-hand side of the screen.

![](https://4282324958-files.gitbook.io/~/files/v0/b/gitbook-x-prod.appspot.com/o/spaces%2F-MXep_PEmh8mDPVWj49x%2Fuploads%2FLb2ZfsvvHFjBy27MRNgi%2F0.png?alt=media)

**Step 2**: A pop-up will open where you need to fill in the details such as the ‘SMTP Server’, ‘Sender Name’, ‘Sender Email’, ‘BCC’, ‘Priority’ and other mandatory details in the respective fields. Click on the ‘Update Settings’ button and the SMTP settings will be saved.

![](https://4282324958-files.gitbook.io/~/files/v0/b/gitbook-x-prod.appspot.com/o/spaces%2F-MXep_PEmh8mDPVWj49x%2Fuploads%2F6qBfF8OuN3MVOkfQv2o3%2F1.png?alt=media)

**Step 3:** Alternatively, to use the default SMTP settings, click on the ‘Add Default Settings’ button to autofill the values. Enter the ‘BCC’ value as required. Click on the ‘Update Settings’ button and default values will be saved for your organization.

![](https://4282324958-files.gitbook.io/~/files/v0/b/gitbook-x-prod.appspot.com/o/spaces%2F-MXep_PEmh8mDPVWj49x%2Fuploads%2FuE9FRjgGmMqeuf3wDke6%2F2.png?alt=media)

For any queries, contact <support@pockethrms.com>


# Templates Setup

Add Birthday & Anniversary Templates for quick emails

Birthday and anniversary wishes from their company make the employee feel valued and inculcate a sense of belonging to the company. It helps in retaining them for longer as well as improving their job satisfaction scores.

This section explains the steps to develop templates for quickly wishing your employees on their birthdays and anniversaries. Having this option would help in letting your team know that their teammate has a birthday and encourage them to wish that employee.

### **How to add birthday and anniversary templates?**

**Step 1:** Go to 'Settings'

![](https://4282324958-files.gitbook.io/~/files/v0/b/gitbook-x-prod.appspot.com/o/spaces%2F-MXep_PEmh8mDPVWj49x%2Fuploads%2FTGKK0HCOR2TOVQMRjZFG%2FBirthday%20Template%201.png?alt=media\&token=3c2791b9-fe32-4882-a653-14bf8eefb8a7)

**Step 2:** Select the 'HR' tab

![](https://4282324958-files.gitbook.io/~/files/v0/b/gitbook-x-prod.appspot.com/o/spaces%2F-MXep_PEmh8mDPVWj49x%2Fuploads%2FfAkQmjzeklVWeSgEfgnO%2FBirthday%20Template%202.png?alt=media\&token=5554129e-1e6d-41e4-83af-73723c534f0a)

**Step 3:** Select the 'HR - Letter' tab from the left side

![](https://4282324958-files.gitbook.io/~/files/v0/b/gitbook-x-prod.appspot.com/o/spaces%2F-MXep_PEmh8mDPVWj49x%2Fuploads%2Ftv9w9f2Bq6DUVqzLWQoE%2FBirthday%20Template%203.png?alt=media\&token=cf4b7791-745b-4d7d-8209-2d06cc551256)

**Step 4:** Select the '**+**' icon to the right to create a new template

![](https://4282324958-files.gitbook.io/~/files/v0/b/gitbook-x-prod.appspot.com/o/spaces%2F-MXep_PEmh8mDPVWj49x%2Fuploads%2FRtXt0ImIPWV15PggiD7g%2FBirthday%20Template%204.png?alt=media\&token=d8ec8e59-9a0f-4e06-9dd0-ac478e54b13a)

**Step 5:** Enter the Template name now:

* For Birthday Templates, please ensure that its name starts with the phrase **'BDAYTEMPLATE'**
* For Work Anniversary Templates, please ensure that its name starts with the phrase **'WORKANNIVERSARYTEMPLATE'**
* For Marriage Anniversary Templates, please ensure that its name starts with the phrase **'WEDDINGANNIVERSARYTEMPLATE'.**

![](https://4282324958-files.gitbook.io/~/files/v0/b/gitbook-x-prod.appspot.com/o/spaces%2F-MXep_PEmh8mDPVWj49x%2Fuploads%2FMECQjVo7lkDgVRlmkMRG%2FBirthday%20Template%205.png?alt=media\&token=a6ac2fed-37c1-4744-b040-febf15fa5112)

**Step 6:** Enter the rest of the details as well as the attachment and select the button 'Save Template' to save the template.

![](https://4282324958-files.gitbook.io/~/files/v0/b/gitbook-x-prod.appspot.com/o/spaces%2F-MXep_PEmh8mDPVWj49x%2Fuploads%2FZgH86vEbcQkXAJmenWvI%2FBirthday%20Template%206.png?alt=media\&token=7a071ef9-b242-4eb5-8063-2ec3b150077d)

Note: If you wish to edit your template, you can do so by clicking on the corresponding highlighted icon in the image below:

![](https://4282324958-files.gitbook.io/~/files/v0/b/gitbook-x-prod.appspot.com/o/spaces%2F-MXep_PEmh8mDPVWj49x%2Fuploads%2FhGMn4IJeU6iwhwupRbvt%2FBirthday%20Template%207.png?alt=media\&token=0a12c49b-eaf0-4e21-9fc0-c9cb289a32b2)

***Note:** If you are unable to create or edit the template, kindly contact us at* [***support@pockethrms.com***](mailto:support@pockethrms.com)


# Email Templates

HR Email Templates

Email module of Pocket HRMS dashboard helps you create and customize HR templates in clicks.&#x20;

Automated HR template generation helps make employee handling and HRM less time-consuming. Given below are steps involved in editing HR email templates.&#x20;

**How to create new email templates?**

**Step 1:** Go to '**Settings**'

![](https://4282324958-files.gitbook.io/~/files/v0/b/gitbook-legacy-files/o/assets%2F-MXep_PEmh8mDPVWj49x%2F-MYDyYTl0mRJgc8nMMc7%2F-MYDyzUv9-L8lNWxwcWM%2F1.png?alt=media\&token=074f6a92-1b5b-40c8-b61a-5a6e7e4ac153)

**Step 2:** Proceed to 'Organization' module

![](https://4282324958-files.gitbook.io/~/files/v0/b/gitbook-legacy-files/o/assets%2F-MXep_PEmh8mDPVWj49x%2F-MYDyYTl0mRJgc8nMMc7%2F-MYDz1pHkIqbIGRiI7r4%2F2.png?alt=media\&token=54057b6a-75c6-4c5d-9114-5c0dd35d068a)

**Step 3:** Select 'Email Templates' option

![](https://4282324958-files.gitbook.io/~/files/v0/b/gitbook-legacy-files/o/assets%2F-MXep_PEmh8mDPVWj49x%2F-MYDyYTl0mRJgc8nMMc7%2F-MYDz4nTWDa0tLFIB_j_%2F3.png?alt=media\&token=ccb4965b-5e72-4cb6-8112-b937c158a204)

Here, you can preview and edit email templates like payslip, Form16, password reset email, etc.&#x20;

***Note: If you are unable to configure HR templates, kindly contact us at*** [***support@pockethrms.com***](mailto:support@pockethrms.com)&#x20;


# Users

Step-by-step guide for the ‘User’ page on the cloud portal

On this page, you will find a guide for various features such as,

* Creating a New User
* Assign User Rights
* Edit User Details
* Change User Rights
* Disable User
* Enable User
* Delete User

You will find a step-by-step guide for these functions is given below.

### How to create a new user in the cloud portal?

**Step 1:** Log into the cloud portal, go to the ‘Settings’ menu and under the ‘Organization’ tab click on the ‘Users’ subtab. On this page you will see the list of existing users.

![](https://4282324958-files.gitbook.io/~/files/v0/b/gitbook-x-prod.appspot.com/o/spaces%2F-MXep_PEmh8mDPVWj49x%2Fuploads%2FjKkjaqNzDmHkXJNF5IIt%2F0.png?alt=media)

**Step 2:** To create a new user, click on the ‘+’ icon from the upper right-hand side of the screen and a pop-up will open.

![](https://4282324958-files.gitbook.io/~/files/v0/b/gitbook-x-prod.appspot.com/o/spaces%2F-MXep_PEmh8mDPVWj49x%2Fuploads%2FmDDBNa1arGh68zfEN2jG%2F1.png?alt=media)

**Step 3**: Fill in the details in the respective fields such as the ‘Name’, ‘Email Id’, ‘Password’ and then ‘Confirm Password’. Also, select the company ‘Company Name’ for which you want to give access to the user and click on the ‘Create User’ button.

A new user will be created.

![](https://4282324958-files.gitbook.io/~/files/v0/b/gitbook-x-prod.appspot.com/o/spaces%2F-MXep_PEmh8mDPVWj49x%2Fuploads%2F4Qm3w8fcJhhyAElfiTcg%2F2.png?alt=media)

### How to assign rights to the user in the cloud portal?

**Step 1:** Log into the cloud portal, go to the ‘Settings’ menu and under the ‘Organization’ tab click on the ‘Users’ subtab. On this page you will see the list of existing users.&#x20;

<figure><img src="https://4282324958-files.gitbook.io/~/files/v0/b/gitbook-x-prod.appspot.com/o/spaces%2F-MXep_PEmh8mDPVWj49x%2Fuploads%2FS0BasxuhBH3V7R7JXBkS%2F3.png?alt=media" alt=""><figcaption></figcaption></figure>

**Step 2**: Find the user to whom you want to give rights and click on the ‘View User Rights’ button.

![](https://4282324958-files.gitbook.io/~/files/v0/b/gitbook-x-prod.appspot.com/o/spaces%2F-MXep_PEmh8mDPVWj49x%2Fuploads%2FPZjnJulOWk2myCzdeLkD%2F4.png?alt=media)

**Step 3:** Select all the checkboxes from the ‘Menu’ and the ‘Category’ list for which you want to provide rights to the user and click on the ‘Save’ button. The right to access the selected menu and category will be given to the user.

![](https://4282324958-files.gitbook.io/~/files/v0/b/gitbook-x-prod.appspot.com/o/spaces%2F-MXep_PEmh8mDPVWj49x%2Fuploads%2Fxwa5zz7dDhPKjTnnznVq%2F5.png?alt=media)

### How to edit user details or change user access to companies?

### or How to change user name for users in cloud portal?

**Step 1:** Log into the cloud portal, go to the ‘Settings’ menu and under the ‘Organization’ tab click on the ‘Users’ subtab. On this page, you will see the list of existing users.&#x20;

<figure><img src="https://4282324958-files.gitbook.io/~/files/v0/b/gitbook-x-prod.appspot.com/o/spaces%2F-MXep_PEmh8mDPVWj49x%2Fuploads%2FwXfllv57qoOsNjDg8xTM%2F6.png?alt=media" alt=""><figcaption></figcaption></figure>

**Step 2:** Locate the user for whom you want to edit details and click on the ‘Edit Icon’.

![](https://4282324958-files.gitbook.io/~/files/v0/b/gitbook-x-prod.appspot.com/o/spaces%2F-MXep_PEmh8mDPVWj49x%2Fuploads%2Fdq0pLomdQgakm09UG6u6%2F7.png?alt=media)

**Step 3**: The ‘User’ pop-up will open where you can edit ‘Name’ in the respective field.

Under the ‘Company’ list you can,

* Select the respective checkboxes to provide access.
* Deselect the respective checkboxes to remove the access.

Click on the ‘Update User’ button and the changes will be saved accordingly.

![](https://4282324958-files.gitbook.io/~/files/v0/b/gitbook-x-prod.appspot.com/o/spaces%2F-MXep_PEmh8mDPVWj49x%2Fuploads%2FcTBHfzYBXA5iibzj8Oj9%2F8.png?alt=media)

<figure><img src="https://4282324958-files.gitbook.io/~/files/v0/b/gitbook-x-prod.appspot.com/o/spaces%2F-MXep_PEmh8mDPVWj49x%2Fuploads%2FUEy092Ckw33YbqryKqXw%2F9.png?alt=media" alt=""><figcaption></figcaption></figure>

**Path**: Cloud>Settings>Organization>Users>Find user-‘Edit Icon’>you can change the details ex. name/password>Update User

**Link**: <https://cloud.pockethrms.com/Settings/Employee/Index?module=organization&submodule=users>

For any queries, contact <support@pockethrms.com>

### How to edit/change user rights from the cloud portal?

**Step 1:** Log into the cloud portal, go to the ‘Settings’ menu and under the ‘Organization’ tab click on the ‘Users’ subtab. On this page, you will see the list of existing users.&#x20;

<figure><img src="https://4282324958-files.gitbook.io/~/files/v0/b/gitbook-x-prod.appspot.com/o/spaces%2F-MXep_PEmh8mDPVWj49x%2Fuploads%2FiZeMxPWu4BUvG6FuXNER%2F10.png?alt=media" alt=""><figcaption></figcaption></figure>

**Step 2**: Find the user for whom you change rights and click on the ‘View User Rights’ button.

![](https://4282324958-files.gitbook.io/~/files/v0/b/gitbook-x-prod.appspot.com/o/spaces%2F-MXep_PEmh8mDPVWj49x%2Fuploads%2FJ23HfPRksBaXF9SaTOr9%2F11.png?alt=media)

**Step 3**: You will find various ‘Menus’ and ‘Categories’ listed here.

* Select the respective checkboxes to provide access.
* Deselect the respective checkboxes to remove the access.

Click on the ‘Save’ button and the rights or access will be changed for the user accordingly.

![](https://4282324958-files.gitbook.io/~/files/v0/b/gitbook-x-prod.appspot.com/o/spaces%2F-MXep_PEmh8mDPVWj49x%2Fuploads%2FmaMpC4YLWweqLpDZANbZ%2F12.png?alt=media)

**Note**: You need to keep at least one category and one menu selected to save the changes.

### How to disable user from the cloud portal?

**Step 1:** Log into the cloud portal, go to the ‘Settings’ menu and under the ‘Organization’ tab click on the ‘User’ subtab. On this page, you will see the list of existing users.&#x20;

<figure><img src="https://4282324958-files.gitbook.io/~/files/v0/b/gitbook-x-prod.appspot.com/o/spaces%2F-MXep_PEmh8mDPVWj49x%2Fuploads%2FbMES5C6vCKRaka9377Ow%2F13.png?alt=media" alt=""><figcaption></figcaption></figure>

**Step 2:** Locate the user to whom you want to disable and click on the ‘Disable User’ button.

![](https://4282324958-files.gitbook.io/~/files/v0/b/gitbook-x-prod.appspot.com/o/spaces%2F-MXep_PEmh8mDPVWj49x%2Fuploads%2FpSlSqAqMW4wbZG2ODDh2%2F14.png?alt=media)

**Step 3:** The system will ask you for confirmation, click on the ‘Ok’ button and the user will be disabled. The user will not be able to login with their respective credential anymore.

<figure><img src="https://4282324958-files.gitbook.io/~/files/v0/b/gitbook-x-prod.appspot.com/o/spaces%2F-MXep_PEmh8mDPVWj49x%2Fuploads%2F4MrJMR6mnuHCVyk0tiLh%2F15.png?alt=media" alt=""><figcaption></figcaption></figure>

**Note:** Once the user is disabled it will be still visible in the user’s list and the system will show the ‘Enable User’ button for them.

<figure><img src="https://4282324958-files.gitbook.io/~/files/v0/b/gitbook-x-prod.appspot.com/o/spaces%2F-MXep_PEmh8mDPVWj49x%2Fuploads%2F3nEtqmaXz7iS8GKpdqOM%2F16.png?alt=media" alt=""><figcaption></figcaption></figure>

### How to enable user from the cloud portal?

**Step 1:** Log into the cloud portal, go to the ‘Settings’ menu and under the ‘Organization’ tab click on the ‘User’ subtab. On this page, you will see the list of existing users.&#x20;

<figure><img src="https://4282324958-files.gitbook.io/~/files/v0/b/gitbook-x-prod.appspot.com/o/spaces%2F-MXep_PEmh8mDPVWj49x%2Fuploads%2F2NlFsWL2E17ZEGOmjcrU%2F17.png?alt=media" alt=""><figcaption></figcaption></figure>

**Step 2:** Locate the disabled user to whom want to enable and click on the ‘Enable User’ button.

![](https://4282324958-files.gitbook.io/~/files/v0/b/gitbook-x-prod.appspot.com/o/spaces%2F-MXep_PEmh8mDPVWj49x%2Fuploads%2FZD0VZb4ozTOta7iLv83n%2F18.png?alt=media)

**Step 3:** the system will ask you for confirmation, click on the ‘Ok’ button and the user will be enabled. The user will be able to log in with their respective credential.

<figure><img src="https://4282324958-files.gitbook.io/~/files/v0/b/gitbook-x-prod.appspot.com/o/spaces%2F-MXep_PEmh8mDPVWj49x%2Fuploads%2FMshOPCBEIaYF8Qi8DAd4%2F19.png?alt=media" alt=""><figcaption></figcaption></figure>

### How to delete a user from cloud portal?

**Step 1:** Log into the cloud portal, go to the ‘Settings’ menu and under the ‘Organization’ tab click on the ‘User’ subtab. On this page, you will see the list of existing users.&#x20;

<figure><img src="https://4282324958-files.gitbook.io/~/files/v0/b/gitbook-x-prod.appspot.com/o/spaces%2F-MXep_PEmh8mDPVWj49x%2Fuploads%2FRLq8DsDvzjgXXtWlg6cn%2F20.png?alt=media" alt=""><figcaption></figcaption></figure>

**Step 2:** Locate the employee user whom you want to delete and click on the ‘Delete Icon’.

<figure><img src="https://4282324958-files.gitbook.io/~/files/v0/b/gitbook-x-prod.appspot.com/o/spaces%2F-MXep_PEmh8mDPVWj49x%2Fuploads%2FPI5MSAjuBfBHTqfJJXrK%2F2.png?alt=media&amp;token=77ee3c3c-e75d-48ca-b373-b1312003beb4" alt=""><figcaption></figcaption></figure>

**Step 3:** the system will ask you for confirmation, click on the ‘Ok’ button and the user will be deleted.

<figure><img src="https://4282324958-files.gitbook.io/~/files/v0/b/gitbook-x-prod.appspot.com/o/spaces%2F-MXep_PEmh8mDPVWj49x%2Fuploads%2FxOtJARu6CW2tc2VJ6ypv%2F3.png?alt=media&amp;token=b7239202-61ca-472d-81c5-284753c26c89" alt=""><figcaption></figcaption></figure>

For any queries, contact <support@pockethrms.com>


# HR

### 1. How to upload Form16 for all employees?

Follow the steps below to upload Form 16 for all employees.

* Download Part A and Part B of Form 16 from TRACES
* Prepare the Files
* Use the Utility to Upload Form 16

#### Step 1: Download Part A and Part B of Form 16 from TRACES:

* Log in to **TRACES** using the employer credentials (you’ll need the TAN login).
* Go to the ‘**Downloads’** and click on the ‘**Form 16’** option.

![](https://4282324958-files.gitbook.io/~/files/v0/b/gitbook-x-prod.appspot.com/o/spaces%2F-MXep_PEmh8mDPVWj49x%2Fuploads%2FwlMBJXyjF8392EAYhsBN%2F0.png?alt=media)

* Download **Part A** and **Part B** of Form 16 for each employee **without Digital Signature**.

![](https://4282324958-files.gitbook.io/~/files/v0/b/gitbook-x-prod.appspot.com/o/spaces%2F-MXep_PEmh8mDPVWj49x%2Fuploads%2Fi3sqWZGULC9xYgxOzjwQ%2F1.png?alt=media)

#### Step 2: Prepare the Files:

* Ensure both Part A and Part B are correctly downloaded in PDF format
* Keep the **digital signature dongle** ready
* Make sure the files Part A files and the Part B files are saved in the separate folders.
* PAN number should be updated for all the employees in the Cloud portal.

#### Step 3: Use the Utility to Upload Form 16:

* Once you have Part A and Part B are ready, you can let us know to use the utility.
* ‘Select Company’ for ‘Part A’ and ‘Part B’ select folders from the respective fields and click on the ‘Sign And Upload’ button.

**Note**: For utility installation, we recommend using a system where the digital signature is already installed.

![](https://4282324958-files.gitbook.io/~/files/v0/b/gitbook-x-prod.appspot.com/o/spaces%2F-MXep_PEmh8mDPVWj49x%2Fuploads%2F3RuvYTEJaCR4QLxWShYR%2F2.png?alt=media)

* We will update the utility to upload the Form 16 documents to the employee portal, so employees can access them directly **from their ESS portal**.

#### Path for employees to access their ‘Form 16’

* Employee can log into the ESS portal, go to the ‘Profile’ menu and click on the ‘My Tax Details’ submenu

![](https://4282324958-files.gitbook.io/~/files/v0/b/gitbook-x-prod.appspot.com/o/spaces%2F-MXep_PEmh8mDPVWj49x%2Fuploads%2FSWN0FAkAV1dGwIqsJsv6%2F3.png?alt=media)

* Click on the ‘From 16’ tab and the Form 16 can be downloaded from here.

![](https://4282324958-files.gitbook.io/~/files/v0/b/gitbook-x-prod.appspot.com/o/spaces%2F-MXep_PEmh8mDPVWj49x%2Fuploads%2FAb7l7nZAhRjHMeOjHp3T%2F4.png?alt=media)

For any queries, contact <support@pockethrms.com>


# Transfer Setting

Transfer setting

The transfer setting module lets you anytime transfer HR templates like location transfer letters easily. Employee code transfer, ESI location transfer, year-end transfer, etc. becomes easy with Pocket HRMS dashboard.

Stepwise transfer setting is as explained below.

#### Pre-requisites:

:heavy\_check\_mark: Admin credentials

:heavy\_check\_mark:User rights

***Note** - Kindly contact your Admin/ HR for rights if you are not able to perform the steps below.*

### **How to go with transfer management?**

**Step 1:** Go to 'Settings'

![](https://4282324958-files.gitbook.io/~/files/v0/b/gitbook-legacy-files/o/assets%2F-MXep_PEmh8mDPVWj49x%2F-MYDls_5XAcqBEqqcko5%2F-MYDmINOVGtTBxywZSU6%2F1.png?alt=media\&token=0692aed9-1e0f-4d7f-b30c-ffcbbc25dc47)

**Step 2:** Proceed to 'HR' column

![](https://4282324958-files.gitbook.io/~/files/v0/b/gitbook-legacy-files/o/assets%2F-MXep_PEmh8mDPVWj49x%2F-MYDls_5XAcqBEqqcko5%2F-MYDmObTA1ASggweb-LT%2F2.png?alt=media\&token=1bed3c2d-c7b4-493a-b3e6-b526ac649f37)

**Step 3:** Select 'Transfer Setting' option.

![](https://4282324958-files.gitbook.io/~/files/v0/b/gitbook-legacy-files/o/assets%2F-MXep_PEmh8mDPVWj49x%2F-MYDls_5XAcqBEqqcko5%2F-MYDmSOJa1l4UOJqub4o%2F3.png?alt=media\&token=ece08660-790e-4e0f-9f92-8c7ab879dc48)

Now, a window (as above) appears. Here, fill in all the required details like setting name, transfer type, fields for transfer template, etc. After successfully filling all the details, click on 'Save'.&#x20;

***Note:** If you are unable to setup transfer setting, kindly contact us at* [*support@pockethrms.com*](mailto:support@pockethrms.com)&#x20;


# Confirmation

Pocket HRMS Confirmation Process | User Guide

Confirmation is a configuration-based module in Pocket HRMS. The workflow of this module is based on the Master settings.

The Admin needs to configure the Master settings which includes the following:

* Confirmation Module
* Approval Matrix
* Dynamic Form

#### Pre-requisites:

✔ Admin credentials

✔ User rights

***Note** - Kindly contact your Admin/ HR for rights if you are not able to perform the steps below.*

### **How to configure the Confirmation Module?**

#### **Step 1**: Go to Settings > HR.

![](https://4282324958-files.gitbook.io/~/files/v0/b/gitbook-x-prod.appspot.com/o/spaces%2F-MXep_PEmh8mDPVWj49x%2Fuploads%2F8Ihi5r336hiY01sVuya4%2FConfirmation%20Admin%201.1.png?alt=media\&token=7650e1db-f84b-413a-8f0d-0f9c2d1a3fee)

**Step 2:** Select the ‘Confirmation Module’ tab.

![](https://4282324958-files.gitbook.io/~/files/v0/b/gitbook-x-prod.appspot.com/o/spaces%2F-MXep_PEmh8mDPVWj49x%2Fuploads%2FbhUcR7BsM2FpECVFpUCL%2FConfirmation%20Admin%201.2.png?alt=media\&token=eb926b2d-81ce-4ea2-bae3-f1ed847e04f8)

**Step 3:** Select the correct options as required.

![](https://4282324958-files.gitbook.io/~/files/v0/b/gitbook-x-prod.appspot.com/o/spaces%2F-MXep_PEmh8mDPVWj49x%2Fuploads%2FillyFDTTbhdfbkodeAsM%2FConfirmation%20Admin%201.3.png?alt=media\&token=7f500a18-8db5-4902-bbc1-23076d342bcb)

**Step 4:** Click on the ‘Save’ button to save the configuration.

![](https://4282324958-files.gitbook.io/~/files/v0/b/gitbook-x-prod.appspot.com/o/spaces%2F-MXep_PEmh8mDPVWj49x%2Fuploads%2FnFmChbw10dHEXhPxvnVK%2FConfirmation%20Admin%201.4.png?alt=media\&token=9ae0e70d-4c5d-4d0c-a7b5-ae34b49dcd3e)

### **How to configure the Approval Matrix (for 1 Employee)?**

**Step 1:** Go to Employee > Employee List.

![](https://4282324958-files.gitbook.io/~/files/v0/b/gitbook-x-prod.appspot.com/o/spaces%2F-MXep_PEmh8mDPVWj49x%2Fuploads%2FKFw5Ss4gJaWTOFML84af%2FConfirmation%20Admin%202.1.png?alt=media\&token=c6230f1d-cccb-4324-99eb-2fadfc2ba946)

**Step 2:** Select an Employee from the Employee List.

![](https://4282324958-files.gitbook.io/~/files/v0/b/gitbook-x-prod.appspot.com/o/spaces%2F-MXep_PEmh8mDPVWj49x%2Fuploads%2FYg35COHLKrdcE2HPs6kO%2FConfirmation%20Admin%202.2.png?alt=media\&token=86bd9025-1abe-435b-9391-6827f74d221d)

**Step 3:** Select the ‘Approval Matrix’ tab and select the ‘+’ icon to proceed.

![](https://4282324958-files.gitbook.io/~/files/v0/b/gitbook-x-prod.appspot.com/o/spaces%2F-MXep_PEmh8mDPVWj49x%2Fuploads%2FluS39A9VdJT9VmbYg8ZC%2FConfirmation%20Admin%202.3.png?alt=media\&token=9877855b-2b14-4b10-9aef-801e3b89fcd2)

**Step 4:** Enter the required information and select the ‘Save’ button to save the details.

![](https://4282324958-files.gitbook.io/~/files/v0/b/gitbook-x-prod.appspot.com/o/spaces%2F-MXep_PEmh8mDPVWj49x%2Fuploads%2FEDmG4OebbBumI8UDl0jU%2FConfirmation%20Admin%202.4.png?alt=media\&token=2fe81d59-9653-4ad4-95ff-4fe82fba9c1c)

### **How to configure the Approval Matrix (for All Employees)?**

**Step 1:** Go to Employee > Import.

![](https://4282324958-files.gitbook.io/~/files/v0/b/gitbook-x-prod.appspot.com/o/spaces%2F-MXep_PEmh8mDPVWj49x%2Fuploads%2FazkamZZJo5oTOBU2TSHN%2FConfirmation%20Admin%203.1.png?alt=media\&token=097b17f7-329b-492e-bcf5-cc3c4be28e70)

**Step 2:** Select the option ‘Approval Matrix Manager Import’ under the drop-down menu titled ‘Select Import Template’.

![](https://4282324958-files.gitbook.io/~/files/v0/b/gitbook-x-prod.appspot.com/o/spaces%2F-MXep_PEmh8mDPVWj49x%2Fuploads%2FIhEksQkZSilj1h36r8OE%2FConfirmation%20Admin%203.2.png?alt=media\&token=efa4e6ee-b30c-4851-9519-b595a20ca631)

**Step 3:** Enter the relevant details in this page and click on the ‘Save Settings’ button if you wish to save the Excel file configuration.

![](https://4282324958-files.gitbook.io/~/files/v0/b/gitbook-x-prod.appspot.com/o/spaces%2F-MXep_PEmh8mDPVWj49x%2Fuploads%2FCfllZoH1AvY8VtC5DVMc%2FConfirmation%20Admin%203.3.png?alt=media\&token=42ee9b63-76ea-4163-84b0-61f84e4cad5e)

**Step 4:** Drag and drop the Excel file in the ‘.xlsx’ format inside the designated area and click on the ‘Upload File’ button to upload the Excel file.

![](https://4282324958-files.gitbook.io/~/files/v0/b/gitbook-x-prod.appspot.com/o/spaces%2F-MXep_PEmh8mDPVWj49x%2Fuploads%2FfProurApPjNkdkN8zGh0%2FConfirmation%20Admin%203.4.png?alt=media\&token=b00e4021-9d63-4d55-989c-5091cf4db1c6)

### **How to configure the Confirmation Dynamic Form?**

**Step 1**: Go to Settings > HR.

![](https://4282324958-files.gitbook.io/~/files/v0/b/gitbook-x-prod.appspot.com/o/spaces%2F-MXep_PEmh8mDPVWj49x%2Fuploads%2FmnwcLY93HaIMKwcvlJtA%2FConfirmation%20Admin%204.1.png?alt=media\&token=e148040a-50bf-4692-95a2-c4ed59b352ec)

**Step 2:** Select the ‘Field Creation’ tab.

![](https://4282324958-files.gitbook.io/~/files/v0/b/gitbook-x-prod.appspot.com/o/spaces%2F-MXep_PEmh8mDPVWj49x%2Fuploads%2FTOkBMD7ClAC4RqSfDZuK%2FConfirmation%20Admin%204.2.png?alt=media\&token=2ac24da0-5aba-47d8-a1fe-9b1b0a3483a0)

**Step 3:** Click on the ‘+’ icon to the right side of the screen.

![](https://4282324958-files.gitbook.io/~/files/v0/b/gitbook-x-prod.appspot.com/o/spaces%2F-MXep_PEmh8mDPVWj49x%2Fuploads%2F4z8c9HxD5ONhUQsiSRgg%2FConfirmation%20Admin%204.3.png?alt=media\&token=cd98526e-7f07-4b0f-92d9-a7d606ef2968)

**Step 4:** Enter the required information and click on the ‘Create’ button to enter the details.

![](https://4282324958-files.gitbook.io/~/files/v0/b/gitbook-x-prod.appspot.com/o/spaces%2F-MXep_PEmh8mDPVWj49x%2Fuploads%2FkyeFq9BpY4Rl3e9RutQ7%2FConfirmation%20Admin%204.4.png?alt=media\&token=cad90133-a4cb-4d41-a248-38d7fb3b76ce)

***Note:***

* *Based on the settings configured here, the Confirmation Form in the manager’s ESS portal will change.*
* *The Confirmation Module is based on the confirmation date of the employee. Hence, the Admin or HR needs to update the probation period for all employees in the Employee Master.*

*If you are unable to perform the configuration, kindly contact us at* [*support@pockethrms.com*](mailto:support@pockethrms.com)


# Asset Management

Pocket HRMS provides comprehensive Asset Management to upgrade your experience and give you greater efficiency. This guide provides step-by-step instructions and intuitive interface to simplify asset management and ensure streamlined processes and enhanced productivity.

With the help of this guide, you will learn how to create, categorize and assign assets to employees, and generate detailed reports tailored to your organization's needs.

### How to add Asset Category?

Log into the pocket HRMS cloud portal and click on the ‘Settings’ menu and click on the ‘HR’ tab.&#x20;

<figure><img src="https://4282324958-files.gitbook.io/~/files/v0/b/gitbook-x-prod.appspot.com/o/spaces%2F-MXep_PEmh8mDPVWj49x%2Fuploads%2FEUu2h2UAVqOSt47k2lfn%2F0.png?alt=media" alt=""><figcaption></figcaption></figure>

Scroll down to select the ‘Asset Info’ submenu to view asset categories.

![](https://4282324958-files.gitbook.io/~/files/v0/b/gitbook-x-prod.appspot.com/o/spaces%2F-MXep_PEmh8mDPVWj49x%2Fuploads%2FoT8E27AidhVDrmeSeFUj%2F1.png?alt=media)

Under asset info you can see existing asset categories and click on the ‘+’ to create a new asset category.

![](https://4282324958-files.gitbook.io/~/files/v0/b/gitbook-x-prod.appspot.com/o/spaces%2F-MXep_PEmh8mDPVWj49x%2Fuploads%2FuM5DIVXS8GGzn4IourZG%2F2.png?alt=media)

An ‘Asset Info’ pop-up will appear where you need to enter ‘Title’ and ‘Notification Email’ to create a new asset category. That way you will experience systematic asset management. A notification will be sent to this email every time an asset is assigned to an employee, the person in charge will always stay updated.

![](https://4282324958-files.gitbook.io/~/files/v0/b/gitbook-x-prod.appspot.com/o/spaces%2F-MXep_PEmh8mDPVWj49x%2Fuploads%2FxNumZx0pFhDXwljZ6Qy8%2F3.png?alt=media)

Once you click on the ‘Save’ button a new category will be created which will automatically appear under ‘Asset Info’.

![](https://4282324958-files.gitbook.io/~/files/v0/b/gitbook-x-prod.appspot.com/o/spaces%2F-MXep_PEmh8mDPVWj49x%2Fuploads%2FsohAuKYbtDX3WGC6yxtr%2F4.png?alt=media)

{% embed url="<https://youtu.be/v0QQsfWIRmU>" %}

### How to add Assets?

To view all the assets in the company you need to click on ‘Settings’ menu and under the ‘HR’ tab and click on the ‘Asset List’ submenu.

![](https://4282324958-files.gitbook.io/~/files/v0/b/gitbook-x-prod.appspot.com/o/spaces%2F-MXep_PEmh8mDPVWj49x%2Fuploads%2FDH7mKmqsECf5NsIwunsF%2F5.png?alt=media)

If you want to create a new asset you can click on the ‘+’ button.

![](https://4282324958-files.gitbook.io/~/files/v0/b/gitbook-x-prod.appspot.com/o/spaces%2F-MXep_PEmh8mDPVWj49x%2Fuploads%2FkKMGK3nSy3gNE8F2NjC4%2F6.png?alt=media)

‘Update Asset’ pop-up will appear which allows you to enter various details about the asset.

![](https://4282324958-files.gitbook.io/~/files/v0/b/gitbook-x-prod.appspot.com/o/spaces%2F-MXep_PEmh8mDPVWj49x%2Fuploads%2F69VmcizB4LJ5IQzGJwLn%2F7.png?alt=media)

Choose an asset category from the drop-down so you can add a new asset under it.

![](https://4282324958-files.gitbook.io/~/files/v0/b/gitbook-x-prod.appspot.com/o/spaces%2F-MXep_PEmh8mDPVWj49x%2Fuploads%2Fg6a232kgKiBkDR2avBt3%2F8.png?alt=media)

You also need to enter the details such as ‘Asset Name’, ‘Asset Tag’ and ’Model Name’. This makes every asset unique and helps to easily identify the asset.

![](https://4282324958-files.gitbook.io/~/files/v0/b/gitbook-x-prod.appspot.com/o/spaces%2F-MXep_PEmh8mDPVWj49x%2Fuploads%2FUhsJ5yvyXU0YQyXCkX2R%2F9.png?alt=media)

You can select the ‘Asset Status’ from the drop-down. You can also segregate assets here depending on whether it is broken or have been requested which further improves the asset management process.

![](https://4282324958-files.gitbook.io/~/files/v0/b/gitbook-x-prod.appspot.com/o/spaces%2F-MXep_PEmh8mDPVWj49x%2Fuploads%2F0Xd2L5nvK3uPkJcc3mLq%2F10.png?alt=media)

You can also add details such as ‘Serial Number’ and ‘Vendor Name’ to further increase accuracy.

![](https://4282324958-files.gitbook.io/~/files/v0/b/gitbook-x-prod.appspot.com/o/spaces%2F-MXep_PEmh8mDPVWj49x%2Fuploads%2FFLaetqR1i7zoXJLV9O3y%2F11.png?alt=media)

You can also add ‘Purchase Date’, and ‘Default Location’ and also add specific ‘Description’ for the asset if you want. In addition to that you can easily ‘Choose File’ from your computer if you want to ‘Upload Image’ and ‘Attach Invoice’ so, you will ‘Save’ all the essential details at the same place.

![](https://4282324958-files.gitbook.io/~/files/v0/b/gitbook-x-prod.appspot.com/o/spaces%2F-MXep_PEmh8mDPVWj49x%2Fuploads%2Ft1ievjFvzXouRpLKm1xN%2F12.png?alt=media)

{% embed url="<https://youtu.be/Sw-9cnShW4c>" %}

[](<https://youtu.be/Sw-9cnShW4c&#xD;&#xA;>)For any queries, contact <support@pockethrms.com>


# Password Generation

This is a step by step guide for HR to set strong ESS passwords for employees

### 1. How to set ESS password or log in credentials for employees?

To set the ESS password or login credentials for employees refer the below link:

{% embed url="<https://docs.pockethrms.com/faqs/cloud-portal/settings/hr#id-29.-how-to-generate-employee-password-and-send-it-in-direct-mail-to-the-employees>" %}

For any queries, contact <support@pockethrms.com>

### 2. How to generate log in credentials or password & username for new employees and send it through email?

To generate login credentials for new employees refer to the link below:

{% embed url="<https://docs.pockethrms.com/faqs/cloud-portal/settings/hr#id-29.-how-to-generate-employee-password-and-send-it-in-direct-mail-to-the-employees>" %}

For any queries, contact <support@pockethrms.com>

### 3. How to change/update or create/generate password for a new employee and sent it over email?

{% embed url="<https://docs.pockethrms.com/faqs/cloud-portal/settings/hr#id-29.-how-to-generate-employee-password-and-send-it-in-direct-mail-to-the-employees>" %}

For any queries, contact <support@pockethrms.com>


# Dedicated HR

### **Dedicated HR**

### **What is a Dedicated HR and How Do I Assign One?**

This guide explains what the **Dedicated HR** functionality does, how to assign a Dedicated HR to an employee, and how Dedicated HR screens work across modules.

### **What is a Dedicated HR?**

A **Dedicated HR (DHR)** is an employee who is given HR-level approval and review access, but only for a specific set of employees who are tagged to them, instead of the entire company. This is useful when you want to split HR workload — for example, by department or location — without giving every HR person full visibility into all employee records.

The Dedicated HR functionality is available in five modules: Exit, FnF, Confirmation, Transfer, and Safety Incident.

### **The Dedicated HR Field**

**Dedicated HR** is set up through a configuration field that is provided by default ([Click here](https://docs.pockethrms.com/faqs/cloud-portal/settings/hr/configuration-fields#id-1.-how-to-add-new-column-new-field-in-master-field-of-employee-profile) to know more about the Configuration Fields):

* Field name: DHR
* Field label: Dedicated HR

This field can be placed in one of three panels on an employee's profile: Basic Details, Employee Details, or Personal Details. Wherever it is configured, the field appears in that panel, so make sure to update the panel placement as required for your account.

### **Assigning a Dedicated HR While Creating an Employee**

The **Dedicated HR** field can be filled in at the time an employee is created, through any of the following paths.

* **Path:** [Cloud > Employee > Employee List > Employee Wizard](https://cloud.pockethrms.com/Employee/Employee/EmployeeList)
* **Path:** [Cloud > Employee > Import > Employee Master Import](https://cloud.pockethrms.com/Employee/Employee/EmployeeImport?import=1)
* **Path:** [ESS > Hire V2 > Candidates > Add/Manage > Candidate Profile > Onboard](https://swa.pockethrms.com/Recruitment/RecruitmentV2/Candidate)\
  (This only shows the Dedicated HR field if it has been configured in the Basic Details panel.)
* **Path:** [ESS > Hire > Recruiter > Candidate Onboarding > Add](https://swa.pockethrms.com/Recruitment/Transaction/Recruitment?Menu=CandidateOnboarding)\
  (This only shows the Dedicated HR field if it has been configured in the Basic Details panel.)

### **Assigning or Changing a Dedicated HR for an Existing Employee**

The **Dedicated HR** field can also be assigned or changed after an employee record already exists, through either of the following paths.

* **Path:** [Cloud > Employee > Employee List > Employee Profile > Basic Details/Employee Details/Personal Data panel > Dedicated HR](https://cloud.pockethrms.com/Employee/Employee/EmployeeList)
* **Path:** [Cloud > Employee > Import > Employee Amendment Import](https://cloud.pockethrms.com/Employee/Employee/EmployeeImport?import=1)

### **Who Can Be Assigned as a Dedicated HR?**

Only an employee who has a Manager Eligible Self Service Role can be assigned as a Dedicated HR.

[Click here](https://docs.pockethrms.com/faqs/cloud-portal/employee/employee-list/profile#id-12.-how-to-provide-an-employee-manager-rights-or-manager-role) to know more about Manager Eligible Self Service Role.

### **Dedicated HR Screens**

Each of the five modules where Dedicated HR is available gets its own screen for Dedicated HRs. Each of these screens is an exact replication of the corresponding HR screen on the same path, and functions the same way — the only difference is what data it shows.

* The HR screen continues to show entries for all employees in the company.
* The Dedicated HR screen shows entries only for the employees who are tagged to that logged-in Dedicated HR.

The screens are as follows.

* **Exit** — **Path:** [ESS > Exit > Approval > DHR Separation Approval Data](https://essstaging.pockethrms.com/ExitManagement/Transaction/Approval?Menu=DHRSeparationApprovalData)
* **FnF** — **Path:** [ESS > FnF > Approval > Full Final DHR Approval](https://essstaging.pockethrms.com/FullnFinal/Transaction/Approval?Menu=FullFinalDHRApproval)
* **Confirmation**
  * **Path:** [ESS > Confirm > DHR Approval > DHR Approval](https://essstaging.pockethrms.com/Confirmation/Transaction/ConfirmationDHRApproval?Menu=DHRApproval)
  * **Path:** [ESS > Confirm > DHR Approval > DHR Training Period Approval](https://essstaging.pockethrms.com/Confirmation/Transaction/ConfirmationDHRApproval?Menu=DHRTrainingPeriodApproval)
  * **Path:** [ESS > Confirm > DHR Approval > DHR Employee Confirmation Pending](https://essstaging.pockethrms.com/Confirmation/Transaction/ConfirmationDHRApproval?Menu=DHREmployeeConfirmationPending)
* **Transfer** — **Path:** [ESS > Transfer > Approval > DHR Transfer Approval](https://essstaging.pockethrms.com/Transfer/Transaction/Approval?Menu=DHRTransferApproval)
* **Safety Incident** — **Path:** [ESS > Safety > Safety Incident > DHR Reviews](https://essstaging.pockethrms.com/SafetyIncident/SafetyIncident/Index?Menu=dhrreview)

{% hint style="info" %}
**Important Note:**

* All 5 module flows stay the same for Dedicated HRs as they are for HRs
* Notifications that apply to HRs also apply to Dedicated HR
* And all actions available to HRs are also available to Dedicated HRs
  {% endhint %}

### **Granting Dedicated HR Screen Access**

Having the DHR field filled in on an employee's profile assigns them as a Dedicated HR, but it does not automatically give them access to the Dedicated HR screens. For an employee to actually see and act on entries as a Dedicated HR, their Self Service Role must be granted access to the relevant Dedicated HR screens.

{% stepper %}
{% step %}

## Step 1

Go to [Cloud > ESS Settings > Profile > Role Allocation](https://cloud.pockethrms.com/Settings/Employee/ESSIndex?module=Profile\&submodule=RoleAllocation).
{% endstep %}

{% step %}

## Step 2

Grant the Self Service Role used by your Dedicated HR employees access to the Dedicated HR screens listed above, for the modules they should handle.

Only once this access is granted will the Dedicated HR be able to see their tagged employees' entries and act on them.
{% endstep %}
{% endstepper %}

### **How HR and Dedicated HR Actions Work Together**

In all five modules, either the HR or the Dedicated HR can take action on an entry. The system considers whichever action is taken first, whether it comes from the HR screen or the Dedicated HR screen.

Access the respective module’s HR guides below:

* [Exit](https://docs.pockethrms.com/ess-portal/admin/exit-hr)
* [FnF](https://docs.pockethrms.com/ess-portal/admin/fnf-hr)
* [Confirmation](https://docs.pockethrms.com/ess-portal/admin/employee-confirmation#how-to-confirm-an-employee-as-an-hr-admin)
* [Transfer](https://docs.pockethrms.com/module-guides/transfer-module)
* **Safety Incident (coming soon)**

**For any queries, contact** [**support@pockethrms.com**](mailto:support@pockethrms.com)


# Employee

Employee Management and Employee data warehousing


---

[Next Page](/llms-full.txt/1)