> For the complete documentation index, see [llms.txt](https://docs.pockethrms.com/llms.txt). Markdown versions of documentation pages are available by appending `.md` to page URLs; this page is available as [Markdown](https://docs.pockethrms.com/module-guides/exit-and-fnf-settlement-module.md).
# Exit And FNF Settlement Module
### **Exit & FnF module**
The **Exit & FnF Module** brings structure and transparency to employee offboarding — managing every separation from request to final settlement through a single, connected workflow. It gives HR complete visibility and control at every approval stage, while keeping the process simple and transparent for the departing employee.
### **How to do Settings or Configurations for Employee Exit?**
**How to Configure Separation Setting?**
**Path**: Login into Cloud Portal > Settings > Payroll > Pay Settings > Separation Setting
The **Separation Setting** page controls how employee separations are handled, whether master details stay editable after a separation is recorded, how far in advance a separation date can be set, and whether separations can go through after payroll has already been processed for that period.
**Step 1:** Log in to the **Cloud Portal**, open **Payroll**, go to **Pay Settings**, and select **Separation Setting**.
\
**Step 2**: Set **Master details** can be edited after separation made to **Yes** or **No**, depending on whether HR should still be able to edit an employee's master details once their separation is recorded.
\
**Step 3:** Enter a **value in No. of months** upto which separation date can be given. This is mandatory — it sets how far into the future a separation date can be set.
**Step 4:** Set **Allow Separation After Payroll Process** to **Yes** or **No**, depending on whether separations can still be processed after payroll has already run for that period.
**Step 5:** Under **Separation Processing Control (Cloud)**, choose Separate Now to process the separation immediately, or Approve & Separate Later to route it through approval first. Click **Save**.
**Important Note:** Separate Now processes the separation immediately. Approve & Separate Later first approves the resignation, then auto-separates the employee at the end of day on their Last Working Date — Separate Now can still be used afterward to separate them immediately if needed.
**Path Link:**
### **How to Configure Form Master?**
**Path:** Login into Cloud Portal > Settings > HR > Form Master
**Form Master** lets you create and manage configurable forms for different HR modules, grouped and ordered by department. For the Exit & FnF module, this is where Exit Interview Form (Exit Management module) and FnF No Dues Clearance Forms (Full & Final module) are set up.
**Step 1:** Log in to the **Cloud Portal**, open **Settings**, go to **HR**, and select **Form Master.**
**Step 2:** Click the **+ icon** to add a new form.
**Step 3:** In the Module Name dropdown, select the module the form belongs to — for example, **Exit Management for an exit interview form**, or **FullnFinal for a Full & Final no-dues form.**
**Step 4:** For **ExitManagement** : Enter a **Form Name, Description, and Order**. Order sets the display sequence among other forms in the same module.
**Step 5:** For **FullnFinal** : Enter a **Form Name, Header, Description, and Order**. Order sets the display sequence among other forms in the same module.
**Step 6:** Click **Save**.
**Path Link:** [**https://cloud.pockethrms.com/Settings/Employee/Index?module=hr\&submodule=FormMaster**](https://cloud.pockethrms.com/Settings/Employee/Index?module=hr\&submodule=FormMaster)
**To Know how to add questions to the form? Refer:** [**https://docs.pockethrms.com/faqs/cloud-portal/settings/hr/form-master#id-1**](https://docs.pockethrms.com/faqs/cloud-portal/settings/hr/form-master#id-1)**.**
### **How to Assign Exit/Separation Department Head?**
**Path:** Login into Cloud Portal > Settings > HR > Exit/Separation Department Head Setting
This page assigns a **department head** and contact email for exit and separation processing, against each department. These Department Heads approve Employee Resignations, raised from ESS by the employees, after they are approved by the Self-Service Separation – Approval Matrix Manager. If no Department Head is assigned for a department, the Resignations of the employees from such departments are routed to HR approval directly after the Manager approval.
**Step 1:** Log in to the **Cloud Portal**, open **Settings**, go to **HR**, and select **Exit/Separation Department Head** Setting.
**Step 2:** For each **department row**, use **Department Head** to choose one or more employees.
**Step 3:** Enter a **Department Email** for that department. Check the **box** beside the row to select the row, and Click **Save**.
The page lists all the Departments created in your system, each with a checkbox, a Department Head field (multiple employees can be selected), and a Department Email field. Selecting one or more row checkboxes and clicking Delete removes assigned department Managers
**Path Link:** [**https://cloud.pockethrms.com/Settings/Employee/Index?module=hr\&submodule=ExitSetting**](https://cloud.pockethrms.com/Settings/Employee/Index?module=hr\&submodule=ExitSetting)
### **How To Assign FnF Department Head Manager?**
**Path:** Login into Cloud Portal > Settings > HR > FnF Department Head Manager
This page assigns **FnF (Full and Final) No Dues Managers** for each department and business unit combination, so that no-dues clearance requests route to the right approver.
**Step 1:** Log in to the **Cloud Portal**, open **Settings**, go to **HR**, and select **FnF Department Head Manager.**
**Step 2:** To find a specific **department's assignment**, choose it under **Department Filter** and click **Search**.
**Step 3:** Click **Add row** to add a new assignment, then fill in **Department**, **Manager**, **Priority**, and **Form** from the dropdowns (Exit Interview Form OR F\&F No Dues Form).
**Step 4:** To add an **extra column** (for example, Blood Group or Branch), select the unit under **Select Business Unit**(s), then click **Add Column.**
**Step 5:** Select the **checkbox next to a row** to act on it — for example, to **delete** it with **Delete Selected**. Click **Save**. Saving every row is necessary for the changes to take effect.
**Step 6:** To replace the manager on a row, click its **Replace Manager** icon in the Action column, choose a replacement from the dropdown, and save. This shifts all pending approvals to the new manager.
**Step 7:** To require the particular Department Head’s clearance before FnF No Dues can proceed with Final HR submission, click the **Clearance Lock icon** in the Action column and turn it on. It's off by default.
**Step 8:** To **export** or **import** the current settings, use the two icons next to the **FnF Department Head Manager** title at the top of the page.
**Path Link:** [**https://cloud.pockethrms.com/Settings/Employee/Index?module=hr\&submodule=AssignFormManager**](https://cloud.pockethrms.com/Settings/Employee/Index?module=hr\&submodule=AssignFormManager)
### **How To Import FnF Department Head Manager?**
**Path:** Login into Cloud Portal > Employee > Import > FnF Department Head Manager Import.
This screen bulk-imports **FnF Department Head Manager** assignments from an Excel file — the same assignments configured manually on the FnF Department Head Manager screen — by mapping spreadsheet columns to the required fields.
**Step 1:** Log in to the **Cloud Portal**, open **Employee**, go to **Import**, and select **FnF Department Head Manager Import,** Or **click on the Upload icon on the top right corner of the page.**
**Step 2:** Under **Select Import Template**, confirm **FnF Department Head Manager Import** is selected, then **download FnF Department Head Manager Sample Import** and fill it in.
**Step 3:** Under **Select Settings**, choose an **existing setting**, or create one by entering a name under **Setting Name** and clicking **Add**. Click **Save Settings**.
**Step 4:** **drag and drop your file** into Import Templates, or click to browse, to upload it and run the import. Only .xlsx files are accepted Fill in **Starting - Ending** Row. The **sheet name** gets updated automatically.
**Step 5:** If this import should replace existing managers, check **Overwrite previous managers.** This replaces the previous managers and transfers all their pending approvals to the new ones, for the selected departments.
**Step 6**: **Map each required field to its matching column in your Excel file:** Department Name, Manager Code, Manager Company Code, Priority, Select Form, and Clearance Lock. All six are mandatory.
The **Employee Master** panel on the right lists further fields you can also bring into the mapping — for example Bank Account Number, Blood group, Branch, Cost Centre, and Designation.
**Step 7:** Click on **Upload File.**
.
**Path Link:** [**https://cloud.pockethrms.com/Employee/Employee/EmployeeImport?import=1#**](https://cloud.pockethrms.com/Employee/Employee/EmployeeImport?import=1%23)
### **How To Configure Exit Notification Settings?**
**Path:** Cloud > Settings > HR > Exit Notification Settings
This page is the control panel for the full separation lifecycle — how resignations are submitted, approved, documented, and closed, across ESS, Cloud Separation, and the Full & Final process. Settings apply company-wide and take effect immediately for new separation requests; separations already in progress keep the settings that were active when they were submitted.
**Settings**
* **Exit Interview Form** — Choose **Exit Dynamic Form** (the system's built-in questionnaire builder) or **Form Master** (a fully custom form for cases the dynamic form can't handle);
switching to Form Master can't be undone without rebuilding the dynamic form from scratch. Upon switching, the form created in Form Builder will be automatically replicated into Form Master.
* **Open Exit Interview Form On** — Sets how many days before the Last Working Day the exit interview form becomes available to the employee.
* **Reminders for Exit Interview Form** — Enables automated reminder emails for employees who haven't completed the exit interview form.
* **Reminders for FnF No Due Form** — Enables automated reminder emails for pending FnF No Dues clearances to the respective Department Heads
* **Select Email Notification** — Sends FnF approval emails only to the resigning employee's own department head (Employee Department), or to every department head in the company (All Department).
* **BCC Name** — A single email address silently copied on every exit notification email, for compliance monitoring; leave blank to disable.
* **Approval Assets** — Multi-select separations from which departments must require asset return confirmation by HR before separation can completed or processed..
* **Parallel Approval** - ‘True’ notifies all selected department heads at once so they can submit their FnF No Dues independently; ‘False’ routes them one after another in sequence.
* **Disclaimer Text** —Custom text the employee must read on the separation request page before after submitting the Resignation request, typically covering notice period and asset return obligations.
* **Withdraw Days** —Number of days after submission an employee can self-withdraw a resignation without HR involvement; 0 disables self-withdrawal entirely. Employee can only withdraw resignation before the Manager approves the same.
* **Select HR Letter** — Choose one or more HR Letter templates to auto-email the employee at the configured trigger point; leave blank to suppress automatic dispatch.
* **Send letter upon** — Sends the HR letter as soon as the employee is marked separated, or only after the Full and Final settlement is completed, with separate checkboxes for ESS-raised and Cloud-raised separations.
* **Send letter on** — Delivers the HR letter to the employee's official company email or their personal email on file.
* **Notice Period Days** — Selects the Employee Config field holding the notice period duration, which the system uses to auto-calculate the Last Working Date on resignation.
* **Disable Ess login After Separation** —Set number of days after separation when the ESS access should be revoked, or check Disable Instantly to revoke it the moment HR approves the separation and employee is separated.
* **Adjustment Behavior** — For both Last Working Date and Resignation Date, sets whether a default date falling on a holiday moves to the previous working day, the next working day, or stays unchanged; HR can still override manually, and this doesn't retroactively change dates already saved on in-progress separations. The Last Working Date as per Notice Period is saved independently in the reports.
* **Last Working and Resignation Date update Permission** — For both Last Working Date and Resignation Date, independently toggles whether Employees, and Managers and HR can edit the dates after submission, and whether they're restricted to working days only or allowed any day with a warning on Holiday / Week-offs.
* **Stop Payment Custom** — Yes automatically excludes separated employees from the next payroll run; No leaves payroll to stop payment manually.
* **Manager Approval Days** —Number of days a manager has to act on a resignation before moves further in the Approval Chain (Department Heads and HR); leave blank for no time limit.
* **Resignation Date can be added upto Days** — Sets how far back an employee can backdate a resignation date; Blank allows any past date.
* **Separation HR Approval Lock** — True restricts HR's ability to approve separations to the day-of-month window set in From / To below; False allows approval anytime. Saving this page while separations are pending updates only the lock settings — everything else waits until those records clear.
Each field below can be set to Mandatory (blocks submission until filled) or Optional, on the separation request form:
* **Employee Comments** — The reason/comments box the employee fills in when submitting their resignation.
* **Manager Comments** — The feedback field the manager fills in when accepting or rejecting a resignation.
* **Resignation Letter** — The file upload field for attaching a formal resignation letter document.
* **Personal No** — The employee's personal mobile number, used for contact after company systems are deactivated.
* **Email ID** — The employee's personal email address, used to send documents like relieving letters and FnF statements post-separation.
* **Designation** — The employee's current designation, shown on the form and used on relieving letters.
* **Address** — The employee's home address, used for mailing physical documents like PF forms or experience certificates.
And Click on **Save**.
**Reminders**
**Path:** Cloud > Settings > HR > Exit Notification Settings > Reminders
Configures automated email reminders that fire on specific exit events; each row handles one event and lets you choose who gets notified.
Set Reminder Settings to **Yes** to reveal the configuration table below.
* **Entities** — Select specific employees who should always receive this reminder, regardless of their role in the exit process.
* **Emails** — Enter one or more comma-separated email addresses for external or additional recipients not in the system.
* **Manager** — Sends the reminder to the resigning employee's direct manager.
* **HRs** — Sends the reminder to the HR team.
* **Dpmt Head** — Sends the reminder to department heads; when checked, Type must also be set to specify which department heads.
* **Type** — Only relevant when Dpmt Head is checked: Exit sends to the department heads configured under Exit/Separation Department Head Setting (the resignation approval chain), FNF sends to the department managers configured for Full & Final clearance sign-off — these are different people, and both need to be configured for department head reminders to work.
Each row below is one exit event that can trigger a reminder:
* **Employee Resigns** — The employee submits a separation request via ESS.
* **Manager Approves Resignation** — The manager approves the resignation.
* **Manager Rejects Resignation** — The manager rejects the resignation.
* **Last Working Day Alert** — An automated alert fires as the Last Working Date approaches, with the lead time set per row.
* **Full & Final HR Accepts** — HR completes and approves the Full & Final settlement.
* **HR Edits Last Working Date** — HR changes the Last Working Date after manager approval.
* **Full & Final Form Activated** — HR activates the Full & Final form for processing.
* **Dept. Head Approves Resignation** — A department head approves the resignation, as part of the Exit approval chain.
* **Dept. Head Rejects Resignation** — A department head rejects the resignation, as part of the Exit approval chain.
* **HR Approves Resignation** — HR approves the resignation.
* **HR Rejects Resignation** — HR rejects the resignation.
* **Full & Final Department Accepts** — A department head approves the FnF clearance step for their department.
* **Full & Final All Department Accepts** — Every department has now approved FnF clearance.
**Actions**
**Step 1:** Click the **eye icon** on a row to preview the email as it will be sent.
**Step 2:** Click the **envelope** icon to open that row's email template for editing — subject, body, and merge-field categories like Master, Special, Dynamic, and Learning Details.
**Step 3:** Click the **trash** icon to delete the row.
**Path Link:** [**https://cloud.pockethrms.com/Settings/Employee/Index?module=hr\&submodule=ExitNotificationSettings**](https://cloud.pockethrms.com/Settings/Employee/Index?module=hr\&submodule=ExitNotificationSettings)
### **How To Configure Full And Final Settings?**
**Path:** Cloud > ESS Settings > Full & Final > Full And Final Settings
This page controls whether the Full & Final process is active, what triggers it, how long the clearance period runs, and which form HR uses for it.
**Step 1:** Log in to the **Cloud Portal**, open **ESS Settings**, go to **Full & Final**, and select **Full And Final Settings**.
**Step 2:** Set **Full & Final Process Activate** to **Yes** or **No** to turn the process on or off.
**Step 3:** Under **Full & Final** Activation Trigger, choose when the FnF No Dues process starts: **On Employee Separation** (right after the employee is separated from the system), On **HR Approval** (right after HR approves the separation request in ESS or cloud using Approve and Separate Later), or a **set number of days before the Last Working Date** when the process should start.
**Step 4:** **Enter Clearance Period Days** — the number of days allowed for the clearance process.
**Step 5:** Under **HR Form**, select which form should act as the Final FnF No Dues form for the HR. Click **Save**.
**Important Note:** Pocket HRMS recommends X Days before LWD, since it avoids last-minute dependencies by starting FnF at a pre-planned time — On Employee Separation waits for a confirmed exit, On HR Approval starts right after validation.
**Path Link:** [**https://cloud.pockethrms.com/Settings/Employee/ESSIndex?module=FullFinal\&submodule=FullFinalSettings**](https://cloud.pockethrms.com/Settings/Employee/ESSIndex?module=FullFinal\&submodule=FullFinalSettings)
### **How To Assign Approval Matrix Manager For Employees?**
**Path:** Cloud > Employee > Employee List > Employee Profile > Approval Matrix
This screen assigns which manager approves which type of request for an employee — including the two separation-related approval roles — through a shared checklist of workflow types.
**Step 1:** Log in to the **Cloud Portal** and open **Approval Matrix Manager** (under Manager Details). Click **Add Approval Matrix Manager**, or **Import Approval Matrix Manager Details to bulk-upload** entries instead.
**Step 2:** Select the Employee, then search for and **select a Manager** under **Select** **Manager**.
**Step 3:** From the checklist, check **Selfservice Separation Manager** if this manager should approve separations the employee raises themselves from their ESS Portal.
or check **Employee Separation Manager** if this manager should approve separations that HR or an admin raises on the employee's from Cloud Portal. Click **Save**.
**Path Link:** [**https://cloud.pockethrms.com/Employee/employee/Profile?employeeID=17489\&module=profile\&empstatus=1**](https://cloud.pockethrms.com/Employee/employee/Profile?employeeID=17489\&module=profile\&empstatus=1)
### **How To Configure Role Allocation (Exit Module)?**
**Path:** Cloud > ESS Settings > Role Allocation > Module: Exit
This screen defines what each role **— HR, Manager, Admin, and others** — is allowed to do within a selected module.
**Step 1:** Log in to the **Cloud Portal**, open **ESS Settings**, and select **Role Allocation**.
**Step 2:** Under **Select Module**, choose **Exit for the Exit/FnF module**. Under **Select Role**, choose the role to configure — for example HR, Manager, or Admin. Click **Search**.
**Step 3:** In the **checklist that appears**, check or uncheck items to control what that role can access — **for example**, for Manager under the Exit module:
Report > Exit Tracker, Request > Employee Separation, and Approval > Separation Approval Data, HR Separation Approval Data, and Department Head Separation Approval, And Click **Save**.
**Path Link:** [**https://cloud.pockethrms.com/Settings/Employee/ESSIndex?module=Profile\&submodule=RoleAllocation**](https://cloud.pockethrms.com/Settings/Employee/ESSIndex?module=Profile\&submodule=RoleAllocation)
### **How to Add Separation Reason?**
**Path:** Cloud > Settings > HR > Pop Up data > Separation Reason
This is where the list of selectable reasons for separation is maintained — the values that populate the Separation Reason dropdown elsewhere in the exit flow.
**Step 1:** Log in to the **Cloud Portal**, open **Settings**, go to **HR**,
and select **Pop Up data.**
**Step 2:** Under **Select Component**, choose **Separation Reason**. Click the **+ icon** to add a new reason.
**Step 3:** enter the text under Value in the popup that appears, then click **Save**.
**Step 4:** Use the other **two icons** at the top to export (download) or import (upload) the list of reasons.
**Step 5:** On an existing reason card, click the **pencil icon** to **edit** it, or the **trash icon** to **delete** it.
Existing reasons appear as cards, each showing an Employees Available count with avatar icons — Better Offer, Family Reason, Health Issues, Medical Issue, Personal Issue, and Salary Issue are already configured in this example.
**Path Link:** [**https://cloud.pockethrms.com/Settings/Employee/Index?module=hr\&submodule=popup**](https://cloud.pockethrms.com/Settings/Employee/Index?module=hr\&submodule=popup)
### **How to Separate an Employee Through the Cloud Portal?**
**Path:** Cloud > Payroll > Transactions > Separation.
The **Separation** screen is HR's entry point for formally initiating and processing an employee's exit from the organization.
**Step 1:** Log in to the **Cloud Portal**, open **Payroll**, Click on **Transactions**, and select **Separation**.
**Step 2:** Select the **Employee**. **Date of Joining** fills in automatically and is read-only.
**Step 3:** Set **Separation Type** to **Voluntary** or **Involuntary**, depending on whether the employee (Voluntary) or the employer (Involuntary) initiated the separation.
\
**Step 4:** Set **Separation Status** — options include **Separation, Suspension, Resignation, Other, Termination, Retirement, ContractEnd, Abscond, Redundancy,** and **Expired.**
\
**Step 5:** Set **Separation Reason**, Enter **Last Working Date** and **Resignation Date**.
**Step 6:** Under **Disable ESS Login After Separation**, choose one:
* Tick **Disable Instantly upon Separation** to remove access the moment the separation is processed.
* **Enter a number of days** — 1 disables login at 00:00 the next calendar day after separation, 2 disables it at 00:00 the day after that, and so on.
* If the **Last Working Date** is future-dated, login is disabled according to that date instead.
**Step 7:** Set **Activate FNF No Dues Forms,** to **YES** or **NO.**
\
**Step 8:** Set **Employee Rehire** to **Yes** or **No**, and edit Employee Rehire Remark as needed. This mandatory field auto-fills a default remark based on the Rehire choice, but can be edited freely.
**Step 9:** Click **Save** to submit the separation.
\
**Step 10:** Click **Left Employees** to view the list of employees already separated.
**Path Link:**
**Important Note:** After HR initiates a separation from Cloud, the approval request reaches the Employee Separation Manager only if that manager has already been assigned to the employee.
### **How To assign an Employee Separation Manager to a Specific Employee?**
**Path:** Login into Cloud Portal > Employee > Employee List > Select Employee > Approval Matrix.
**Step 1:** Log in to the **Cloud Portal**, open **Employee**, go to **Employee List,** and select the **employee's profile**.
**Step 2:** Go to **Approval Matrix** and click **Add Approval Matrix Manager.**
**Step 3:** Enter the **Manager's name** and set **Priority.**
**Step 4:** Check **Employee Separation Manager** from the module checklist, and Click **Save**.
**Path Link:** [**https://cloud.pockethrms.com/Employee/Employee/EmployeeLis**t](https://cloud.pockethrms.com/Employee/Employee/EmployeeList)
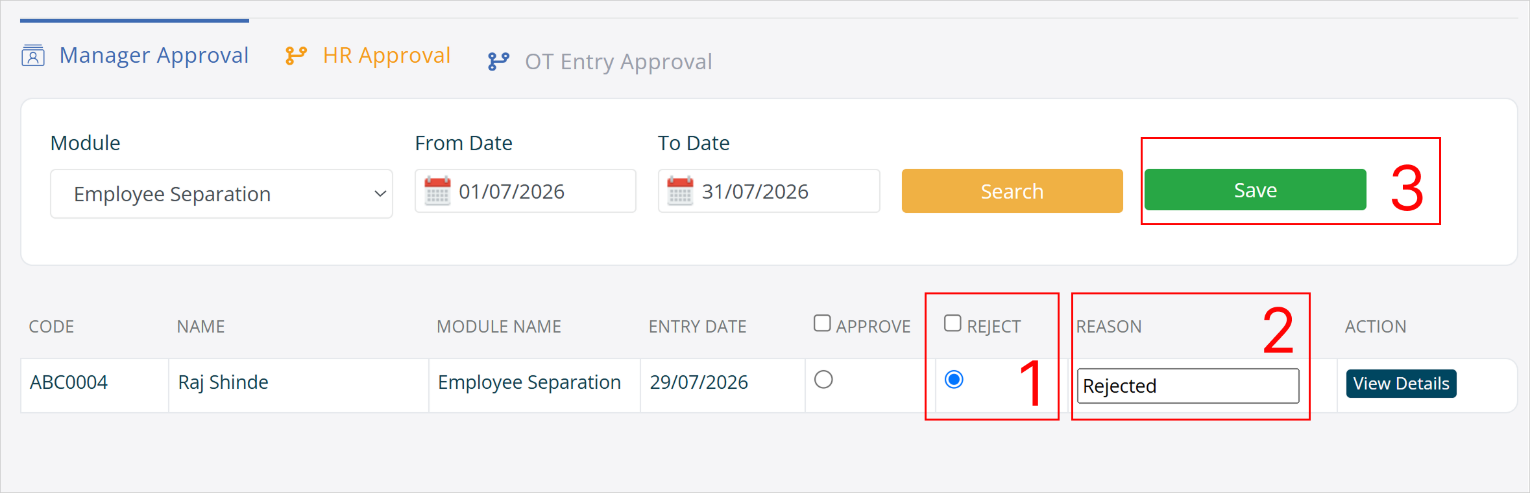
### **How to Approve an HR-Initiated Employee Separation as a Manager?**
Path: ESS > Profile > Approval > Manager Approval
The **Manager Approval screen** is where a resigning employee's manager reviews and acts on separation requests routed to them.
**Step 1:** Log in to **ESS**, open **Profile**, go to **Approval**, and select **Manager Approval.**
**Step 2:** Under **Module**, select **Employee Separation.**
**Step 3:** Set **From Date** and **To Date**, then click **Search**.
**Step 4:** Click **View Details** on a row to review the request.
**Step 5:** Tick **Approve** and **Save**,
\
or **Reject**, If you select to reject the request, Enter a **remark** then click **Save**.
**Path Link:** [**https://ess.pockethrms.com/Employee/Profile/EmployeeApprovals?Menu=managerapprove**](https://ess.pockethrms.com/Employee/Profile/EmployeeApprovals?Menu=managerapprove)
### **ESS Transactions For Exit And FNF Settlement?**
### **How to Raise an Employee Self-Separation Request?**
**Path:** ESS Portal > Exit > Request > Employee Separation
The **Employee Separation** page is where as an Employee, you can raise a self separation or resignation request. You provide your separation/resignation details like, the reason for leaving, desired resignation and last working dates and any supporting documents, before submitting the request for managerial, departmental and HR approval.
**Step 1:** Log in to the **ESS Portal**, open the **Exit modul**e, go to **Request**, and select **Employee Separation**.
**Step 2:** Check your details in the **Employee Details** section. **Employee Name, Employee Code, Department, Designation, and Date of Joining** are filled in automatically from your record and cannot be edited.
**Step 3:** Set your Resignation Date using the calendar. The **Last** **Working Date** updates automatically based on the **Resignation Date** and Notice Period Days.
\
You will be able to edit the Resignation and Last Working dates only if the Amin/HR has enabled edit rights for the employees. Else, Resignation Date will be automatically taken as **‘TODAY**’ and Last Working Date as **‘Resignation Date + Notice Period Days’.**
**Step 4:** **Separation Status** will be by default selected as **Resignation**, since the other options are applicable for Involuntary Separation processed by HR from cloud.
**Step 5:** Select your **Separation Reason** from the dropdown.
**Step 6:** Enter your contact details — **Personal Email ID, Personal Mobile No, and Address** — so you can be reached after you leave.
**Note:** These details will be auto-fetched if they were updated in your profile.
**Step 7:** **Upload your documents.** Use Choose File under **Resignation Letter** to attach your resignation letter, and Choose File under Other Attachments for any additional files.
**Step 8:** Add any extra details in the **Comments box**, And Click **Submit** to raise your separation request.
After you submit, the request goes to the responsible manager for approval.
**Step 9:** Under **Separation Status**, review your submitted request — Date of Joining, Last Working Date, Separation Reason, Remarks, Employee Comments, HR Attachments, Resign Letter, Other Attachments, and Status. Click **Cancel** to withdraw it.
**Step 10:** Under **Approval Status**, check the current stage — it updates to Approved once the manager approves the request. Click Manager Status to see the assigned manager's code, name, and approval status.
**Path Link:** [**https://ess.pockethrms.com/ExitManagement/Transaction/Request?Menu=EmployeeSeparation**](https://ess.pockethrms.com/ExitManagement/Transaction/Request?Menu=EmployeeSeparation)
### **How to Approve an Employee's Self - Separation Request as a Manager On ESS?**
**Path:** ESS Portal > Exit > Approval > Separation Approval Data
When an employee raises a separation request, it comes to the assigned manager on the Separation Approval Data page. Here the manager reviews the request, adjusts the Resignation and Last Working dates if needed and enabled for Manager, and either approves or rejects it.
**Step 1:** When a request is raised, Manager gets a notification under Exit Management on their dashboard, along with an email if configured in [**Exit Notification Settings**](#how-to-configure-exit-notification-settings) (Reminder).
Log in to the **ESS Portal**, open the **Exit module**, go to **Approval**, and select **Separation Approval Data**.
**Step 2:** The page opens on the **Separation Approval Data tab**, which lists the separation requests waiting for your approval. Each row shows the **employee code, name, module name, Entry date, last working date, separation type, separation category, separation reason, employee comments,** and **status.**
**Step 3:** In the **Action column** of a request, click **Details** to open a read-only summary of the full separation request.
**Step 4:** Click **Manager Status** to check the approval status of all the Managers.
**Step 5:** Click **View** to open the approval screen for the request.
**Step 6:** Review the request. You can adjust the **Resignation Date** and **Last Working Date** using the calendars if needed and only if the Admin/HR has enabled the edit rights for the Managers. The page also shows the last working date calculated from the notice period and modifications done by Managers prior to your level (if available).
**Step 7:** Enter your **mandatory comments** in the Manager Remarks box.
**Step 8:** Click **Approve** to approve the request,
or **Reject** to reject it.
Once you approve, the request moves to the department head(s) if available, else it directly moves to HR.
**Path Link:** [**https://ess.pockethrms.com/ExitManagement/Transaction/Approval?Menu=SeparationApprovalData**](https://ess.pockethrms.com/ExitManagement/Transaction/Approval?Menu=SeparationApprovalData)
### **How to Approve Employee Separation as a Department Head On ESS?**
**Path:** ESS Portal > Exit > Approval > Department Head Separation Approval
The **Department Head Separation Approval** page is where the assigned department head reviews and acts on separation requests that have cleared manager approval.
**Step 1:** When a **Separation Request** has received Managers approval, the Department Heads gets a notification under Exit Management on their dashboard, along with an email if configured in [**Exit Notification Settings (Reminder).**](#how-to-configure-exit-notification-settings)
Log in to the **ESS Portal**, open the **Exit module**, go to **Approval**, and select **Department Head Separation Approval.**
**Step 2:** The page lists separation requests awaiting department head approval. Each row shows the **employee code, name, module name, creation date, last working date, separation type, separation category, notice period days, separation reason,** and **entry status.**
**Step 3:** In the **Action column** of a request, click **Details** to open a read-only summary of the full separation request.
**Step 4:** Click **Department Head Status** to see the assigned department head's code (including you), **name, approval status, approval date,** and **remark.**
**Step 5:** Click **View Details** to open the approval screen for the request.
**Step 6:** Review the request — **Employee code and name, Last Working Date, Separation Category, Separation Type, Asset Details, and Separation Reason.** The page also shows the Last Working Date calculated from the notice period and dates modified by the Managers.
**Step 7**: Check **Asset Details** for the list of assets allotted to the employee. Before approving, release any allocated assets
go to [Asset Details- Employee Profile](https://cloud.pockethrms.com/Employee/employee/Profile?employeeID=17490\&module=profile\&empstatus=1)
\
And Select the **Asset** and Click on **Release**, add a **note**, and **click Submit.**
**Step 8:** Enter a **Reason.**
**Step 9:** Click **Approve** to approve the request,
or **Reject** to reject it.
Once approved, the request moves to HR For their Approval.
**Path Link:** [**https://ess.pockethrms.com/ExitManagement/Transaction/Approval?Menu=DepartmentHeadSeparationApproval**](https://ess.pockethrms.com/ExitManagement/Transaction/Approval?Menu=DepartmentHeadSeparationApproval)
### **How to Approve Employee Separation as HR Through ESS?**
**Path:** ESS Portal > Exit > Approval > HR Separation Approval Data
The **HR Separation Approval Data** page is where HR reviews separation requests after manager and department head approval.
**Reviewing Requests**
**Step 1:** Log in to the **ESS Portal**, open the **Exit module**, go to **Approval**, and select **HR Separation Approval Data.**
**Step 2:** Optionally filter by **Employee** or **Department**, then **click Search.**
**Step 3:** The page lists all separation requests, each showing the **code, name, entry date, resignation date, modified LWD, Manager status, Department status,** and **HR Action.**
**Step 4:** Click the **Manager status** badge to see the manager's approval level, name, approval date, and remark.
**Step 5:** Click the **Department status** badge to see the department head's approval, approval date, and remark.
**Approving a Request**
**Step 1:** Set **Employee Rehire** to **Yes** or **No**.
A remarks popup appears with a default and editable message based on your choice
which you can edit before saving.
**Step 2:** The **Exit Interview Form** will open automatically if the Admin/HR has configured the same in **Exit Notification Settings** in cloud. However, it can be manually opened and closed from here.
**Step 3:** Click **Approve** in the HR Action column to open the review screen.
**Step 4:** Review the **Separation Details** and **Asset Details** shown.
**Step 5:** Set **Separation Type** as **Voluntary** or **Involuntary** and Separation Category — for a self-service separation, set Separation Category to Resignation.
**Step 6:** Enter **DHR/HR Remark.** This is mandatory.
**Step 7:** Attach a file under **Attachment**, if needed.
**Step 8:** Click **Approve** to open the Approve Employee Separation,
or click **Withdraw** to withdraw the request instead.
**Step 9:** After Clicking Approve, Optionally set **Disable ESS Login after Separation**, as Days or Disable Instantly upon Separation.
**Step 10:** Choose **Approve and Separate Later** to approve the resignation now while keeping the employee active until their Last Working Date — they auto-separate at end of day on that date unless HR separates it first.
**Step 11:** Choose **Approve and Separate Now** to approve and separate the employee immediately, adjusting ‘LWD Updates to’ if needed.
After Approve and Separate Later, the Approve button in the HR Action column turns into an Edit button, so HR can update the LWD or separate the employee early at any point before the auto-separation date.
After Approve and Separate Now, the employee is separated immediately, and the row's PDF, Excel, and comment icons become active —
\
• PDF downloads the exit report,
\
• Excel downloads it as a spreadsheet,
\
• and the comment icon adds a remark.
**Related Records**
**Step 1:** Scroll down to **Previous Records** and **click Load Previous Records** to see already-approved requests. Each row shows Rehire Remarks, Download PDF and Download Excel for the interview report, Manager Status, Details, and Edit for the separation and Last Working Date.
**Step 2:** Scroll down further to **Cloud Separation Records** and **click Load Cloud Separation Data** to see separations initiated directly from Cloud. Manager, Dept, and HR Action show as Cloud Separation for these rows, since they bypass the ESS approval chain.
**Path Link:** [**https://ess.pockethrms.com/ExitManagement/Transaction/Approval?Menu=HRSeparationApprovalData**](https://ess.pockethrms.com/ExitManagement/Transaction/Approval?Menu=HRSeparationApprovalData)
### **How to Approve Employee Separation as a Dedicated HR Through ESS?**
**Path:** ESS Portal > Exit > Approval > DHR Separation Approval Data
A **Dedicated HR (DHR)** is an employee who is given HR-level approval and review access, but only for a specific set of employees who are tagged to them, instead of the entire company. This is useful when you want to split HR workload — for example, by department or location — without giving every HR person full visibility into all employee records.
\
HR and DHR approval run in parallel after manager and department head approval.
**Important Note:** The HR and DHR Separation Approval Data tabs are initiated at the same time — this is a parallel approval, not a sequential one. Whichever of HR or DHR approves first, that decision is taken as the outcome.
**To add a dedicated HR:** : [**How to Assign a Dedicated HR?**](https://docs.pockethrms.com/hr-and-admin-portal/cloud-configuration/hr/dedicated-hr%23what-is-a-dedicated-hr-and-how-do-i-assign-one)
**Reviewing Requests**
**Step 1:** Log in to the **ESS Portal**, open the **Exit module**, go to **Approval**, and select **DHR Separation Approval Data.**
\
**Step 2:** Optionally filter by **Employee** or **Department**, then click **Search**.
**Step 3:** The page lists all separation requests, each showing the code, **name, entry date, resignation date, modified LWD, Manager status, Department status,** and **DHR Action.**
**Step 4:** Click the **Manager status** badge to see the manager's approval level, name, approval date, and remark.
**Step 5:** Click the **Department status** badge to see the department head's approval, approval date, and remark.
**Approving a Request**
**Step 1:** Set **Employee Rehire** to **Yes** or **No**.
**Step 2:** Set **Exit Interview** to **Open** or **Close**.
**Step 3:** Click **Approve in the DHR Action** column to open the review screen.
**Step 4:** Review the **Separation Details** and **Asset Details** shown.
**Step 5:** Set **Separation Type** and **Separation Category** — for a self-service separation, set Separation Category to Resignation.
**Step 6:** Enter **DHR/HR Remark.** This is mandatory.
**Step 7:** Attach a file under **Attachment**, if needed.
**Step 8:** Click **Approve** to open the **Approve Employee Separation choice,**
or click **Withdraw** to withdraw the request instead.
**Step 10:** Choose **Approve and Separate Later** to approve the resignation now while keeping the employee active until their Last Working Date — they auto-separate at end of day on that date unless updated first. Optionally set Disable ESS Login after Separation, as Days or Disable Instantly upon Separation.
**Step 11:** Choose **Approve and Separate Now** to approve and separate the employee immediately, adjusting LWD Updates to if needed.
**Related Records**
**Step 1:** Scroll down to **Previous Records** to see already-approved requests.
Once approved here, the separation process is complete.
**Path Link:** [**https://ess.pockethrms.com/ExitManagement/Transaction/Approval?Menu=DHRSeparationApprovalData**](https://ess.pockethrms.com/ExitManagement/Transaction/Approval?Menu=DHRSeparationApprovalData)
### **How To Configure FNF No Dues Form Settings?**
The **FnF No Dues** process is where each approving department confirms that a departing employee has no outstanding dues against them before the final settlement is released.
The process begins according to the trigger set under **Full And Final Settings**, and routes to each approver in sequence.
This helps in:
* Collecting departmental clearance against a single settlement record
* Preventing a settlement from closing while dues remain open
* Giving each approver a defined window to act before the exit date
**Important:** The FnF No Dues process runs only when **Full & Final Process Activate** is set to **Yes** under [**Full And Final Settings**](#how-to-configure-full-and-final-settings), and only for department heads mapped under [**FnF Department Head Manager**](#how-to-assign-fnf-department-head-manager).
**When the FnF No Dues Process is Triggered**
The trigger point is set under **Full And Final Activation Trigger** in **Full And Final Settings**.
| **Option** | **Trigger Point** | **Ideal When / Suitable For** |
| -------------------------- | ------------------------------------------------------------------------ | ------------------------------------------------------------------------------------------------- |
| **On Employee Separation** | F\&F forms are triggered after the employee is separated from the system | Best for companies preferring to start FnF only after confirmed exit |
| **On HR Approval** | F\&F forms are triggered after HR approves the separation request in ESS | Useful when companies want early initiation after validation |
| **X Days before LWD** | F\&F forms are triggered x days before the Last Working Date | Ideal for proactive departments who want to prepare in advance based on the most recent exit plan |
**smHRt Recommendation:** **X Days before LWD** offers the most flexibility and helps organizations avoid last-minute dependencies by initiating FnF at a pre-planned time.
To change the trigger, refer to [**Full And Final Settings**](https://cloud.pockethrms.com/Settings/Employee/ESSIndex?module=FullFinal\&submodule=FullFinalSettings)**.**
### **Where the FnF No Dues Form is Submitted**
Each approver submits their FnF No Dues Form from their own approval screen:
* Department Head — **ESS → F & F → Approval → Full Final Department Approval**
* HR — **ESS → F & F → Approval → Full Final HR Approval**
**Full Final Department Approval** and **Full Final HR Approval** appear as tabs at the top of the screen. You can switch between them without navigating away.
### **Full And Final Department Head Approval**
**Path: ESS → F & F → Approval → Full Final Department Approval**
The **Full Final Department Approval** screen is where a department head reviews a departing employee's separation record and submits the department's F\&F No Dues Form.
**Step 1: Open the Approval Screen**
Log in to the ESS Portal, go to **F & F**, then select **Approval** and open **Full Final Department Approval**.
**Step 2: Locate the Employee's Request**
The screen lists the separation requests routed to you. Use **Search** to filter the list, and **Show entries** to change the number of rows displayed.
The list displays the following columns.
| **Column** | **Description** |
| ------------------ | ------------------------------------------------------ |
| **CODE** | The employee's code |
| **NAME** | The employee's name |
| **COMPANY** | The company the employee belongs to |
| **ENTRY DATE** | The date the request was raised |
| **STATUS** | The current status of the request, such as **Pending** |
| **MANAGER STATUS** | Opens the manager's action status on the request |
| **ACTION** | **Details** and **View** buttons |
Each column heading can be clicked to sort the list.
**Step 3: Review the Separation Details**
Click **Details** to open the **Separation Details** window. The window displays:
* **Code**
* **Employee Name**
* **Personal Email ID**
* **Department**
* **Designation**
* **Date of Joining**
* **Last Working Date**
* **Separation Status**
* **Resignation Letter**
* **Resignation Date**
* **Personal Mobile No**
* **Address**
* **Separation Reason**
* **Remarks**
* **Other Attachments**
**Step 4: Download the Resignation Letter**
Click **Download** against **Resignation Letter** to download the letter submitted by the employee.
**Step 5: Check the Manager Status**
Click **Manager Status** to open the **Manager Status** window. The window lists each approver against the request:
* **MANAGER CODE** and **MANAGER NAME** — the approver's employee code and name
* **FORM** — the form assigned to that approver, such as **F\&F No Dues Form**
* **STATUS** — the approver's status against that form, such as **Pending**
The **STATUS** value against each approver updates as that approver submits their form.
Click **Close** to return to the list.
**Step 6: Open the F\&F No Dues Form**
Click **View** to open the **Full Final Approval Save New** screen.
The header displays **Employee Name & Code**, **Last Working Day**, **Tenure** and **Employee Status** for the employee.
**Step 7: Upload the F\&F No Dues Form**
Under **1. F\&F No dues form**, drop the completed form into the upload area or click to browse for it.
The file must be a PDF, JPG or PNG, and must not exceed 5 MB. The upload is mandatory.
**Step 8: Submit the Form**
Click **SUBMIT** to submit the department's clearance.
The request then moves to the next approver, and the row is removed from the **Full Final Department Approval** list.
**Important:** The sections shown on this screen are built from the form assigned to the **FullnFinal** module under **Form Master**. Sections and fields differ by company.
### **Full And Final HR Approval**
**Path: ESS → F & F → Approval → Full Final HR Approval**
The **Full Final HR Approval** screen is where HR reviews each department's F\&F No Dues Form, submits HR's own form, and closes the clearance for the departing employee.
**Step 1: Open the Approval Screen**
Log in to the ESS Portal, go to **F & F**, then select **Approval** and open **Full Final HR Approval**.
**Step 2: Locate the Employee's Request**
The **Pending Records** section lists the clearances awaiting HR action. Use **Search** to filter the list, and **Show entries** to change the number of rows displayed.
**Step 3: Check the Manager Status**
Click **Manager Status** to open the **Manager Status** window. The window lists each approver against the request:
**Step 4: Review the Separation Details**
Click **Details** to open the **Separation Details** window. The window displays:
* **Code**
* **Employee Name**
* **Personal Email ID**
* **Department**
* **Designation**
* **Date of Joining**
* **Last Working Date**
* **Separation Status**
* **Resignation Letter**
* **Resignation Date**
* **Personal Mobile No**
* **Address**
* **Separation Reason**
* **Remarks**
* **Other Attachments**
**Step 5: Open the F\&F No Dues Form**
Click **View** to open the **Full Final Approval Save New** screen.
**Step 6: Review the Employee Summary**
The header displays the employee's **Employee Name & Code**, **Last Working Day** with the number of days elapsed, the **Department Head** responsible for the clearance, the **Tenure**, and the **Employee Status**.
**Step 7: Select the Form to Work On**
The screen displays one tab per form assigned against the clearance:
* **Full and Final Form - F\&F No Dues Form** — the department's F\&F No Dues Form
* **Full and Final Form - HR** — HR's own F\&F No Dues Form
Each tab displays an attention banner naming the team responsible for that form, reminding you to verify that all asset and access clearances are documented before final submission.
**Step 8: Upload the Form**
Under **1. F\&F No dues form**, drop the completed form into the upload area or click to browse for it.
The file must be a PDF, JPG or PNG, and must not exceed 5 MB. The upload is mandatory.
**Step 9: Save or Submit the Form**
The buttons available depend on the tab you are on:
* **SAVE AS DRAFT** — the filled form is saved but not submitted. Once saved, the Submit button is enabled to approve the FnF.
* **SAVE AND SUBMIT OR SUBMIT FINAL APPROVAL** — the form is saved and submitted at once. The FnF is approved and moved to the **Approved Records** section of this screen.
Click the **?** icon beside the buttons to view a summary of what **Save As Draft** and **Save and Submit** do.
A form saved as a **draft** can be reopened and edited later if corrections are needed, then submitted once it is final.
**Step 10: View the Approved Records**
Scroll to the **Approved Records** section at the bottom of the screen. It lists the clearances that have already been approved, and carries its own **Search**, **Show entries** and pagination controls.
* **F & F NO DUES REPORT** — click **Download PDF** or **Download Excel** to download the approved No Dues report in that format.
* **MANAGER STATUS** — opens the same **Manager Status** window, with each approver's status shown as **Approved**.
* **ACTION** — click **Details** to open the **Separation Details** window, or **Edit** to reopen the **Full and Final Form - HR** screen.
**Approval Sequence**
The department heads submit their F\&F No Dues Forms first. Once a department head submits, the request moves to the next approver and the row is removed from the **Full Final Department Approval** list.
HR is the final approver. No further approval is required once HR submits, and the record moves to the **Approved Records** section of the **Full Final HR Approval** screen.
**Related Configuration**
The FnF No Dues process depends on two configuration screens in Cloud. Configure both before the process is used.
| **Screen** | **Path** | **What it controls** |
| ------------------------------------------------------------------------------------------------------------------------------------ | ----------------------------------------------------------------- | -------------------------------------------------------------------------------------------- |
| [**Full And Final Settings**](https://cloud.pockethrms.com/Settings/Employee/ESSIndex?module=FullFinal\&submodule=FullFinalSettings) | Cloud → ESS Settings → Full & Final → Full And Final Settings | Whether the process is active, the activation trigger, the clearance period, and the HR form |
| [**FnF Department Head Manager.**](https://cloud.pockethrms.com/Settings/Employee/Index?module=hr\&submodule=AssignFormManager) | Cloud → ESS Settings → Full & Final → FnF Department Head Manager | Which department heads receive the FnF No Dues request for each department |
**Why is this step required?**
If **Full & Final Process Activate** is not set to **Yes**, the FnF No Dues forms are never triggered and no approval screen receives a request.
If no department head is mapped under **FnF Department Head Manager**, the request has no recipient and the clearance chain cannot start.
To create or edit the form used here, refer to [Form Master.](#how-to-configure-form-master)
### **How to Configure Full and Final Settlement of an Employee?**
The **Full and Final Settlement (F\&F)** process calculates and settles all dues payable to an employee when they leave the organization, including earnings, deductions, leave encashment, notice period adjustments, and any recoveries.
For detailed information on the Full and Final Settlement process, refer to the following topics:
#### How to run or generate a Full and Final Settlement?
Follow the steps outlined in the dedicated guide to generate and process the Full and Final Settlement for an employee.
[**How to run or generate a Full and Final Settlement?**](https://docs.pockethrms.com/hr-and-admin-portal/cloud-configuration/employee-management/employee-separation-and-release#id-1.-how-to-run-or-generate-a-full-and-final-settlement)
#### How to download Full and Final processed payslip (FNF Settlement Slip)?
Once the Full and Final Settlement has been processed, follow the dedicated guide to download the employee’s FNF Settlement Slip.
[**How to download Full and Final processed payslip (FNF Settlement Slip)?**](https://docs.pockethrms.com/hr-and-admin-portal/cloud-configuration/employee-management/employee-separation-and-release#id-9.-how-to-download-full-and-final-processed-payslip-fnf-settlement-slip)
**For any queries, contact** [**support@pockethrms.com**](mailto:support@pockethrms.com)
---
# Agent Instructions
This documentation is published with GitBook. GitBook is the documentation platform designed so that both humans and AI agents can read, navigate, and reason over technical content effectively. Learn more at gitbook.com.
## Querying This Documentation
If you need additional information that is not directly available in this page, you can query the documentation dynamically by asking a question.
Perform an HTTP GET request on the current page URL with the `ask` query parameter, and the optional `goal` query parameter:
```
GET https://docs.pockethrms.com/module-guides/exit-and-fnf-settlement-module.md?ask=&goal=
```
`ask` is the immediate question: it should be specific, self-contained, and written in natural language.
`goal` is optional and describes the broader end goal you are ultimately trying to accomplish on behalf of the user. GitBook uses it to tailor the answer towards what is most useful for that goal.
The response will contain a direct answer to the question and relevant excerpts and sources from the documentation.
Use this mechanism when the answer is not explicitly present in the current page, you need clarification or additional context, or you want to retrieve related documentation sections.