> For the complete documentation index, see [llms.txt](https://docs.pockethrms.com/llms.txt). Markdown versions of documentation pages are available by appending `.md` to page URLs; this page is available as [Markdown](https://docs.pockethrms.com/module-guides/expense-module.md).
# Expense Module
Step-by-step Guide to setup the Expense Module
### **Expense Module**
The **Expense Module** in Pocket HRMS helps organisations manage employee expense claims and reimbursements in one place.
Employees can submit expenses such as travel, food, conveyance, or other business-related expenses, upload bills or supporting documents, and track the status of their claims.
This helps in:
* Centralising expense submission, documentation, and status tracking for employees
* Applying organisation-defined rules for expense types, eligibility, and restrictions
* Structuring expense approvals through a configurable **Approval Matrix**
#### **Prerequisites**
Before configuring the Expense Module, ensure the following:
* **Self-Service Role**: Assign the required ESS role to Employees, Managers, HR/Admin, and Finance users. Refer to [Self Service Role](https://docs.pockethrms.com/hr-and-admin-portal/cloud-configuration/employee-management/setup-and-activation).
* **Expense Rights**: Enable the required Expense options through [Role Allocation](https://docs.pockethrms.com/hr-and-admin-portal/ess-configurations/profile-info/role-allocation).
* **Expense Manager**: Assign the employee's Expense Manager through the [Approval Matrix](https://docs.pockethrms.com/hr-and-admin-portal/cloud-configuration/employee-management/approval-matrix).
* **Employee Details**: Ensure basic employee details such as **Employee Code** and **Business Unit** are updated.
Once these are in place, you can proceed with the Cloud Configuration.
### **Cloud Configuration**
**Path: Cloud → ESS Settings → Expense**
The **Expense** tab groups the settings that control how expense claims work for your organisation:
### **How to set ‘Expense Type’?**
**Path: Cloud → ESS Settings → Expense → Expense Type**
**Expense Types** – the categories of expense employees can claim, such as travel or food
**Step 1:** Log in to the cloud portal and select **‘ESS Settings’.**
Click on the **‘Expense’** tab and select the **‘Expense type’** subtab,
now simply click on the **‘+’** icon to create a new Expense Type.
**Step 2: Select the Business Unit**
Under **Business Unit**, select the company this expense type applies to.
**Step 3: Enter the Expense Type Name**
Enter a name for the expense category in the **Expense Type** field. This field is mandatory.
**Step 4: Set Approval Rights**
Set **Approval Rights** to **Yes** if claims under this expense type require approval, or **No** if they do not.
**Step 5: Enable Location Tracking**
Check the **Location** box to add **From** and **To** location fields to the expense claim entry, for tracking travel-based expenses. Leave it unchecked if location tracking does not apply to this expense type.
**Step 6: Set Location as Mandatory**
When **Location** is checked, the **Location Required Mandatory** toggle appears. Enable it to make entering location details compulsory for the employee, or leave it off to keep location details optional.
**Step 7: Set Expense Mode as Mandatory**
Enable **Mode required Mandatory** to make selecting an **Expense Mode** compulsory when an employee submits a claim under this expense type.
**Step 8: Set the Expense Type as Active**
Keep **Active** checked to make the expense type available for selection during claim entry. Uncheck it to disable the expense type without deleting it.
**Step 9: Save the Expense Type**
Click **Save** to add the expense type, or **Close** to discard the entry without saving.
#### **Managing Existing Expense Types**
Each configured expense type is listed as a card, showing:
* **Business Unit**
* **Expense Type**
* **Approval Rights**
* **Active Location** — with its mandatory / non-mandatory status
* **Is Finance Approval Required**
* **Mode required Mandatory**
* **Active**
**Step 1: Edit an Expense Type**
Click the **pencil icon** on an expense type card to edit its details.
**Step 2: Delete an Expense Type**
Click the **trash icon** on an expense type card to delete it.
**Step 3: Bulk Import Expense Types**
Click **Bulk Import** to upload multiple expense types at once.
**Path Link:** [**https://cloud.pockethrms.com/Settings/Employee/ESSIndex?module=Expense\&submodule=ExpenseType**](https://cloud.pockethrms.com/Settings/Employee/ESSIndex?module=Expense\&submodule=ExpenseType)
### **How to Set ‘Expense Eligibility’ for expense types?**
**Path: Cloud → ESS Settings → Expense → Employee Eligibility**
**Expense Eligibility** – which employees or business units can claim which expense types, and the applicable limits
Go to **‘ESS Settings’** from the cloud portal and under the ‘**Expense**’ tab select ‘**Employee Eligibility**’ subtab then click on the ‘**+**’ icon to open an ‘**Expense Eligibility**’ pop-up window.
* Fill in the necessary fields to set ‘Expense Eligibility’ to improve productivity management.
* Start with selecting the ‘Business Unit’ you want it to be applicable to. This way system allows you the flexibility to customize expense eligibility for various business units.
* From the ‘Expense Type’ drop down you can choose from various expenses that you have created in the system conveniently.
* You can also select an ‘Employee Code’ making it super easy to select individual employees and save a lot of time in the process.
* You also need to set an ‘Amount’ which will be the upper limit for this eligibility criteria. So, the expense claim that will be approved for the eligibility criteria can not exceed this amount.
* The ‘Approval Type’ drop-down gives you quick access to set it as ‘Claim Wise’ or ‘Month Wise’
**'Claim Wise'** means approvals are done individually for each claim, offering flexibility. 'Month Wise' means a consolidated amount will be considered for approval within a month.
* In addition to that you get an option to ensure that there is ‘No Approval up to Amount’. That way mundane expenses can pass swiftly without hindering day-to-day operations. That also means less administrative work for those who are in charge of approving the expense and focus better on their high-stake responsibilities.
* Option to set ‘Prior Days Claim Request Limit’ allows you to limit the prior claim request up to a certain number of days.
**For example:** if you set 7 days in this setting then the system will not allow employees to submit claim requests more than 7 days old.
* If you tick the check box for ‘Limit to attendees’ the system will check the eligibility according to the employee’s attendance or completed shift hours. This means only the employees who have completed a certain number of shift hours or attendance.
* If you tick the check box for **'Eligibility Override'**, the employee will be allowed to raise a claim that goes beyond the set eligibility amount. When this happens, the system will show a confirmation prompt asking the user to confirm before the claim is submitted.
**Path Link:** [**https://cloud.pockethrms.com/Settings/Employee/ESSIndex?module=Expense\&submodule=ExpenseEligibility**](https://cloud.pockethrms.com/Settings/Employee/ESSIndex?module=Expense\&submodule=ExpenseEligibility)
### **How to do ‘Auto Document Number Setting’?**
**Path: Cloud → ESS Settings → Expense →** **Auto Document Number Setting**
**Auto Document Number Setting’** generates a unique '**Transaction Code'** automatically when an employee submits a claim. This feature streamlines record-keeping by ensuring each transaction has a distinct identification, reducing errors and enhancing organization. It simplifies tracking and makes it easier to find it resulting in efficient management of employee claims within the system.
Log into the cloud portal and go to the **‘ESS Settings’** menu. Under the **‘Expense’** tab click on the **‘Auto Document Settings’** subtab.
The system allows you to customize series settings by selecting the initial '**Characters**,' specifying the '**Trailing Zero**,' and the 'Starting Number.' This feature allows you to see the preview for defining unique identifiers for various elements within the system resulting in better data management.
**Path Link:** [**https://cloud.pockethrms.com/Settings/Employee/ESSIndex?module=Expense\&submodule=DocumentNumberSetting**](https://cloud.pockethrms.com/Settings/Employee/ESSIndex?module=Expense\&submodule=DocumentNumberSetting)
### **How to create ‘Expense Mode’?**
**Path: Cloud → ESS Settings → Expense → Expense Mode**
**Expense Modes** – the modes of expense (for example, per kilometre) and their rates
The system allows you to easily create ‘**Expense Mode’**. Go to the **‘ESS Settings**’ menu and under the **‘Expense’** tab click on the ‘**Expense Mode**’ subtab and simply click on the ‘**+**’ Icon. Here, you can enter essential information such as the **‘Expense Type**’, ‘**Mode**’, the ‘**Rate**’ that allows for this expense type and the ‘**Unit**’ of expense.
The system allows you to simply click on the checkbox for the **‘Kilometer Required?’**. If you check the box the ‘**Unit**’ will always be in the terms of Kilometer.
**Path Link:** [**https://cloud.pockethrms.com/Settings/Employee/ESSIndex?module=Expense\&submodule=ExpenseMode**](https://cloud.pockethrms.com/Settings/Employee/ESSIndex?module=Expense\&submodule=ExpenseMode)
### **How to create ‘Expense Purpose’?**
**Path: Cloud → ESS Settings → Expense → Expense Purpose**
**Expense Purposes** – the list of purposes employees can select for a claim
Go to **‘ESS Settings’** and under the ‘Expense’ tab click on the **‘Expense Purpose’** subtab and click on the ‘**+**’ icon. A **‘Purpose’** pop-up window will open, simply enter the purpose and click on the ‘**Save**’ button. The system will immediately add this purpose.
You can also create multiple expense purposes in the system.
**Path Link:** [**https://cloud.pockethrms.com/Settings/Employee/ESSIndex?module=Expense\&submodule=ExpensePurpose**](https://cloud.pockethrms.com/Settings/Employee/ESSIndex?module=Expense\&submodule=ExpensePurpose)
### **How to set due dates and expense cycles?**
**Path: Cloud → ESS Settings → Expense → Restrictions**
**Expense Cycles and Due Dates** – the periods expenses are grouped into and their submission deadlines
**Step 1**: Log into the cloud portal. Go to the **‘ESS Settings’** menu. Under the **‘Expense’** tab click on the **‘Restrictions’** subtab. Select the checkbox for the **‘Due Date Required’** option. That will allow you to add multiple expense cycles.

**Step 2**: Fill in the details in the following fields accordingly
* **Count** – Number of expense cycles you want create for a month.
* **Date Range** – Fill in the start date and the end date for the expense cycle in the first and second boxes respectively
The expenses that are occurred during this date range will be considered as part of the respective expense cycle.
* **Due Date** – The last date to submit expense claims for respective expense cycle
**Note**: If your company policy requires employees to submit hard copies of the bills/invoices to HR/Finance person, the ‘Due Date’ will also be applicable for these submissions. The HR will update the status for the bills they received.
* **Month** - Select the option for the due date:
1. Current - If the due date is in the same month as the expense cycle.
2. Next - If the due date is in the following month of the expense cycle.
Once you entered all the details click on the ‘Save’ button and the employee will see the defined expense cycles while requesting the expense claim.
**For example,**
We keep the ‘**Count**’ for the expense cycles ‘2’
1\. Date Range: 1 to 15, Due Date: 25 of the ‘Current’ month.
2\. Date Range: 16 to 31, Due Date: 10 of the ‘Next’ month.

**Path Link:** [**https://cloud.pockethrms.com/Settings/Employee/ESSIndex?module=Expense\&submodule=Restrictions**](https://cloud.pockethrms.com/Settings/Employee/ESSIndex?module=Expense\&submodule=Restrictions)
### **How to Restrict/Block certain Expense Types against another expense type claim request?**
**Path: Cloud → ESS Settings → Expense → Restrictions**
**Expense Restrictions** – rules that block or restrict certain expense types against others
**Step 1**: Log into the cloud portal. Go to the **‘ESS Settings**’ menu. Under the ‘**Expense’** tab click on the **‘Restrictions’** subtab.
In the **‘Restrictions Against Expenses’** section you will find fields that help you put restrictions against expenses.

**Step 2:** From the **‘Expense Type’** drop-down, select the type of expense you want to put restrictions against.
For example, if you want to restrict or block certain expense requests against the **‘Travel’** expense, you need to select the ‘Travel’ option from the **‘Expense Type’** drop-down.

**Step 3**: Select the checkbox for the **‘Exclusive Expense’** if you want to restrict other expenses against it.
The **‘Block Expenses’** field will become visible under the ‘Exclusive Expense?’ field.

**Step 4**: From the **‘Block Expenses’** drop-down you can choose single or multiple expenses that you want to restrict against the exclusive expense.
That means if the employee has added the exclusive expense in their claim entry, the system won’t let them add the restricted/blocked expense.

**Step 5**: Select the checkbox for ‘Remarks Mandatory’ to ensure that the employee provides a remark for their expense claim entry and click on the ‘Save’ button and the restrictions will be applied to the employee’s expense claim entries.
**Path Link:** [**https://cloud.pockethrms.com/Settings/Employee/ESSIndex?module=Expense\&submodule=Restrictions**](https://cloud.pockethrms.com/Settings/Employee/ESSIndex?module=Expense\&submodule=Restrictions)
### **How to set a ‘Lock Date’ for expense claims?**
**Path: Cloud → ESS Settings → Expense → Expense Lock**
**Expense Lock Dates** – the date before which expense entries cannot be submitted
Go to **ESS Settings** and under the Expense tab go to the **‘Expense Lock’** subtab. This feature allows you to set a lock date for the expense type. For this enter the date against the Expense type, this is the lock date for an entry date.
For example, if you set a lock date for a particular date type the system will not allow employees to submit entries before that date. This feature helps you bring a more structured approach to expense management and improve efficiency.
**Path Link:** [**https://cloud.pockethrms.com/Settings/Employee/ESSIndex?module=Expense\&submodule=ExpenseLock**](https://cloud.pockethrms.com/Settings/Employee/ESSIndex?module=Expense\&submodule=ExpenseLock)
### **How to do trip configuration?**
**Path: Cloud → ESS Settings → Expense → Trips**
**Trip Settings** – whether trip-based claims are enabled, and how proof documents are captured
Under the Expense tab, click on the **Trip Configuration** subtab. Use the **Enable Trip Functionality** toggle key to turn trip capture on or off for the ESS portal and mobile app.
Once trips are enabled, you can choose the **Trip Type** — **Manual Trip**, where the employee enters the Start and End KM and location manually, and attaches an odometer reading as proof; or **Location-Based Trip**, where the employee searches and selects locations via map, and the KM is auto-calculated from the selected From/To locations.
You can choose to configure proof uploads through **Camera Only** or **Camera and Gallery**. The camera-only feature will work only on mobile devices.
You will also get an option to make this attachment mandatory using the **Make this mandatory** toggle. When enabled, the attachment will be required at the time of submission.
The **KM Modification Rights** toggle lets you decide who is allowed to edit the KM entered for a trip — **Manager**, **Finance**, or **Both**. By default, both Managers and Finance have rights to edit the amount.
Next, you need to configure the expense type and mode in the expense module.
For that go to ‘ESS Settings’ in the admin portal, select the ‘Expense’ tab and then ‘**Expense Type’.**
Now you can select the ‘**Expense Mode**’ subtab under the expense tab and click on the ‘**+**’ icon. A pop-up window will open where you can define ‘Rate’ and ‘unit while setting up mode and on the basis of this configuration trips functionality will work. You must check the box for **‘Kilometers Required’** for the trip function.
**Path Link:** [**https://cloud.pockethrms.com/Settings/Employee/ESSIndex?module=Expense\&submodule=TripConfiguration**](https://cloud.pockethrms.com/Settings/Employee/ESSIndex?module=Expense\&submodule=TripConfiguration)
### **How To Configure Expense Field Creation?**
The **Expense Field Creation** page lets you add custom fields to Expense forms, such as **Expense Claim**, without any additional development.
It appears inside **Field Creation** when the **Expense** module is selected, and lists every custom field configured for the chosen Expense form.
This helps in:
* Capturing additional expense details specific to your organisation
* Controlling which custom fields are mandatory before submission
* Extending Expense forms without changing the core application
**Path: Login into Cloud Portal → Settings → HR → Expense Field Creation.**
**Step 1:** Log in to the **Cloud Portal** with your credentials. From the left-hand navigation menu, click **Settings**, then select **HR**.
**Step 2: Open Expense Field Creation**
From the list of modules in **Field Creation**, select **Expense** to open the **Expense Field Creation** screen.
**Step 3: Select the Expense Form**
The section header displays **Custom Fields,** based on the form selected in the dropdown beside it — for example, **Expense Claim**. Select a different form from the dropdown to view or add custom fields for that form instead.
**Step 4: Add a Custom Field**
Click **+ Add Field** to open the **Add Custom Field** panel.
**Step 5: Enter the Field Label**
Under **Field Configuration**, enter a name for the field in **Field Label** — for example, **City**.
The system auto-generates a **System ID** by prefixing the label with **cf\_** and lowercasing it — for example, city becomes cf\_city.\
Click the **edit** icon next to it to set a custom ID instead.
**Step 6: Select the Field Type**
Select the field's data type from the **Field Type** dropdown. Available types include:
* Text
* Number
* Dropdown
* Multi-select
* Date
* File Upload
* Email
* Phone
* Radio Button
**Step 7: Set Field Behaviour**
Enable **Mandatory** to require the field before the form can be submitted.
Enable **Help Text** to reveal a text input where you can enter guidance text shown to the user — for example, "**Select your current residing city.**"
**Step 8: Add Options**
Under **Options**, type a value in **Type option, press Enter to add** and press **Enter** or, to add it. Each added value appears as a removable tag next to the input — for example, MUMBAI, NAVI MUMBAI, PUNE, NOIDA.
**Step 9: Set Up a Conditional Field**
Enable **Make this a conditional field** to control the field's visibility based on another field. The info icon next to this option shows the tooltip: "Enable cascading level fields." This setting corresponds to the **Conditional** column in the custom fields table.
Enabling it adds a **Level 1** block for configuring the cascading child field.
**Step 10: Configure the Level 1 Child Field**
Under **Level 1**, select the child field's data type from **Input Type**, and enable **Make Mandatory** if the child field should be required.
**Step 11: Name the Child Field**
Enter a name for the child field in **Child Field Label** — for example, Area.
**Step 12: Set Values by Parent Option**
Under **Values by Parent Option**, a When show: row appears for every value already added to the parent field's **Options** list — for example, MUMBAI, NAVI MUMBAI, PUNE, NOIDA. For each row, type the child field values that should appear when that parent option is selected, and press **Enter** or,to add each one.
**Step 13: Add Further Levels**
Click **+ Add Level** below the current level to add another cascading level (**Level 2**) underneath Level 1.
The **Live Preview** panel on the right shows how the field will look based on the selected **Field Type**.
#### **Understanding the Live Preview**
The **Live Preview** panel updates as you configure the field, showing how it will actually appear on the Expense form once saved:
1. The **Field Label** you enter appears as the preview heading, exactly as typed (case included).
2. A red asterisk **(\*)** is added next to the label automatically when **Mandatory** is enabled.
3. The input control shown matches the selected **Field Type** — for example, **Dropdown** previews as a **"Select City”**" dropdown, and if there’s a conditional field applied to it, It will show another dropdown preview as a **“Select Area”.**
**Step 14: Save the Field**
Click **Save Field** to add the custom field to the selected form, or **Cancel** to discard it.
**Step 15: Edit a Custom Field**
To modify an existing custom field, click **Edit** against the required field, make the necessary changes, and then click **Update Details** to save the updated configuration.
**Step 16: Delete a Custom Field**
To remove an existing custom field, click **Delete** against the required field. A confirmation pop-up will appear; click **OK** to confirm and delete the field.
**Note:** Once deleted, the field cannot be restored.
#### **Understanding the Custom Fields Table**
Once created, each custom field appears in a table with the following details:
| **Column** | **Description** |
| --------------- | -------------------------------------------------------------------- |
| **Label** | Display name of the custom field |
| **System Key** | Unique identifier used to reference the field in the system |
| **Type** | Data type of the field |
| **Mandatory** | Whether the field must be filled before the form can be submitted |
| **Conditional** | Whether the field's visibility depends on another field or condition |
| **Status** | Whether the field is active or inactive |
If no custom fields have been created yet for the selected form, the table shows: *"No custom fields yet. Click '* ***Add Field'*** *to create one."*
### **How Custom Fields Appear on the Actual Expense Claim Form?**
**Path: (ESS Portal):** [Login to ESS portal → Expense → Request → Claim Entry → click the + icon](https://ess.pockethrms.com/Expense/Transaction/ExpenseRequests)**.**
**Step 1:** Log in to the **ESS Portal** and navigate to **Expense,** then click on **Request.**
**Step 2:** In the **Claim Entry tab**, Click the **+ (Add)** icon.
This opens the **Expense** window where an employee's filed-in expense line is shown, along with every custom field configured for **Expense Claim**. Confirmed from a live example with four custom fields — **City**, **Expense Amount**, **Bill/Receipt**, and **Expense Category**.
* **Dropdown** fields (e.g. City) render as a **--Select--** dropdown, with a red asterisk if Mandatory is enabled.
* **Number** fields (e.g. Expense Amount) render as a plain number input.
* **File Upload** fields (e.g. Bill/Receipt) render as a **Choose file** control showing "No file chosen."
* **Multi-select** fields (e.g. Expense Category) render as a list box where multiple values can be selected — for example, travel, food, accomodation.
* When **Help Text** is enabled, it appears as a small line of guidance text directly below the field — for example, "select appropriate expense amount" below **Expense Amount**, and "upload our file here" below **Bill/Receipt**.
**Path Link:** [**https://ess.pockethrms.com/Expense/Transaction/ExpenseRequests**](https://ess.pockethrms.com/Expense/Transaction/ExpenseRequests)
### **ESS Portal**
Once submitted, an expense claim moves through the ESS Portal based on each user's role:
**Employee submits Expense → Manager reviews → HR reviews (if applicable) → Finance approves**
**Important:** The approval flow may vary depending on the organisation's configuration.
### **How to submit expense claim entries?**
Follow the steps below to submit the expense claim entries.
**Path: ESS Portal → Expense → Request → Claim Entry**
**Step 1**: Log into the **ESS portal**. Go to the **‘Expense’** menu and select the ‘**Request**’ submenu.
**Step 2**: Click on the **‘Claim Entry’** tab at the top of the page and your previously submitted expense claim entries will be visible. Information such as applied date, expense cycle, expense date, expense amount and transaction number will be visible for respective expense claim entries.
In the **‘Claim Entry’** tab you will also see the status for your expense claim entries under the ‘Status’ column.

**Step 3:** Click on the **‘+ Add’** button towards the upper right-hand corner of the screen to add a new expense claim entry. A new window will open

The system will fetch the present date in the ‘**Applied Date**’ field. You need to select the date on which the expense occurred in the ‘Expense Date’ field.

#### Special Case:Expense Cycle
If your company policies define expense cycles, then some additional fields will be visible to you as listed below. Fill in the details accordingly in the respective fields.
* **Expense Month** – The ‘**Month**’ during which concerned expense occurred
* **Expense Year** - The ‘**Year**’ during which concerned expense occurred
* **Expense Cycle** - The ‘**Expense Cycle**’ during which concerned expense occurred.
The predefined expense cycle date ranges will appear in the ‘Expense Cycle’ drop-down. You need to select the cycle during which the concerned expense occurred.

**Step 4**: Once you added the above details click on the ‘**+**’ icon towards the right-hand of the screen to add your expenses.

**Step 5:** You need to add details such as expense type, mode, from date, to date, remark, and the purpose in the respective fields. Click on the **‘Choose File’** button if you want to upload any file and click on the ‘Add’ button and the expense will be added to your expense claim entry.

#### Special Cases
#### Additional Fields
Depending on your company you may find some additional fields below the ‘Purpose field. You can scroll down and provide the necessary details and then click on the ‘**Add**’ button.
#### Kilometres (KMs) Details
If your company policies require you to provide ‘Kilometers (KMs)’ details for an expense claim entry there will be a few additional fields.
**For example**,
The company policies make it necessary to provide **‘Kilometers KMs’** details for specific expenses such as ‘**Travel**’, the you need to fill in the details in the additional fields as listed below.
* **Start Location KMs** - Reading of your vehicle’s odometer at the time you started the travel/journey
* **End Location KMs**- Reading of your vehicle’s odometer at the time you finished the travel/journey (Reached the Destination)
* **Total Kms**- Then the system will calculate the total distance you travelled in the field based on the values you provided for the **‘Start Location KMs’** and **‘End Location KMs’** fields.

Scroll down, and add more details such as the **‘Invoice No./Bill No.’** and the ‘**Purpose**’ in the respective fields. Click on the **‘Choose Files’** button to upload files such as photos of your Odometer or the invoice for the respective expenses.
Add the ‘**Remark**’ and once you fill in all the necessary details click on the ‘Add’ button.

#### Restrictions for Claim Amount
If the company policies set a limit for the amount you can claim in a month or for a particular type of expense, you can click on the ‘Remaining Amount’ button.
* The **‘Remaining Amount’** pop-up will open, specifying the remaining amount for which you can submit a claim request.
* If company policies don’t set any limit on the amount to be claimed in the expense request the **‘Remaining Amount’** pop-up will inform you that there is no such limit.

**Step 6**: Once you fill in all the necessary details according to your company policies click on the ‘Add’ button the expense will be added to your expense claim entry.

You can click on the ‘**+**’ icon, towards the right-hand side of the screen, again to add multiple expenses following the steps above.
**For example**,
We will add 2 more expenses i.e. **'Calling Expenses'** and **'Client Visit'** in the expense claim entry.

#### Restricted Expenses
If a certain expense is restricted against the expense you have already added, the system will not allow you to add a new request for that restricted/blocked expense on the same day.
**For example**,
If you added the expense for the expense type **‘Travel’** and the expense type ‘Stationary’ is restricted against it. If you select the **‘Stationary’** as the **‘Expense Type’** the system won’t accept that input.

You will also get a notification informing you that the expense type you are trying to select is blocked.

**Step 7:** You can click on the **‘Edit Icon’** at the end of the row for the respective expense to make any changes.

**Step 8**: You can click on the **‘Delete Icon’** at the end of the row for the respective expense to delete the expense.

**Step 9:** Once you have added all the expenses you need to add the **‘Remark’** and then you can click on the **‘Save As Draft’** button. The entry will be moved to the **‘Pending Claim’** tab.
You can also click on the **‘Submit’** button and the expense claim entry will be sent to the respective manager for approval.
**Note:**
The approval flow of the expense claim entries depends on your company policies.
1. Employee submits expense claim entry it goes to the Manager, once approved it goes to Finance Manager (Finance Department) for final approval.
2. Employee submits expense claim entry it goes to the Manager, once approved it goes to the Human Resources (HR), and once approved it goes to the Finance Manager (Finance Department) for final approval

**Step 10**: Click on the **‘Pending Claim’** tab to view the expense claim requests that you have saved as draft or not yet submitted. You can click on the ‘**Details**’ button for the respective entry to see more information.

The expense details pop-up will open where you will find details such as, expense type, from-to date, mode, purpose, applied amount, the bill if uploaded and the remark.
**Step 11**: You can click on the ‘**View**’ button to see additional information specific to the expense and another **‘Expense Details’** pop-up will open.

In this **‘Expense Details’** pop-up, along with the **‘Expense Type’** you will find information that is specific to that particular expense type and in accordance with the company policies.
**For example**,
When it comes to the expense type ‘**Travel**’ the additional details you filled in for the request such as, start location kms, end location kms, total kms, total amount and the invoice number will be visible here.

**Step 12**: Under the **‘Pending Claim’** tab you can also click on the ‘**Edit**’ button for the respective entry to make any changes.

**Step 13**: In the page that opens next, you can fill in details such as, the **‘Vendor Name’** and the **‘Invoice Number’** that you may have missed earlier and click on the **‘Save as Draft’** button.
**Step 14**: It will take you to the **‘Pending Claims’** tab where you can click on the **‘Details’** buttons for the respective entry to view the changes you made in the expense entry.
**Step 15**: Once you verified all the details and made any necessary edits you can click on the ‘**Submit**’ button. The expense claim request will be sent to the respective manager for approval.
**Step 16**: Click on the **‘Claim Entry’** tab to view the expense claim entries you have submitted for approval. Under the ‘**Status**’, column you can check the approval status for your expense claim entry.
### **How to save a 'Trip'?**
**Path: ESS Portal → Expense → My Trip → My Trips**
**Step 1:** Log into your ESS portal, from the **'Expense'** menu on the left-hand side of the screen click on the **'My Trip'** sub-menu.
**Step 2:** Under the **'My Trips'** tab, check that the **'Expense Type'** field shows **'Trip'**, then select the **'Mode'** and **'Purpose'**.
**Step 3:** Enter your **'Start KMs' and 'End KMs'**, upload a supporting document and add a **'Remark'**.
**Step 4:** Click on the **'Submit'** button.
**Step 5:** Once you complete your trip, go to **'My Trips'** and click on **'End Trip'**. Your **'Expense Type'**, **'Mode'** and **'Purpose'** carry over from when you started the trip. Enter your **'End KMs'** — the **'Total KMs'** and **'Total Amount'** fields are shown on the screen.
**Step 6:** Upload a supporting document, add a **'Remark'** and click on the **'End Trip'** button. No pop-up appears after this — the trip is saved directly and moves to the **'Saved Trips'** tab.
**Step 7:** Go to the **'Saved Trips'** tab, click on **'View Details'** to check the trip, or click on **'Submit'** to submit it for your expense claim.
**Path Link:** [**https://ess.pockethrms.com/Expense/Transaction/ExpenseTrips?Menu=MyTrips**](https://ess.pockethrms.com/Expense/Transaction/ExpenseTrips?Menu=MyTrips)
### **Manager: Reviewing Expense Claims**
Managers are notified by email and through the ESS Portal notification bell when an employee submits a claim.
* Review the claim, then **Approve** or **Reject** it; multiple claims can be actioned together
* If the **Approval Matrix** is configured for multi-level approval, the claim moves to the next manager only after the first approves
The employee is notified of the outcome by email and through the ESS Portal.
### **Responding to Expense Entries as a Manager**
**Step 1**: Log into the **ESS portal**, go to the ‘**Expense**’ menu and click on the **‘Approval’** submenu.

**Step 2**: Click on the **‘Manager Approval’** tab. Select the ‘**Month**’ and the ‘Year’ in the respective fields and click on the ‘**Search**’ button. The entries for the selected timeframe will appear below.

**Step 3:** To view expense entries for an individual employee select an employee name or code from the **‘Employee’** field, followed by selecting the ‘**Month**’ and the ‘**Year**’ and click on the **‘Search’** button. The expense entries from the employee in the selected timeframe will appear.

**Step 4**: Click on the ‘**Details**’ button for the respective expense entry to view the Details.

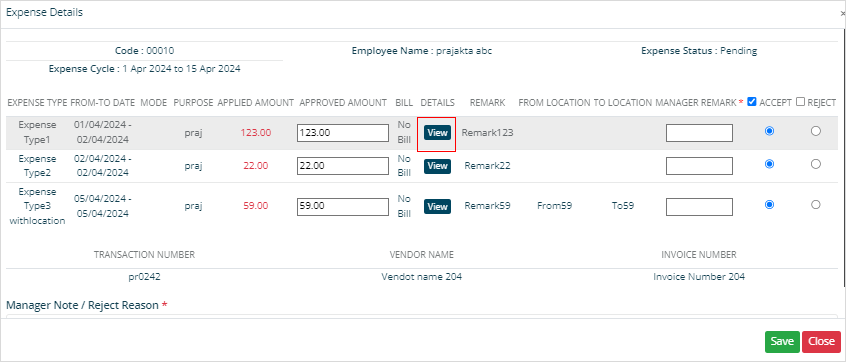
**Step 5**: The **‘Expense Details’** pop-up will open where you can find details of all the expenses in the expense entry. To get more information about the expense click on the ‘**View**’ button in the ‘**Details**’ column.
**Step 6**: A pop-up will open where you can view additional information which is specific to the certain expense type. Click on the ‘**Close**’ button to close the ‘**pop-up**’.
**Step 7:** In will take you back to the ‘**Expense Details**’ pop-up. The column ‘**Applied Amount**’ shows the amount the employee asked for, and in the **‘Approved Amount**’ column you can enter the amount you want to approve for the respective expense.

**Step 8:** Select the radio button in the ‘**Accept**’ and the ‘**Reject**’ column to take respective actions for the expenses. You can also click on the ‘**check box**’ in front of the ‘**Accept**’ and the '**Reject**’ option/column name, to select all the expenses in the expense entry.

**Step 9:** It is mandatory to enter your comment in the ‘**Manager Note/Reject Reason’** and the ‘**Manager Remark**’ in the respective fields. Click on the save button to submit your response.

**Step 10**: You will get a notification asking if you are sure about saving your response as you can’t edit/change your action later.
* Click on the ‘**Cancel’** button if you want to reconsider your response or edit it.
* You can click on the ‘**Ok**’ button to confirm your response and the expense entry
Once you click on the ‘**Ok**’ in the notification your response will be submitted.

Your response (Accepted/Rejected) to the expense entries will be submitted to finance manager/HR for further approval.
**Step 11**: On the **‘Manager Approval’** page, you can select,
1. Specific entries
2. All the entries present on the current page
3. All the entries present in the system
#### Specific expense entries
If you want to select specific expense entries from the **‘Manager Approval’** page, select the radio buttons in the ‘**Accept**’ or ‘**Reject**’ column for respective action. Add a remark in the respective field and click on the ‘**Save**’ button to submit your response.

As this action is irreversible you will get a notification asking if you are sure about the action. The notification will also specify the number of entries selected for the response.
* Click on the ‘**Ok**’ button in the notification to confirm your action.
* Click on the ‘**Cancel**’ button in the notification if you are not sure about your action.
Once you click on the ‘**Ok**’ in the notification your response will be submitted for the selected entries.

#### All the expense entries present on the current page
You can select the respective checkbox for the ‘**Accept**’ and the ‘**Reject**’ to select all the expense entries on the current page. Click on the ‘**Save**’ button to submit your response.
The ‘Remarks’ as accepted/rejected will also be auto-filled for the entries on the current page.

As this action is irreversible you will get a notification asking if you are sure about the action. The notification will also specify the number of entries selected for the response.
* Click on the ‘**Ok**’ button in the notification to confirm your action.
* Click on the ‘**Cancel**’ button in the notification if you are not sure about your action.
Once you click on the ‘**Ok**’ in the notification your response will be submitted for expense entries on the current page.

#### All the expense entries present in the system
You can use the **‘Approve All’** and the **‘Reject All’** buttons to select all the expense entries in the system and the ‘**Remarks**’ as accepted/rejected will be auto-filled for all the expense entries in the system. That also includes the entries that are not visible on the current page.

As this action is irreversible you will get a notification. This notification intends to make sure that you want to submit your response for all the entries and it also shows you the exact number of entries selected.
* Click on the ‘**Ok**’ button in the notification to confirm your action.
* Click on the ‘**Cancel**’ button in the notification if you are not sure about your action.
Once you click on the ‘**Ok**’ in the notification your response will be submitted for all expense entries present in the system.

Your response (Accepted/Rejected) to the expense entries will be submitted to finance manager/HR for further approval.
#### **Expense Tracker**
Clicking the **Tracker** button under the **Action** column opens the **Expense Request Tracking** window, which shows the current approval status of the expense request. Under **Expense request**, each approval level is listed with the approver's name and status — for example, **Level 1** and **Level 2**, each shown as **Pending** until that approver acts. Once the request clears all approval levels, it moves to the **Finance** stage, shown as **Waiting** until finance processes it, along with the date.
### **How to download expense reports as a Manager?**
If managers want to download the expense reports they can go to the ‘**Expense**’ menu and then click on the **‘My Team Report’** submenu.
Under the **‘Manager Report’** tab select the ‘**Status**’, and **‘Date Range’** and click on the search button. You can easily download it by clicking on the **‘Download Excel’** button.
Managers can download reports for an individual **‘Employee’** by entering their employee code.
[**Path Link:** ](https://ess.pockethrms.com/Expense/Reports/MyTeamExpenseReport?Menu=expensemanagerreport)[**https://ess.pockethrms.com/Expense/Reports/MyTeamExpenseReport?Menu=expensemanagerreport**](https://ess.pockethrms.com/Expense/Reports/MyTeamExpenseReport?Menu=expensemanagerreport)
#### **Admin/HR: Tracking and Reporting on Expense Claims**
**Path: ESS Portal → Expense → HR Reports**
* Filter claims by status (**Approved**, **Pending**, **Rejected**, or **All**) and by date range
* Download the **HR Report**, or download bills submitted against individual claims
**Important:** If your company policy requires employees to submit hard copies of bills, HR must update the receipt status separately once received.
**Path Link:** [**https://ess.pockethrms.com/Expense/Reports/HRReport**](https://ess.pockethrms.com/Expense/Reports/HRReport)
### **Finance: Approving Expense Claims for Reimbursement**
### **How approve expense claims as a finance person?**
As a Finance person, you need to log into the **ESS portal** and click on the **‘Finance Approval’** under the ‘**Expense**’ menu.
Under the ‘**Finance Approval**’ tab select the ‘**Month**’ and click on the ‘Search’ button. The expense requests will appear, click on the ‘**Details**’ button for more information.
The ‘**Expense Details’** pop-up will open, you can edit the ‘Finance Amount’ and scroll left to ‘**Approve**’ or ‘**Reject**’ the request. Enter the ‘Finance Remark’ and click on the ‘**Save**’ button.
Once approved by Finance, the claim is processed for reimbursement.
**Path Link:** [**https://ess.pockethrms.com/Expense/Transaction/FinanceApproval?Menu=financeapproval**](https://ess.pockethrms.com/Expense/Transaction/FinanceApproval?Menu=financeapproval)
### **Expense Management in the Pocket HRMS 2.0 Mobile App**
The **Expense Module** in the Pocket HRMS 2.0 Mobile App allows employees to submit expense claims, upload bills or supporting documents, and track their expense requests directly from the mobile application. Managers and Finance users can also review and process expense requests based on the rights assigned to them.
For detailed steps on using the Expense Module in the Pocket HRMS 2.0 Mobile App, refer to the documentation below:
[**Expense - Pocket HRMS 2.0 Mobile App Docs**](/pocket-hrms-2.0-mobile-app/expense.md)
**For any queries, contact** [**support@pockethrms.com**](mailto:support@pockethrms.com)
---
# Agent Instructions
This documentation is published with GitBook. GitBook is the documentation platform designed so that both humans and AI agents can read, navigate, and reason over technical content effectively. Learn more at gitbook.com.
## Querying This Documentation
If you need additional information that is not directly available in this page, you can query the documentation dynamically by asking a question.
Perform an HTTP GET request on the current page URL with the `ask` query parameter, and the optional `goal` query parameter:
```
GET https://docs.pockethrms.com/module-guides/expense-module.md?ask=&goal=
```
`ask` is the immediate question: it should be specific, self-contained, and written in natural language.
`goal` is optional and describes the broader end goal you are ultimately trying to accomplish on behalf of the user. GitBook uses it to tailor the answer towards what is most useful for that goal.
The response will contain a direct answer to the question and relevant excerpts and sources from the documentation.
Use this mechanism when the answer is not explicitly present in the current page, you need clarification or additional context, or you want to retrieve related documentation sections.