> For the complete documentation index, see [llms.txt](https://docs.pockethrms.com/llms.txt). Markdown versions of documentation pages are available by appending `.md` to page URLs; this page is available as [Markdown](https://docs.pockethrms.com/module-guides/travel-module.md).
# Travel Module
Step-by-step Guide to setup the Travel Module
### **Travel Management Module**
The **Travel Management Module** in Pocket HRMS helps organizations manage employee travel efficiently by streamlining travel requests, approvals, advances, reimbursements, and related activities in one place.
It provides a smooth and structured experience for employees, managers, HR/Admin, and Finance teams throughout the travel process.
This guide covers the key features, configurations, and workflows available in the **Travel Module.**
#### **Prerequisites**
Before configuring the Travel Module, ensure the following:
* **Self-Service Role:** Assign the required ESS role to Employees, Managers, HR/Admin, and Finance users.
* **Travel Rights:** Enable the required Travel options through **Role Allocation**.
* **Travel Manager:** Assign the employee’s Travel Manager through the **Approval Matrix**.
* **Employee Details:** Ensure basic employee information such as **Employee Code** and **Business Unit** is correctly updated.
Let us start with setting up the module according to company’s requirement.
### **Cloud Configurations for Travel Management**
The **Cloud Configurations** section allows administrators to set up and manage the key settings required for the Travel Management Module.
### **Configuration**
**Path: Cloud → ESS Settings → Travel → Configuration**
**Step 1:** Log in to the **Cloud Portal**, select **ESS Settings** from the main menu, open the **Travel** tab, and then click **Configuration.**
**Step 2: Set Manager Amount Edit Rights**
Under **Manager Approval**, enable **Manager Amount Edit Rights** to allow the Reporting Manager to edit the reimbursement amount before approving the request. Keep it disabled to restrict the Reporting Manager to approving or rejecting the amount as submitted.
**Step 3: Enable Finance Approval for Travel Advance Requests**
Under **Finance Approval**, enable **Required for Travel Advance Request** to route travel advance requests to the Finance team for approval.
**Step 4: Set Finance Amount Approval Rights**
Enable **Amount Approval Rights** to allow the Finance team to edit final amounts and approve or reject travel requests.
**Step 5: Add the Approval Screen Note/Disclaimer**
Enter the note or disclaimer text in the **Approval Screen note/disclaimer** field. This text is shown to approvers on the approval screen.
Click **Preview** to review it,
then click **Save**.
#### **Where These Settings Apply**
| **Approver** | **Path** |
| ----------------- | ------------------------------------------------------------------------------------------ |
| Reporting Manager | ESS Portal → Manager → Travel → Approval → Travel Approval / Travel Reimbursement Approval |
| Finance Team | ESS Portal → Finance → Travel → Finance Approval |
**Path Link:** [**https://cloud.pockethrms.com/Settings/Employee/ESSIndex?module=Travel\&submodule=TravelConfiguration**](https://cloud.pockethrms.com/Settings/Employee/ESSIndex?module=Travel\&submodule=TravelConfiguration)
### **Travel Master**
The **Travel Master** page lets you define the base data used across the Travel module — the purposes, modes, and other categories an employee selects while raising a travel request.
This helps in:
* Standardising the travel purposes and modes available to employees
* Keeping travel request data consistent and structured
* Supporting any additional, company-specific travel categories
**Path: Cloud → ESS Settings → Travel → Travel Master**
**Step 1: Navigate to the Travel Master Screen**
Log in to the Cloud portal and click **ESS Settings**. Go to the **Travel** tab, then click the **Travel Master** subtab.
**Step 2: Add a New Travel Master Entry**
Click the **+** icon on the **Travel Master** screen to open the **Travel Master** pop-up.
**Step 3: Select the Travel Master Type**
From the **Select Travel Master** drop-down, choose the type of entry to add:
* **Purpose of Travel**
* **Mode of Travel**
* **Other Miscellaneous**
**Step 4: Enter the Description and Save**
Enter a **Description** for the selected type, then click **Save**.
Repeat these steps for each **Purpose of Travel**, **Mode of Travel**, or **Other Miscellaneous** entry you want to configure.
#### **Viewing Saved Travel Master Entries**
Once saved, the entry appears in the list on the **Travel Master** screen.
**Path Link:** [**https://cloud.pockethrms.com/Settings/Employee/ESSIndex?module=Travel\&submodule=TravelMaster**](https://cloud.pockethrms.com/Settings/Employee/ESSIndex?module=Travel\&submodule=TravelMaster)
### **Travel Form Builder Settings**
The **Travel Form Builder Settings** page lets you configure the fields captured on the **Travel Request** and **Reimbursement** forms, and choose how each form's fields are sourced.
This helps in:
* Configuring the Travel Request and Reimbursement forms independently
* Choosing whether form fields come from a fixed company-wide form, a business-unit-specific form, or custom input fields
* Keeping the correct form linked to each request type
**Path: Cloud → ESS Settings → Travel → Travel Form Builder Settings**
**Step 1: Navigate to the Travel Form Builder Settings Screen**
Log in to the Cloud portal and click **ESS Settings**. Go to the **Travel** tab, then click the **Travel Form Builder Settings** subtab.
**Step 2: Select the Request Type**
Choose the **Travel Request** or **Reimbursement** tab, depending on which form you want to configure.
**Step 3: Select the Field Source Type**
Choose the source type for the form's fields: **Company Wise**, **Dynamic**, or **Input Selection**. The fields displayed below change based on the selected type.
#### Field Source Types
**Company Wise**
Displays the **Form Name** drop-down only. Select the form to associate with the request type.
**Dynamic**
Displays **Business Unit**, **Value**, and **Form Name** drop-downs. Select the **Business Unit** and **Value** the form applies to, then select the **Form Name**.
**Input Selection**
Displays **Label Name** and **Component Name** text fields, along with the **Form Name** drop-down. Enter the **Label Name** and **Component Name**, then select the **Form Name**.
**Step 4: Save the Form Configuration**
Click **Submit** to save the configuration.
**Path Link:** [**https://cloud.pockethrms.com/Settings/Employee/ESSIndex?module=Travel\&submodule=FormBuilderSettings**](https://cloud.pockethrms.com/Settings/Employee/ESSIndex?module=Travel\&submodule=FormBuilderSettings)
### **Travel Notification Settings**
The **Travel Notification Settings** page lets you configure who receives email notifications for Travel Management events, and whether Managers and HRs are notified.
This helps in:
* Routing event notifications to specific employees
* Adding direct email addresses for notification, independent of employee records
* Controlling whether Managers and HRs receive notifications for each event
**Path: Cloud → ESS Settings → Travel → Travel - Notification Settings**
**Step 1: Navigate to the Travel Notification Settings Screen**
Log in to the Cloud portal and click **ESS Settings**. Go to the **Travel** tab, then click the **Travel - Notification Settings** subtab.
**Step 2: Select the Entities to Notify**
Under **Entities**, add the employees who should receive a notification for the **Event**. Click the **×** on an entry to remove it.
**Step 3: Add Notification Email Addresses**
Under **Emails**, enter the email address(es) that should also receive the notification, independent of the selected **Entities**.
**Step 4: Enable Manager and HR Notifications**
Select the **Manager** checkbox to notify the Reporting Manager, and select the **HRs** checkbox to notify HR, for the **Event**.
**Step 5: Save the Notification Settings**
Click **Save**.
#### **Removing an Event's Notification Configuration**
Click **Delete** in the **Action** column to remove that **Event's** notification configuration.
**Path Link:** [**https://cloud.pockethrms.com/Settings/Employee/ESSIndex?module=Travel\&submodule=TravelNotification**](https://cloud.pockethrms.com/Settings/Employee/ESSIndex?module=Travel\&submodule=TravelNotification)
### **Calculative Fields**
The **Calculative Fields** page lets you define formula-driven fields used on Travel forms — each field applies a **Rate** to a selected **Value**, using a mathematical **Operator**, for a specific **Business Unit** category.
This helps in:
* Defining reusable calculation rules, such as a per-kilometer travel rate
* Applying different rates for different values within a Business Unit
* Keeping travel amount calculations consistent across requests
**Path: Cloud → ESS Settings → Travel → Calculative Fields**
**Step 1: Navigate to the Calculative Fields Screen**
Log in to the Cloud portal and click **ESS Settings**. Go to the **Travel** tab, then click the **Calculative Fields** subtab.
**Step 2: Add a New Calculative Field**
Click the **+** icon in the top right corner of the **Calculative Fields** screen to open the **Calculative Fields** pop-up.
**Step 3: Select the Business Unit and Value**
Select the **Business Unit** and the **Value** the calculative field applies to.
**Step 4: Enter the Label, Operator, and Rate**
Enter a **Label** for the field, the **Operator** to use in the calculation, and the **Rate**,
then click **Save**.
**Business Unit**, **Value**, **Label**, **Operator**, and **Rate** are all mandatory fields.
#### **Viewing and Managing Saved Calculative Fields**
Each saved calculative field appears as a card on the **Calculative Fields** screen.
| **Pop-up Field** | **Displayed on Card As** |
| ---------------- | ------------------------ |
| Business Unit | Business Unit |
| Value | Business Value |
| Label | Label |
| Operator | Operator |
| Rate | Rate |
Click the **edit icon** on a card to reopen it in the **Calculative Fields** pop-up. Click the **delete icon** on a card to remove it.
**Path Link:** [**https://cloud.pockethrms.com/Settings/Employee/ESSIndex?module=Travel\&submodule=CalculativeFields**](https://cloud.pockethrms.com/Settings/Employee/ESSIndex?module=Travel\&submodule=CalculativeFields)
### **Travel Priority Approval**
The **Travel Priority Approval** page lets you set an approval priority and an approval cycle for each mode of travel used on Travel requests.
This helps in:
* Ranking modes of travel by approval priority
* Defining the approval cycle to apply for each mode of travel
* Controlling approval routing consistently across travel modes
**Path: Cloud → ESS Settings → Travel → Travel Priority Approval**
**Step 1: Navigate to the Travel Priority Approval Screen**
Log in to the Cloud portal and click **ESS Settings**. Go to the **Travel** tab, then click the **Travel Priority Approval** subtab.
**Step 2: Set the Priority for a Mode of Travel**
Against the relevant entry under **Description**, select a numeric ranking from the **Priority** drop-down.
**Step 3: Set the Approval Cycle for a Mode of Travel**
Against the same entry, select the approval cycle from the **Approval** drop-down.
**Step 4: Save the Travel Priority Approval Settings**
Click **Save**.
#### **Removing Travel Priority Approval Settings**
Click **Delete** to remove the saved **Travel Priority Approval** configuration.
**Path Link:** [**https://cloud.pockethrms.com/Settings/Employee/ESSIndex?module=Travel\&submodule=TravelPriorityApproval**](https://cloud.pockethrms.com/Settings/Employee/ESSIndex?module=Travel\&submodule=TravelPriorityApproval)
### **ESS Portal - Transactions In Travel Module.**
### **Travel Management – Employee Request & Submission**
### **How To Submit a Travel Request through ESS Portal?**
The **Travel Request** page lets Employee submit a request for business travel, covering your travel schedule, accommodation needs, and anticipated expenses, so it can be reviewed and approved.
This helps in:
* Requesting approval for upcoming business travel in a single form
* Requesting a travel advance based on your estimated expenses
* Tracking the approval status of a submitted request
#### **Submitting a Travel Request**
**Path: ESS Portal → Travel → Request → Travel Request**
**Step 1: Navigate to the Travel Request Screen**
Log in to the **ESS portal** and click the **Travel** menu, followed by the **Request** submenu. Click the **Travel Request** tab.
**Step 2: Start a New Travel Request**
Click **+ Add** to open a new **Travel Request** form.
**Step 3: Enter the Basic Travel Details**
Enter the **Work Order** and **Project**. Select the **Date of Travel**, **Purpose of Travel**, and **Mode Of Travel**.
**Step 4: Fill in the Travel Schedule**
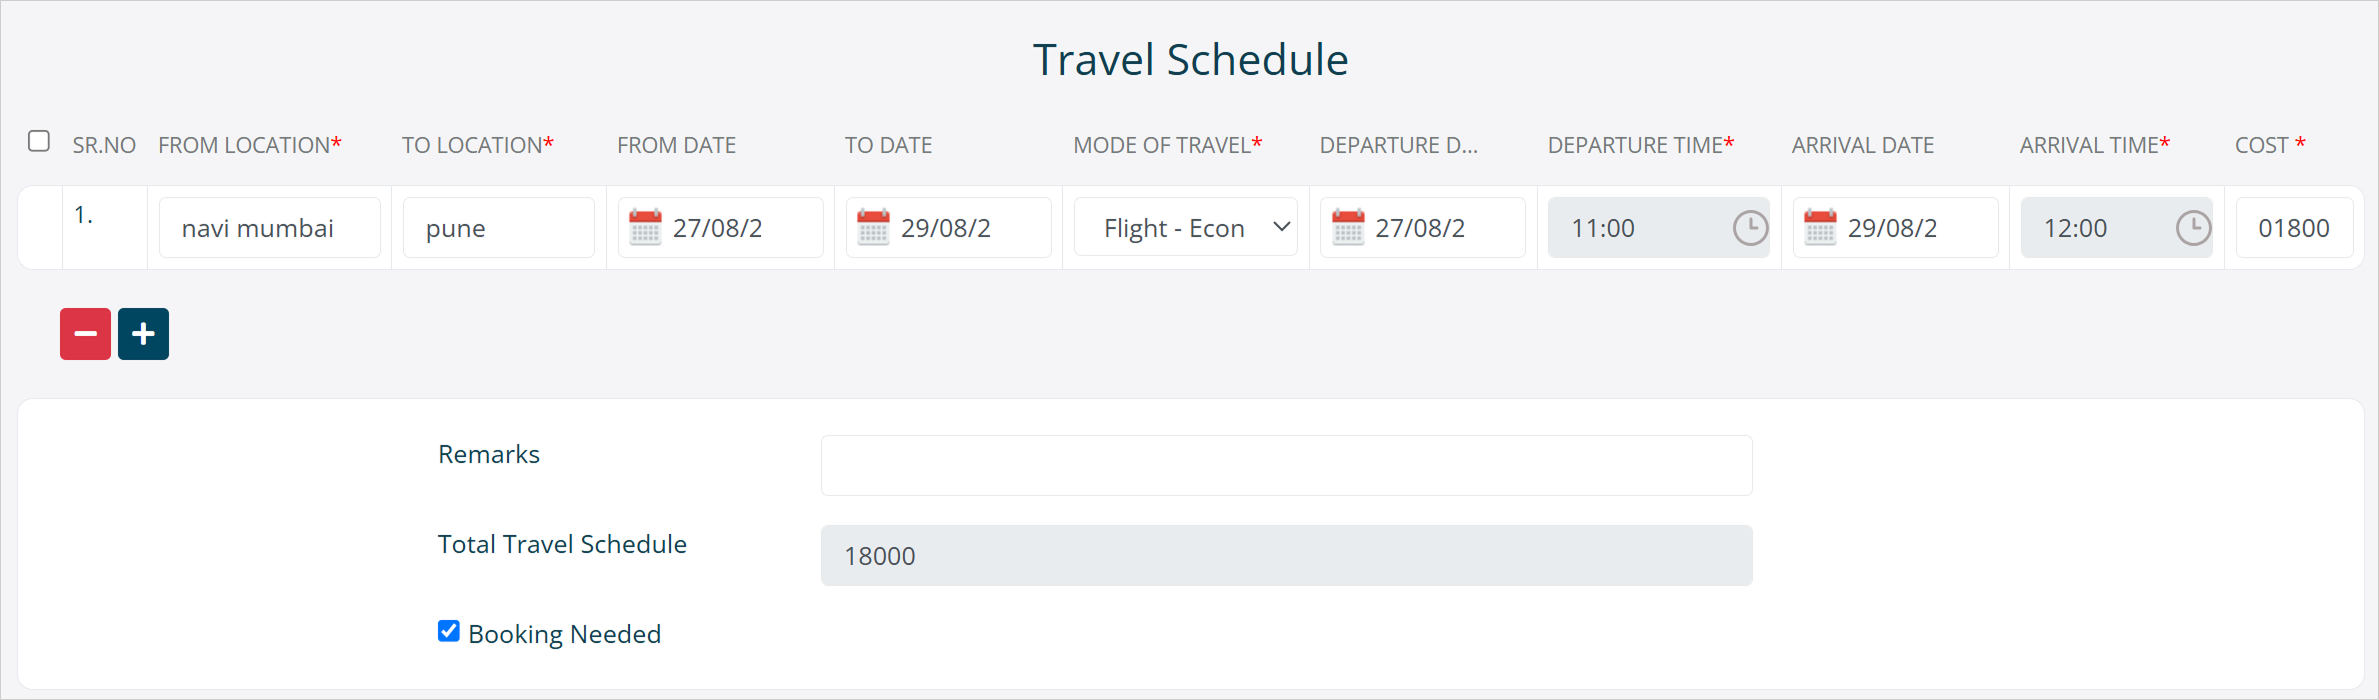
Under **Travel Schedule**, enter the **From Location**, **To Location**, travel dates, **Mode of Travel**, departure and arrival date/time, and **Cost** for each leg of the trip. Click **+** to add another leg, or **-** to remove one
**Step 5: Fill in the Accommodation Schedule**
Under **Accommodation Schedule**, enter the check-in and check-out dates, **Accommodation Details**, **No. of Days**, and **Rate (Per Day)**. Click **+** to add another entry, or **-** to remove one
**Step 6: Add Miscellaneous Expenses**
Under **Miscellaneous Expenses**, enter the **No. of Days** and **Cost (Per Day)** against the relevant expense categories — such as **Local Travelling**, **Food**, or **Daily Expense** — and add any remarks.
**Step 7: Enter Additional Details**
Under **Additional Details**, select the **End Date** and enter any notes under **Remarks 1**.
**Step 8: Enter Other Details**
Under **Other Details**, enter values for any listed field. These fields are configured through \[\[Calculative Fields]], which calculates each field's **Total**.
**Step 9: Save the Request**
Click **Save** to submit the request to your Reporting Manager for approval,
or click **Save As Draft** to save it without submitting.
The **Total Travel Schedule**, **Total Accommodation Schedule**, **Total Miscellaneous Expenses**, **Total Other Expenses**, and **Total Travel Advance** fields are calculated automatically as you fill in the form.
#### **Viewing Submitted Travel Requests**
The **Claim Entries** tab lists all submitted requests with their **Travel ID**, **Work Order**, **Travel Date**, **Travel Mode**, **Project Name**, and **Status**. Requests saved without submitting appear under the **Drafted Entries** tab.
Click **Details** on a request to view its full travel, accommodation, and miscellaneous expense details, along with its **Travel Approval Date**, **Reimbursement Approval Date**, **Finance Approval Date**, and **Admin Booking Approval Date**. Click **Print** or **Download Excel** to export the request.
#### **Editing and Resubmitting a Rejected Request**
Click **Edit** on a request with a rejected status — such as **Travel Admin Rejected** or **Travel Rejected** — to reopen it in the **Edit Travel Rejected Details** pop-up. Update the required details, review the **Total Amount** summary (**Travel Scheduled Expense**, **Accommodation Expense**, **Miscellaneous Expenses**, and **Total Other Expenses**), then click **Resubmit**.
**Path Link:** [**https://ess.pockethrms.com/Travel/Transaction/TravelRequest?Menu=TravelRequest**](https://ess.pockethrms.com/Travel/Transaction/TravelRequest?Menu=TravelRequest)
### **How To Check Status For Your Travel Request?**
The **Travel Report** screen lets you check the approval status of your submitted **Travel Requests**, track each approval stage, and download or print the full request details.
This helps in:
* Filtering your travel requests by date range and report type
* Tracking each approval stage of a request — Admin, Finance, and Reimbursement
* Downloading or printing a request's full details
#### **Checking Your Travel Request Status**
**Path: ESS Portal → Travel → My Report → Travel Report**
**Step 1: Navigate to the Travel Report Screen**
Log in to the **ESS portal**, click the **Travel** menu, then click the **My Report** submenu, followed by the **Travel Report** tab.
**Step 2: Filter the Report**
Select a **Filter**,
set the **Date Range**,
and choose the **Report Type** — such as **Travel Detailed Report**
then click **Search,**
**or** Click **Download Excel** to export the filtered report directly.
**Step 3: View the Travel Request List**
The list shows each entry's **Travel ID**, **Code**, **Name**, **Travel Date**, **Project**, **Status**, **Travel Advance**, **Reimburse Amount**, and any **Reimbursement Attachments**. Use the **Search** box above the list, or the pagination controls below it, to find a specific entry.
**Step 4: View the Approval Tracking**
Click the **ⓘ** icon next to the **Status** to open **Travel Request Tracking**. This shows the **Travel Request Flow** (**Travel Request → Admin Booking Needed → Finance Advance**) along with the approver and status — **Pending** or **Waiting** — at each stage.
**Step 5: View the Full Request Details**
Click **Travel Details** to open the request's full details — **Travel ID**, **Work Order**, **Date of Travel**, **Mode Of Travel**, **Project**, **Purpose of Travel**, and remarks — along with its **Travel Approval Date**, **Reimbursement Approval Date**, **Finance Approval Date**, and **Admin Booking Approval Date**, its **Travel Schedule**, **Accommodation Schedule**, and **Miscellaneous Expenses**.
**Step 6: Download or Print the Request**
Under **Travel Request**, click **Download** next to **Travel Request form** to download the submitted form. Click **Print** or **Download Excel** to export the request along with its **Total Travel Advance**.
#### **Viewing Approval Notifications**
Once your Reporting Manager approves your travel entry, you receive a notification. Click the **Bell** icon in the upper right-hand corner of the screen to view it.
**Path Link:** [**https://ess.pockethrms.com/Travel/Transaction/TravelMyReport?Menu=TravelRepor**t](https://ess.pockethrms.com/Travel/Transaction/TravelMyReport?Menu=TravelReport)
### **How To Submit A Reimbursement Request?**
The **Reimbursement Request** page lets you claim reimbursement for actual travel expenses against an approved **Travel Request**, once your travel entry has been approved by your Reporting Manager.
This helps in:
* Claiming reimbursement only against manager-approved travel entries
* Automatically calculating expense totals and the reimbursement amount against the travel advance received
* Attaching supporting documents for each expense category
#### **Submitting a Reimbursement Request**
**Path: ESS Portal → Travel → Request → Reimbursement Request**
**Step 1: Navigate to the Reimbursement Request Screen**
Log in to the ESS portal and click the **Travel** menu, followed by the **Request** submenu. Click the **Reimbursement Request** tab.
**Step 2: Select the Approved Travel Entry**
Under **Claim Entries**, click **View Details** against the approved travel request you want to claim reimbursement for. This opens a summary of the entry's **Travel ID**, **Travel Date**, **Project Name**, **Travel Remark**, **Accommodation Remark**, and **Miscellaneous Remark**.
**Step 3: Open the Reimbursement Form**
Click **Reimburse** to open the entry's **Reimbursement** form.
**Step 4: Enter the Accommodation and Miscellaneous Expenses**
Under **Accommodation Expense** and **Miscellaneous Expense**, enter the actual amount spent against each date and expense category — such as **Local Travelling**, **Food**, or **Daily Expense** — and add any remarks. Each row's **Total** is calculated automatically.
**Step 5: Enter the Mode of Travel and Cost**
Enter the **Mode of Travel** and **Cost** for the **Date From-To** shown.
**Step 6: Review the Reimbursement Amount**
Pocket HRMS fetches the **Travel Advance Received** automatically. Your **Actual Expenses** and the final **Reimbursement** amount are calculated automatically once you've entered your expenses.
**Step 7: Attach Supporting Documents**
Click **Add Files** against **Travel Schedule**, **Accommodation Schedule**, or **Miscellaneous Expenses** to upload supporting documents.
**Step 8: Submit the Reimbursement Request**
Click **Submit** to send the request to your Reporting Manager for approval,
or click **Save Draft** to save it without submitting.
**Path Link:** [**https://ess.pockethrms.com/Travel/Transaction/TravelRequest?Menu=ReimbursementRequest**](https://ess.pockethrms.com/Travel/Transaction/TravelRequest?Menu=ReimbursementRequest)
### **Travel Management – Manager's Approval**
According to the approval matrix configuration, the designated manager is required to either approve or reject travel requests submitted by employees. **Pocket HRMS** allows you to configure multiple levels of managers for Travel Management, ensuring that travel requests are reviewed and approved according to the defined approval hierarchy.
### **How to Approve a Travel Request?**
Once an employee submits a travel request, the designated approver can review and take action on the request from the **Travel Approval** screen.
#### **Approving a Travel Request**
**Path: ESS Portal → Travel → Approval → Travel Approval**
**Step 1: Navigate to the Travel Approval Screen**
Log in to the **ESS portal** and click the **Travel** menu from the left-side navigation panel. Select **Approval**, and then click the **Travel Approval** tab.
The **Travel Approval** screen allows you to filter travel requests by **Employee** and **Date Range**. Select the required employee and date range, and click **Search** to view the relevant travel requests.
> **Note:** The entries must be approved for each month by all the designated approvers.
**Step 2: Select the Travel Request**
The Travel Approval list displays the available travel requests with details such as:
* **Travel ID**
* **Code**
* **Name**
* **Travel Date**
* **Project**
* **Approve**
* **Reject**
Click **View Details** against the required travel request to review the complete travel information.
**Step 3: Review the Travel Details**
The Travel Approval details screen displays the key information associated with the request, including:
* **Travel ID**
* **Date of Travel**
* **Project**
* **Work Order**
* **Mode of Travel**
* **Purpose of Travel**
* **Travel Schedule Remark**
* **Accommodation Remark**
* **Miscellaneous Remark**
Review these details before taking any action on the request.
**Step 4: Review the Travel Schedule**
Under **Travel Schedule**, you can review the employee's travel itinerary, including:
* From Location and To Location
* From Date and To Date
* Mode of Travel
* Departure Date and Time
* Arrival Date and Time
* Travel Cost
**Step 5: Review the Accommodation Schedule**
The **Accommodation Schedule** section displays the accommodation details provided in the travel request, including:
* Date In and Date Out
* Accommodation Details
* Number of Days
* Rate per Day
* Total Accommodation Cost
**Step 6: Review Miscellaneous Expenses**
The **Miscellaneous Expenses** section displays the expenses associated with the travel request, such as:
* Local Travelling
* Miscellaneous expenses
* Other expenses
* Food
* Daily Expense
You can review the applicable dates, number of days, cost per day, total amount, and remarks entered for each expense.
**Step 7: Add a Remark**
At the bottom of the Travel Approval details screen, you can enter a **Remark** before taking action on the request.
**Step 8: Approve or Reject the Travel Request**
After reviewing all the travel details, click **Approve** to approve the travel request
or **Reject** to reject it.
The system processes the selected action and updates the travel request accordingly.
Once the travel request is approved by all the managers configured in the approval matrix, the employee can proceed with submitting a [**Reimbursement Request**](#how-to-submit-a-reimbursement-request) against the approved travel entry.
**Path Link:** [**https://ess.pockethrms.com/Travel/Transaction/TravelApproval?Menu=TravelApproval**](https://ess.pockethrms.com/Travel/Transaction/TravelApproval?Menu=TravelApproval)
### **How to Approve a Travel Reimbursement Request?**
Once an employee submits their **travel reimbursement request**, their respective manager receives an alert. The **Travel Reimbursement Approval** screen allows managers to verify actual travel expenses against the travel advance received, review attached documents, and approve or reject the request before it moves to the finance department.
**Path: ESS Portal → Travel → Approval → Travel Reimbursement Approval**
**Step 1: Navigate to the Approval Screen**
You can access pending requests by clicking the **Bell Icon** at the top right corner of your **ESS portal** for notifications. Alternatively, select the **Travel menu** from the left-hand sidebar, click **Approval**, and navigate to the **Travel Reimbursement Approval tab**.
**Step 2: Locate the Employee's Request**
Use the **Select Employee** dropdown and **Date Range** fields to filter requests, then click **Search**. A list of pending reimbursement entries will appear, displaying the **Travel ID**, **Employee Name**, **Travel Date**, and the **Reimbursement Amount.**
**Step 3: View Details and Attachments**
To thoroughly review a specific request, click the **View Details** button under the Action column. Here, you can also download any booking attachments provided by the employee by clicking **Download** under the Booking Attachment column.
**Step 4: Verify Schedules and Expense Breakdowns**
Upon opening the details, verify the granular data submitted by the employee by reviewing the **Travel Schedule, Accommodation Schedule, and Miscellaneous Expenses.** Scroll down to cross-check specific entries and review any additional custom fields in the Other Details section.
**Step 5: Review the Final Calculations**
At the bottom of the form, review the **reimbursement summary table.** This automatically compares the Employee Submitted amounts with the Current Value. The system will display the Actual Expenses, deduct the Travel Advance Received, and show the final auto-calculated Reimbursement amount.
**Step 6: Add Remarks and Approve/Reject**
Enter any **necessary comments** or **feedback** in the Remarks box. Finally,
click the **Approve** button to forward the request to the finance department,
or click **Reject** if the claim is invalid or requires corrections.
**Path Link:** [h**ttps://ess.pockethrms.com/Travel/Transaction/TravelApproval?Menu=TravelReimbursementApproval**](https://ess.pockethrms.com/Travel/Transaction/TravelApproval?Menu=TravelReimbursementApproval)
### **How to Get the Employee Travel Report?**
In **Pocket HRMS**, you can generate and view travel reports for your team with just a few clicks. This allows you to easily monitor both travel requests and their associated **reimbursement statuses.**
**Path: ESS Portal → Travel → My Team Report**
**Step 1: Navigate to the Team Report Menu**
Click on the **Travel menu** from the left-hand sidebar, followed by the **My Team Report** option.
**Step 2: Access Travel and Reimbursement Details**
This will take you to the **Travel report** page. Here, you can view specific information by clicking the **Travel Details** or **Reimbursement Details** buttons. You can further refine the data by using the available filters or by searching for **specific employees** using their **employee code.**
**Path Link:** [**https://ess.pockethrms.com/Travel/Transaction/TravelTeamReport**](https://ess.pockethrms.com/Travel/Transaction/TravelTeamReport)
### **Travel Management – Finance Department Approval**
### **How to Approve a Travel Request as a Finance Personnel?**
As a person responsible for financial approval, you can review manager-approved travel entries to process and release the requested travel advance or reimbursement amount to the employee.
**Path: ESS Portal → Travel → Finance Approval**
**Step 1: Navigate to the Finance Approval Screen**
Click on the **Travel menu** from the left side of the screen and select the **Finance Approval** option. You will be directed to a screen where all the entries that are approved by the managers will be visible to you.
**Step 2: Filter and Access the Request**
You can use the **Date Range** or **Select Employee fields** and click **Search** to find specific requests.
To review a request, click on the **View Details** button under the Action column, where you can see the amount approved by the managers. You can also click **Manager Remarks** to view the previous approver's notes.
**Step 3: Review the Travel and Expense Schedules**
Upon opening the details, verify the granular data submitted for the trip. You can scroll through the Travel Schedule, Accommodation Schedule, and Miscellaneous Expenses to ensure all financial limits and policies are respected.
**Step 4: Add Remarks and Finalize the Approval**
Scroll to the bottom of the page to the Other Details section to view the **Total Travel Advance**.
Here you can add your **comments** in the Finance Advance **Remark box**.
Finally, click the **Approve** button to approve the request and release the reimbursement amount to the employee,
or click **Reject** if the claim cannot be processed.
**Path Link:** [**https://ess.pockethrms.com/Travel/Transaction/TravelFinanceApproval?Menu=TravelAdvanceFinanceApproval**](https://ess.pockethrms.com/Travel/Transaction/TravelFinanceApproval?Menu=TravelAdvanceFinanceApproval)
**For any queries, contact** [**support@pockethrms.com**](mailto:support@pockethrms.com)
---
# Agent Instructions
This documentation is published with GitBook. GitBook is the documentation platform designed so that both humans and AI agents can read, navigate, and reason over technical content effectively. Learn more at gitbook.com.
## Querying This Documentation
If you need additional information that is not directly available in this page, you can query the documentation dynamically by asking a question.
Perform an HTTP GET request on the current page URL with the `ask` query parameter, and the optional `goal` query parameter:
```
GET https://docs.pockethrms.com/module-guides/travel-module.md?ask=&goal=
```
`ask` is the immediate question: it should be specific, self-contained, and written in natural language.
`goal` is optional and describes the broader end goal you are ultimately trying to accomplish on behalf of the user. GitBook uses it to tailor the answer towards what is most useful for that goal.
The response will contain a direct answer to the question and relevant excerpts and sources from the documentation.
Use this mechanism when the answer is not explicitly present in the current page, you need clarification or additional context, or you want to retrieve related documentation sections.




.avif?alt=media&token=dd34914a-793b-4ee2-8b5c-11074fe95b65)


